Table of Contents
Advertisement
Advertisement
Table of Contents

Related Manuals for Newland BS80


Summary of Contents for Newland BS80
- Page 1 NLS-BS80 Barcode Scanner User Guide...
- Page 2 All pictures in this manual are for reference only and actual product may differ. Regarding to the product modification and update, Fujian Newland Auto-ID Tech. Co., Ltd. reserves the right to make changes to any software or hardware to improve reliability, function, or design at any time without notice. The information contained herein is subject to change without prior notice.
- Page 3 Revision History Version Description Date V1.0 Initial release. March 18, 2015 V1.1 Added the content concerning the 2D version. May 19, 2015 Updates: V1.2 September 16, 2015 1. Added the Enable/Disable USB HID-KBW feature in Chapter 2. 2. Added barcode parameters in Chapter 3. Added the USB country keyboard types in Chapter 2.
-
Page 4: Table Of Contents
Unpacking ..............................2 BS80 Scanner .............................. 3 Functions of the Buttons ..........................4 Charging the Battery ............................ 5 Connecting the BS80 to Smartphone/Tablet ....................6 LED Notifications ............................7 Turning the BS80 On/Off ..........................8 Scanning Instructions ........................... 9 Scanning 1D Barcode ..........................9 Scanning 2D Barcode .......................... - Page 5 USB Country Keyboard Types ......................20 Convert Case ............................23 Inter-Keystroke Delay for KBW ......................24 Enable/Disable USB HID-KBW ......................25 Upgrade the Firmware ..........................26 Chapter 3 Symbologies ..........................29 Introduction..............................29 1D Scanner ..............................29 Enable/Disable All Symbologies ......................29 Code 128 .............................
- Page 6 Set Code ID ..........................41 2-Digit Add-On Code ........................42 5-Digit Add-On Code ........................43 ISSN ..............................44 Restore Factory Defaults ......................44 Enable/Disable ISSN ........................44 Set Code ID ..........................44 ISBN ..............................45 Restore Factory Defaults ......................45 Enable/Disable ISBN ........................
- Page 7 ITF-14 ..............................59 Set Code ID ..........................59 Deutsche 14 ............................60 Restore Factory Defaults ......................60 Enable/Disable Deutsche 14 ......................60 Set Code ID ..........................61 Deutsche 12 ............................62 Restore Factory Defaults ......................62 Enable/Disable Deutsche 12 ......................62 Set Code ID ..........................
- Page 8 Set Code ID ..........................72 Check Digit Verification......................... 73 Transmit Start/Stop Character ...................... 73 Enable/Disable Code 39 Full ASCII ..................... 74 Set Length Range for Code 39 ..................... 74 Codabar ............................... 75 Restore Factory Defaults ......................75 Enable/Disable Codabar ......................75 Set Code ID ..........................
- Page 9 Restore Factory Defaults ......................88 Enable/Disable GS1 Databar ....................... 88 Set Code ID ..........................88 2D Scanner ..............................89 Global Settings ............................. 89 Enable/Disable All Symbologies ....................89 Enable/Disable 1D Symbologies ....................89 Enable/Disable 2D Symbologies ....................89 Video Reverse ..........................90 Code 128 .............................
- Page 10 Set ISBN Format ........................101 UPC-E ..............................102 Restore Factory Defaults ......................102 Enable/Disable UPC-E ....................... 102 Transmit Check Digit ........................102 Add-On Code ..........................103 Add-On Code Required ......................104 Transmit System Character ......................104 UPC-E Extension ........................104 UPC-A ..............................
- Page 11 Enable/Disable Code 39 ......................115 Transmit Start/Stop Character ....................115 Check Digit Verification....................... 116 Enable/Disable Code 39 Full ASCII ................... 116 Codabar ............................. 117 Restore Factory Defaults ......................117 Enable/Disable Codabar ......................117 Check Digit Verification....................... 118 Transmit Start/Stop Character ....................118 Start/Stop Character Format ......................
- Page 12 PDF417 .............................. 129 Restore Factory Defaults ......................129 Enable/Disable PDF417 ......................129 Data Matrix ............................130 Restore Factory Defaults ......................130 Enable/Disable Data Matrix ......................130 Rectangular Barcodes ........................ 130 Mirror Images..........................131 QR Code ............................132 Restore Factory Defaults ......................132 Enable/Disable QR Code ......................
-
Page 13: Preface
Preface Introduction This manual provides detailed instructions for setting up and using the NLS-BS80 barcode scanner (hereinafter referred to as “the BS80” or “the scanner”). Chapter Descriptions Chapter 1, Getting Started : This chapter provides information on getting the scanner up and running for the first time. -
Page 14: Introduction
Windows devices through Bluetooth HID or SPP communication. An illustrated introduction to the BS80 is included in this chapter. If you have the scanner at hand, make good use of it to develop a better understanding of this manual. This chapter is written for normal users, maintenance staff and software developers. -
Page 15: Bs80 Scanner
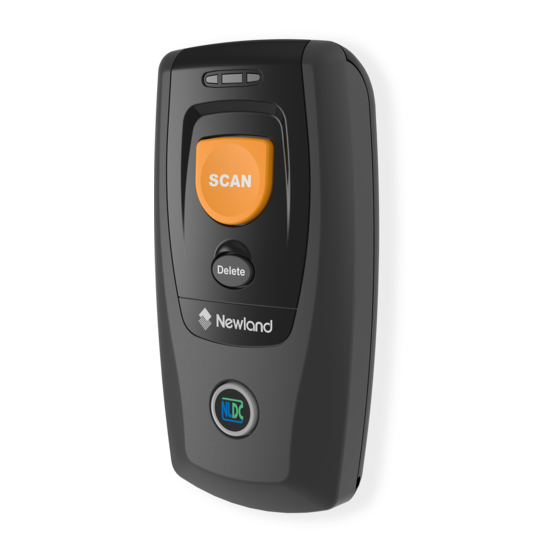
BS80 Scanner Charging/Battery LED Good Read LED Data LED Scan/Power Button Delete/Reset Button Function Button/Function LED Micro USB Port Product Label Scan Window... -
Page 16: Functions Of The Buttons
Functions of the Buttons Scan/Power Button *Press the button to scan barcode when the scanner is on. *Hold down the button for 3 seconds to power it on when the scanner is off. Delete/Reset Button *Press the button to remove the corresponding data from the USB storage area of FLASH memory in the Batch mode before scanning the barcode to be deleted. -
Page 17: Charging The Battery
Charging the Battery Charge the scanner by connecting it to a host device with Micro USB cable, as shown below. Note: Low battery may result in failure or misoperation of the scanner. Before your first use, charge the battery for 3-4 hours. -
Page 18: Connecting The Bs80 To Smartphone/Tablet
SPP profile. HID (default) 4. Complete the following connection procedure (example: pairing with iPhone). If the BS80 does not appear in the search results in step (5), you may need to delete existing pairing information on the scanner by holding down the Function button on the scanner for 8 seconds (see Functions of the Buttons in this chapter) or by scanning the Delete Bluetooth Pairing barcode (see Delete Bluetooth Pairing in Chapter 2). - Page 19 (1) Click “Settings”. (2) Click “General”. (3) Click “Bluetooth”. (5) Select “BS80XXXX” to (6) The “Connected” message (4) Turn it on and search the devices. connect. means the connection is OK. BS80XXXX Connected BS80XXXX 5. After the connection is completed, the blue Function LED on the scanner will illuminate. 6.
-
Page 20: Led Notifications
Function LED Blue LED flashes slowly with long OFF Bluetooth turned on, but no Bluetooth connection state established and the BS80 undiscoverable. Blue LED flashes slowly with long ON Bluetooth turned on, but no Bluetooth connection state established and the BS80 discoverable. -
Page 21: Turning The Bs80 On/Off
Turning the BS80 On/Off Turn the scanner on: Press the Scan/Power button. Turn the scanner off: By default, the scanner automatically powers off if no operation is performed on the scanner for 30 minutes. You can adjust the auto power-off timer. You can also turn off the scanner by scanning the Power Off barcode. -
Page 22: Scanning Instructions
Scanning Instructions Scanning 1D Barcode Adjust the scan angle (Do not read barcode at vertical degree) or the distance between barcode and the scanner to ensure that the length of the scan line is roughly 8mm greater than that of the barcode, as shown below. -
Page 23: Chapter 2 System Settings
Chapter 2 System Settings Introduction This chapter describes how to configure the basic system parameters on the scanner. Restore Factory Defaults Restore Factory Defaults Operating Modes The scanner provides two operating modes: Real-Time mode (Bluetooth mode) and Batch mode. 1. Real-Time mode Real-Time Mode (default) When the scanner is in the Real-Time mode, scanning the following barcodes can switch between Bluetooth HID and SPP profiles. -
Page 24: Query Scanner Information
There are two data transmission modes: Synchronous mode and Asynchronous mode. (1) Synchronous mode: When you scan barcodes, the data will be sent to smartphone/tablet directly. If you are out of Bluetooth service range, scanned data will be lost. (2) Asynchronous mode: When you are out of Bluetooth service range, scanned data will be saved in the FLASH memory. -
Page 25: Query/Delete The Data In Flash
Query Scanner Information Query the Firmware & Hardware Versions of Scanner Query the Manufacture Date of Scanner Query the Serial Number of Scanner Query/Delete the Data in FLASH The FLASH memory is divided into a USB storage area (used to save the data acquired in the Batch mode) and a Bluetooth storage area (used to save the data acquired in Bluetooth asynchronous mode). -
Page 26: Sound Notifications
Sound Notifications Turn sound notifications on or off by scanning the appropriate barcode below. After this feature is enabled, the scanner beeps when one of the following events occurs: 1. The scanner is turned on. 2. The scanner resets. 3. A barcode is decoded (including good read for removing barcode data from the FLASH memory in the Batch mode). -
Page 27: Vibration Notifications
Vibration Notifications Turn vibration notifications on or off by scanning the appropriate barcode below. After this feature is enabled, the scanner vibrates when one of the following events occurs: 1. A barcode is decoded (including good read for removing barcode data from the FLASH memory in the Batch mode). -
Page 28: Terminating Character Suffix
Terminating Character Suffix Append CRLF as Terminating Character Suffix (default) Disable Terminating Character Suffix... -
Page 29: Inter-Character Delay For Bluetooth Hid
Inter-Character Delay for Bluetooth HID Select an appropriate inter-character delay to avoid data loss during transmission. This parameter is only valid in the Bluetooth HID mode. 15ms (default) 35ms 25ms Query Inter-Character Delay 45ms Delete Bluetooth Pairing Delete Bluetooth Pairing... -
Page 30: Automatic/Manual Power-Off
Automatic/Manual Power-Off By default, the scanner automatically powers off if no operation is performed on the scanner for 30 minutes. This feature can help to extend battery life. Query Auto Power-Off Timer Set the auto power-off timer: Scan the Set Auto Power-Off Timer barcode then one of the timers listed below. - Page 31 You can power off your scanner manually by scanning the barcode below. Power Off Note: After the Power Off barcode is scanned, the scanner emits a long beep and then turns off.
-
Page 32: Time Stamp
Time Stamp You can decide whether to send date and time or not by enabling or disabling time stamp. Enable Time Stamp (default) Disable Time Stamp Set Date Format Format 1: mm/dd/yyyy Format 2: dd/mm/yyyy 01/23/2011) (example: 23/01/2011) (example: Format 3: yyyy/mm/dd (default) (example: 2011/01/23) -
Page 33: Set Date & Time
Set Date & Time Step 1: Double click on BS80Setting.exe to run BS80 Date&Time Setting Tool. Then check the “Auto-sync date and time with the host” item on it. Step 2: After the time in the box is in sync with the system clock, click the “Generate Barcode” button. -
Page 34: Parameters Of Usb Hid-Kbw
Parameters of USB HID-KBW USB Country Keyboard Types US English (default) Japanese Denmark Finland France Turkey_F Italy Germany... - Page 35 Spain Turkey_Q U.K. Russia Belgium Sweden Portugal...
-
Page 36: Convert Case
Convert Case No Case Conversion (default) Convert All to Upper Case Convert All to Lower Case Invert Upper and Lower Case Characters... -
Page 37: Inter-Keystroke Delay For Kbw
Inter-Keystroke Delay for KBW To set the inter-keystroke delay, scan the following barcode and a digit barcode (0~F). Note: 0~F corresponds to 3ms (default), 8ms, 13ms, 18ms, 23ms, 28ms, 33ms, 38ms, 43ms, 48ms, 53ms, 58ms, 63ms, 68ms, 73ms and 78ms respectively. Inter-Keystroke Delay for KBW... -
Page 38: Enable/Disable Usb Hid-Kbw
Enable/Disable USB HID-KBW Disable HID-KBW (default) Enable HID-KBW... -
Page 39: Upgrade The Firmware
Upgrade the Firmware Step 1: Install the driver: Run the CDC - Virtual COM Driver v1.1.0 program and then follow the on-screen instructions to complete the installation processs. (Skip this step if it is already installed on your PC.) Make sure that the driver is properly installed. You cannot upgrade the firmware without it. Step 2: Run the BS80Update program. - Page 40 Step 4: Hold down the Function button and the Delete/Reset button on the scanner at the same time for 7 seconds to upgrade the firmware. The red and blue Function LEDs flash alternately during the updating process. Step 5: Wait for the “Firmware upgraded!” window to pop up and click “OK” to exit the program. Note: If this utility does not operate normally, check to see if the FirmwarePath in the UpdataTool.ini file is correct (its value should be identical with the name of the .bin file).
-
Page 42: Chapter 3 Symbologies
Chapter 3 Symbologies Introduction Every symbology (barcode type) has its own unique attributes. This chapter provides programming barcodes for configuring the scanner so that it can identify various barcode symbologies. It is recommended to disable those that are rarely used to increase the efficiency of the scanner. 1D Scanner Enable/Disable All Symbologies Enable All Symbologies... -
Page 43: Code 128
Code 128 Restore Factory Defaults Restore the Factory Defaults of Code 128 Enable/Disable Code 128 Enable Code 128 (default) Disable Code 128 Set Code ID To set the Code ID, scan the Set Code ID barcode, the numeric barcodes corresponding to the hexadecimal value of a desired ID and the Save barcode. -
Page 44: Set Length Range For Code 128
Set Length Range for Code 128 The scanner can be configured to only decode Code 128 barcodes with lengths that fall between (inclusive) the minimum and maximum lengths. To accomplish it, you need to set the minimum and maximum lengths. If minimum length is set to be greater than maximum length, the scanner only decodes Code 128 barcodes with either the minimum or maximum length. -
Page 45: Ucc/Ean-128
UCC/EAN-128 Restore Factory Defaults Restore the Factory Defaults of UCC/EAN-128 Enable/Disable UCC/EAN-128 Enable UCC/EAN-128 (default) Disable UCC/EAN-128 Set Code ID To set the Code ID, scan the Set Code ID barcode, the numeric barcodes corresponding to the hexadecimal value of a desired ID and the Save barcode. Set Code ID Example: Set the Code ID of UCC/EAN-128 to “p”... -
Page 46: Set Length Range For Ucc/Ean-128
Set Length Range for UCC/EAN-128 The scanner can be configured to only decode UCC/EAN-128 barcodes with lengths that fall between (inclusive) the minimum and maximum lengths. To accomplish it, you need to set the minimum and maximum lengths. If minimum length is set to be greater than maximum length, the scanner only decodes UCC/EAN-128 barcodes with either the minimum or maximum length. -
Page 47: Aim 128
AIM 128 Restore Factory Defaults Restore the Factory Defaults of AIM 128 Enable/Disable AIM 128 Enable AIM 128 Disable AIM 128 (default) Set Code ID To set the Code ID, scan the Set Code ID barcode, the numeric barcodes corresponding to the hexadecimal value of a desired ID and the Save barcode. -
Page 48: Set Length Range For Aim 128
Set Length Range for AIM 128 The scanner can be configured to only decode AIM128 barcodes with lengths that fall between (inclusive) the minimum and maximum lengths. To accomplish it, you need to set the minimum and maximum lengths. If minimum length is set to be greater than maximum length, the scanner only decodes AIM128 barcodes with either the minimum or maximum length. -
Page 49: Restore Factory Defaults
EAN-8 Restore Factory Defaults Restore the Factory Defaults of EAN-8 Enable/Disable EAN-8 Enable EAN-8 (default) Disable EAN-8 Set Code ID To set the Code ID, scan the Set Code ID barcode, the numeric barcodes corresponding to the hexadecimal value of a desired ID and the Save barcode. Set Code ID Example: Set the Code ID of EAN-8 to “p”... -
Page 50: 2-Digit Add-On Code
2-Digit Add-On Code An EAN-8 barcode can be augmented with a two-digit add-on code to form a new one. Disable 2-Digit Add-On Code: The scanner decodes EAN-8 and ignores the add-on code when presented with an EAN-8 plus 2-digit add-on barcode. It can also decode EAN-8 barcodes without 2-digit add-on codes. -
Page 51: 5-Digit Add-On Code
5-Digit Add-On Code An EAN-8 barcode can be augmented with a five-digit add-on code to form a new one. Disable 5-Digit Add-On Code: The scanner decodes EAN-8 and ignores the add-on code when presented with an EAN-8 plus 5-digit add-on barcode. It can also decode EAN-8 barcodes without 5-digit add-on codes. -
Page 52: Ean-8 Extension
EAN-8 Extension Disable EAN-8 Zero Extend: Transmit EAN-8 barcodes as is. Enable EAN-8 Zero Extend: Add five leading zeros to decoded EAN-8 barcodes to extend to13 digits. Convert EAN-8 to EAN-13: Add five leading zeros to decoded EAN-8 barcodes to make them compatible in format to EAN-13 barcodes. -
Page 53: Restore Factory Defaults
EAN-13 Restore Factory Defaults Restore the Factory Defaults of EAN-13 Enable/Disable EAN-13 Enable EAN-13 (default) Disable EAN-13 Transmit Check Digit EAN-13 is 13 digits in length with the last one as its check digit used to verify the integrity of the data. Transmit EAN-13 Check Digit (default) Do Not Transmit EAN-13 Check Digit... -
Page 54: Set Code Id
Set Code ID To set the Code ID, scan the Set Code ID barcode, the numeric barcodes corresponding to the hexadecimal value of a desired ID and the Save barcode. Set Code ID Example: Set the Code ID of EAN-13 to “p” (Hex: 0x70) Scan the Set Code ID barcode. -
Page 55: 2-Digit Add-On Code
2-Digit Add-On Code An EAN-13 barcode can be augmented with a two-digit add-on code to form a new one. Disable 2-Digit Add-On Code: The scanner decodes EAN-13 and ignores the add-on code when presented with an EAN-13 plus 2-digit add-on barcode. It can also decode EAN-13 barcodes without 2-digit add-on codes. -
Page 56: 5-Digit Add-On Code
5-Digit Add-On Code An EAN-13 barcode can be augmented with a five-digit add-on code to form a new one. Disable 5-Digit Add-On Code: The scanner decodes EAN-13 and ignores the add-on code when presented with an EAN-13 plus 5-digit add-on barcode. It can also decode EAN-13 barcodes without 5-digit add-on codes. -
Page 57: Issn
ISSN Restore Factory Defaults Restore the Factory Defaults of ISSN Enable/Disable ISSN Enable ISSN Disable ISSN (default) Set Code ID To set the Code ID, scan the Set Code ID barcode, the numeric barcodes corresponding to the hexadecimal value of a desired ID and the Save barcode. Set Code ID Example: Set the Code ID of ISSN to “p”... -
Page 58: Isbn
ISBN Restore Factory Defaults Restore the Factory Defaults of ISBN Enable/Disable ISBN Enable ISBN Disable ISBN (default) Set ISBN Format ISBN-13 (default) ISBN-10... -
Page 59: Set Code Id
Set Code ID To set the Code ID, scan the Set Code ID barcode, the numeric barcodes corresponding to the hexadecimal value of a desired ID and the Save barcode. Set Code ID Example: Set the Code ID of ISBN to “p” (Hex: 0x70) Scan the Set Code ID barcode. -
Page 60: Upc-E
UPC-E Restore Factory Defaults Restore the Factory Defaults of UPC-E Enable/Disable UPC-E Enable UPC-E (default) Disable UPC-E Transmit Check Digit UPC-E is 8 digits in length with the last one as its check digit used to verify the integrity of the data. Transmit UPC-E Check Digit (default) Do Not Transmit UPC-E Check Digit... -
Page 61: Set Code Id
Set Code ID To set the Code ID, scan the Set Code ID barcode, the numeric barcodes corresponding to the hexadecimal value of a desired ID and the Save barcode. 【Set Code ID】 Example: Set the Code ID of UPC-E to “p” (Hex: 0x70) Scan the Set Code ID barcode. -
Page 62: 2-Digit Add-On Code
2-Digit Add-On Code A UPC-E barcode can be augmented with a two-digit add-on code to form a new one. Disable 2-Digit Add-On Code: The scanner decodes UPC-E and ignores the add-on code when presented with a UPC-E plus 2-digit add-on barcode. It can also decode UPC-E barcodes without 2-digit add-on codes. -
Page 63: 5-Digit Add-On Code
5-Digit Add-On Code A UPC-E barcode can be augmented with a five-digit add-on code to form a new one. Disable 5-Digit Add-On Code: The scanner decodes UPC-E and ignores the add-on code when presented with a UPC-E plus 5-digit add-on barcode. It can also decode UPC-E barcodes without 5-digit add-on codes. -
Page 64: Transmit Preamble Character
Transmit Preamble Character Preamble characters (Country Code and System Character) can be transmitted as part of a UPC-E barcode. Select one of the following options for transmitting UPC-E preamble to the host device: transmit system character only, transmit system character and country code (“0” for USA), or transmit no preamble. -
Page 65: Upc-A
UPC-A Restore Factory Defaults Restore the Factory Defaults of UPC-A Enable/Disable UPC-A Enable UPC-A (default) Disable UPC-A Set Code ID To set the Code ID, scan the Set Code ID barcode, the numeric barcodes corresponding to the hexadecimal value of a desired ID and the Save barcode. Set Code ID Example: Set the Code ID of UPC-A to “p”... -
Page 66: Transmit Check Digit
Transmit Check Digit UPC-A is 13 digits in length with the last one as its check digit used to verify the integrity of the data. Transmit UPC-A Check Digit (default) Do Not Transmit UPC-A Check Digit Transmit Preamble Character Preamble characters (Country Code and System Character) can be transmitted as part of a UPC-A barcode. -
Page 67: 2-Digit Add-On Code
2-Digit Add-On Code A UPC-A barcode can be augmented with a two-digit add-on code to form a new one. Disable 2-Digit Add-On Code: The scanner decodes UPC-A and ignores the add-on code when presented with a UPC-A plus 2-digit add-on barcode. It can also decode UPC-A barcodes without 2-digit add-on codes. -
Page 68: 5-Digit Add-On Code
5-Digit Add-On Code A UPC-A barcode can be augmented with a five-digit add-on code to form a new one. Disable 5-Digit Add-On Code: The scanner decodes UPC-A and ignores the add-on code when presented with a UPC-A plus 5-digit add-on barcode. It can also decode UPC-A barcodes without 5-digit add-on codes. -
Page 69: Interleaved 2 Of 5
Interleaved 2 of 5 Restore Factory Defaults Restore the Factory Defaults of Interleaved 2 of 5 Enable/Disable Interleaved 2 of 5 禁止识读 Interleaved 2 of 5 Enable Interleaved 2 of 5 (default) Set Code ID To set the Code ID, scan the Set Code ID barcode, the numeric barcodes corresponding to the hexadecimal value of a desired ID and the Save barcode. -
Page 70: Check Digit Verification
Check Digit Verification Disable Do Not Transmit Check Digit After Verification (default) Transmit Check Digit After Verification Set Length Range for Interleaved 2 of 5 The scanner can be configured to only decode Interleaved 2 of 5 barcodes with lengths that fall between (inclusive) the minimum and maximum lengths. -
Page 71: Set Code Id
ITF-6 ITF-6 is a special kind of Interleaved 2 of 5 with a length of 6 characters and the last character as the check character. Restore the Factory Defaults of ITF-6 Disable ITF-6 (default) Enable ITF-6, Do Not Transmit Check Digit Enable ITF-6, Transmit Check Digit Note: It is advisable not to enable ITF-6 and Interleaved 2 of 5 at the same time. -
Page 72: Set Code Id
ITF-14 ITF-14 is a special kind of Interleaved 2 of 5 with a length of 14 characters and the last character as the check character. Restore the Factory Defaults of ITF-14 Enable ITF-14, Do Not Transmit Check Digit Disable ITF-14 (default) Enable ITF-14, Transmit Check Digit Note: It is advisable not to enable ITF-14 and Interleaved 2 of 5 at the same time. -
Page 73: Deutsche 14
Deutsche 14 Restore Factory Defaults Restore the Factory Defaults of Deutsche 14 Enable/Disable Deutsche 14 Enable Deutsche 14, Do Not Transmit Check Digit Disable Deutsche 14 (default) Enable Deutsche 14, Transmit Check Digit Note: It is advised not to enable Deutsche 14 unless necessary, because Deutsche 14, ITF-14 and Interleaved 2 of 5 use the same encoding method and enabling them at the same time can easily cause confusion with each other when decoding. -
Page 74: Set Code Id
Set Code ID To set the Code ID, scan the Set Code ID barcode, the numeric barcodes corresponding to the hexadecimal value of a desired ID and the Save barcode. Set Code ID Example: Set the Code ID of Deutsche 14 to “p” (Hex: 0x70) Scan the Set Code ID barcode. -
Page 75: Deutsche 12
Deutsche 12 Restore Factory Defaults Restore the Factory Defaults of Deutsche 12 Enable/Disable Deutsche 12 Enable Deutsche 12, Do Not Transmit Check Digit Disable Deutsche 12 (default) Enable Deutsche 12, Transmit Check Digit Note: It is advised not to enable Deutsche 12 unless necessary, because Deutsche 12, ITF-12 and Interleaved 2 of 5 use the same encoding method and enabling them at the same time can easily cause confusion with each other when decoding. -
Page 76: Set Code Id
Set Code ID To set the Code ID, scan the Set Code ID barcode, the numeric barcodes corresponding to the hexadecimal value of a desired ID and the Save barcode. Set Code ID Example: Set the Code ID of Deutsche 12 to “p” (Hex: 0x70) Scan the Set Code ID barcode. -
Page 77: Coop 25 (Japanese Matrix 2 Of 5)
COOP 25 (Japanese Matrix 2 of 5) Restore Factory Defaults Restore the Factory Defaults of COOP 25 Enable/Disable COOP 25 Enable COOP 25 Disable COOP 25 (default) Set Code ID To set the Code ID, scan the Set Code ID barcode, the numeric barcodes corresponding to the hexadecimal value of a desired ID and the Save barcode. -
Page 78: Check Digit Verification
Check Digit Verification Disable (default) Transmit Check Digit After Verification Do Not Transmit Check Digit After Verification Set Length Range for COOP 25 The scanner can be configured to only decode COOP 25 barcodes with lengths that fall between (inclusive) the minimum and maximum lengths. To accomplish it, you need to set the minimum and maximum lengths. -
Page 79: Matrix 2 Of 5 (European Matrix 2 Of 5)
Matrix 2 of 5 (European Matrix 2 of 5) Restore Factory Defaults Restore the Factory Defaults of Matrix 2 of 5 Enable/Disable Matrix 2 of 5 Enable Matrix 2 of 5 (default) Disable Matrix 2 of 5 Set Code ID To set the Code ID, scan the Set Code ID barcode, the numeric barcodes corresponding to the hexadecimal value of a desired ID and the Save barcode. -
Page 80: Check Digit Verification
Check Digit Verification Disable (default) Transmit Check Digit After Verification Do Not Transmit Check Digit After Verification Set Length Range for Matrix 2 of 5 The scanner can be configured to only decode Matrix 2 of 5 barcodes with lengths that fall between (inclusive) the minimum and maximum lengths. -
Page 81: Industrial 25
Industrial 25 Restore Factory Defaults Restore the Factory Defaults of Industrial 25 Enable/Disable Industrial 25 Enable Industrial 25 (default) Disable Industrial 25 Set Code ID To set the Code ID, scan the Set Code ID barcode, the numeric barcodes corresponding to the hexadecimal value of a desired ID and the Save barcode. -
Page 82: Check Digit Verification
Check Digit Verification Disable (default) Transmit Check Digit After Verification Do Not Transmit Check Digit After Verification Set Length Range for Industrial 25 The scanner can be configured to only decode Industrial 25 barcodes with lengths that fall between (inclusive) the minimum and maximum lengths. To accomplish it, you need to set the minimum and maximum lengths. -
Page 83: Standard 25
Standard 25 Restore Factory Defaults Restore the Factory Defaults of Standard 25 Enable/Disable Standard 25 Enable Standard 25 (default) Disable Standard 25 Set Code ID To set the Code ID, scan the Set Code ID barcode, the numeric barcodes corresponding to the hexadecimal value of a desired ID and the Save barcode. -
Page 84: Check Digit Verification
Check Digit Verification Disable (default) Transmit Check Digit After Verification Do Not Transmit Check Digit After Verification Set Length Range for Standard 25 The scanner can be configured to only decode Standard 25 barcodes with lengths that fall between (inclusive) the minimum and maximum lengths. To accomplish it, you need to set the minimum and maximum lengths. -
Page 85: Code 39
Code 39 Restore Factory Defaults Restore the Factory Defaults of Code 39 Enable/Disable Code 39 Enable Code 39 (default) Disable Code 39 Set Code ID To set the Code ID, scan the Set Code ID barcode, the numeric barcodes corresponding to the hexadecimal value of a desired ID and the Save barcode. -
Page 86: Check Digit Verification
Check Digit Verification Disable (default) Transmit Check Digit After Verification Do Not Transmit Check Digit After Verification Transmit Start/Stop Character Code 39 uses an asterisk (*) for both the start and the stop characters. You can choose whether or not to transmit the start/stop characters by scanning the appropriate barcode below. -
Page 87: Enable/Disable Code 39 Full Ascii
Enable/Disable Code 39 Full ASCII The scanner can be configured to identify all ASCII characters by scanning the appropriate barcode below. Disable Code 39 Full ASCII Enable Code 39 Full ASCII (default) Set Length Range for Code 39 The scanner can be configured to only decode Code 39 barcodes with lengths that fall between (inclusive) the minimum and maximum lengths. -
Page 88: Codabar
Codabar Restore Factory Defaults Restore the Factory Defaults of Codabar Enable/Disable Codabar Enable Codabar (default) Disable Codabar Set Code ID To set the Code ID, scan the Set Code ID barcode, the numeric barcodes corresponding to the hexadecimal value of a desired ID and the Save barcode. Set Code ID Example: Set the Code ID of Codabar to “p”... -
Page 89: Check Digit Verification
Check Digit Verification Disable (default) Transmit Check Digit After Verification Do Not Transmit Check Digit After Verification Transmit Start/Stop Character Do Not Transmit Start/Stop Character Transmit Start/Stop Character (default) ABCD/ABCD as the Start/Stop Character (default) ABCD/TN*E as the Start/Stop Character abcd/abcd as the Start/Stop Character abcd/tn*e... -
Page 90: Set Length Range For Codabar
Set Length Range for Codabar The scanner can be configured to only decode Codabar barcodes with lengths that fall between (inclusive) the minimum and maximum lengths. To accomplish it, you need to set the minimum and maximum lengths. If minimum length is set to be greater than maximum length, the scanner only decodes Codabar barcodes with either the minimum or maximum length. -
Page 91: Code 93
Code 93 Restore Factory Defaults Restore the Factory Defaults of Code 93 Enable/Disable Code 93 Enable Code 93 (default) Disable Code 93 Set Code ID To set the Code ID, scan the Set Code ID barcode, the numeric barcodes corresponding to the hexadecimal value of a desired ID and the Save barcode. -
Page 92: Check Digit Verification
Check Digit Verification Disable Transmit Check Digit After Verification Do Not Transmit Check Digit After Verification (default) Set Length Range for Code 93 The scanner can be configured to only decode Code 93 barcodes with lengths that fall between (inclusive) the minimum and maximum lengths. -
Page 93: Code 11
Code 11 Restore Factory Defaults Restore the Factory Defaults of Code 11 Enable/Disable Code 11 Enable Code 11 Disable Code 11 (default) Set Code ID To set the Code ID, scan the Set Code ID barcode, the numeric barcodes corresponding to the hexadecimal value of a desired ID and the Save barcode. -
Page 94: Check Digit Verification
Check Digit Verification Disable One Check Digit, MOD11 (default) Two Check Digits, MOD11/MOD11 Two Check Digits, MOD11/MOD9 One Check Digit, MOD11 (Len <= 10) One Check Digit, MOD11 (Len <= 10) Two Check Digits, MOD11/MOD11 (Len > 10) Two Check Digits, MOD11/MOD9 (Len > 10) Do Not Transmit Check Digit (default) Transmit Check Digit... -
Page 95: Set Length Range For Code 11
Set Length Range for Code 11 The scanner can be configured to only decode Code 11 barcodes with lengths that fall between (inclusive) the minimum and maximum lengths. To accomplish it, you need to set the minimum and maximum lengths. If minimum length is set to be greater than maximum length, the scanner only decodes Code 11 barcodes with either the minimum or maximum length. -
Page 96: Plessey
Plessey Restore Factory Defaults Restore the Factory Defaults of Plessey Enable/Disable Plessey Enable Plessey Disable Plessey (default) Set Code ID To set the Code ID, scan the Set Code ID barcode, the numeric barcodes corresponding to the hexadecimal value of a desired ID and the Save barcode. Set Code ID Example: Set the Code ID of Plessey to “p”... -
Page 97: Check Digit Verification
Check Digit Verification Disable Transmit Check Digit After Verification Do Not Transmit Check Digit After Verification (default) Set Length Range for Plessey The scanner can be configured to only decode Plessey barcodes with lengths that fall between (inclusive) the minimum and maximum lengths. To accomplish it, you need to set the minimum and maximum lengths. -
Page 98: Msi-Plessey
MSI-Plessey Restore Factory Defaults Restore the Factory Defaults of MSI-Plessey Enable/Disable MSI-Plessey Enable MSI-Plessey Disable MSI-Plessey (default) Set Code ID To set the Code ID, scan the Set Code ID barcode, the numeric barcodes corresponding to the hexadecimal value of a desired ID and the Save barcode. Set Code ID Example: Set the Code ID of MSI-Plesseyto “p”... -
Page 99: Check Digit Verification
Check Digit Verification Disable One Check Digit, MOD10 (default) Two Check Digits, MOD10/MOD10 Two Check Digits, MOD10/MOD11 Do Not Transmit Check Digit (default) Transmit Check Digit... -
Page 100: Set Length Range For Msi-Plessey
Set Length Range for MSI-Plessey The scanner can be configured to only decode MSI-Plessey barcodes with lengths that fall between (inclusive) the minimum and maximum lengths. To accomplish it, you need to set the minimum and maximum lengths. If minimum length is set to be greater than maximum length, the scanner only decodes MSI-Plessey barcodes with either the minimum or maximum length. -
Page 101: Gs1 Databar
GS1 Databar Restore Factory Defaults Restore the Factory Defaults of GS1 Databar Enable/Disable GS1 Databar Enable GS1 Databar (default) Disable GS1 Databar Set Code ID To set the Code ID, scan the Set Code ID barcode, the numeric barcodes corresponding to the hexadecimal value of a desired ID and the Save barcode. -
Page 102: 2D Scanner
2D Scanner Global Settings Enable/Disable All Symbologies Enable All Symbologies Disable All Symbologies Enable/Disable 1D Symbologies Enable 1D Symbologies Disable 1D Symbologies Enable/Disable 2D Symbologies Enable 2D Symbologies Disable 2D Symbologies... -
Page 103: Video Reverse
Video Reverse Regular barcode: Dark image on a bright background. Inverse barcode: Bright image on a dark background. The examples of regular barcode and inverse barcode are shown below. Regular Barcode Inverse Barcode Video Reverse is used to allow the scanner to read barcodes that are inverted. Video Reverse ON: Read both regular barcodes and inverse barcodes. -
Page 104: Code 128
Code 128 Restore Factory Defaults Restore the Factory Defaults of Code 128 Enable/Disable Code 128 Enable Code 128 (default) Disable Code 128... -
Page 105: Ucc/Ean-128 (Gs1-128)
UCC/EAN-128 (GS1-128) Restore Factory Defaults Restore the Factory Defaults of UCC/EAN-128 Enable/Disable UCC/EAN-128 Enable UCC/EAN-128 (default) Disable UCC/EAN-128... -
Page 106: Aim 128
AIM 128 Restore Factory Defaults Restore the Factory Defaults of AIM 128 Enable/Disable AIM 128 Enable AIM 128 (default) Disable AIM 128... -
Page 107: Restore Factory Defaults
EAN-8 Restore Factory Defaults Restore the Factory Defaults of EAN-8 Enable/Disable EAN-8 Enable EAN-8 (default) Disable EAN-8 Transmit Check Digit EAN-8 is 8 digits in length with the last one as its check digit used to verify the integrity of the data. Transmit EAN-8 Check Digit (default) Do Not Transmit EAN-8 Check Digit... -
Page 108: Add-On Code
Add-On Code An EAN-8 barcode can be augmented with a two-digit or five-digit add-on code to form a new one. In the examples below, the part surrounded by blue dotted line is an EAN-8 barcode while the part circled by red dotted line is add-on code. -
Page 109: Add-On Code Required
Add-On Code Required EAN-8 Add-On Code Required EAN-8 Add-On Code Not Required (default) EAN-8 Extension Disable EAN-8 Zero Extend: Transmit EAN-8 barcodes as is. Enable EAN-8 Zero Extend: Add five leading zeros to decoded EAN-8 barcodes to extend to13 digits. Enable EAN-8 Zero Extend Disable EAN-8 Zero Extend (default) -
Page 110: Restore Factory Defaults
EAN-13 Restore Factory Defaults Restore the Factory Defaults of EAN-13 Enable/Disable EAN-13 Enable EAN-13 (default) Disable EAN-13 Transmit Check Digit EAN-13 is 13 digits in length with the last one as its check digit used to verify the integrity of the data. Transmit EAN-13 Check Digit (default) Do Not Transmit EAN-13 Check Digit... -
Page 111: Add-On Code
Add-On Code An EAN-13 barcode can be augmented with a two-digit or five-digit add-on code to form a new one. In the examples below, the part surrounded by blue dotted line is an EAN-13 barcode while the part circled by red dotted line is add-on code. -
Page 112: Add-On Code Required
Add-On Code Required EAN-13 Add-On Code Required EAN-13 Add-On Code Not Required (default) -
Page 113: Issn
ISSN Restore Factory Defaults Restore the Factory Defaults of ISSN Enable/Disable ISSN Enable ISSN Disable ISSN (default) -
Page 114: Isbn
ISBN Restore Factory Defaults Restore the Factory Defaults of ISBN Enable/Disable ISBN Enable ISBN (default) Disable ISBN Set ISBN Format ISBN-13 (default) ISBN-10... -
Page 115: Upc-E
UPC-E Restore Factory Defaults Restore the Factory Defaults of UPC-E Enable/Disable UPC-E Enable UPC-E (default) Disable UPC-E Transmit Check Digit UPC-E is 8 digits in length with the last one as its check digit used to verify the integrity of the data. Transmit UPC-E Check Digit (default) Do Not Transmit UPC-E Check Digit... -
Page 116: Add-On Code
Add-On Code A UPC-E barcode can be augmented with a two-digit or five-digit add-on code to form a new one. In the examples below, the part surrounded by blue dotted line is a UPC-E barcode while the part circled by red dotted line is add-on code. -
Page 117: Add-On Code Required
Add-On Code Required UPC-E Add-On Code Required UPC-E Add-On Code Not Required (default) Transmit System Character The first character of UPC-E barcode is the system character “0”. Transmit System Character “0” Do Not Transmit System Character “0” (default) UPC-E Extension Disable UPC-E Extend: Transmit UPC-E barcodes as is. -
Page 118: Upc-A
UPC-A Restore Factory Defaults Restore the Factory Defaults of UPC-A Enable/Disable UPC-A Enable UPC-A (default) Disable UPC-A Transmit Check Digit UPC-A is 13 digits in length with the last one as its check digit used to verify the integrity of the data. Transmit UPC-A Check Digit (default) Do Not Transmit UPC-A Check Digit... -
Page 119: Add-On Code
Add-On Code A UPC-A barcode can be augmented with a two-digit or five-digit add-on code to form a new one. In the examples below, the part surrounded by blue dotted line is a UPC-A barcode while the part circled by red dotted line is add-on code. -
Page 120: Add-On Code Required
Add-On Code Required UPC-A Add-On Code Required UPC-A Add-On Code Not Required (default) Transmit Preamble Character Transmit Preamble Character “0” Do Not Transmit Preamble Character “0” (default) Note: The preamble character “0” usually does not appear in printed UPC-A barcodes. -
Page 121: Interleaved 2 Of 5
Interleaved 2 of 5 Restore Factory Defaults Restore the Factory Defaults of Interleaved 2 of 5 Enable/Disable Interleaved 2 of 5 Enable Interleaved 2 of 5 (default) Disable Interleaved 2 of 5... -
Page 122: Check Digit Verification
Check Digit Verification Disable (default) Do Not Transmit Check Digit After Verification Transmit Check Digit After Verification Transmit Appended “0” If an Interleaved 2 of 5 barcode contains an odd number of characters, a leading zero must be appended to the barcode. Scan the appropriate barcode to choose whether to transmit the appended “0”. Transmit Appended “0”... -
Page 123: 110
ITF-6 ITF-6 is a special kind of Interleaved 2 of 5 with a length of 6 characters and the last character as the check character. Restore the Factory Defaults of ITF-6 Disable ITF-6 (default) Enable ITF-6, Do Not Transmit Check Digit Enable ITF-6, Transmit Check Digit Note: It is advisable not to enable ITF-6 and Interleaved 2 of 5 at the same time. -
Page 124: 111
ITF-14 ITF-14 is a special kind of Interleaved 2 of 5 with a length of 14 characters and the last character as the check character. Restore the Factory Defaults of ITF-14 Disable ITF-14 Enable ITF-14, Do Not Transmit Check Digit Enable ITF-14, Transmit Check Digit (default) Note: It is advisable not to enable ITF-14 and Interleaved 2 of 5 at the same time. -
Page 125: Matrix 2 Of 5
Matrix 2 of 5 Restore Factory Defaults Restore the Factory Defaults of Matrix 2 of 5 Enable/Disable Matrix 2 of 5 Enable Matrix 2 of 5 (default) Disable Matrix 2 of 5 Check Digit Verification Disable (default) Do Not Transmit Check Digit After Verification Transmit Check Digit After Verification... -
Page 126: Industrial 25
Industrial 25 Restore Factory Defaults Restore the Factory Defaults of Industrial 25 Enable/Disable Industrial 25 Enable Industrial 25 (default) Disable Industrial 25 Check Digit Verification Disable (default) Do Not Transmit Check Digit After Verification Transmit Check Digit After Verification... -
Page 127: Standard 25
Standard 25 Restore Factory Defaults Restore the Factory Defaults of Standard 25 Enable/Disable Standard 25 Enable Standard 25 (default) Disable Standard 25 Check Digit Verification Disable (default) Do Not Transmit Check Digit After Verification Transmit Check Digit After Verification... -
Page 128: Code 39
Code 39 Restore Factory Defaults Restore the Factory Defaults of Code 39 Enable/Disable Code 39 Enable Code 39 (default) Disable Code 39 Transmit Start/Stop Character Code 39 uses an asterisk (*) for both the start and the stop characters. You can choose whether or not to transmit the start/stop characters by scanning the appropriate barcode below. -
Page 129: Check Digit Verification
Check Digit Verification Disable (default) Do Not Transmit Check Digit After Verification Transmit Check Digit After Verification Enable/Disable Code 39 Full ASCII The scanner can be configured to identify all ASCII characters by scanning the appropriate barcode below. Enable Code 39 Full ASCII Disable Code 39 Full ASCII (default) -
Page 130: Codabar
Codabar Restore Factory Defaults Restore the Factory Defaults of Codabar Enable/Disable Codabar Enable Codabar (default) Disable Codabar... -
Page 131: Check Digit Verification
Check Digit Verification Disable (default) Do Not Transmit Check Digit After Verification Transmit Check Digit After Verification Transmit Start/Stop Character Transmit Start/Stop Character (default) Do Not Transmit Start/Stop Character... -
Page 132: Start/Stop Character Format
Start/Stop Character Format ABCD/ABCD as the Start/Stop Character (default) ABCD/TN*E as the Start/Stop Character abcd/abcd as the Start/Stop Character abcd/tn*e as the Start/Stop Character... -
Page 133: Code 93
Code 93 Restore Factory Defaults Restore the Factory Defaults of Code 93 Enable/Disable Code 93 Enable Code 93 (default) Disable Code 93 Check Digit Verification Disable Do Not Transmit Check Digit After Verification (default) Transmit Check Digit After Verification... -
Page 134: Code 11
Code 11 Restore Factory Defaults Restore the Factory Defaults of Code 11 Enable/Disable Code 11 Enable Code 11 (default) Disable Code 11... -
Page 135: Check Digit Verification
Check Digit Verification Disable One Check Digit, MOD11 (default) Two Check Digits, MOD11/MOD11 Two Check Digits, MOD11/MOD9 One Check Digit, MOD11 (Len <= 11) One Check Digit, MOD11 (Len <= 11) Two Check Digits, MOD11/MOD11 (Len > 11) Two Check Digits, MOD11/MOD9 (Len > 11) Transmit Check Digit (default) Do Not Transmit Check Digit... -
Page 136: Plessey
Plessey Restore Factory Defaults Restore the Factory Defaults of Plessey Enable/Disable Plessey Enable Plessey (default) Disable Plessey Check Digit Verification Disable Do Not Transmit Check Digit After Verification (default) Transmit Check Digit After Verification... -
Page 137: Msi-Plessey
MSI-Plessey Restore Factory Defaults Restore the Factory Defaults of MSI-Plessey Enable/Disable MSI-Plessey Enable MSI-Plessey (default) Disable MSI-Plessey... -
Page 138: Check Digit Verification
Check Digit Verification Disable One Check Digit, MOD10 (default) Two Check Digits, MOD10/MOD10 Two Check Digits, MOD10/MOD11 Transmit Check Digit (default) Do Not Transmit Check Digit... -
Page 139: 126
RSS-14 Restore Factory Defaults Restore the Factory Defaults of RSS-14 Enable/Disable RSS-14 Enable RSS-14 (default) Disable RSS-14 Transmit Application Identifier “01” Transmit Application Identifier “01” (default) Do Not Transmit Application Identifier “01”... -
Page 140: Rss-Limited
RSS-Limited Restore Factory Defaults Restore the Factory Defaults of RSS-Limited Enable/Disable RSS-Limited Enable RSS-Limited (default) Disable RSS-Limited Transmit Application Identifier “01” Transmit Application Identifier “01” (default) Do Not Transmit Application Identifier “01”... -
Page 141: Rss-Expand
RSS-Expand Restore Factory Defaults Restore the Factory Defaults of RSS-Expand Enable/Disable RSS-Expand Enable RSS-Expand (default) Disable RSS-Expand... -
Page 142: Pdf417
PDF417 Restore Factory Defaults Restore the Factory Defaults of PDF417 Enable/Disable PDF417 Enable PDF417 (default) Disable PDF417... -
Page 143: Data Matrix
Data Matrix Restore Factory Defaults Restore the Factory Defaults of Data Matrix Enable/Disable Data Matrix Enable Data Matrix (default) Disable Data Matrix Rectangular Barcodes Decode Rectangular Barcodes (default) Do Not Decode Rectangular Barcodes... -
Page 144: Mirror Images
Mirror Images Decode Unmirrored DM Only (default) Decode Mirrored DM Only Decode Both... -
Page 145: Qr Code
QR Code Restore Factory Defaults Restore the Factory Defaults of QR Code Enable/Disable QR Code Enable QR Code (default) Disable QR Code Micro QR Enable Micro QR (default) Disable Micro QR Mirrored Micro QR Decode Mirrored Micro QR Do Not Decode Mirrored Micro QR (default) -
Page 146: Chapter 4 Prefix & Suffix
Chapter 4 Prefix & Suffix 1D Scanner After a successful barcode reading, a string containing numbers, letters or symbols will be returned. In real applications, barcode data may be found insufficient for your needs. You may wish to include additional information such as barcode type, data acquisition time or delimiter in data being scanned. Adding extra information to printed barcodes does not seem like a sensible solution since that will increase the barcode size and make them inflexible. -
Page 147: Custom Prefix
Custom Prefix Enable/Disable Custom Prefix If custom prefix is enabled, you are allowed to append to the data a user-defined prefix that cannot exceed 11 characters. For example, if barcode data is “123” and custom prefix is “AB”, the host device will receive “AB123”. Disable Custom Prefix (default) Enable Custom Prefix Set Custom Prefix... -
Page 148: Code Id Prefix
Code ID Prefix Code ID can be used to identify barcode type and it is user programmable. To learn how to program it, see the “Set Code ID” sections in Chapter 3. For the information of default Code ID, see the “Code ID Table (1D Scanner)”... -
Page 149: Custom Suffix
Custom Suffix Enable/Disable Custom Suffix If custom suffix is enabled, you are allowed to append to the data a user-defined suffix that cannot exceed 11 characters. For example, if barcode data is “123” and custom suffix is “AB”, the host device will receive “123AB”. Disable Custom Suffix (default) Enable Custom Suffix Set Custom Suffix... -
Page 150: Terminating Character Suffix
Terminating Character Suffix Enable/Disable Terminating Character Suffix A terminating character such as carriage return (CR) or carriage return/line feed pair (CRLF) can only be used to mark the end of data, which means nothing can be added after it. A terminating character suffix cannot exceed 7 characters. -
Page 151: 2D Scanner
2D Scanner In many applications, barcode data needs to be edited and distinguished from one another. Usually Code ID can be used as identifiers, but in some special cases terminating character suffix like Carriage Return or Line Feed can also be the alternative. The scanner can be configured to transmit barcode data in the following format: [Code ID] + [DATA] + [Terminating Character] Note: [DATA] must be transmitted while user can decide whether to transmit any of the rest parts. -
Page 152: Terminating Character Suffix
Terminating Character Suffix A terminating character such as carriage return (CR) or carriage return/line feed pair (CRLF) or horizontal tab (TAB) can be used to mark the end of data. Disable Terminating Character Suffix (default) Append CR Append CRLF Append TAB... -
Page 153: Appendix
Appendix Factory Defaults Table Parameter Factory Default Remark System Settings Operating Mode Real-Time mode (Bluetooth mode) Bluetooth Profile USB Interface Type USB HID-KBW Data Transmission Mode for Bluetooth Asynchronous mode Sound Notifications Enabled Vibration Notifications Disabled Append CRLF as Terminating Character Terminating Character Suffix Suffix Inter-Character Delay for Bluetooth HID... - Page 154 Parameter Factory Default Remark Symbologies 1D Scanner Code 128 Code 128 Enabled Maximum Length Minmum Length UCC/EAN-128 UCC/EAN-128 Enabled Maximum Length Minmum Length AIM 128 AIM 128 Disabled Maximum Length Minmum Length EAN-8 EAN-8 Enabled Check Digit Transmit 2-Digit Add-On Code Disabled 5-Digit Add-On Code Disabled...
- Page 155 5-Digit Add-On Code Disabled Decode EAN-13 + 2-digit Add-On Code Only Disabled Decode EAN-13 + 5-digit Add-On Code Only Disabled ISSN ISSN Disabled ISBN ISBN Disabled ISBN Format ISBN-13 UPC-E UPC-E Enabled Check Digit Transmit 2-Digit Add-On Code Disabled 5-Digit Add-On Code Disabled Decode UPC-A + 2-digit Add-On Code Only Disabled...
- Page 156 Interleaved 2 of 5 Enabled Check Digit Verification Enabled Check Digit Do not transmit Maximum Length Minmum Length No less than 2 ITF-6 ITF-6 Disabled Check Digit Do not transmit ITF-14 ITF-14 Disabled Check Digit Do not transmit Deutshe 14 Deutshe 14 Disabled Check Digit...
- Page 157 Industrial 25 Industrial 25 Enabled Check Digit Verification Disabled Check Digit Do not transmit Maximum Length Minmum Length No less than 4 Standard 25 Standard 25 Enabled Check Digit Verification Disabled Check Digit Do not transmit Maximum Length Minmum Length No less than 4 Code 39 Code 39...
- Page 158 Code 93 Enabled Check Digit Verification Enabled Check Digit Do not transmit Maximum Length Minmum Length No less than 1 Code 11 Code 11 Disabled Check Digit Do not transmit Enabled Check Digit Verification 1 Check Digit, MOD11 Maximum Length Minmum Length No less than 3 Plessey...
- Page 159 Parameter Factory Default Remark 2D Scanner Video Reverse Disabled Applicable to all symbologies. Code 128 Code 128 Enabled ( ) UCC/EAN-128 GS1-128 UCC/EAN-128 Enabled AIM 128 AIM 128 Enabled EAN-8 EAN-8 Enabled Check Digit Transmit 2-Digit Add-On Code Disabled 5-Digit Add-On Code Disabled Add-On Code Not required...
-
Page 160: Code Id Table (2D Scanner)
Check Digit Transmit 2-Digit Add-On Code Disabled 5-Digit Add-On Code Disabled Add-On Code Not required Extend to UPC-A Disabled System Character “0” Do not transmit UPC-A UPC-A Enabled Check Digit Transmit 2-Digit Add-On Code Disabled 5-Digit Add-On Code Disabled Add-On Code Not required Preamble Character “0”... - Page 161 Check Digit Do not transmit Industrial 25 Industrial 25 Enabled Check Digit Verification Disabled Check Digit Do not transmit Standard 25 Standard 25 Enabled Check Digit Verification Disabled Check Digit Do not transmit Code 39 Code 39 Enabled Check Digit Verification Disabled Check Digit Do not transmit...
-
Page 162: Digit Barcodes (1D Scanner)
Check Digit Transmit Plessey Plessey Enabled Check Digit Verification Enabled Check Digit Do not transmit MSI-Plessey MSI-Plessey Enabled Enabled Check Digit Verification One check digit, MOD10 Check Digit Transmit RSS-14 RSS-14 Enabled AI (Application Identifier) Transmit RSS-Limited RSS-Limited Enabled AI (Application Identifier) Transmit RSS-Expand RSS-Expand... -
Page 163: Code Id Table (1D Scanner)
Code ID Table (1D Scanner) Barcode Code ID Code 128 UCC/EAN-128 AIM 128 EAN-8 EAN-13 ISSN ISBN UPC-E UPC-A Interleaved 2 of 5 ITF-6 ITF-14 Deutsche 14 Deutsche 12 COOP 25(Japanese Matrix 2 of 5) Matrix 2 of 5(European Matrix 2 of 5) Industrial 25 Standard 25 Code 39... - Page 164 Code ID Table (2D Scanner) Symbology Original Code ID Visible Code ID Code 128 FNC3 A(0x41) Code 128 B(0x42) UCC/EAN 128 C(0x43) EAN-8 D(0x44) EAN-13 E(0x45) UPC-E F(0x46) UPC-A G(0x47) Interleaved 2 of 5 H(0x48) ITF-14 I(0x49) ITF-6 J(0x4A) Code 39 M(0x4D) Codabar O(0x4F)
- Page 165 Digit Barcodes (1D Scanner) 0 ~ 9...
- Page 166 A ~ F...
-
Page 167: Save/Cancel Barcodes (1D Scanner)
Save/Cancel Barcodes (1D Scanner) After reading numeric barcode(s), you need to scan the Save barcode to save the data. If you scan the wrong digit(s), you can either scan the Cancel barcode and then start the configuration all over again, or scan the Cancel the Last Digit barcode and then the correct digit, or scan the Cancel All Digits barcode and then the digits you want. -
Page 168: Ascii Table
ASCII Table Char (Null char.) (Start of Header) (Start of Text) (End of Text) (End of Transmission) (Enquiry) (Acknowledgment) (Bell) (Backspace) (Horizontal Tab) (Line Feed) (Vertical Tab) (Form Feed) (Carriage Return) (Shift Out) (Shift In) (Data Link Escape) (XON) (Device Control 1) (Device Control 2) (XOFF) (Device Control 3) (Device Control 4) - Page 169 Char (Request to Send) (Unit Separator) (Space) (Exclamation Mark) " (Double Quote) (Number Sign) (Dollar Sign) (Percent) & (Ampersand) (Single Quote) (Right / Closing Parenthesis) (Right / Closing Parenthesis) (Asterisk) (Plus) (Comma) (Minus / Dash) (Dot) (Forward Slash) (Colon) (Semi-colon) <...
- Page 170 Char > (Greater Than) (Question Mark) (AT Symbol) (Left / Opening Bracket) (Back Slash) (Right / Closing Bracket)
- Page 171 Char (Caret / Circumflex) (Underscore) (Grave Accent) (Left/ Opening Brace) (Vertical Bar) (Right/Closing Brace) (Tilde) (Delete)
- Page 172 Headquarters Fujian Newland Auto-ID Tech. Co., Ltd. 3F, Building A, No.1, Rujiang West Rd., Mawei, Fuzhou, Fujian, China 350015 TEL: +86 - (0) 591-83979222 FAX: +86 - (0) 591-83979208 E-mail: marketing@nlscan.com WEB:www.nlscan.com Newland Europe BV Rolweg 25, 4104 AV Culemborg, The Netherlands...
Need help?
Do you have a question about the BS80 and is the answer not in the manual?
Questions and answers