Table of Contents
Advertisement
Quick Links
Advertisement
Table of Contents

Subscribe to Our Youtube Channel
Related Manuals for Newland NLS-PT980 Series


Summary of Contents for Newland NLS-PT980 Series
- Page 1 NLS-PT980 Series Portable Data Collection Terminal User Manual V2.1 V2.1 Version...
-
Page 2: Table Of Contents
Content Standard Configuration ............................1 Optional Configuration ............................2 Tips and Cautions ............................3 Cautions ...................................3 General Usage Tips ................................4 Battery Usage & Cautions ...............................4 Specifications ..............................5 Product Outline ..............................6 Outline .....................................6 Indicator & Keyboard ..............................7 Power ................................8 Dismount Battery ................................8 Mount Battery ..................................9 Power ON/OFF Idle Charge ..........................10 Operation Interface ............................11 Desktop Layout ................................11... -
Page 3: Standard Configuration
Standard Configuration NLS-PT980 Main Machine Stylus Pen » » SCAN USB Slave Cable Li Battery » » nlscan.com Page 1... -
Page 4: Optional Configuration
Optional Configuration Power Adapter » Leather Case » Communication Cable » nlscan.com Page 2... -
Page 5: Tips And Cautions
Tips and Cautions Cautions Disassemble and Refit » Unauthorized disassemble and refit will avoid the limited warranty Power Adapter » Only manufacturer original power adapter should be applied. Improper adapter causes permanent damage and avoids the limited warranty Phenomenon & Safety »... -
Page 6: General Usage Tips
Tips and Cautions General Usage Tips When system halt, press “Reset” button using the stylus pen. Please see Page 9 to locate the » position of “Reset” button. Crash, throw, impact and fold will cause permanent LCD damage, system halt and irreversible »... -
Page 7: Specifications
Specifications Specification PT980 PT982 PT983 PT981 XScale PXA 270, 312MHz SDRAM: 64 MB Memory NAND Flash: 128MB, expandable to 256MB Suppor Minii SD up to 2GB Display 262K color TFT touch panel, 2.8inches, 240*320 resolution Keyboard 25 keys MTBF 5000 hours RS232 9.6~115.2kbps Interface... -
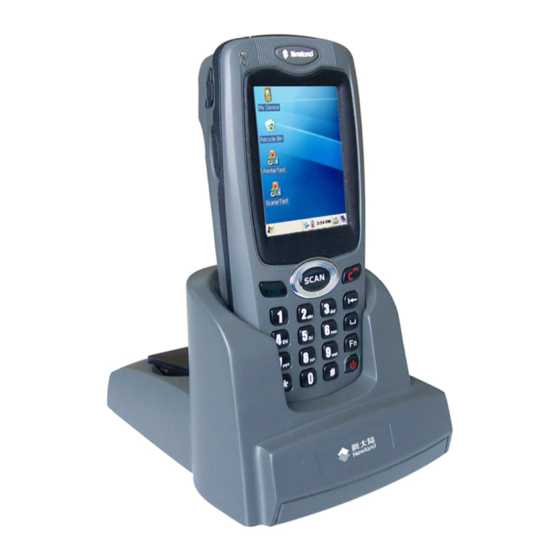
Page 8: Product Outline
Product Outline Outline SCAN 1.Indicator 2.USB Slave/Earphone 3.Left Fn Key (F13) 4.Beeper 5.Scan Window 6.LCD 7.Keyboard 8.USB Host 9.IC Slot 10.Stylus Pen 11.Right Fn Key (F14) 12.IrDA Port 13.Label 14.Hand Belt Ring 15.ID Label 16.Battery Lid 17.Reset 18.Contact Pins 19.SIM Slot 20.SD Slot 21.SAM Slot 22.The direction to insert SIM Card... -
Page 9: Indicator & Keyboard
Product Outline Indicator & Keyboard SCAN 1、 Power Indicator Charging: red light keep on. Charged: green light keep on. Red turns Green: Adapter con- nected. No battery inserted. 2、 GPRS Indicator Green Flash (1 sec interval): GPRS power up. No SIM card. Green Flash (3 sec interval): GPRS power up. -
Page 10: Power
Power Dismount Battery Lock Step 1: Push lid lock button to unlock. Remove the lid as it shown in the picture. Unlock Step2: Gently press to release the battery. Step 3: Remove the battery as it shown in the picture. Lock Step 4: Reverse Step 1 to mount the battery lid. -
Page 11: Mount Battery
Power Mount Battery Lock Step 1: Push lid lock button to unlock. Remove the lid as it shown in the picture. Unlock Step 2: Fit the battery with the copper contact pin. Step 3: Press to insert the battery. Lock Step 4: Reverse Step 1 to mount the battery lid. -
Page 12: Power On/Off Idle Charge
Power ON/OFF Idle Charge Power ON » Long press on “Power” button 2~3 seconds to power on. Windows desktop will pop up. Idle » Touch “Power” button when the device is on. (Idle function is enabled) Program Idle Function: Start—>Settings—>Control Panel—>Power Management Touch “Power”... -
Page 13: Operation Interface
Operation Interface Desktop Layout Zone 1----------------- Zone 2----------------- Zone 1: Recycle Bin, My Device, Internet Explorer and other shortcuts. Zone 2:Toolbar icons, Left to right : Start: slide on the panel to select, touch to confirm selection » Connection: shows connection with a Host, through USB slave port; »... -
Page 14: System Toolbar
Operation Interface System Toolbar “Start” Button Tap and slide on the panel to select. Touch to confirm selection Connection Status shows the intensity of GPRS signal . Double click to open the dialog in the picture. shows connection with a Host, through USB slave port;... - Page 15 Operation Interface System Toolbar System Time Double click the icon to open “Date/ Time Properties”. Or setup time from “Start”-> “Settings”-> “Control Panel” -> “Date/Time”. Click “Apply” to confirm settings. Power Icon Double Click to open “Power Management”. “Low-power”: Screen brightness turns low and other modules turn to power saving mode.
- Page 16 Operation Interface System Toolbar Input Choice Icon Click icon to slide show input choices. Click to confirm choice Click icon again to hind slide show Display Desktop Click the icon to show desktop. nlscan.com Page 14...
-
Page 17: Control Panel
Operation Interface Control Panel Open Control Panel “Start”-> “Settings”-> “Control Panel” PC Connection Setup direct connections to the desktop computer: enable, disable and communication type. nlscan.com Page 15... - Page 18 Operation Interface Control Panel Backlight Setting Setup backlight for 2 status: ① Normal Mode: The device work- ing in full power state. ②Low-power Mode: Screen bright- ness turns low and other modules turn to power saving mode. Keyboard backlight brightness stays the same in two modes.
- Page 19 Operation Interface Control Panel Dialing Properties Double click “Dialing” to open “Dialing Properties”. Storage Manger Double click “Storage Manager” to open “Storage Properties”. Caution: The settings bellow may cause system failure Format: permanently delete all data in selected disk. Dismount: disconnect selected disk New: create a partition in selected disk Delete: delete selected partition.
- Page 20 Operation Interface Control Panel Power Management “Low-power”: screen brightness turns low and other modules turn to power saving mode. “Auto Idle”: Most modules switch off. Operational variables restore in volatile memory. Any commencing operation (screen, transmission or other) prevents idle mode.
- Page 21 Operation Interface Control Panel Date/Time To setup date, time and time zone. Remove Program Select and click “Remove” to unin- stall programs. nlscan.com Page 19...
- Page 22 Operation Interface Control Panel Input Panel Setup default input method Click “Options” to select user preferences. ReaderServer Configuration Run “ReaderServer” before reading. It output reading results to keyboard event or clipboard. See page 42 for detail. nlscan.com Page 20...
- Page 23 Operation Interface Control Panel Owner Display and edit ID, owner notes and Network ID. Network and Dial-up Connections New a connection and configuration GPRS connection. See page 24 for details. “SERIAL ON USB”: shows con- nection with a Host, through USB slave port;.
- Page 24 Operation Interface Control Panel System To check the system information: Basic, General, Memory, Device, Copy right. Display Select a desktop picture nlscan.com Page 22...
- Page 25 Operation Interface Control Panel Certificates Import, View or remove certifications. Autorun Select programs automatically launch when power on. nlscan.com Page 23...
-
Page 26: Gprs Connection Setup
GPRS Connection Setup Your PT980 has setup a GPRS Coneection. If you are using PT980 in China, you can click Start->Settings->(Control Panel->)Network and Dial-up Connections, then double click GPRS to use it . If you are not, you can new a GPRS connection or modify related parameters. Please see “Create a Connection”... - Page 27 GPRS Connection Setup Create a Connection Rename “My Connection” to be a friendly name. New a GPRS, select “Dial-Up Con- nection” New a direct connection through USB or serial port, select “Direct Con- nection” New a Virtual Network, select “Vir- tual Private Network”...
- Page 28 GPRS Connection Setup Create a Connection Select bard rate “115200” in the “Port Settings” dialog. Leave other options to be default. Select “Call Options” to access this dialog. Fill the “Extra Settings” box with [+CGDCONT=1, “IP”, “APN”]. Ask the GPRS network provider for APN (Access Point Name).
- Page 29 GPRS Connection Setup Create a Connection Click “Next” to proceed. Fill “Country/region code” and “Area code” with required digits. Always fill “Phone number” with [*99***1#]. Click “Finish” to complete setup. nlscan.com Page 27...
- Page 30 GPRS Connection Setup Create a Connection A new GPRS dial-up created in this dialog. Double click to configure and dial. There will be an icon appearing in the toolbar. Click “Dial Properties” progress to next. nlscan.com Page 28...
-
Page 31: Dial Properties
GPRS Connection Setup Dial Properties Click “Edit” to fill in dialing pat- terns. Fill the 3 dialing patterns with “G”. Click “OK” twice to finish. nlscan.com Page 29... -
Page 32: Dial
GPRS Connection Setup Dial Do not fill the blanks. Click “Connect” The GPRS dialing has finished. You can use GPRS now. You can click to get the dialog showing left. nlscan.com Page 30... -
Page 33: Bluetooth Connection Setup
Bluetooth Connection Setup Create Connection Click Start->Control Panel. Double click “Bluetooth Device Proper- ties”. nlscan.com Page 31... - Page 34 Bluetooth Connection Setup Create Connection This is the interface of BT Manager V2.1. Click “Next”, PT980 starts to search for Bluetooth devices. And the available devices will be listed below. nlscan.com Page 32...
- Page 35 Bluetooth Connection Setup Create Connection Double click the device you want to connect, such as “LUKHAN”, the main machine will start to searching services. Double click , and choose a COM port to connect. nlscan.com Page 33...
- Page 36 Bluetooth Connection Setup Create Connection If the Bluetooth device requests authentication, you should enter PIN to connect. When connection is successful, the icon will has a green round mark on it . Click “OK” to quit. nlscan.com Page 34...
-
Page 37: Wifi Connection Setup
WiFi Connection Setup Create Connection Click Start->Network and Dial-up Connections. Double click “WiFi” icon and the interface of WiFi settings will be shown. nlscan.com Page 35... - Page 38 WiFi Connection Setup Create Connection “tiwlnapi1”Settings has two tabs. Left picture shows the interface of IP Address. You can obtain an IP address via DHCP or input it by yourself. This is the interface of Name Servers. When settings are finished, it could be saved by clicking “OK”.
- Page 39 WiFi Connection Setup Create Connection Double click Network Connection icon to enter WiFi interface. Click “Wireless Information” tab and choose the network you want to connect in the list. Then click “Con- nect”. nlscan.com Page 37...
- Page 40 WiFi Connection Setup Create Connection Choose the network’s Encryption and Authentication types and input network key, then click “OK”to connect. When connection is success- ful, there will be a remark of “prefered”following the Net- work’s name. nlscan.com Page 38...
-
Page 41: Connect Pt980 & Host
Connect PT980 & Host RS232 1、 Connect the Host (RS232 female DIN) and PT980 (female DIN) with RS232 & USB Host Cable 2、 Connect RS232 cable and the mains with power adapter 3、 Switch ON and perform nlscan.com Page 39... -
Page 42: Usb Slave
Connect PT980 & Host USB Slave 1、 Open USB slave port rubber on the top left corner. 2、 Connect the Host and PT980 with USB slave cable. 3、 Switch on and perform. Note: “Microsoft ActiveSync” should be installed in the Host to establish connection for PT980 and the Host. -
Page 43: Usb Host
Connect PT980 & Host USB Host 1、 Connect PT980 and the peripheral equipment with RS232 & USB Host Cable 2、 Insert peripheral equipment into USB port on the cable. 3、 Switch on and perform. nlscan.com Page 41... -
Page 44: Reading
Reading Reader Server “ReaderServer”, a barcode reading program (server) has been installed in advance. Follow the steps to open: start->setting->control panel->ReaderServer. ReaderServer supports reading 1D&2D barcode. RFID Function will be provided later. ReaderServer is for reading configurations. It uses keyboard or clipboard events to output barcode messages. Two settings in this program: 1. -
Page 45: How To Read 1D Barcode
Reading How to Read 1D Barcode Configure ReaderServer in the Control Pane Looking at the picture above, the dialog “Reader type” will jump out when you press the button “Select Reader Type”. There are three types you can select. Click "Select ReaderType" and choose Laser, there is only a configuration page which named “Common”... - Page 46 Reading How to Read 1D Barcode Adjust the distance and angle between PT980 and barcode. For the optimum reading stance, laser width should be 4mm more than barcode width. Then trigger to read. Right Stance Wrong Stance nlscan.com Page 44...
-
Page 47: How To Read 2D Barcode
Reading How to Read 2D Barcode Configure Reader Server in the Control Panel The dialog “Reader type” will jump out when you press the button “Select Reader Type”. If you select “Camera”, there are four configuration pages. They are “Common”, “Camera”, “De- code”... - Page 48 Reading How to Read 2D Barcode Optimum Reading Stance: 1、 Focus the green aiming bar on the central of a barcode. 2、 The distance of scan window & barcode between 5cm and 20cm 3、Yaw (αas below)between 0° and 45° (0 is the best) 4、Pitch(γas below) between 0°...
-
Page 49: How To Read Rfid Card
Reading How to Read RFID Card Main machine has a RFID module to read RFID card. Adjust the distance of RFID reader & RFID card for the optimum reading stance, then trigger and perform. nlscan.com Page 47... -
Page 50: Trouble Shooting
Trouble Shooting Malfunction Shootings Please contact your supplier for services. Key failure, inaction, wrong response Ensure adaptor is plugged correctly Charging indicator no response 1. Ensure battery is fully charged. Battery incompetent perfor- 2. Battery reaches invalidation. Please replace with a new Power mance one. - Page 51 Trouble Shooting Trouble Shooting Malfunction Shootings 1、USB cable is connected properly Incompetent communication 2、Clean the object blocked in RS232 port. 3、Above methods do not work out, contact supplier for services. 1、Ensure PT980 is power on 2、PT980 is in idle state. Short touch power button to quit idle. 3、Ensure battery is competent for work Screen Screen black and no response 4、Battery loose contact.
-
Page 52: Software Development
Software Development Introduction Operating System » PT980 series use Microsoft Windows CE 6.0 .NET OS. Any software in accordance with .NET Com- pact Framework 2.0 can be applied on PT980 series. Language » Support C, C++ , C# and VB.net, etc. Environment »... -
Page 53: Program Registry
Software Development Program Registry Backlight of LCD Screen Path Type Range Remark Validate HKLM\SYSTEM\CurrentControl- Backlight of LCD screen in DWORD 0-100 Set\Control\Power\Backlight\On working state. HKLM\SYSTEM\CurrentCon- Restart Backlight of LCD screen trolSet\Control\Power\Backlight\ DWORD 0-100 in idle. UserIdle Keypad Buz Path Type Range Remark Validate... -
Page 54: Appendix
Appendix Key Value PT980 Keyboard PC Keyboard Macro Hex Value 0x31 ‘1’ 0x32 ‘2’ 0x33 ‘3’ 0x34 ‘4’ 0x35 ‘5’ 0x36 ‘6’ 0x37 ‘7’ 0x38 ‘8’ 0x39 ‘9’ 0x30 ‘0’ VK_MULTIPLY 0x6A VK_SHIFT+‘3’ 0x10+0x33 VK_UP 0x26 Down Down VK_DOWN 0x28 Left Left VK_LEFT... -
Page 55: Testing Codes
Appendix Testing Codes Code128 UCC/EAN-128 UPC-E UPC-A Code 39 Interleaved 2 of 5 QR Code Micro QR PDF 417 Aztec Data Matrix nlscan.com Page 53... - Page 56 Revisions Version Data Source Description Date Approved V2.1 20090826 nlscan.com Page 54...
Need help?
Do you have a question about the NLS-PT980 Series and is the answer not in the manual?
Questions and answers