Table of Contents
Advertisement
Advertisement
Table of Contents

Subscribe to Our Youtube Channel
Related Manuals for Newland BS8050-3V Piranha


Summary of Contents for Newland BS8050-3V Piranha
- Page 1 BS8050-3V Piranha (1D) Barcode Scanner User Guide...
- Page 2 Do not disassemble the device or remove the seal label from the device. Otherwise, Fujian Newland Auto-ID Tech. Co., Ltd. does not assume responsibility for the warranty or replacement.
-
Page 3: Revision History
Revision History Version Description Date V1.0 Initial release. March 18, 2015... -
Page 4: Table Of Contents
Table of Contents Revision History ............................- 3 - Preface ................................1 Introduction..............................1 Chapter Descriptions............................ 1 Safety Instructions ............................1 Chapter 1 Getting Started ..........................2 Introduction..............................2 Unpacking ..............................2 Piranha Scanner ............................3 Functions of the Buttons ..........................4 Charging the Battery ............................ - Page 5 Parameters of USB HID-KBW ........................22 USB Country Keyboard Types ......................22 Convert Case ............................23 Inter-Keystroke Delay for KBW ......................23 Upgrade the Firmware ..........................24 Chapter 3 Symbologies ..........................27 Introduction..............................27 1D Symbologies ............................27 Code 39..............................27 Transmit Code 39 Start/Stop Character ....................
-
Page 7: Preface
Preface Introduction This manual provides detailed instructions for setting up and using the NLS-BS80 barcode scanner (hereinafter referred to as “the BS80” or “the scanner”). Chapter Descriptions Chapter 1, Getting Started : This chapter provides information on getting the scanner up and running for the first time. -
Page 8: Chapter 1 Getting Started
Chapter 1 Getting Started Introduction The Piranha is a wireless pocket barcode scanner equipped with 1D or 2D scan engine to meet different needs. It is a great space-saver for busy or limited workspaces. It also supports iOS, Android, and Windows devices through Bluetooth HID or SPP communication. -
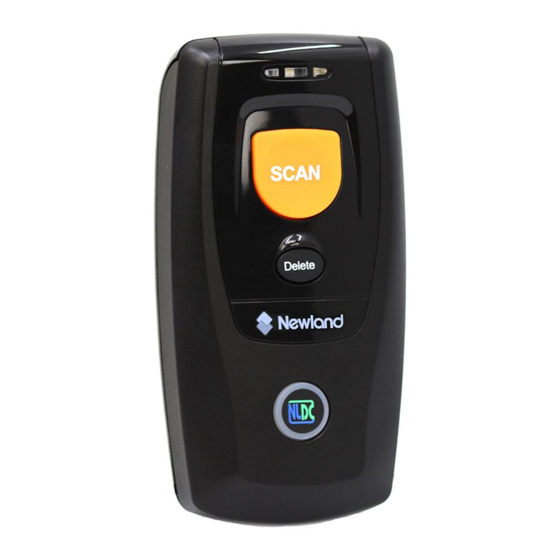
Page 9: Piranha Scanner
BS80 Scanner Charging/Battery LED Good Read LED Data LED Scan/Power Button Delete/Reset Button Function Button/Function LED Micro USB Port Product Label Scan Window: Please remove the protective sticker from the window before use. -
Page 10: Functions Of The Buttons
Functions of the Buttons Scan/Power Button *Press the button to scan barcode when the scanner is on. *Hold down the button for 3 seconds to power it on when the scanner is off. Delete/Reset Button *Press the button to remove the corresponding data from the USB storage area of FLASH memory in the USB mode before scanning the barcode to be deleted. -
Page 11: Charging The Battery
Charging the Battery Charge the scanner by connecting it to a host device with USB cable, as shown below. Note: Low battery may result in failure or misoperation of the scanner. Before your first use, charge the battery for 3-4 hours. -
Page 12: Connecting The Piranha To Smartphone/Tablet
Connecting the BS80 to Smartphone/Tablet 1. Make sure your device has HID or SPP profile. 2. Turn off the Power-Saving mode of your smartphone/tablet first. If the red Function LED on the scanner illuminates, hold down the Scan/Power button and Function button at the same time for 3 seconds or scan the barcode below to switch to the Wireless mode. - Page 13 (1) Click “Settings”. (2) Click “General”. (3) Click “Bluetooth”. (5) Select “BS80XXXX” to (6) The “Connected” message (4) Turn it on and search the devices. connect. means the connection is OK. BS80XXXX Connected BS80XXXX 5. After the connection is completed, the blue Function LED on the scanner will illuminate. 6.
-
Page 14: Led Notifications
LED Notifications Charging/Battery LED Red LED on Charging in progress. Green LED on Fully charged. Red and green LEDs flash alternately Battery not found. Red LED flashes Low battery alert. If the scanner is on and it is not connected to PC via USB cable, pressing the Scan/Power button and Delete/Reset button at the same time can display the battery level with the Charging/Battery LED. -
Page 15: Turning The Piranha On/Off
Turning the Piranha On/Off Turn the scanner on: Press the Scan/Power button. Turn the scanner off: By default, the scanner automatically powers off if no operation is performed on the scanner for 30 minutes. You can adjust the auto power-off time. You can also turn off the scanner by scanning the Power Off barcode. -
Page 16: Scanning Instructions
Scanning Instructions Scanning 1D Barcode Adjust the scan angle (Do not read barcode at vertical degree) or the distance between barcode and the scanner to ensure that the length of the scan line is roughly 8mm greater than that of the barcode, as shown below. -
Page 17: Chapter 2 System Settings
Chapter 2 System Settings Introduction This chapter describes how to configure the basic system parameters on the scanner. Restore Factory Defaults Restore Factory Defaults Operating Modes The scanner provides two operating modes: Wireless mode (Bluetooth mode) and USB mode. 1. Wireless mode Wireless Mode (default) When the scanner is in the Wireless mode, scanning the following barcodes can switch between Bluetooth HID and SPP profiles. - Page 18 There are two data transmission modes: Synchronous mode and Asynchronous mode. (1) Synchronous mode: When you scan barcodes, the data will be sent to smartphone/tablet directly. If you are out of Bluetooth service range, scanned data will be lost. (2) Asynchronous mode: When you are out of Bluetooth service range, scanned data will be saved in the FLASH memory.
-
Page 19: Query Scanner Information
Query Scanner Information Query the Firmware Version of Scan Engine Query the Firmware & Hardware Versions of Scanner Query the Manufacture Date of Scanner Query the Serial Number of Scanner Query/Delete the Data in FLASH The FLASH memory is divided into a USB storage area (used to save the data acquired in the USB mode) and a Bluetooth storage area (used to save the data acquired in Bluetooth asynchronous mode). -
Page 20: Sound Notifications
Sound Notifications Turn sound notifications on or off by scanning the appropriate barcode below. After this feature is enabled, the scanner beeps when one of the following events occurs: 1. The scanner is turned on. 2. The scanner resets. 3. A barcode is decoded (including good read for removing barcode data from the FLASH memory). 4. -
Page 21: Vibration Notifications
Vibration Notifications Turn vibration notifications on or off by scanning the appropriate barcode below. After this feature is enabled, the scanner vibrates when one of the following events occurs: 1. A barcode is decoded (including good read for removing barcode data from the FLASH memory). 2. -
Page 22: Terminating Character Suffix
Terminating Character Suffix Append CRLF as Terminating Character Suffix (default) Disable Terminating Character Suffix... -
Page 23: Inter-Character Delay For Bluetooth Hid
Inter-Character Delay for Bluetooth HID Select an appropriate inter-character delay to avoid data loss during transmission. This parameter is only valid in the Bluetooth HID mode. 15ms (default) 35ms 25ms Query Inter-Character Delay 45ms Delete Bluetooth Pairing Delete Bluetooth Pairing... -
Page 24: Automatic/Manual Power-Off
Automatic/Manual Power-Off By default, the scanner automatically powers off if no operation is performed on the scanner for 30 minutes. This feature can help to extend battery life. Query Auto Power-Off Timer Set the auto power-off timer: Scan the Set Auto Power-Off Timer barcode then one of the timers listed below. - Page 25 You can power off your scanner manually by scanning the barcode below. Power Off Note: After the Power Off barcode is scanned, the scanner emits a long beep and then turns off.
-
Page 26: Time Stamp
Time Stamp You can decide whether to send date and time or not by enabling or disabling time stamp. Enable Time Stamp (default) Disable Time Stamp Set Date Format Format 1: mm/dd/yyyy Format 2:dd/mm/yyyy 01/23/2011) (example: (example: 23/01/2011) Format 3: yyyy/mm/dd (default) (example: 2011/01/23) -
Page 27: Set Date & Time
Set Date & Time Step 1: Double click on BS80Setting.exe to Piranha Date&Time Setting Tool. Then check the “Auto- sync dateand time with the host” item on it. Step 2: After the time in the box is in sync with the system clock, click the “Generate Barcode” button. Step 3: Scan the barcode generated to set the date and time on the scanner. -
Page 28: Parameters Of Usb Hid-Kbw
Parameters of USB HID-KBW USB Country Keyboard Types US English (default) Japan Denmark Finland France Turkey_F Italy Norway Spain Turkey_Q U.K. -
Page 29: Convert Case
Convert Case No Case Conversion (default) Convert All to Upper Case Convert All to Lower Case Invert Upper and Lower Case Characters Inter-Keystroke Delay for KBW To set the inter-keystroke delay, scan the following barcode and a digit barcode (0~F). Note: 0~F corresponds to 3ms (default), 8ms, 13ms, 18ms, 23ms, 28ms, 33ms, 38ms, 43ms, 48ms, 53ms, 58ms, 63ms, 68ms, 73ms and 78ms respectively. -
Page 30: Upgrade The Firmware
Upgrade the Firmware Step 1: Install the driver: Run the CDC - Virtual COM Driver v1.1.0 program and then follow the on-screen instructions to complete the installation processs. (Skip this step if it is already installed on your PC.) Make sure that the driver is properly installed. You cannot upgrade the firmware without it. Step 2: Run the BS80Update program. - Page 31 Step 4: Hold down the Function button and the Delete/Reset button on the scanner at the same time for 7 seconds to upgrade the firmware. The red and blue Function LEDs flash alternately during the updating process. Step 5: Wait for the “Firmware upgraded!” window to pop up and click “OK” to exit the program. Note: If this utility does not operate normally, check to see if the FirmwarePath in the UpdataTool.ini file is correct (its value should be identical with the name of the .bin file).
-
Page 33: Chapter 3 Symbologies
Chapter 3 Symbologies Introduction Every symbology (barcode type) has its own unique attributes. This chapter provides programming barcodes for configuring the scanner so that it can identify various barcode symbologies. It is recommended to disable those that are rarely used to increase the efficiency of the scanner. 1D Symbologies Code 39 Enable (default) -
Page 34: Code 128
Code 128 Enable (default) Disable UCC/EAN-128 Enable (default) Disable EAN-8 Enable (default) Disable EAN-13 Enable (default) Disable... -
Page 35: Issn
ISSN Enable (default) Disable ISBN Enable (default) Disable UPC-E Enable (default) Disable UPC-A Enable (default) Disable... -
Page 36: Interleaved 2 Of 5
Interleaved 2 of 5 Enable (default) Disable Demo Demo Matrix 25 Enable (default) Disable Industrial 25 Enable (default) Disable Codabar Enable (default) Disable... -
Page 37: Code 93
Code 93 Enable (default) Disable GS1 Databar (RSS) Enable (default) Disable Code 11 Enable (default) Disable Plessey Enable (default) Disable... -
Page 38: Msi-Plessey
MSI-Plessey Enable (default) Disable... -
Page 39: Appendix
Appendix Factory Defaults Table Parameter Factory Default Remark System Settings Operating Mode Wireless mode (Bluetooth mode) Bluetooth Profile USB Interface Type USB HID-KBW Data Transmission Mode for Bluetooth Asynchronous mode Sound Notifications Enabled Vibration Notifications Disabled Append CRLF as Terminating Terminating Character Suffix Character Suffix Inter-Character Delay for Bluetooth HID... - Page 40 Parameter Factory Default Remark Symbologies Code 39 Code 39 Enabled Transmit Start/Stop Character Enabled Code 39 Full ASCII Enabled Code 128 Code 128 Enabled UCC/EAN-128 UCC/EAN-128 Enabled EAN-8 EAN-8 Enabled EAN-13 EAN-13 Enabled ISSN ISSN Enabled ISBN ISBN Enabled UPC-E UPC-E Enabled UPC-A...
- Page 41 Code 93 Code 93 Enabled GS1 Databar (RSS) GS1 Databar (RSS) Enabled Code 11 Code 11 Enabled Plessey Plessey Enabled MSI-Plessey MSI-Plessey Enabled...
-
Page 42: Digit Barcodes
Digit Barcodes 0 ~ 9... - Page 43 A ~ F...
Need help?
Do you have a question about the BS8050-3V Piranha and is the answer not in the manual?
Questions and answers