R&S TSMA6 Getting Started
Autonomous mobile network scanner
Hide thumbs
Also See for TSMA6:
- User manual (190 pages) ,
- Getting started (51 pages) ,
- Manual (10 pages)

Related Manuals for R&S TSMA6


Summary of Contents for R&S TSMA6
- Page 1 ® R&S TSMA6 Autonomous Mobile Network Scanner Getting Started (a0ÞX2) 4900804002 Version 10...
- Page 2 "Open Source Acknowledgment" document, which is available for download from the R&S TSMA6 product page at www.rohde-schwarz.com/product/tsmx > "Downloads" >"Firmware". Rohde & Schwarz would like to thank the open source community for their valuable contribution to embed- ded computing.
-
Page 3: Table Of Contents
® Contents R&S TSMA6 Contents 1 Safety and regulatory information........5 1.1 Safety instructions................5 1.2 Labels on the product................8 1.3 WLAN/Bluetooth adapter..............9 1.4 Warning messages in the documentation........11 1.5 Korea certification class A..............11 2 Welcome................12 2.1 Documentation overview.............. - Page 4 3.7.4 Connecting to a battery pack..............20 3.8 Switching on or off R&S TSMA6............23 3.9 Connecting with R&S TSMA6 WLAN access point......24 3.10 Connecting to LAN/WAN from a remote PC........27 3.11 Connecting USB to LAN adapter TSPC-U2L2 / TSPC-USL (optional) ......................
-
Page 5: Safety And Regulatory Information
Intended use The R&S TSMA6 is intended for the development, production and verification of electronic components and devices in industrial, administrative, and laboratory environments. Use the R&S TSMA6 only for its designated purpose. Observe the operating conditions and performance limits stated in the data sheet. - Page 6 ® Safety and regulatory information R&S TSMA6 Safety instructions Never open the casing of the product. Only service personnel authorized by Rohde & Schwarz are allowed to repair the product. If any part of the product is damaged or broken, stop using the product. Contact Rohde & Schwarz customer service at http://www.customersupport.rohde-schwarz.com.
- Page 7 ® Safety and regulatory information R&S TSMA6 Safety instructions Handling batteries safely The product contains exchangeable or built-in lithium polymer or lithium ion cells or batteries. The use of the word battery in the following always means all types. Only the battery contents are potentially hazardous. As long as a battery is undamaged and the seals remain intact, there is no danger.
-
Page 8: Labels On The Product
● Product and environment safety, see Table 1-1 ● Identification of the product, see bottom label of the R&S TSMA6. Table 1-1: Labels regarding product and environment safety Labeling in line with EN 50419 for disposal of electrical and electronic equipment after the product has come to the end of its service life. -
Page 9: Wlan/Bluetooth Adapter
Read the manual for information. WLAN/Bluetooth adapter The R&S TSMA6 has built-in WLAN/Bluetooth module. This wireless adapter complies with Part 15 of the FCC Rules and with Industry Canada license-exempt RSS standards. Operation of the device is subject to the following two conditions: ●... - Page 10 ® Safety and regulatory information R&S TSMA6 WLAN/Bluetooth adapter L’utilisation d’un réseau sans fil IEEE802.11a est restreinte à une utilisation en intérieur à cause du fonctionnement dans la bande de fréquence 5.15 GHz to 5.25 GHz. Industry Canada requiert que ce produit soit utilisé à l’intérieur des bâtiments pour la bande de fréquence 5.15 GHz - 5.25 GHz afin de réduire les...
-
Page 11: Warning Messages In The Documentation
® Safety and regulatory information R&S TSMA6 Korea certification class A Warning messages in the documentation A warning message points out a risk or danger that you need to be aware of. The signal word indicates the severity of the safety hazard and how likely it will occur if you do not follow the safety precautions. -
Page 12: Welcome
2.1.1 Getting started manual Introduces the R&S TSMA6 and describes how to set up and start working with the product. Includes basic operations, typical measurement examples, and gen- eral information, e.g. safety instructions, etc. A printed version is delivered with the product. -
Page 13: Release Notes And Open Source Acknowledgment (Osa)
The R&S TSMA6 enhances such solutions, providing the user with accurate insight into the RF environment. The R&S TSMA6 combines the technology of the R&S TSME6 ultra-compact drive test scanner with a high-performance Intel processor. - Page 14 ® Welcome R&S TSMA6 Key features ● Maximum connectivity supporting additional scanner hardware, Windows- based PC, Android-based UEs or tablets using wireless and wired connec- tions ● Integrated high-performance Intel i7 CPU-based PC Getting Started 4900.8040.02 ─ 10...
-
Page 15: Preparing For Use
6. Setting up indoors 3.3.1 Placing the product on a bench top If you want to set up the R&S TSMA6 on a benchtop or prepare the R&S TSMA6 for mobile use, proceed as follows. Getting Started 4900.8040.02 ─ 10... -
Page 16: Mounting The Product In A Rack
To place the product on a bench top 1. Place the R&S TSMA6 on a stable, flat and level surface. 2. If you want to stack TSMx, proceed as described in the R&S TSMA6 user manual. 3. If you want to stack the R&S TSMA6 together with other products: a) Follow the instructions given for the other products. - Page 17 ® Preparing for use R&S TSMA6 Considerations for test setup Signal input and output levels Information on signal levels is provided in the data sheet. Keep the signal levels within the specified ranges to avoid damage to the product and connected devi- ces.
-
Page 18: Connecting Antennas
Connecting to a vehicle DC power supply via cigarette lighter The R&S TSMA6 is delivered with a 12 V DC power supply cable with a cigarette lighter connector. 1. Check the rating of the vehicle DC power supply. It has to be 12 V. -
Page 19: Connecting To The Vehicle Power Supply Via Terminal
® Preparing for use R&S TSMA6 Connecting to power 2. Connect the 7-pin connector to DC IN. 3. Connect the cigarette lighter adapter to the 12 V outlet of the vehicle. 3.7.2 Connecting to the vehicle power supply via terminal To connect vehicle power supply via terminal 1. -
Page 20: Connecting To An Ac Power Supply
● R&S TSME-Z1 has an output power of about 30 W, sufficient for up to two products, one TSME6 and one TSME30/44DC. ● R&S TSMA6-Z1 has an output power of 105 W and is suitable for multiple TSMx products. 1. Ensure that the required ratings listed in the data sheet are matched. - Page 21 Preparing for use R&S TSMA6 Connecting to power 2. Screw the collar screws on the top of the R&S TSMA6 with a Torx 8 screw driver. ● Torque: 0.66 Nm ± 0.05 Nm Figure 3-2: Collar screws 1 = Collar screws 3.
- Page 22 3 = R&S TSMA6/6B 4 = Snap in holes on the bottom pane of R&S TSMA6/6B 4. Move the R&S TSMA6/6B to the rear side (2) until you hear a click when the collar screws are locked in. Getting Started 4900.8040.02 ─ 10...
-
Page 23: Switching On Or Off R&S Tsma6
Figure 3-4: Connected R&S TSMA6/6B and R&S TSMA6-BP 1 = Attach R&S TSMA6 to R&S TSMA6-BP 2 = Move R&S TSMA6/6B to the rear side 3 = Power connection established (docking connector is snapped in) Switching on or off R&S TSMA6 To switch on the device The device is off but connected to power. -
Page 24: Connecting With R&S Tsma6 Wlan Access Point
For a coldstart, hold the power on/off button at least 5 s. Connecting with R&S TSMA6 WLAN access point The R&S TSMA6 has a built-in WLAN access point. For configuration, see the R&S TSMA6 user manual. The usage of WLAN is restricted to indoor use. - Page 25 ® Preparing for use R&S TSMA6 Connecting with R&S TSMA6 WLAN access point 3. Select "Connect automatically" and click "Connect". 4. Select "Connect using a security key instead". Getting Started 4900.8040.02 ─ 10...
- Page 26 ® Preparing for use R&S TSMA6 Connecting with R&S TSMA6 WLAN access point 5. Enter the network security key and click "Next". Default security key: instrument Getting Started 4900.8040.02 ─ 10...
-
Page 27: Connecting To Lan/Wan From A Remote Pc
® Preparing for use R&S TSMA6 Connecting to LAN/WAN from a remote PC The connection to the WLAN access point is established. 3.10 Connecting to LAN/WAN from a remote PC Network environment Before connecting the product to a local area network (LAN), consider the follow- ing: ●... -
Page 28: Connecting Usb To Lan Adapter Tspc-U2L2 / Tspc-Usl (Optional)
TSMA6 Connecting test mobile phones (optional) 1. Connect the R&S TSMA6 LAN connector with an RJ45 cable to the LAN. 2. Configure the LAN port settings on the R&S TSMA6 via web-GUI in accord- ance with your administrator guidelines. The IP address setting is shown in the web-GUI (see R&S TSMA6 user manual). -
Page 29: Calibrating Gps For Dead Reckoning
31) of the R&S TSMA6. 1. Mount the R&S TSMA6 device fixed to the frame of a car. 2. Power on the R&S TSMA6 device. 3. Activate "Dead Reckoning" in the used software (for details, refer to R&S ROMES, R&S NESTOR or R&S ViCom documentation). - Page 30 ® Preparing for use R&S TSMA6 Calibrating GPS for dead reckoning The GPS calibration is saved in the module. Whenever the device is switched off, the calibration procedure must be repeated for the next usage of dead reckoning. Getting Started 4900.8040.02 ─ 10...
-
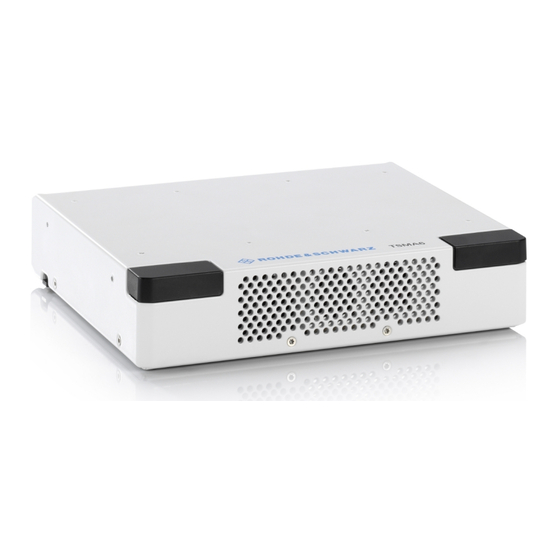
Page 31: Instrument Tour
Rear panel view Instrument tour Front panel view The front panel of the R&S TSMA6 does not provide any connectors or control elements for operation. The black caps on the left and right contain the WLAN antennas. Figure 4-1: R&S TSMA6 - Front Panel... - Page 32 The SCAN port provides a high-speed 1 Gbit Ethernet interface with an RJ 45 connector. It is used to connect the R&S TSMA6 to a separate R&S TSME6 as a second scanner. It can be used for MIMO scenarios and for increasing bandwidth and measurement rate.
- Page 33 Overall USB current (USB-C, USB 3.0 and USB 2.0): max. 3 A LAN Port - Remote Control (RJ45 connector) The LAN port provides a high-speed 1 Gbit Ethernet interface with an RJ 45 con- nector. It is used to connect the R&S TSMA6 to a LAN/WAN. Getting Started 4900.8040.02 ─ 10...
-
Page 34: Built-In Gps Receiver
Do not overload the maximum allowed input of +20 dBm. Non-compliance destroys the input mixer. Docking connector Connector for the battery pack unit TSMA6/B-BP. Built-In GPS receiver The integrated multi-GNSS (GPS / BeiDou / Galileo / GLONASS) receiver allows to use three satellite systems in parallel. It offers an accuracy improvement of 30 % to 50 % by using a second constellation of satellites. -
Page 35: Built-In Wlan / Bluetooth Adapter
● Client connection to a distant WLAN network ● Serving as a WLAN access point Per default, the R&S TSMA6 WLAN access point is switched on. The login cre- dentials are found on the bottom label of the device. The WLAN / Bluetooth can be switched off (flight mode) via rear panel switch. - Page 36 ® Instrument tour R&S TSMA6 Status LEDs Device Scanner [Mode] LED [Meas] LED [Pwr] LED [State]LED Comment Power Off green (BLINK- Power On ING, 1 Hz) Selftest / Power Down green (CONT.) --- Power On / WLAN Off blue (CONT.)
- Page 37 ® Instrument tour R&S TSMA6 Status LEDs Device Scanner [Mode] LED [Meas] LED [Pwr] LED [State]LED Comment red (CONT.) Scanner Error Temperature Error red (BLINKING rap- SW error idly) Getting Started 4900.8040.02 ─ 10...
-
Page 38: Transporting
® Transporting R&S TSMA6 Transporting Packing Use the original packaging material. It consists of antistatic wrap for electrostatic protection and packing material designed for the product. If you do not have the original packaging, use similar materials that provide the same level of protection. -
Page 39: Maintenance, Storage And Disposal
® Maintenance, storage and disposal R&S TSMA6 Maintenance, storage and disposal The product does not require regular maintenance. It only requires occasional cleaning. It is however advisable to check the nominal data from time to time. Do not use any liquids for cleaning. Cleaning agents, solvents (thinners, acetone), acids and bases can damage the front panel labeling, plastic parts and display. - Page 40 ® Maintenance, storage and disposal R&S TSMA6 For information on returning batteries to Rohde & Schwarz subsidiaries, see "Handling batteries safely" on page 7. Getting Started 4900.8040.02 ─ 10...
-
Page 41: Contacting Customer Support
® Contacting customer support R&S TSMA6 Contacting customer support Technical support – where and when you need it For quick, expert help with any Rohde & Schwarz product, contact our customer support center. A team of highly qualified engineers provides support and works with you to find a solution to your query on any aspect of the operation, program- ming or applications of Rohde &... -
Page 42: Index
® Index R&S TSMA6 Index Brochures ..........12 Warning messages ........11 Casing Labels ........... 8 Customer support ........41 Data sheets ..........12 Dead reckoning ........34 Getting started ......... 12 HDMI Port ..........34 Help ............12 Labels on casing ........8 Environment ........27...
Need help?
Do you have a question about the TSMA6 and is the answer not in the manual?
Questions and answers