Novexx Solutions ALX 73 Series Operating Manual
Hide thumbs
Also See for ALX 73 Series:
- User manual (135 pages) ,
- Service manual (54 pages) ,
- Operating manual (15 pages)
Table of Contents
Advertisement
Quick Links
03/12 Rev. 5.08-01
Overview ....................................................... 2
Designs of the ALX 73x ............................. 2
Configurations of the ALX 73x ................... 3
Functionality .............................................. 3
Operating components .............................. 5
Control panels ........................................... 8
Connections ............................................ 10
Options ........................................................ 12
External control panels ............................ 12
Fixed dispensing edge ............................ 12
Swivelling dispensing edge ..................... 12
Spring-loaded dispensing edge ............... 12
Pneumatic dispensing edge .................... 13
V-shape dispensing edge ........................ 13
Adjustable dispensing edge holders ....... 13
Adjustable head joint ............................... 14
Roll diameter sensor ............................... 14
monitoring ............................................... 14
Additional material guiding disc ............... 15
Capacitive label sensor ........................... 15
Applicator interface ................................. 15
Blow-on applicator LA-BO ....................... 16
Tamp-on applictor LA-TO ........................ 16
Twin deflection roller ............................... 16
Operating modes of the dispenser .............. 18
Overview ................................................. 18
Online mode ............................................ 19
Offline mode ............................................ 22
Printer operating modes .............................. 25
Overview ................................................. 25
Online mode ............................................ 26
Offline mode ............................................ 28
Standalone mode .................................... 31
OPERATNG MANUAL
ALX 73x
Dispenser parameter menu .........................32
Overview of parameter menu ..................32
description ...............................................34
menu ........................................................34
LABEL SETUP menu ...............................34
MACHINE SETUP menu .........................36
Printer parameter menu ..............................38
Overview of parameter menu ..................38
description ...............................................38
PRINT PARAMETERS menu ..................39
SYSTEM PARAMETER menu .................40
SPECIAL FUNCTION menu ....................41
SERVICE FUNCTIONS menu .................43
Advertisement
Table of Contents

Related Manuals for Novexx Solutions ALX 73 Series


Summary of Contents for Novexx Solutions ALX 73 Series
-
Page 1: Table Of Contents
03/12 Rev. 5.08-01 OPERATNG MANUAL ALX 73x Product description Overview ............2 Dispenser parameter menu ......32 Designs of the ALX 73x ......2 Overview of parameter menu ....32 Configurations of the ALX 73x ....3 Information about the parameter description ..........34 Functionality .......... -
Page 2: Product Description
RODUCT DESCRIPTION Overview Designs of the ALX 73x ALX 734/735 The ALX 73x is available in versions ALX 734, ALX 735 and ALX 736. These two ver- sions differ in the width of the printhead: • ALX 734: 4" print width (106 mm) •... -
Page 3: Configurations Of The Alx 73X
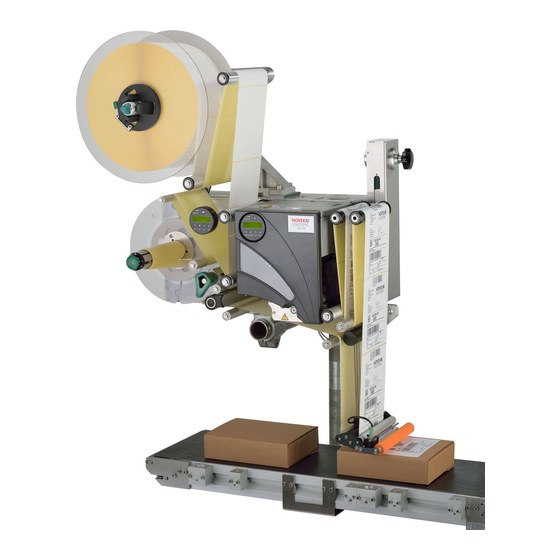
RODUCT DESCRIPTION Configurations of the ALX 73x The ALX 73x can be adjusted in many ways to meet customer requirements: Feature Adjustment Direction in which products move Selection of design: LH / RH Horizontal / vertical (for labelling from above or Assembly position of the machine from the side) Machine fastening... - Page 4 RODUCT DESCRIPTION [2] Left: Functional elements of the ALX 73x. Right: Flow of material. A Unwinder B Dispenser (LMA) C Printer (PMA) D Dancer unit (DU) E Dispensing edge holder F Dispensing edge (optional) Sequence of print dispensing: • A print job is transferred to the printer (via database interface or memory card). •...
-
Page 5: Operating Components
RODUCT DESCRIPTION Operating components [3] Operating components of the ALX 73x RH. A Unwinder The unwinding mandrel receives the material roll. B Dancer lever Holds the label material evenly under tension. Brakes the rotation of the material roll if the material tension drops. C Core diameter adapter To adjust the diameter of the dispenser mandrel to the core diameter of the label roll. - Page 6 RODUCT DESCRIPTION Rewinder Winds up the empty carrier material. G Unlocking button Pressing the button reduces the diameter of the rewinding core. This makes it pos- sible to remove wound carrier material easily. H Dispenser control panel (dispensing module "LMA") To enter commands on the dispensing section of the machine and display operat- ing states and error messages.
- Page 7 RODUCT DESCRIPTION [4] Operating components of the printer in a ALX 73x RH. A Printer control panel (print module „PMA“) To enter commands on the printing section of the machine and display operating states and error messages. B Front cover Held open by gas pressure spring.
-
Page 8: Control Panels
RODUCT DESCRIPTION Control panels Control panel language Different languages are available for texts that appear on screen. Instructions for se- lecting the language: Setting parameters • Dispenser: see on page 23. Setting parameters • Printer: see on page 30. Printer control panel ERROR APPLY... - Page 9 RODUCT DESCRIPTION Dispenser control panel [6] Dispenser control panel. A Operating LED Lights up green when the dispenser is turned on. B Error LED Lights up red when an error has occurred. C Screen Display of operating states, parameters, setting values and error messages. The displays depend on the operating state of the dispenser.
-
Page 10: Connections
RODUCT DESCRIPTION Connections WARNING! Danger of electrocution. Only connect the printer to devices that fulfil the SELV (safety extra-low voltage) circuit requirements in accordance with EN 60950. CAUTION! Danger of damage to the machine due to faulty accessories. Only connect original accessories. - Page 11 RODUCT DESCRIPTION H Connection to the mains power supply Label sensor Product (start) sensor (available as accessory) K Rotary encoder (available as accessory); used for operation with automatic speed adaptation Capacitive label sensor Alternative label sensor (see on page 15) ...
-
Page 12: Options
RODUCT DESCRIPTION Options External control panels In addition to the permanently installed control panel, external control panels can also be connected. External control panels are advantageous if the in- stalled control panels are difficult to access due to the installation position of the machine. [8] External dispenser control panel Fixed dispensing edge The dispensing edge is rigidly connected with the hold-... -
Page 13: Pneumatic Dispensing Edge
RODUCT DESCRIPTION Pneumatic dispensing edge The dispensing edge can be rotated in the dispensing head. Compressed air presses the dispensing edge onto the surface of the product. This makes it possible to compensate for differences in height between products or on the surface of the product. -
Page 14: Adjustable Head Joint
RODUCT DESCRIPTION Adjustable head joint Using the adjustable head joint [15A], just one person can tilt the label dispenser ±4° for fine dosing. [15] Adjustable head joint (A) Roll diameter sensor The roll diameter sensor (OD sensor) [16A] generates a warning if a specific, adjustable Outer Diameter of the roll is exceeded. -
Page 15: Additional Material Guiding Disc
RODUCT DESCRIPTION Additional material guiding disc The additional material guiding disc [18A] improves side guiding of the material roll. This option is especially recommended for processing very narrow label materi- al (< 30 mm in width). [18] Additional material guiding disc (A) Capacitive label sensor Optional sensor, required for processing transparent la- bels [19A]. -
Page 16: Blow-On Applicator La-Bo
RODUCT DESCRIPTION Blow-on applicator LA-BO The LA-BO applies labels to products without touching them. It suits especially well for labelling delicate prod- ucts like fruits or vegetables. [21] Applicator LA-BO. Tamp-on applicator LA-TO The LA-TO presses labels onto products by means of a movable pressure plate, which is driven pneumatical- ly. - Page 17 RODUCT DESCRIPTION 17 | Options Operating manual ALX 73x | file version 01 | 03/2012...
-
Page 18: Operating Modes Of The Dispenser
RODUCT DESCRIPTION Operating modes of the dispenser Overview Operating modes of the dispenser: • Online mode – dispensing mode – Active operating mode after switching on – Label counter screen or – Display/setting of dispensing speed and start delay • Offline mode Settings in parameter menu [24] Dispenser control panel on the ALX 73x. -
Page 19: Online Mode
RODUCT DESCRIPTION Online mode STATUS Online Labels – – [25] Dispenser control panel in online mode (292 labels dispensed) A Meaning of keys in online mode Activate online mode Normally activated automatically after switching on. Activate from offline mode: Press the key 2x. - Page 20 RODUCT DESCRIPTION Continue label output: 1. (applicator mode) remove label from applicator. 2. Press the key. Online settings STATUS Speed Offset 12.2 fix – – [26] Dispenser control panel in the online settings mode. A Dispensing speed display (here: 12,2 m/min constant) B Dispense label key C Start delay display (here: 0 mm) D Meaning of keys for online settings...
- Page 21 RODUCT DESCRIPTION Changing the counter MACHINE SETUP > Dispense counter. Set the counter state with state Count labels back- To count dispensed labels backwards from a starting value to zero: wards Set LABEL SETUP > Stop counter mode to "Enabled“. 2.
-
Page 22: Offline Mode
RODUCT DESCRIPTION Offline mode Activate offline mode Activate from online mode: Press the key 2x. OFFLINE Press the key. LABEL SETUP LABEL SETUP is the first menu in the parameter menu. In offline mode the key assignments as they are represented under the keys apply. Opening the parameter In the parameter menu the user has access to a number of menus in which various menu... - Page 23 RODUCT DESCRIPTION Setting parameters MACHINE SETUP MACHINE SETUP Dispenser type MACHINE SETUP Language English Language Language German MASCHINEN SETUP Sprache [28] Key function when setting the parameter MACHINE SETUP > Language. A Key for "Accept change" B Key for "Reject change" Each menu contains parameters that can be used to make settings on the machine control unit.
- Page 24 RODUCT DESCRIPTION Operating manual ALX 73x | file version 00 | 03/2012 Operating modes of the dispenser | 24...
-
Page 25: Printer Operating Modes
RODUCT DESCRIPTION Printer operating modes Overview Operating modes of the printer: • Online mode – Print jobs are received and processed immediately – Active operating mode after switching on – Print contrast setting • Offline mode – Print jobs are received but are not processed –... -
Page 26: Online Mode
RODUCT DESCRIPTION Online mode ERROR ONLINE 0: JOBS APPLY ONLINE FEED PROG [30] Printer control panel of the ALX 73x in online mode. A Interpreter activity B Data transfer Activate online mode Activate from offline mode: Press the Enter key. Screen: ONLINE 0 JOBS (There are no pending print jobs for processing). - Page 27 RODUCT DESCRIPTION Screen showing the Screen during printing: progress of printing • Number of print jobs interpreted (13) • Number of remaining labels to be printed in the current job (25) ONLINE 13 JOBS Restcount: 25 ONLINE 13 JOBS Restcount: endless ...
-
Page 28: Offline Mode
RODUCT DESCRIPTION Offline mode Activate offline mode Normally activated automatically after switching on. To activate from online mode (when the print job is stopped): Press the Enter key. OFFLINE 0 JOBS (There are no pending print jobs for processing). OFFLINE xx JOBS Stopped: yy (The operator has switched from stopped online mode to offline mode) - Page 29 RODUCT DESCRIPTION Opening the parameter In the parameter menu the user has access to a number of menus in which various menu parameters can be called in a defined order. The dispenser can be set so that some menus and/or parameters are not visible. Figure [31] shows the key functions for switching between different menus and for exiting the parameter menu.
- Page 30 RODUCT DESCRIPTION Setting parameters SYSTEM PARAMETER SYSTEM PARAMETER Speed unit Language English SYSTEM PARAMETER Language Language German SYSTEM PARAMETER Sprache [32] Key function when setting the SYSTEM PARAMETER > Language parameter. A Key for "Accept change" B Key for "Reject change" Each menu contains parameters that can be used to make settings on the machine control unit.
-
Page 31: Standalone Mode
RODUCT DESCRIPTION Standalone mode In standalone mode, print jobs are not transferred via data cable but are instead stored on a memory card. You can access them there from the printer control panel or using a connected keyboard. Activate standalone 1. -
Page 32: Dispenser Parameter Menu
RODUCT DESCRIPTION Dispenser parameter menu Overview of parameter menu LABEL SETUP MACHINE SETUP (continued) INTERFACE PARA (continued) Load prod.profil Dispenser type Slave IP address >EASYPLUGINTERPR Port address Gap detect. mode Store prod.prof. Tandem Distance Interface Ethernet speed Dispense speed Del. prod.profil Label sens. - Page 33 RODUCT DESCRIPTION SIGNAL INTERFACE (continued) SERVICE/DIAGNOS. SERVICE DATA (continued) Interface mode >AI BOARD SIGNAL Service >MODULE FW VERS. Manufacturer >PLC SIGNALS Applicator type Serv. data reset System version Work place End dispense mod Apply mode Sensor Test System revision Company name Disp.end delay Start mode Memory card test...
-
Page 34: Information About The Parameter Description
RODUCT DESCRIPTION Information about the parameter description • The setting range or the individual settings of a parameter are shown in square brackets. • For parameters with individual setting values, the preset value is shown in italic type. Tips for data entry in the parameter menu Line overflow If the displayed text is longer than the length of the line in the display: Move text to the left:... - Page 35 RODUCT DESCRIPTION Slew speed Feed speed during initialisation Setting range: [5.0…50.0] m/min; default: 1,0 Label pitch Label pitch = label length+gap Setting range: [5,0…600,0] mm; default: 100,0 mm Lab. stop offset Stop position of the label on the dispensing plate Setting range: [0,0…999,9] mm;...
-
Page 36: Machine Setup Menu
RODUCT DESCRIPTION Disabled: Dispensing counter counts forwards, i.e. each label that is dispensed in- creases the counter state. Label stop quan. After dispensing this number of labels, the dispenser stops LABEL SETUP > Stop count. mode This function only appears if = "Enabled"... - Page 37 RODUCT DESCRIPTION Materialend warn Related to internal OD monitoring. • Settings: [Disabled, „Mat.diam < x mm“] • Setting range for x = [50…500] • Default setting: x= 80 Disabling the function: Set x < 40. Re-enabling the function: Press the key.
-
Page 38: Printer Parameter Menu
RODUCT DESCRIPTION Printer parameter menu Overview of parameter menu PRINT INFO PRINT PARAMETERS INTERFACE PARA. SYSTEM PARAMETER (DP INTERFACE) … Print speed … … … Feed speed Light sens. type Material type … Material length Ribbon autoecon. Material width Ribb. eco. limit Print direction …... -
Page 39: Print Parameters Menu
RODUCT DESCRIPTION PRINT PARAMETERS menu Print speed Print speed The print speed (material feed) can be adapted to the combination of ribbon and ma- terial in use to optimise the contrast intensity and the degree of blackening of the print image. -
Page 40: System Parameter Menu
RODUCT DESCRIPTION Settings: ["Foot first", "Head first"] • "Foot first": Alignment of the print image as shown in [33A]. • "Head first": Alignment of the print image as shown in [33B]. Note the following: Define the "true" label length (without label gaps) in parameter PRINT PARAMETERS >... -
Page 41: Special Function Menu
RODUCT DESCRIPTION • "Thermal/head lift": Thermal direct printing with automatic head lifting over unprinted areas (protects the printhead) • "Thermal printing". Thermal direct printing (ribbon end sensor shut off) • "Enabled": Thermal transfer printing with ribbon saving • "Off": Thermal transfer printing without ribbon saving Ribb. - Page 42 RODUCT DESCRIPTION • With adjust para Parameters containing device-specific settings are saved as well. The relevant pa- rameter names are marked in the text file with a *. Application: Service Pre-set filename: SETUPALL.FOR Store diagnosis Saves diagnostic data to memory card. Pre-set filename: Diagnose ALX 735 PMA RH A662105104002453.log where…...
-
Page 43: Service Functions Menu
RODUCT DESCRIPTION SERVICE FUNCTIONS menu Head dot test Checks the printhead for faulty dots. The check ends with a status report [34] contain- ing a list of faulty dots. This printout is generated even if no faulty dots were found. CAUTION! Danger of damage to the printhead.
Need help?
Do you have a question about the ALX 73 Series and is the answer not in the manual?
Questions and answers