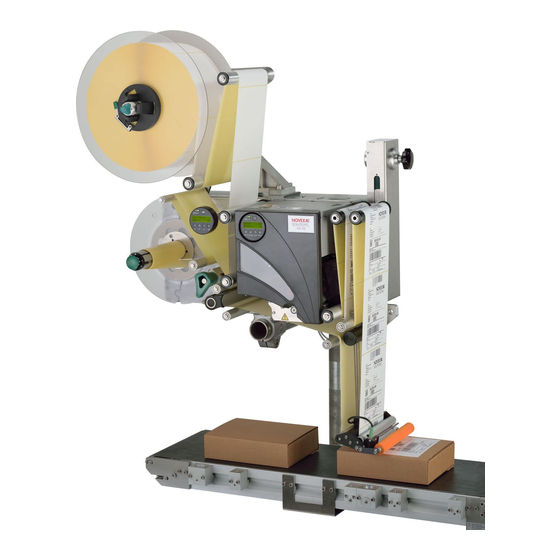
Novexx Solutions ALX 73 Series User Manual
Hide thumbs
Also See for ALX 73 Series:
- User manual (135 pages) ,
- Service manual (54 pages) ,
- Operating manual (43 pages)
Table of Contents
Advertisement
Quick Links
04/13 Rev. 5.08-02
Electrical connections ................................... 2
Connecting sensors .................................. 3
Inserting label material .................................. 4
Inserting the label roll ................................ 4
Threading in the label web ........................ 5
Replacing a label roll ............................... 11
Inserting/replacing ribbon ............................ 12
Inserting ribbon ....................................... 12
Changing ribbon ...................................... 13
Mechanical settings .................................... 15
unwinder .................................................. 15
Positioning the pressure roller ................. 15
dispensing edge ...................................... 16
Setting the ribbon tension ....................... 17
Setting the printhead pressure ................ 18
dancer lever ............................................ 19
dancer lever ............................................ 20
USER MANUAL
ALX 73x
Switching the unit on and off .......................21
Switching the machine on/off ...................21
Setting and monitoring the dispenser ..........22
Settings in parameter menu .....................22
Monitoring functions .................................25
Setting and monitoring the printer ...............27
Settings in parameter menu .....................27
Monitoring functions .................................28
Printing ........................................................30
Creating print jobs ....................................30
Installing the printer driver .......................30
Transferring a print job .............................30
Using product profiles (dispenser) ...............32
What are product profiles? .......................32
Loading a product profile .........................32
Saving a product profile ...........................33
Deleting a product profile .........................34
Advertisement
Table of Contents

Related Manuals for Novexx Solutions ALX 73 Series


Summary of Contents for Novexx Solutions ALX 73 Series
-
Page 1: Table Of Contents
04/13 Rev. 5.08-02 USER MANUAL ALX 73x Startup and operation Electrical connections ........2 Switching the unit on and off .......21 Connecting to the mains power supply ..2 Switching the machine on/off ....21 Connecting sensors ........3 Setting and monitoring the dispenser ..22 Settings in parameter menu .....22 Inserting label material ........ -
Page 2: Startup And Operation
TARTUP AND OPERATION Electrical connections WARNING! This unit operates at mains voltage! Contacting electrically live components can cause lethal electrical shocks and burns. The machine must only be connected to the mains power supply by an authorised specialist. This person must be acquainted with the associated dangers. ... -
Page 3: Connecting Sensors
TARTUP AND OPERATION Connecting sensors WARNING! This unit operates at mains voltage! Contacting electrically live components can cause lethal electrical shocks and burns. The machine must only be connected with other machines if they meet the requirements of a SELV circuit (Safety Extra-Low Voltage circuit) in accordance with EN 60950. -
Page 4: Inserting Label Material
TARTUP AND OPERATION Inserting label material WARNING! Danger of injury due to moving and rapidly rotating parts! Before inserting the label roll ensure that the printer and dispenser are both in offline mode. Danger of injury caused by falling label roll. ... -
Page 5: Threading In The Label Web
TARTUP AND OPERATION Threading in the label web Threading diagrams The following illustrations show the flow of material through the ALX 73x in different installation positions and designs with right-hand and left-hand versions. [7] Flow of material with horizontal installation and one unwinder. [8] Flow of material with horizontal installation and two unwinders. - Page 6 TARTUP AND OPERATION [9] Flow of material with vertical installation and one unwinder. [10] Flow of material with horizontal installation, one unwinder and double roller at the dancer lever. 6 | Inserting label material User manual ALX 73x | file version 05 | 04/2013...
- Page 7 TARTUP AND OPERATION [11] Flow of material with horizontal installation, one unwinder and V-shape dispensing edge. User manual ALX 73x | file version 05 | 04/2013 Inserting label material | 7...
- Page 8 TARTUP AND OPERATION Threading the label web into the printer 1. Open the printer cover [12]. Hold the cover on the bottom right [12A]. 2. Adjust the material guide to the width of the label web. To do this, release the thumb screw [13A] on the outer material guide [13B], push the material guide up to the edge of the label material and screw in the thumb screw again until it is tight.
- Page 9 TARTUP AND OPERATION Thread in the label web on the dispensing edge Fixed [15] and swivelling L-shape dispensing edges: 1. Guide the backing paper around the first deflection roller [15A] and through the slot in the sensor [15B]. 2. Guide the backing paper under the pressure roller [15C] to the dispensing plate [15D].
- Page 10 TARTUP AND OPERATION Thread in the label web on the drive roller 1. Open the pressure roller. To do this turn the lever [18A] clockwise. 2. Position the backing paper around the deflection roller [18B] and drive roller [18C]. 3. Close the pressure roller. To do this turn the lever [18A] anticlockwise until you feel it snap into place.
-
Page 11: Replacing A Label Roll
TARTUP AND OPERATION Replacing a label roll Detecting end of roll To keep downtimes during production as short as pos- sible, the roll should be changed as quickly as possible. Threading the label material through the entire machine is relatively time consuming. Threading in can be avoid- ed by connecting the beginning of the new material roll to the end of the old material roll (= splicing). -
Page 12: Inserting/Replacing Ribbon
TARTUP AND OPERATION Inserting/replacing ribbon WARNING! Rotating parts can entrap objects and body parts and draw them in! Never wear loose long hair, loose jewellery, long sleeves or similar items when working with the machine. Always close the printer cover before printing. -
Page 13: Changing Ribbon
TARTUP AND OPERATION Changing ribbon With roll diameter monitoring We recommend switching on roll diameter monitoring, see section Ribbon reserve on page 29. As soon as the critical diameter is reached, the mes- sage appears: FOIL X JOBS Follow these steps: 1. - Page 14 TARTUP AND OPERATION 5. Press the feed key. The last (incomplete) label to be printed will be printed again. Then printing continues with the cur- rent print job. Now the label that was not completely printed must be removed. As soon as the label that was not completely printed is at the front of the buffer loop [27A]: 1.
-
Page 15: Mechanical Settings
TARTUP AND OPERATION Mechanical settings Adjusting the core diameter of the unwinder Tools: 3 mm hexagonal (Allen) key wrench The unwinder can be adapted to the internal diameter of the label rolls using core adapters [28A]. Depending on this diameter, various adapters will have to be in- stalled or removed: 38.1 mm (1") core: ... -
Page 16: Position The Label Sensor On The Dispensing Edge
TARTUP AND OPERATION Position the label sensor on the dispensing edge 1. Loosen the thumb screw. 2. Push the sensor into place on the axis so that it can detect the gaps between labels. LED [31A] is lit when the sensor is standing over a label. -
Page 17: Setting The Ribbon Tension
TARTUP AND OPERATION Setting the ribbon tension For optimum printing results, the ribbon must run with- out creases. This can be achieved by correctly setting the torque on the rewinding mandrel and the braking torque on the unwinding mandrel. The factory settings cover a wide range of different rib- bon widths. -
Page 18: Setting The Printhead Pressure
TARTUP AND OPERATION Setting the printhead pressure CAUTION! Shortened service life of printhead. Always set the weakest printhead pres- sure that will produce acceptable printing results. Different material widths and thicknesses affect the contact pressure of the printhead on the print roller. The contact pressure can be set with an adjusting knob [35A] in 3 stages: •... -
Page 19: Setting The Return Force Of The Unwinder Dancer Lever
TARTUP AND OPERATION Setting the return force of the unwinder dancer lever The dancer lever on the unwinder is set so that a wide range of label materials can be processed without hav- ing to change the setting of the dancer lever return force. -
Page 20: Setting The Return Force Of The Linear Dancer Lever
TARTUP AND OPERATION Setting the return force of the linear dancer lever The linear dancer lever is set so that a wide range of la- bel materials can be processed without having to change the setting of the dancer lever return force. Adjusting the return force: 1. -
Page 21: Switching The Unit On And Off
TARTUP AND OPERATION Switching the unit on and off Switching the machine on/off Switching on the unit Move the mains power switch [41A] of the machine to "I" (On). The machine starts up. Then the dispenser and printer are both in online mode. Switching off the unit ... -
Page 22: Setting And Monitoring The Dispenser
TARTUP AND OPERATION Setting and monitoring the dispenser Settings in parameter menu Label pitch Switch to offline mode To measure label pitch automatically: Works only up to max. 120 mm label pitch Press and hold the key (for longer than 2 sec- onds). - Page 23 TARTUP AND OPERATION Label stop position CAUTION! Mind the following setting rules to avoid a strong decrease of dispensing accuracy: At maximum dispensing speed set the Lab. stop offset to at least 10 mm! Don´t set Lab. stop offset to the same value ...
- Page 24 TARTUP AND OPERATION Suppressing start signals The shape of the product or reflecting surfaces can cause a premature start signal, which will result in in- correct labelling. Start signals can therefore be ignored in cases such as these, while the product is being moved along under the dispensing edge.
-
Page 25: Monitoring Functions
TARTUP AND OPERATION Monitoring functions During labelling operation, the electronic control unit monitors the following functions: Material end / roll diameter (OD = outer roll diameter, PMA = printer, LMA = dis- penser) To facilitate quick and smooth changing of the material roll, the machine can send an alarm to operating per- sonnel in advance before the end of the material roll. - Page 26 TARTUP AND OPERATION Prerequisites: – External OD sensor is mounted – (LMA) MACHINE SETUP > Ext. OD sensor "Warning" or „Error“ Message (warning) of the LMA, if the critical OD is (MACHINE SETUP > Ext. OD sensor reached "Warning") ONLINE OD sensor warn.
-
Page 27: Setting And Monitoring The Printer
TARTUP AND OPERATION Setting and monitoring the printer Settings in parameter menu The settings described below are generally includ- ed in the print job, in which case they do not need to be made. Manual settings that were made before a print job was transferred will be overwritten by the settings in the print job. -
Page 28: Monitoring Functions
TARTUP AND OPERATION Material type PRINT PARAMETERS > Material type 1. Set to “Punched”. 2. For punched material: Set PRINT PARAMETERS > Light sens. type to “Punched”. for material with reflex markings "Reflex". Print process SYSTEM PARAMETER > Ribbon autoecon. depending ... - Page 29 TARTUP AND OPERATION Ribbon reserve To monitor the ribbon reserve, a critical diameter can be set for the ribbon roll. If the diameter falls below this level, the following message appears: FOIL X JOBS The display flashes. SYSTEM PARAMETER > Foil end warning to the pre- ferred ribbon roll diameter in millimetres.
-
Page 30: Printing
TARTUP AND OPERATION Printing Creating print jobs There are two ways to create a print job: • Layout software + printer driver • Text file with Easy-Plug commands Layout software + Requirement: A printer driver must be installed on the PC. printer driver Layout software may include any type of software that has a print function (for example text processing). - Page 31 TARTUP AND OPERATION To send via serial interface (COM1): copy testjob.txt com1 . To send via USB or Ethernet interface: copy testjob.txt \\ComputerName\ShareName , where • ComputerName is the name of the computer (Windows XP: see START > SETTINGS >...
-
Page 32: Using Product Profiles (Dispenser)
TARTUP AND OPERATION Using product profiles (dispenser) What are product profiles? Product profiles are memory slots in which the complete setting of the dispenser unit can be saved. This makes it possible to adjust the dispenser to a given product quickly for recurring product orders. -
Page 33: Saving A Product Profile
TARTUP AND OPERATION Saving a product profile Selecting a memory Open function MACHINE SETUP > Store prod. prof.. slot Display if all memory slots are free: Store prod. prof. Prof 1 product 1 If memory slots are assigned, the memory slot that was last active is displayed: Store prod. -
Page 34: Deleting A Product Profile
TARTUP AND OPERATION Deleting a product profile MACHINE SETUP > Del prod. profil. 1. Open function The last memory slot that was active is displayed. 2. Press the keys until the required memory slot (1-16) is reached. 3. Press the key to delete the memory slot: Screen: Del.
Need help?
Do you have a question about the ALX 73 Series and is the answer not in the manual?
Questions and answers