Table of Contents
Advertisement
Quick Links
Advertisement
Table of Contents

Subscribe to Our Youtube Channel
Related Manuals for Novexx Solutions LA-BO


Summary of Contents for Novexx Solutions LA-BO
- Page 1 OPERATING MANUAL LA-BO Applicator Release 1 - 2/2016...
-
Page 2: Table Of Contents
Adjusting the dispensing edge to the vacuum grid Parameter settings on the ALS 20x/256 Adjusting the labelling application height Adjusting the LA-BO to the used label material Adjusting the sliding bars in the vacuum grid Adjusting the air nozzles in the vacuum grid... - Page 3 LA-BO Operating Manual 02/2016 Content...
-
Page 4: General Notes & Safety Instructions -5
Validity and binding effect of this manual Contents The present manual refers exclusively to the LA-BO applicator. It is written for the purpose of en- suring professional usage and calibration of the unit. Prerequisites for the use and adjustment are the professional installation and configuration of the unit. - Page 5 Always follow the instructions. Figures Texts are accompanied by figures where necessary. Generally, the LA-BO unit shown is a right-handed version. The left-handed version is only shown where it is necessary to differentiate between the two. 02/2016 | 00 General Notes & Safety Instructions...
-
Page 6: Safety Instructions -7
Information and qualifications Follow the instructions WARNING! Safe and efficient operation of the LA-BO unit can only be guaranteed if you observe all neces- sary information. Product liability and warranty claims can only be asserted if the unit was operated in accordance with the directions in the manual. -
Page 7: Operational Safety Of The Unit -8
Operational safety of the unit Proper usage Applicators of type LA-BO are additional units for NOVEXX Solutions print & apply systems or la- bellers. The applicators take self-adhesive labels from the dispenser mechanism and stick these onto moving or non-moving products. The company operating the unit must install it with suitable equipment to protect operating personnel from danger;... - Page 8 LA-BO Operating Manual WARNING! There is a low risk that you may get your hands crushed between the vacuum grid of the LA-BO and the conveyed products! Never reach between the product and the LA-BO edge while the unit is in operation or ready for operation.
-
Page 9: Technical Data
AI or internal ALS 204/206/256 RH A8678 [Tab. 1] Print-and-Apply and labelling machines, to which the LA-BO can be applied (LH = lefthand, RH = righthand, AI = Applicator Interface). Use of the AI is mandatory for ALX. The Applicator Interface (AI) is not contained in the scope of delivery and has to be ordered separately with the ALX or ALS unit. -
Page 10: Properties -11
Mode of Operation The fan in the LA-BO is continuously powered, creating a strong inwards airflow through the alu- minium vacuum grid at the bottom side. While a label is dispensed, the small blow pipe is activated, creating a small focused air stream to force the label against the aluminium grid. -
Page 11: Specifications -12
24 V DC (from ALX or ALS) Noise level 82 dB(A) during blow cycle [Tab. 2] Technical specifications of the LA-BO. Depending on label size. Depending on label size and time necessary for trailing edge of label to be released from backing paper. -
Page 12: Mounting & Setting -13
When setting the applicator: make sure that the applicator cannot be triggered unintentionally. • When mounting, dismounting or servicing the LA-BO, make sure the labelling head ALX 92x or ALS 20x/256 and the air pressure are switched off! • The operating air pressure must be at least 5 bars and no more than 6 bars. -
Page 13: Mounting On An Alx 92X -14
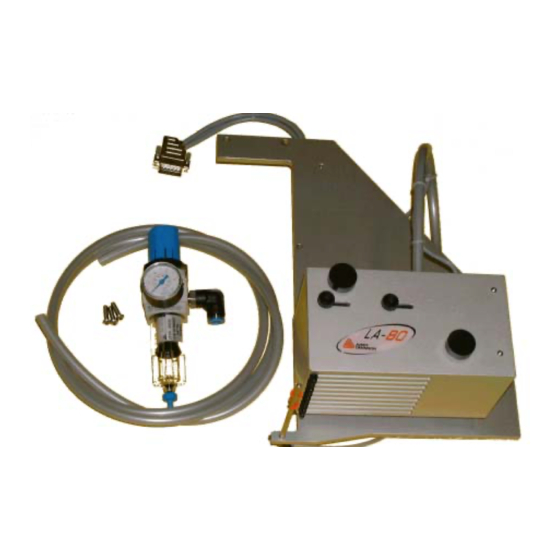
Bolt Set (3x screw ISO7380 M5x20) included Filter regulator included [Tab. 3] These parts are required to mount the LA-BO on an ALX 92x. [1] LA-BO for ALX 92x. Required tools • Allen key 3 mm • Small size screwdriver ... -
Page 14: Fitting The Applicator -15
2. Bolt the base plate of the applicator onto the base plate of the ALX 92x (3x M5x20). 3. Plug the cable of the LA-BO into the D-sub connector of the ALX 92x on the top side of the print- er unit. -
Page 15: Adjusting The Dispensing Edge To The Vacuum Grid -16
LA-BO Operating Manual 4. Connect the applicator to the compressed air. Adjusting the dispensing edge to the vacuum grid After fitting the applicator, the position of the dispensing edge in relation to the vacuum grid of the applicator must be verified and adjusted if necessary. When viewed from the side, the bottom sur- face of the vacuum grid must be slightly below and in front of the dispensing edge (fig. -
Page 16: Parameter Settings On The Alx 92X -17
Applicator type After start sig. APPLICATOR PARA Application mode (preferred setting for maximum output capacity) Blow on time 60 ms [Tab. 4] The parameter settings required for operating the LA-BO applicator on an ALX 92x. 02/2016 | 00 Mounting & Setting... -
Page 17: Mounting On An Als 20X/256 -18
Basic Module LA-BO for ALS 206/256 A9825 (RH) Filter regulator included [Tab. 5] These parts are required to mount the LA-BO on an ALS 20x/256. When mounting LA-BO to ALS 206/256, an additional spacer block (A9090) for the L-shape fixture has to be ordered. -
Page 18: Fitting The Applicator -19
M8 bolt (2). Remove the black bracket from the dispenser rods by releasing the 2 M5 bolts (3) at the bottom side. 2. Slide the aluminium bracket of the LA-BO over the 2 dispenser arm rods (1) and tighten the screws (2). - Page 19 LA-BO Operating Manual 4. Plug the cable of the LA-BO into the high density D-sub connector in the AI-board at the back side of the ALS 20x/256 or into the D-Sub 15 connector when using Internal Applicator Interface (adapter connector A9103 necessary). Install the included filter regulator somewhere close by the LA-BO, e.g.
-
Page 20: Adjusting The Dispensing Edge To The Vacuum Grid -21
As a guideline, the vacuum grid surface should be positioned approximately 1 mm below the center of the dispensing edge. To adjust: Loosen the fixing screws of the applicator’s bracket, adjust the height of the LA-BO to the dispensing edge and retighten the screws. -
Page 21: Parameter Settings On The Als 20X/256 -22
APPLICATOR PARA Apply mode (preferred setting for maximum output capacity) Blow on time 60 ms [Tab. 6] The parameter settings required for operating the LA-BO applicator on an ALS 20x/256 (Labeller firmware version: 1.10). Firmware 1.33 (Standard signal interface) Menu Parameter Value 19.0 mm (also depending on distance of label sensor... - Page 22 APPLIC. SIGNALS (preferred setting for maximum output capacity) Blow on time 60 ms [Tab. 9] The parameter settings required for operating the LA-BO applicator on an ALS 20x/256 (Labeller firmware version: 1.34). Firmware 1.34 (Applicator interface) SIGNAL INTERFACE > AI BOARD SIGNAL...
- Page 23 Apply mode BOARD SIGNAL (preferred setting for maximum output capacity) Blow on time 60 ms [Tab. 12] The parameter settings required for operating the LA-BO applicator on an ALS 20x/256 (Labeller firmware version: 2.52). 02/2016 | 00 Mounting & Setting...
-
Page 24: Adjusting The Labelling Application Height -25
In general, to obtain a good apply accuracy of the label on the product, it is recommended to adjust the LA-BO as close as possible to the product surface. Obviously a safe distance has to be respect- ed so the conveyed products can not come in contact with the parts of the LA-BO, especially the blow pipe for air stream support. -
Page 25: Adjusting The La-Bo To The Used Label Material -26
LA-BO Operating Manual ADJUSTING THE LA-BO TO THE USED LABEL MATERIAL The following adjustments have to be made every time the label format is changed on the ALX 92x or ALS 20x/256. Adjusting the sliding bars in the vacuum grid Because the blow-on applicator needs to create a strong air flow, evenly spread over the label sur- face, it is important to adjust the sliding bars of the vacuum grid. - Page 26 LA-BO Operating Manual [6] Adjusting the bars in the vacuum grid so air nozzles outside the label surface are closed off. In most applications with a blow-on applicator, it will be difficult to visually verify the position of the sliding bars from the bottom side of the vacuum grid. Therefore, the bars can also be adjusted by matching the section of the bars outside the vacuum grid to the label surface, as shown on [7].
-
Page 27: Adjusting The Air Nozzles In The Vacuum Grid -28
To achieve optimal labelling apply accuracy it is important to adjust the blow-off air flow in the center of the label under the vacuum grid. Therefore the air nozzles of the LA-BO can be fine adjusted in the X (width) and Y (length) direction in reference to the label area. -
Page 28: Adjusting The Air Stream Support -29
The air holes in the blow pipe should be directed to the vacuum grid. Setting the dispensing position parameter When using the LA-BO applicator the dispensing stop position should be set so that the label is just released when dispensed, i.e. so that it no longer adheres to the carrier material. -
Page 29: Compressed Air Settings -30
[11]. The valve has 2 electrical coils and therefore 3 positions. If both coils are not activated, the LA-BO is in a stand-by status and no air pressure is used. If the upper coil is activated, the valve switches the air flow to blow off the label from the vacuum grid. If the lower coil is activated, the valve switches the airflow to the blow pipe which functions as a support air-stream to guide the label against the vacuum grid during dispensing of the label. - Page 31 Novexx Solutions GmbH Ohmstraße 3 85386 Eching Germany +49-8165-925-0 www.novexx.com...
Need help?
Do you have a question about the LA-BO and is the answer not in the manual?
Questions and answers