Novexx Solutions ALX 73 Series User Manual
Print & apply system
Hide thumbs
Also See for ALX 73 Series:
- Service manual (54 pages) ,
- Operating manual (43 pages) ,
- User manual (34 pages)

Subscribe to Our Youtube Channel
Related Manuals for Novexx Solutions ALX 73 Series


Summary of Contents for Novexx Solutions ALX 73 Series
- Page 1 USER MANUAL ALX 73x Print & Apply System Edition 9 - 10/2020 - A103131 - Translation of original version...
-
Page 2: Table Of Contents
ALX 73x User Manual Content Please note General notes Validity of this manual and required compliance How information is represented For your safety Intended use Information and qualification Operating safety of the machine Every time before starting production Warning notes on the machine Technical Data Entire unit Dimensions... - Page 3 ALX 73x User Manual Adjustable dispensing edge holders Adjustable head joint Roll diameter sensor Cable kit for internal roll diameter monitoring Additional material guiding disc Capacitive label sensor Applicator interface Blow-on applicator LA-BO Tamp-on applicator LA-TO Double deflection roller Signal beacon Splice table Operating modes of the dispenser Overview...
- Page 4 ALX 73x User Manual Inserting/replacing ribbon Inserting ribbon Changing ribbon Mechanical settings Adjusting the core diameter of the unwinder Positioning the pressure roller Position the label sensor on the dispensing edge Position the label sensor in the printer Setting the ribbon tension Setting the printhead pressure Setting the return force of the unwinder dancer lever Setting the return force of the linear dancer lever...
- Page 5 ALX 73x User Manual Cleaning -116 Cleaning instructions -116 Safety -116 Cleaning agents -116 Cleaning interval -116 General cleaning -117 Printhead -118 General notes -118 Cleaning the printhead -119 Replacing printheads -121 Testing the printhead -122 Rubber rollers -123 Feed rollers/print roller -123 Pressure roller -124...
-
Page 6: Please Note -6
• Dispenser: 2.76 • Printer: 6.75 SR2 Liability Novexx Solutions reserves the right: • to make changes in design, parts and software and to use equivalent parts instead of those specified for the purpose of technological progress. • to change information in this manual. - Page 7 ALX 73x User Manual Copyright Novexx Solutions retains all rights to this manual and its appendices. Reproduction, reprint or any other type of duplication, including parts of the manual, are permitted only with written approval. Printed in Germany Manufacturer Novexx Solutions GmbH...
- Page 8 ALX 73x User Manual Normally the machine is shown as the right version. The left version is only shown if there is a need to make a distinction. Key symbols Keys in the dispenser control panel are represented as symbols. If multiple keys must be pressed simultaneously, the symbols are joined in the text by "+": Keys in the printer control panel are represented as text, for example "Press the ONLINE key".
-
Page 9: For Your Safety -9
Any other type of or more extensive application will be considered non-intended use. NOVEXX Solutions shall assume no liability for damage resulting from non-intended use of the ma- chine. - Page 10 ALX 73x User Manual Tasks System integrator Operator Service technician Mount the machine Connect Make settings Switch on/off Insert/change material/ribbon Application-related settings Rectify minor operating faults Clean the machine Rectify major operating faults Settings to the electronics/ mechanics Repairs Manual: Service manual, Service manual, Operating Manual...
-
Page 11: Operating Safety Of The Machine -11
ALX 73x User Manual Operating safety of the machine Intended use The machine must only be used in accordance with the specifications in section Intended use auf Seite 9. Warning of injuries due to electrical shock WARNING! This unit operates at mains voltage! Contacting electrically live components can cause lethal electrical shocks and burns. - Page 12 ALX 73x User Manual Warning of injury hazards from mechanical components WARNING! Danger of injury due to moving and rapidly rotating parts! Maintain a safety clearance from the machine when it is in operation. Never reach into a machine that is running. ...
-
Page 13: Every Time Before Starting Production -13
ALX 73x User Manual Every time before starting production Due diligence of the operator and service personnel Ensure that the following requirements are met in accordance with details specified in the ser- vice manual: • The machine must be set up and configured to meet applicable requirements. •... - Page 14 ALX 73x User Manual [2] Warning note on the ALX 92x Warning note Meaning Article no. The ´Pinch point´ warning note warns you of the danger posed by the machine´s rotating A5346 parts; they can trap items and draw them in. The "Hot surface"...
-
Page 15: Technical Data
ALX 73x User Manual Technical Data ENTIRE UNIT Dimensions Dimensions The amount of space required by the machine depends on which configuration is used (see instal- lation instructions in the Service manual). • ALX 734/5: 1054 x 905 x 470 mm (H x W x D) •... -
Page 16: Connection, Unit Data -16
ALX 73x User Manual Connection, unit data Property Value Protection rating „I“ Mains voltage 100-240 V (AC) Mains frequency 60/50 Hz Power consumption Max. 750 W Power input 5.5 -3.0 A Label material Material types Self-adhesive, punched labels on carrier material. Thermal direct material, thermal transfer material, plastic ribbon: PE, PP, PVC, PA in rolls. -
Page 17: Ambient Conditions -17
ALX 73x User Manual Label roll • Winding direction: Labels facing inward or outward • Unwinder outside Ø: max. 300/400 mm (depending on the unwinder size) • Rewinder outside Ø: max. 300 mm • Core inside Ø: 38.1 / 76.2 / 101.6 mm (1.5 / 3 / 4") Ambient conditions Property Value... -
Page 18: Print Module -18
ALX 73x User Manual PRINT MODULE Performance data Printhead • Printing technology: Thermal direct or thermal transfer printing • Printhead type: "Corner Edge" • Printhead variables: Resolution Resolution Max. print width Printer (dots/mm) (dpi) (mm) ALX 734 ALX 735 12.0 ALX 736 [Tab. - Page 19 ALX 73x User Manual Max. print length The maximum print length depends on the following factors: • Printer type • Printer resolution • Firmware version • Parameter settings for memory configuration (for example SYSTEM PARAMETER > Free store size) Impression accuracy •...
- Page 20 ALX 73x User Manual Code pages • DOS 437 • DOS 850 • ANSI 1250 • ANSI 1252 • UTF 8 • Legacy code page (7 bits) Character modification • Scaling in x/y direction up to a factor 16 • Rotation by 0, 90, 180, 270 degrees Graphic formats BMP, PCX, JPG, TIF, GIF, Easy-Plug logos Barcodes...
-
Page 21: Thermal Transfer Ribbon -21
ALX 73x User Manual GS1 Databar & CC Barcodes Reduced Space Symbology (GS1 Databar) and Composite Component (CC) Barcodes: GS1 Databar-14 UPC-A + CC-A/CC-B GS1 Databar-14 truncated UPC-E + CC-A/CC-B GS1 Databar-14 stacked EAN 13 + CC-A/CC-B GS1 Databar-14 stacked omnidirectional EAN 8 + CC-A/CC-B GS1 Databar limited UCC/EAN 128 + CC-A/CC-B... -
Page 22: Automatic Ribbon Economy -22
ALX 73x User Manual Automatic ribbon economy In regular print mode, ribbon is fed simultaneously with the labelling material. The automatic ribbon economy (= „ribbon saving“) stops the feeding of the ribbon if there are label areas of a certain size without imprinting. - Page 23 ALX 73x User Manual Print speed Minimum length of Consumed ribbon per in mm/s (Inch/s) unprinted area in mm saving action in mm 330 (13) 34.5 21.2 356 (14) 39.9 24.2 381 (15) 45.6 27.3 406 (16) 51.3 30.5 [Tab. 7] The amount (length) of consumed ribbon per saving action (lifting and lowering of the print head) increases with the print speed.
-
Page 24: Interfaces -24
ALX 73x User Manual Interfaces Interface Std. Opt. Details RS-232 Baud rate: 1200-115200, 8 bits; suitable connection cable: 1:1 Sub-D9 extension cable (plug/socket) RS-232 Optional (I/O board): Baud rate: 1200-115200, 8 bit; (additional) Sub-D 9 RS-422/485 Optional (I/O board): Sub-D15, baud rate: 1200- 115200, 8 bits Ethernet 10/100 Base T with TCP/IP, LPD, RawIP printing,... -
Page 25: Dispensing Module -25
ALX 73x User Manual DISPENSING MODULE Variables • Dispensing speed: Up to 50 m/min • Label stop accuracy on the dispensing plate – At a constant dispensing speed: ± 0.5 mm – At a variable dispensing speed (range of 5-50 m/min): ±1.0 mm •... -
Page 26: Electronic Equipment -26
ALX 73x User Manual External sensors Interface Details Label sensor Transmission sensor; NPN/PNP (switchable), 24 V Product sensor NPN/PNP, 24 V Loop sensor APSF sensor (rotary en- One/two-phase , PNP/P-P, 24 V, max. 20 kHz coder) Material reserve sensor PNP, 24 V [Tab. -
Page 27: Product Description
ALX 73x User Manual Product description OVERVIEW Designs of the ALX 73x ALX 734/735 The ALX 73x is available in versions ALX 734, ALX 735 and ALX 736, which differ in the width of the printhead: • ALX 734: 4" print width (106 mm) •... -
Page 28: Configurations Of The Alx 73X -28
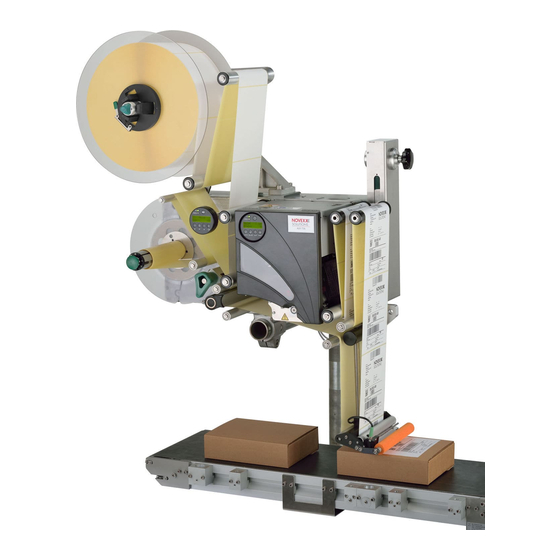
ALX 73x User Manual Configurations of the ALX 73x The ALX 73x can be adjusted in many ways to meet customer requirements: Feature Adjustment Direction in which products move Selection of design: LH / RH Horizontal / vertical (for labelling from above or Assembly position of the machine from the side) Machine fastening... - Page 29 ALX 73x User Manual [8] Left: Functional elements of the ALX 73x. Right: Flow of material. A Unwinder B Dispenser (LMA) C Printer (PMA) D Dancer unit (DU) E Dispensing edge holder F Dispensing edge (optional) Sequence of print dispensing: •...
-
Page 30: Operating Components -30
ALX 73x User Manual Operating components [9] Operating components of the ALX 73x RH. A Unwinder The unwinding mandrel receives the material roll. B Dancer lever Holds the label material evenly under tension. Brakes the rotation of the material roll if the ma- terial tension drops. - Page 31 ALX 73x User Manual G Unlocking button Pressing the button reduces the diameter of the rewinding core. This makes it possible to re- move wound carrier material easily. H Dispenser control panel (dispensing module "LMA") To enter commands on the dispensing section of the machine and display operating states and error messages.
- Page 32 ALX 73x User Manual [10] Operating components of the printer in a ALX 73x RH. A Printer control panel (print module „PMA“) To enter commands on the printing section of the machine and display operating states and error messages. B Front cover Held open by gas pressure spring.
-
Page 33: Control Panels -33
ALX 73x User Manual Control panels Control panel language Different languages are available for texts that appear on screen. Instructions for selecting the lan- guage: • Dispenser: see Setting parameters auf Seite 47. • Printer: see Setting parameters auf Seite 54. - Page 34 ALX 73x User Manual Dispenser control panel [12] Dispenser control panel. A Operating LED Lights up green when the dispenser is turned on. B Error LED Lights up red when an error has occurred. C Screen Display of operating states, parameters, setting values and error messages. The displays de- pend on the operating state of the dispenser.
-
Page 35: Connections -35
ALX 73x User Manual Connections WARNING! Danger of electrocution. Only connect the printer to devices that fulfil the SELV (safety extra-low voltage) circuit requi- rements in accordance with EN 60950. CAUTION! Danger of damage to the machine due to faulty accessories. ... - Page 36 ALX 73x User Manual Position sensor of the linear dancer lever M OD sensor for external OD monitoring (see Roll diameter sensor on page 39) N (Dispenser) signal inputs (connection only to ALX 73x in the "complete") design; used to ex- change signals with other machines or control an applicator O (Dispenser) signal outputs (connection only to ALX 73x in the "complete") design P OD sensor 1 (for internal OD monitoring on dispenser 1, see...
-
Page 37: Options -37
ALX 73x User Manual OPTIONS External control panels In addition to the permanently installed control panel, external control panels can also be connected. External control panels are advantageous if the in- stalled control panels are difficult to access due to the installation position of the machine. -
Page 38: Pneumatic Dispensing Edge -38
ALX 73x User Manual Pneumatic dispensing edge The dispensing edge can be rotated in the dispensing head. Compressed air presses the dispensing edge onto the surface of the product. This makes it possible to compensate for differences in height between products or on the surface of the product. - Page 39 ALX 73x User Manual Adjustable head joint Using the adjustable head joint [21A], just one person can tilt the label dispenser ±4° for fine dosing. [21] Adjustable head joint (A) Roll diameter sensor The roll diameter sensor (OD sensor) [22A] generates a warning if a specific, adjustable Outer Diameter of the roll is exceeded.
- Page 40 ALX 73x User Manual Additional material guiding disc The additional material guiding disc [24A] improves side guiding of the material roll. This option is especially recommended for processing very narrow label materi- al (< 30 mm in width). [24] Additional material guiding disc (A) Capacitive label sensor Optional sensor, required for processing transparent la- bels [25A].
- Page 41 ALX 73x User Manual Blow-on applicator LA-BO The LA-BO applies labels to products without touching them. It suits especially well for labelling delicate prod- ucts like fruits or vegetables. [27] Applicator LA-BO. Tamp-on applicator LA-TO The LA-TO presses labels onto products by means of a movable pressure plate, which is driven pneumatical- ly.
- Page 42 ALX 73x User Manual Signal beacon The signal beacon signals error (red), warning (yellow) or ready (green) status. Ready to use connection ca- bles for different interfaces are also available.. [30] Signal beacon. Splice table With the splice table option, the end of the preceding material roll can be taped to the beginning of the new roll.
- Page 43 ALX 73x User Manual OPERATING MODES OF THE DISPENSER Overview Operating modes of the dispenser: • Online mode – dispensing mode – Active operating mode after switching on – Label counter screen or – Display/setting of dispensing speed and start delay •...
- Page 44 ALX 73x User Manual Online mode STATUS Online Labels – – [33] Dispenser control panel in online mode (292 labels dispensed) A Meaning of keys in online mode Activate online mode Normally activated automatically after switching on. Activate from offline mode: ...
- Page 45 ALX 73x User Manual Continue label output: 1. (applicator mode) remove label from applicator. 2. Press the key. Online settings STATUS Online Labels – – [34] Dispenser control panel in the online settings mode. A Dispensing speed display (here: 12,2 m/min constant) B Dispense label key C Start delay display (here: 0 mm) D Meaning of keys for online settings...
- Page 46 ALX 73x User Manual Changing the counter state Set the counter state with MACHINE SETUP > Dispense counter. Count labels backwards To count dispensed labels backwards from a starting value to zero: LABEL SETUP > Stop count. mode 1. Set to "On“.
- Page 47 ALX 73x User Manual STATUS OFFLINE LABEL SETUP – – MACHINE SETUP INTERFACE PARA [35] Menu selection and key functions in the parameter menu. A Meaning of keys in offline mode B Menus Setting parameters MACHINE SETUP MACHINE SETUP Language Dispenser type English Language...
- Page 48 ALX 73x User Manual Each menu contains parameters that can be used to make settings on the machine control unit. Fig. [36] shows the MACHINE SETUP > Sprache parameter as an example of the key functions for changing settings. Start dispensing cycle ...
- Page 49 ALX 73x User Manual PRINTER OPERATING MODES Overview • Online mode – Print jobs are received and processed immediately – Active operating mode after switching on – Print contrast setting • Offline mode – Print jobs are received but are not processed –...
- Page 50 ALX 73x User Manual Online mode ERROR ONLINE 0: JOBS APPLY ONLINE FEED PROG [38] Printer control panel at the ALX 73x in online mode. A Interpreter activity B Data transfer Activate online mode Activate from offline mode: Press the ONLINE key. Screen: ONLINE 0 JOBS...
- Page 51 ALX 73x User Manual Screen showing the progress of printing Screen during printing: • Number of received print jobs (13) • Number of remaining labels to be printed in the current job (25) ONLINE 13 JOBS Restcount: 25 ONLINE 13 JOBS Restcount: Endless ...
- Page 52 ALX 73x User Manual Offline mode Activate offline mode Normally activated automatically after switching on. To activate from online mode (when the print job is stopped): Press the ONLINE key. OFFLINE 0 JOBS (There are no pending print jobs for processing). OFFLINE X JOBS Stopped : yy...
- Page 53 ALX 73x User Manual Opening the parameter menu In the parameter menu the user has access to a number of menus in which various parameters can be called in a defined order. The dispenser can be set so that some menus and/or parameters are not visible. Figure [39] shows the key functions for switching between different menus and for exiting the pa- rameter menu.
- Page 54 ALX 73x User Manual Setting parameters SYSTEM PARAMETER SYSTEM PARAMETER Speed unit Language English SYSTEM PARAMETER Language Language German SYSTEM PARAMETER Sprache [40] Key function when setting the SYSTEM PARAMETER > Language parameter. A Key for "Accept change" B Key for "Reject change" Each menu contains parameters that can be used to make settings on the machine control unit.
- Page 55 ALX 73x User Manual Standalone mode In standalone mode, print jobs are not transferred via data cable but are instead stored on a mem- ory card. You can access them there from the printer control panel or using a connected keyboard. Activate standalone mode 1.
- Page 56 ALX 73x User Manual DISPENSER PARAMETER MENU Overview of parameter menu LABEL SETUP MACHINE SETUP (continued) INTERFACE PARA (continued) Load prod.profil Dispenser type Label sens. type >EASYPLUGINTERPR MAC Address Gap detect. mode Store prod.prof. Startsen. In.Type Interface DHCP host name Dispense speed Del.
- Page 57 ALX 73x User Manual SIGNAL INTERFACE (continued) SERVICE/DIAGNOS. SERVICE DATA (continued) Interface mode Apply comp. time Service >MODULE FW VERS. Production date >PLC SIGNALS Status signals Serv. data reset System version PCB part number End dispense mod Touch down sens. Sensor Test System revision Board part numb.
- Page 58 ALX 73x User Manual Information about the parameter description • The setting range or the individual settings of a parameter are shown in square brackets. • For parameters with individual setting values, the preset value is shown in italic type. Tips for data entry in the parameter menu Line overflow If the displayed text is longer than the length of the line in the display:...
- Page 59 ALX 73x User Manual Dispense speed Speed at which the label is dispensed. Setting range: [5.0…50.0] m/min; default: 10,0 Slew speed Feed speed at which the label material is driven if missing-label-gaps occur and during the auto- matic measuring of the label length. Setting range: [5.0…50.0] m/min;...
- Page 60 ALX 73x User Manual Label 2 offset Only appears, if LABEL SETUP > Multi label mode = „x labels/start“. LABEL SETUP > Multi label Defines the distance of the 2nd label and of all following labels, if x > 3 (see mode).
- Page 61 ALX 73x User Manual Turn-on mode Operating mode the machine is in after it is turned on Settings: [Online, Offline, Standalone] • Online: dispensing mode • Offline: setting mode • Standalone: operation in standalone mode. Required to load firmware or configurations from CF card.
- Page 62 ALX 73x User Manual Rewinder full Defines the maximum permissible diameter of the wound backing paper on the backing paper re- winder. If the diameter is exceeded, the following message appears: Status num: 5145 Rewinder full Setting range: [50…500]; default: 270 mm 08/2017 | 00 Product description...
- Page 63 ALX 73x User Manual PRINTER PARAMETER MENU Overview of parameter menu PRINT INFO PRINT PARAMETERS INTERFACE PARA SYSTEM PARAMETER (DP INTERFACE) … Print speed … … … Feed speed Label sens. type Materialtype … Materiallength Ribbon autoecon. Materialwidth Ribb. eco. limit Print direction …...
- Page 64 ALX 73x User Manual PRINT PARAMETERS menu Print speed Print speed The print speed (material feed) can be adapted to the combination of ribbon and material in use to optimise the contrast intensity and the degree of blackening of the print image. Setting range: [2…16] inch/s;...
- Page 65 ALX 73x User Manual Print direction [41] Alignment of the print image "Foot first" (A) or "Head first" (B). Settings: [„Foot first“, „Head first“] • "Foot first": Alignment of the print image as shown in [41A]. • "Head first": Alignment of the print image as shown in [41B]. Note the following: ...
- Page 66 ALX 73x User Manual SYSTEM PARAMETER menu Label sens. type Sensor type Select the sensor type or the type of mark for beginning of the label (reflex marking or punch). Settings: ["Reflex", "Punched"] • Reflex: Reflex sensor (detects reflex markings) •...
- Page 67 ALX 73x User Manual SPECIAL FUNCTION menu Delete Job Deletes the active print job. When the online key is pressed, the printer interrupts processing of the active print job. Delete Job Clearing ... Delete Spooler Deletes the print job wait queue (spooler). When the online key is pressed, all print jobs in the print spooler are deleted.
- Page 68 ALX 73x User Manual SERVICE FUNCTIONS menu Head dot test Checks the printhead for faulty dots. The check ends with a status report [42] containing a list of faulty dots. This printout is generated even if no faulty dots were found. CAUTION! Danger of damage to the printhead.
- Page 69 ALX 73x User Manual Startup & Operation ELECTRICAL CONNECTIONS WARNING! This unit operates at mains voltage! Contacting electrically live components can cause lethal electrical shocks and burns. The machine must only be connected to the mains power supply by an authorised specialist. This person must be acquainted with the associated dangers.
- Page 70 ALX 73x User Manual Connecting to a data host According to the factory settings, the ALX 73x is set for data transfer via USB interface. Print data can also be transferred via serial interface or Ethernet interface. Alternatively to transmitting via data line, the printjobs can be stored on a memory card and be started from there, see Transferring a print job ...
- Page 71 ALX 73x User Manual Connecting sensors WARNING! This unit operates at mains voltage! Con- tacting electrically live components can cause lethal electrical shocks and burns. The machine must only be connected with other machines if they meet the re- quirements of a SELV circuit (Safety Ex- tra-Low Voltage circuit) in accordance with EN 60950.
- Page 72 ALX 73x User Manual INSERTING LABEL MATERIAL WARNING! Danger of injury due to moving and rapid- ly rotating parts! Before inserting the label roll ensure that the printer and dispenser are both in offline mode. Danger of injury caused by falling label roll.
- Page 73 ALX 73x User Manual Threading in the label web Threading diagrams The following illustrations show the flow of material through the ALX 73x in different installation positions and designs with right-hand and left-hand versions. [50] Flow of material with horizontal installation and one unwinder. [51] Flow of material with horizontal installation and two unwinders.
- Page 74 ALX 73x User Manual [52] Flow of material with vertical installation and one unwinder. [53] Flow of material with horizontal installation, one unwinder and double roller at the dancer lever. 08/2017 | 00 Startup & Operation...
- Page 75 ALX 73x User Manual [54] Flow of material with horizontal installation, one unwinder and V-shape dispensing edge. 08/2017 | 00 Startup & Operation...
- Page 76 ALX 73x User Manual Threading the label web into the printer 1. Open the printer cover [55]. Hold the cover on the bottom right [55A]. 2. Adjust the material guide to the width of the label web. To do this, release the thumb screw [56A] on the outer material guide [56B], push the material guide up to the edge of the label material and screw in the thumb screw again until it is tight.
- Page 77 ALX 73x User Manual Thread in the label web on the dispensing edge Fixed [58] and swivelling L-shape dispensing edges: 1. Guide the backing paper around the first deflection roller [58A] and through the slot in the sensor [58B]. 2. Guide the backing paper under the pressure roller [58C] to the dispensing plate [58D].
- Page 78 ALX 73x User Manual Thread in the label web on the drive roller 1. Open the pressure roller. To do this turn the lever [61A] clockwise. 2. Position the backing paper around the deflection roller [61B] and drive roller [61C]. 3.
- Page 79 ALX 73x User Manual Replacing a label roll Detecting end of roll To keep downtimes during production as short as pos- sible, the roll should be changed as quickly as possible. Threading the label material through the entire machine is relatively time consuming. Threading in can be avoid- ed by connecting the beginning of the new material roll to the end of the old material roll (= splicing).
- Page 80 ALX 73x User Manual INSERTING/REPLACING RIBBON WARNING! Rotating parts can entrap objects and body parts and draw them in! Never wear loose long hair, loose je- wellery, long sleeves or similar items when working with the machine. Always close the printer cover before printing.
- Page 81 ALX 73x User Manual Changing ribbon With roll diameter monitoring We recommend switching on roll diameter monitoring, see section Ribbon reserve on page 97. As soon as the critical diameter is reached, the mes- sage appears: FOIL X JOBS Follow these steps: 1.
- Page 82 ALX 73x User Manual Now the label that was not completely printed must be removed. As soon as the label that was not completely printed is at the front of the buffer loop [70A]: 1. Press the ENTER key. The printer prints the current label completely and then stops.
- Page 83 ALX 73x User Manual MECHANICAL SETTINGS Adjusting the core diameter of the unwinder Tools: 3 mm hexagonal (Allen) key wrench The unwinder can be adapted to the internal diameter of the label rolls using core adapters [71A]. Depending on this diameter, various adapters will have to be in- stalled or removed: 38.1 mm (1") core: ...
- Page 84 ALX 73x User Manual Position the label sensor on the dispensing edge 1. Loosen the thumb screw. 2. Push the sensor into place on the axis so that it can detect the gaps between labels. LED [74A] is lit when the sensor is standing over a label.
- Page 85 ALX 73x User Manual Setting the ribbon tension For optimum printing results, the ribbon must run with- out creases. This can be achieved by correctly setting the torque on the rewinding mandrel and the braking torque on the unwinding mandrel. The factory settings cover a wide range of different rib- bon widths.
- Page 86 ALX 73x User Manual Setting the printhead pressure CAUTION! Shortened service life of printhead. Always set the weakest printhead pressure that will produce acceptable printing results. Different material widths and thicknesses affect the contact pressure of the printhead on the print roller. The contact pressure can be set with an adjusting knob [78A] in 3 stages: •...
- Page 87 ALX 73x User Manual Setting the return force of the unwinder dancer lever The dancer lever on the unwinder is set so that a wide range of label materials can be processed without hav- ing to change the setting of the dancer lever return force.
- Page 88 ALX 73x User Manual Setting the return force of the linear dancer lever The linear dancer lever is set so that a wide range of la- bel materials can be processed without having to change the setting of the dancer lever return force. Adjusting the return force: 1.
- Page 89 ALX 73x User Manual SWITCHING THE UNIT ON AND OFF Switching the machine on/off Switching on the unit Move the mains power switch [84A] of the machine to "I" (On). The machine starts up. Then the dispenser and printer are both in online mode.
- Page 90 ALX 73x User Manual SETTING AND MONITORING THE DISPENSER Settings in parameter menu Label pitch Switch to offline mode To measure label pitch automatically: Works only up to max. 120 mm label pitch Press and hold the key (for longer than 2 sec- onds).
- Page 91 ALX 73x User Manual Label stop position CAUTION! Mind the following setting rules to avoid a strong decrease of dispensing accuracy: At maximum dispensing speed set Lab. stop offset to at least 10 mm! Don´t set Lab. stop offset to the same value as LABEL SETUP >...
- Page 92 ALX 73x User Manual Suppressing start signals The shape of the product or reflecting surfaces can cause a premature start signal, which will result in in- correct labelling. Start signals can therefore be ignored in cases such as these, while the product is being moved along under the dispensing edge.
- Page 93 ALX 73x User Manual Monitoring functions During labelling operation, the electronic control unit monitors the following functions: Material end / roll diameter (OD = outer roll diameter, PMA = printer, LMA = dis- penser) To facilitate quick and smooth changing of the material roll, the machine can send an alarm to operating per- sonnel in advance before the end of the material roll.
- Page 94 ALX 73x User Manual Additional (errror) message, if no rotation of the ma- terial roll has been registered during at least 600 mm of material feeding (MACHINE SETUP > Mate- rialend err is activated): Status num: 5072 Material end unw •...
- Page 95 ALX 73x User Manual Missing labels Normally a missing label on the label web does not in- terfere with labelling operation. Label feed continues running until the start of a label has moved up under the label sensor again. It may be necessary in some cases, however, to report LABEL SETUP >...
- Page 96 ALX 73x User Manual SETTING AND MONITORING THE PRINTER Settings in parameter menu The settings described below are generally included in the print job, in which case they do not need to be made. Manual settings that were made before a print job was transferred will be over- written by the settings in the print job.
- Page 97 ALX 73x User Manual Print process Direct thermal: SYSTEM PARAMETER > Ribbon autoecon. = „Thermal printing“. Thermal transfer: SYSTEM PARAMETER > Ribbon autoecon. = „Disabled“. Reducing use of the printhead Use of the printhead can be reduced in the thermal direct print process by raising it for extended sections with no printing.
- Page 98 ALX 73x User Manual PRINTING Creating print jobs There are two ways to create a print job: • Layout software + printer driver • Text file with Easy-Plug commands Layout software + printer driver Requirement: A printer driver must be installed on the PC. Layout software may include any type of software that has a print function (for example text pro- cessing).
- Page 99 ALX 73x User Manual Sending a command file directly: To open a Windows command line: START > PROGRAM FILES > ACCESSORIES > PROMPT. To send via serial interface (COM1): copy testjob.txt com1 . To send via USB or Ethernet interface: ...
- Page 100 ALX 73x User Manual USING PRODUCT PROFILES (DISPENSER) What are product profiles? Product profiles are memory slots in which the complete setting of the dispenser unit can be saved. This makes it possible to adjust the dispenser to a given product quickly for recurring product or- ders.
- Page 101 ALX 73x User Manual Saving a product profile Selecting a memory slot MACHINE SETUP > Store prod. prof.. Open function Display if all memory slots are free: Store prod. prof. Prof 1 product 1 If memory slots are assigned, the memory slot that was last active is displayed: Store prod.
- Page 102 ALX 73x User Manual Deleting a product profile 1. Open function MACHINE SETUP > Del prod. profil. The last memory slot that was active is displayed. 2. Press the keys until the required memory slot (1-16) is reached. 3. Press the key to delete the memory slot: Screen: Del.
- Page 103 ALX 73x User Manual Operating faults MATERIAL TEAR Status messages in case of material tear If the material ribbon tears, one of the following messages appears. Which message appears de- pends on which spot in the material ribbon is torn. •...
- Page 104 ALX 73x User Manual STATUS MESSAGES ON THE DISPENSER Error messages When an error occurs, the dispenser stops immediately and shows an error message on the control panel. Error messages are based on the following outline: Status num: 5144 Rewinder init 5144 = The status number.
- Page 105 ALX 73x User Manual Reset warnings A warning is displayed until… • the cause of the warning has disappeared • the warning has been reset Warnings can only be reset in online mode. If the warning occurs in online setting mode or stan- dalone mode, the user must switch to online mode before resetting the warning.
- Page 106 ALX 73x User Manual REFERENCE STATUS MESSAGES - DISPENSER List of warnings Productstartwarn New start signal during the dispensing cycle. The contour of the product is resulting in multiple start signals. LABEL SETUP > Product length. Activate Several missing labels on the label belt; unable to compensate for the gap. ...
- Page 107 ALX 73x User Manual Int. mod. synch Although communication between printer and dispenser has been interrupted, labels can cur- rently still be dispensed from the buffer loop. Check the connection line; see status message 5068 auf Seite 109. Module speed ...
- Page 108 ALX 73x User Manual Label type is not set correctly (MACHINE SETUP > Label sens. type). Check/change setting. (LABEL SETUP > Label pitch). The label length is not set correctly Check/change setting. Label sensor is dirty. ...
- Page 109 ALX 73x User Manual Material end 5002 Material end (if the internal OD sensor is connected and activated). Insert a new label roll. Internal OD sensor is not connected, but is activated. MACHINE SETUP > Materialend err ...
- Page 110 ALX 73x User Manual The connector cable between printer and dispenser is damaged or not connected. Check the connector cable between printer and dispenser and replace it, if necessary. LDU lower limit 5069 The linear dancer lever has reached the lower limit stop. ...
- Page 111 ALX 73x User Manual Example: tearing of the backing paper; the dancer lever moves back down by spring force. Rewinder stop 5143 The rewinder dancer lever is no longer able to move. Therefore the rewinder motor is switched to a powerless state. This can be selectively used to insert a new label roll because the rewinder can easily be turned when the motor is switched off.
- Page 112 ALX 73x User Manual Applicator is jammed Eliminate the obstruction Compressed air applicator: compressed air supply is interrupted or switched off Check the compressed air connection and if necessary connect it correctly Cable not correctly connected. ...
- Page 113 ALX 73x User Manual STATUS MESSAGES ON THE PRINTER Error messages When a fault occurs, the printer shows an error message on the control panel. Error messages are based on the following outline: PrintStatus: 5144 Rewinder init Depending on the cause of the error, "PrintStatus:" or "QueueStatus:" appears here. "PrintStatus:" = message from the printer controller;...
- Page 114 ALX 73x User Manual REFERENCE STATUS MESSAGES - PRINTER List of error messages No gap found 5001 The label sensor has not found a label starting mark (punch or reflex marking). Incorrect setting of the material type. Check to ensure the setting of PRINT PARAMETERS >...
- Page 115 ALX 73x User Manual In thermal transfer print: Ribbon roll is used up. Insert a new ribbon roll. The core of the ribbon roll is resting loosely on the dispenser. Use a ribbon roll with a suitable core diameter. ...
- Page 116 ALX 73x User Manual Cleaning CLEANING INSTRUCTIONS Safety WARNING! Dangerous situations may arise during maintenance and cleaning work. Accidents may occur due to mechanical or electrical effects if the relevant safety instructions are not observed! Switch off the device before cleaning or maintenance and pull out the mains power connec- ting line! Never allow liquid to get into the machine! ...
- Page 117 ALX 73x User Manual GENERAL CLEANING Dust particles are especially likely to accumulate in the area of the print mechanics. Remove dust particles with a soft brush or a vacuum cleaner. Clean the housing with a cloth and a standard com- mercial neutral cleaner.
- Page 118 ALX 73x User Manual PRINTHEAD General notes The thermal head [92A] and its holder [92C] are re- ferred to together as the printhead [91]. CAUTION! Danger of irreversible adjustment of the printhead position. Never loosen the screws [91A] on the printhead.
- Page 119 ALX 73x User Manual Cleaning the printhead WARNING! Burn hazard! The printhead can become hot during operation. Be careful whenever touching the printer. Paper dust and coloured particles from the thermal transfer ribbon may collect on the printhead during printing.
- Page 120 ALX 73x User Manual Cleaning with a cleaning stylus Run the stylus many times back and forth across the thermal strip [95A] of the printhead. [95] Clean the printhead with the cleaning stylus. A Thermal strip Using a cleaning strip ...
- Page 121 ALX 73x User Manual Replacing printheads The printhead can only be replaced as a complete unit as shown in [102A]. WARNING! Burn hazard! The printhead can become hot during operation. Be careful whenever touching the printer. 1. Switch off the machine. [98] Printhead in the ALX 736.
- Page 122 ALX 73x User Manual 8. The resistance of the new printhead can be entered using the SYSTEM PARAMETER > Head resistance rameter. The resistance is given on the printhead sticker [102 B]. CAUTION! Entering the wrong resistance can dama- ge the printhead! ...
- Page 123 ALX 73x User Manual RUBBER ROLLERS Feed rollers/print roller Printer: The feed roller [103A] and print roller [103B] can be cleaned from the bottom of the machine without any ad- ditional assembly work. The ribbon roller [103D] is free- ly accessible while the cover is open and the ribbon is removed.
- Page 124 ALX 73x User Manual Pressure roller WARNING! Burn hazard! The printhead can become hot during operation. Be careful whenever touching the printer. 1. Switch off the machine. 2. Remove the mains power connecting line. 3. Remove the material and ribbon. 4.
- Page 125 ALX 73x User Manual DEVIATOR ROLLERS Glue from the label material may adhere to the deviator rollers. Moisten a clean cloth with cleaning solvent and wipe off the dirty deviator rollers [107] with it. [107]Rubber rollers (dark grey) and deviator rollers (light grey) on the ALX 73x.
- Page 126 ALX 73x User Manual SENSORS Clean the sensors regularly to remove any material res- idue and dust. The cleaning intervals depend on the materials in use. Cleaning the punch sensor To access the punch sensor, first remove the guiding section: 1.
- Page 127 ALX 73x User Manual Cleaning the material end sensor The material end sensor [111A] is located inside the material guide. The sensor must be cleaned of material and dust residue regularly. The cleaning intervals de- pend on the material in use. ...
- Page 128 ALX 73x User Manual CLEANING THE RIBBON PATH All parts which come into contact with the ribbon [112] must be cleaned on a regular basis. The following min- imum distances apply: • Once per week • Every 5000 m of ribbon [112]Parts where ribbon residue gathers: A Ribbon roller B Deflector roller + stress relief...
- Page 129 ALX 73x User Manual REPLACING THE FILTER LINER CAUTION! A clogged dust filter can result in over- heating, thereby causing a machine failure. Replace the filter liner on the fan regularly. The replacement interval for the filter liner must be de- fined according to the specific circumstances.
- Page 130 ALX 73x User Manual EU Declarations EU DECLARATION OF CONFORMITY (Translation of original version) Novexx Solutions GmbH Ohmstraße 3 D-85386 Eching Germany hereby declare that we have designed and built the machine designated below so that it is in conformity with...
- Page 131 ALX 73x User Manual EU DECLARATION OF INCORPORATION (Translation of original version) Novexx Solutions GmbH Ohmstraße 3 D-85386 Eching Germany hereby declare that the partly completed machine designated below has been designed and built in such a way as to be in conformity with the safety and health protection requirements of directive 2006/42/EC, annex I, which are marked „fulfilled“...
- Page 132 ALX 73x User Manual APPENDIX REGARDING THE DECLARATION OF INCOR- PORATION List of the essential health and safety requirements applied and fulfilled for the product named in the declaration of incorporation, relating to the design and construction of machinery. Number Not appli- Designation Fulfilled...
- Page 133 ALX 73x User Manual Number Not appli- Designation Fulfilled Remark Annex I cable 1.5.4. Errors of fitting 1.5.5. Extreme temperatures 1.5.6. Fire 1.5.7. Explosion 1.5.8. Noise 1.5.9. Vibrations 1.5.10. Radiation 1.5.11. External radiation 1.5.12. Laser radiation 1.5.13. Emissions of hazardous materials and substances 1.5.14.
- Page 135 Novexx Solutions GmbH Ohmstraße 3 85386 Eching Germany +49-8165-925-0 www.novexx.com...
Need help?
Do you have a question about the ALX 73 Series and is the answer not in the manual?
Questions and answers