Current E-WAND Installation Manual And User's Manual
Hide thumbs
Also See for E-WAND:
- Installation manual and user's manual (56 pages) ,
- Setup manual (16 pages) ,
- Integration manual (11 pages)
Table of Contents
Advertisement
Quick Links
Advertisement
Table of Contents

Related Manuals for Current E-WAND


Summary of Contents for Current E-WAND
- Page 1 Installation Manual and User Guide...
-
Page 2: Table Of Contents
6. Programming E-Wand Vertical Slat Positions....22-25 Connect the E-Wand to a Zigbee Network Please be aware that the E-Wand may behave differently 7. Set Up the Current Products Corp. Bridge with the based on blind manufacturer, slat size, and tilt mechanism MyCurtains App................... -
Page 3: Package Contents And Parts Identifier
25. Operation of a Single E-Wand............VERTICAL BLIND 26. Controlling a Group of Blinds............EXTRA MOUNT ADHESIVE 27. Operation of a Single E-Wand Within a Group of Blinds. STRIPS VERTICAL BLIND 28. Light Sensor Automation............... REINFORCEMENT TAPE 29. Temperature Sensor Automation.......... -
Page 4: Meet Your E-Wand
For power, the E-Wand requires six (6) 1.5v Alkaline AA sized batteries (provided) which are easy to replace and will provide, in most cases, approximately a year between battery changes. SLATS NOTE: The E-Wand is not compatible with vertical blinds that use a rope or chain to open and close the slats. -
Page 5: Mounting & Programming The E-Wand
For further assistance during the installation and programming process, please view our online instructional videos at myewand.com/support, If your blinds use a wand to tilt the slats, proceed to Installing the E-Wand on 2. Converting a horizontal cord tilt blind email support@currentproductscorp.com, or... -
Page 6: Installing The E-Wand On Horizontal Blinds
If not, use a household cleaner to clean Locate the ADAPTER from the selection Before installing the E-Wand, make sure you are able to freely tilt your the header before installation. supplied which matches your rod shape... - Page 7 Perform a test fit of the HORIZONTAL 1. Detach Original Tilt Wand BLIND MOUNT by snapping the mount onto the E-Wand [Fig. 3.4]. Slide the Move the blind slats to the fully open position, then remove the manual twist mount up or down along the CONTROL wand from the horizontal blinds.
-
Page 8: Programming E-Wand Horizontal Slat Positions
E-Wand being able to move the slats. Limits are set to prevent any over- You must program the open and close limits on the E-Wand prior to the Based on E-Wand positioning [Fig. 3.6, torquing of your blinds. - Page 9 SAME direction [Fig. 4.6] as step 3 so the slats reach the FULL UP position. Be careful not to over tighten the slats. The E-Wand should beep once if it detects over-tightening. Press and hold the PROGRAMMING BUTTON. You will hear a TRIPLE BEEP (3) [Fig.
-
Page 10: Vertical Blinds Installation & Programming Guide
PROGRAMMING BUTTON until the slats begin to move [Fig. 4.9]. Before installing the E-Wand, make sure the slats are in the fully open The slats will automatically move DOWN position and that you are able to freely tilt your blinds in both directions and back to the FULL OPEN position to by turning the twist wand that originally came with your blinds. - Page 11 [Fig. 5.3]. Install the mount so the SENSOR SWITCHES will be facing the Figure 5.6; Reattach Vertical Slat inside of the room. Figure 5.3; Install Blind Mount You have now completed installing your E-Wand onto your vertical blinds.
-
Page 12: Programming E-Wand Vertical Slat Positions
6. PROGRAMMING E-WAND VERTICAL SLAT POSITIONS E-Wand being able to move the slats. Limits are set to prevent any over- You must program the open and close limits on the E-Wand prior to the torquing of your blinds. When programming the E-Wand, you will be listening for audible beeps to assist you through the programming steps. - Page 13 3 so the slats reach the FULL CLOSED You have now completed setting the open and closed limits on the RIGHT position. Be careful not to over E-Wand. You are now ready to add the E-Wand onto a Zigbee Network, if desired [Pg. 26]. tighten the slats.
-
Page 14: Connect The E-Wand To A Zigbee Network
7. Set up the Current Products Corp . bridge with the MyCurtains App If you would like to set up the E-Wand onto a mesh network using the CPC a zigbee network Bridge WITHOUT WiFi, please proceed to the next section (pg. 30). - Page 15 [Fig. 7.7]. On the next page hit the plus (+) icon at the top right [Fig. 7.4]. Beach House On any E-Wand you wish to pair to the Beach House Figure 7.7; Hit the + to add a device bridge (you can add more than one...
-
Page 16: Set Up The Current Products Corp. Bridge Without The Mycurtains App
3. Pair E-Wand 8. Set up the Current Products Corp . bridge On any unit that you would like to pair without the mycurtains app to the bridge, press and release the In some instances you may want to establish a Zigbee mesh network without programming button three times without using the app or WiFi, but still using the CPC Bridge. -
Page 17: Making Sense Of The Sensors
The LIGHT SENSOR will prevent the TEMPERATURE SENSOR from triggering an opening of your blinds at night to maintain your privacy. A movement of an E-Wand via the TWIST HANDLE, REMOTE, or APP will deactivate the automatic features for three (3) hours. -
Page 18: Optional Programming Of The E-Wand
A Twist Group allows you to group multiple E-Wands together so each will respond to the manual twist movement given to any other E-Wand you have placed in the group. Older, FM only E-Wands CAN be grouped to these Zigbee Hybrid E-Wands as long as the Zigbee E-Wand is the twist group Master. -
Page 19: Remove An E-Wand From A Twist Group
[Fig. 13.3]. Any E-Wands in In some instances, you may want to add an E-Wand to an existing Twist the group that have not had their slat 15. ADDING An E-Wand TO A TWIST GROUP Group. -
Page 20: Setting The Preferred Closed Position
Press and hold the PROGRAMMING BUTTON on the E-Wand until again until you hear a SINGLE BEEP (1). Another short tune will play, and you hear a QUADRUPLE BEEP (4). The E-Wand will now close to this set you will have successfully performed a master reset. -
Page 21: Batteries
Attach BATTERY CAP onto the end of the EXTENSION HANDLE. Screw tightly into place [Fig. 21.3]. Screw the BATTERY CAP back onto the end of the E-Wand securely. The E-Wand will play a short tune to confirm the batteries have been installed correctly. -
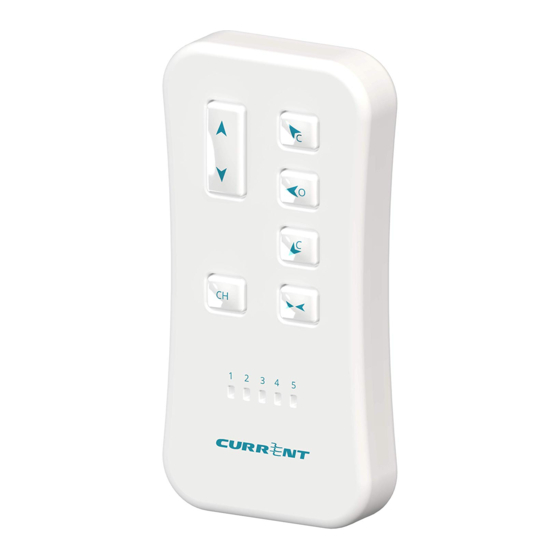
Page 22: Setting Up An Optional Remote Control
CHANNEL SELECTOR selected channel is indicated by the Channel LEDs. Pressing the CHANNEL Button once will display the current channel. Pressing it again will switch to the next channel. When all LEDs are lit, the remote is selected to broadcast on all channels. -
Page 23: Pairing A Remote Control To The E-Wand
23. Pairing a remote control to the E-Wand For further assistance pairing a remote to the E-Wand, please view our online Instructional Videos at www.myewand.com/support. 3. Pair the Remote Pairing an E-Wand to the remote can be performed before or after installation and programming. -
Page 24: Setting The E-Wand Favorite Position
Twist the E-Wand until the desired release. “favorite” position is reached [Fig. 24.1]. Figure 24.1; Twist Blinds to “favorite” Once a group is created, you can twist any E-Wand in the group and release 26. Controlling a Group of Blinds Position 2. Learn Favorite Position at the desired position. -
Page 25: Light Sensor Automation
30. LED Modes on CPC Bridge The E-Wand has an internal light sensor providing the capability to 28. Light Sensor Automation Flashing Blue Solid Blue automatically close your slats at night to provide full privacy in the room, and Join Mode Bluetooth Enabled open your slats in the morning to allow in natural light. -
Page 26: E-Wand Non-Programming Beeps
CAUTION Do not use the E-Wand for anything other than its intended use. Any usage of the parts of this kit outside of its intended purposes in not covered under the warranty. 3) Failure to pair to a Zigbee network. Retry pairing;... - Page 27 This transmitter must not be co-located or operating in conjunction with any other antenna or transmitter. Warning: Changes or modifications not expressly approved by Current Products Corp. could void the user’s authority to operate the equipment. Cet équipment est conforme aux limites d'exposition aux radiations dans un environment non controlé.
- Page 28 Current Products Corp. (the “Manufacturer”) hereby warrants to Customer that the THE MAXIMUM EXTENT PERMITTED BY APPLICABLE LAW, MANUFACTURER DISCLAIMS E-Wand™ (the “Product”) is and will remain for a period of one (1) year from the date ALL OTHER WARRANTIES WITH RESPECT TO THE PRODUCT, EXPRESS OR IMPLIED, of delivery to Customer, as evidenced by Customer’s proof of purchase (the “Warranty...
- Page 29 Current Products Corp. 1995 Hollywood Ave. Pensacola, FL 32505 www.currentproductscorp.com 844-307-7435...