Table of Contents
Advertisement
Quick Links
Advertisement
Table of Contents

Subscribe to Our Youtube Channel
Related Manuals for Elcometer Novo-Gloss 406


Summary of Contents for Elcometer Novo-Gloss 406
- Page 1 Elcometer 406 Novo-Gloss™ Mini Glossmeter Operating Instructions...
- Page 2 (electronic, mechanical, magnetic, optical, manual or otherwise) without the prior written permission of Elcometer Instruments Ltd. A copy of this Instruction Manual is available for download on our Website via www.elcometer.com/downloads Doc.No. TMA-0297 Issue 04...
-
Page 3: Table Of Contents
CONTENTS Section Page About your gauge ..............2 Getting started. -
Page 4: About Your Gauge
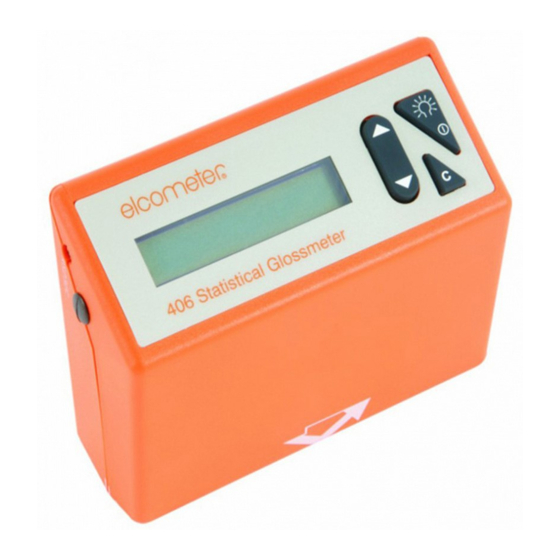
20/60° , optics. The gauge can perform statistical analysis of gloss readings stored in internal memory. The Elcometer 406 contains a light source, a light detector and a system of lenses. A converging beam of light illuminates the specimen at a set angle of incidence. The light detector is set at the same angle of incidence and measures a small aperture area of light reflected from the specimen. - Page 5 Automatic standard check, if required • Extended-life light source; over 10 years under normal operating conditions 1.2 Standards Your Elcometer 406 Novo-Gloss™ Mini Glossmeter can be used in accordance with the following National and International Standards: Figure 1. Elcometer 406 Novo-Gloss™ Mini •...
- Page 6 Consult your local Environmental Authority for further guidance. To maximise the benefits of your new Elcometer 406 please take some time to read these Operating Instructions. Do not hesitate to contact Elcometer or your Elcometer supplier if you have any...
-
Page 7: Getting Started
2 GETTING STARTED 2.1 FITTING BATTERIES The Elcometer 406 uses dry cell batteries only. Sealed alkaline batteries are recommended. 4 x LR6 (AA) alkaline batteries are supplied in the kit. To fit or replace the batteries: 1. Locate the two Posi-Drive screws which retain the battery compartment cover at the rear of the Glossmeter (Figure 3). - Page 8 1. Install and run Novo-Soft™ package. See “Novo-Soft™ software” on page 26. 2. Connect Elcometer 406 to PC and switch gauge on. See “Interfacing to your PC” on page 26. 3. Select required display language. See “Changing settings using Novo-Soft™” on page 28.
- Page 9 Figure 4. Elcometer 406 control panel Note: The Glossmeter is supplied with a protective film over the display. This film may be removed before first use. The Elcometer 406 is a menu-operated Glossmeter and it has three control keys (Figure 4).
- Page 10 This button has three functions: 1. Power: This key is used to switch the gauge on. It is not possible to manually switch off the Elcometer 406. The unit will automatically switch off (power down) approximately one minute after the last key press.
-
Page 11: Taking A Gloss Reading
3 TAKING A GLOSS READING 3.1 Check calibration Before first use the gauge must be calibrated (see “Calibration” on page 15). If the gauge has not been used for some time, it is advisable to check the calibration before taking readings: •... - Page 12 Figure 6. The display after measurement 3.4 Using the Move and Read feature The Elcometer 406 has a special feature to assess quickly large surfaces for gloss variation. 1. Press and hold the READ/SELECT key. The gauge will start to take a measurement.
-
Page 13: Deleting Data
3.5 Taking subsequent readings Repeat the procedure in section 3.3 or section 3.4 to take further measurements. Each time a measurement is taken the number of readings stored increases by one. If an erroneous reading is taken it can be deleted. See “Deleting data”... - Page 14 4.2 Deleting all readings 1. Press the SCROLL UP/DOWN key until the following message is displayed: Delete Sample 60° 94.2 10 2. Press the READ/SELECT key for more than 2 seconds, the gauge will prompt: Del All Results? Are You Sure? Press Read Key 3.
-
Page 15: Analysing Data
5 ANALYSING DATA 5.1 To enter Statistics Mode 1. Turn the gauge on and press the SCROLL UP/DOWN key. The gauge displays the measurement angle with the minimum (MIN) and maximum (MAX) values for the stored data. STATS MIN MAX 60°... - Page 16 Definition of terms used in statistics mode For this purpose the individual readings are defined as values x , --- x and x is any reading in the data set. • Statistical sample population, n: The current number of stored readings (STORE), on which the statistical calculations are based.
-
Page 17: Calibration
6 CALIBRATION 6.1 CERTIFIED CALIBRATION TILE Before taking readings it is necessary to adjust the calibration of the Glossmeter using the certified calibration tile. Foam Lid - Zero Gloss Value Gloss Standard Tile - High Gloss Value Figure 7. Certified calibration tile The calibration tile is supplied certified in a clean and defect-free condition. - Page 18 BAM standards. 6.2 CALIBRATION MODES The Elcometer 406 has two calibration adjustment modes; Automatic or Manual. Automatic calibration sets the Glossmeter to the value of the tile pre-programmed in the memory of the unit.
- Page 19 The display will show the following screen for 2 seconds: Elcometer 406 Mini Glossmeter The display will then revert to measurement mode. ANGLE Value No. 60° 2. Press and hold the ANGLE CHANGE/CANCEL button for two seconds or use the SCROLL UP/DOWN...
- Page 20 The gauge will then prompt: CALIBRATE Sample High Ref 7. Place the gauge on the calibration tile, aligning the gauge base-plate with the top right hand corner of the tile. (This will ensure consistent reading of the tile value.) 8. Press the READ/SELECT key when it is in position. The gauge will display: 60°...
- Page 21 It is necessary for the User to check the calibration tile visually for smears or defects before calibration adjustment. Note: In the Automatic Calibration Mode the Elcometer 406 has an automatic standard tile check routine. If the calibration standard is dirty or damaged and the value does not conform to that stored in the memory the display will show the following warning messages: •...
- Page 22 The manual calibration procedure is as follows: 1. Press the POWER button to switch the gauge on. The display will show the following screen for 2 seconds: Elcometer 406 Mini Glossmeter The display will then revert to measurement mode. ANGLE Value No.
- Page 23 4. Press the READ/SELECT key to confirm the selection. The display will read: CALIBRATE Sample Zero Ref 5. Place the gauge carefully on the zero value foam, which is located in the lid of the calibration standard (Figure 7). 6. Press the READ/SELECT key to set the zero value. The gauge will then prompt: CALIBRATE Sample High Ref...
- Page 24 9. Press the READ/SELECT key to store the value and the gauge will display: 60° Angle Completed The gauge will then return to the measurement mode. MANUAL CALIBRATION – DUAL ANGLE GAUGE Both measurement geometries need to be calibrated before use. 1.
-
Page 25: Set-Up Options
If the reading does not match the tile value check the value stored in the gauge memory. See “Changing calibration value” on page 23. 7 SET-UP OPTIONS 7.1 CALIBRATION VALUE The calibration value is the value that is stored in the gauge to calibrate in the automatic mode. This value must match the value on the label of the gloss standard. - Page 26 3. Press the READ/SELECT key to activate the value setting option. The display will show: SET STD CAL VAL. Mode Active 4. Use the SCROLL UP/DOWN key to adjust the value until it matches the value quoted on the standard tile that is in use.
- Page 27 3. Press the SCROLL UP/DOWN key until the display shows: Back Light Ops Press Read Key 4. Press the READ/SELECT key to toggle the backlight from off to on. 5. Press the SCROLL UP/DOWN key to exit set-up mode. 7.3 TURNING STATISTICS ON/OFF For simplified operation gloss readings can be taken without storing the values.
-
Page 28: Novo-Soft™ Software
8 NOVO-SOFT™ SOFTWARE The Elcometer 406 Novo-Gloss™ Mini Glossmeter is supplied with Novo-Soft™ Quality Control Software. This software allows the user to upload and store reading data from the gauge. Certain settings in the Glossmeter can be downloaded from the software when the gauge is connected. - Page 29 8.3 Running the program If you accepted the default directory, the program will be installed in: C:\Program Files\Novo-Soft On Windows XP, the installation program creates an entry on the start menu. To run the program: Click > Start > All programs > Novo-Soft > Novo-Soft The following screen will appear:...
- Page 30 8.4 Sample Data To enable you to test some of the features of Novo-Soft before downloading any real data, files containing sample data are installed with the software. To access the data click on ‘Load’ and look for the ‘.res’ files in the directories labelled ‘20degree’, ‘60degree’, etc.
-
Page 31: Menu Structure
OPERATION SET-UP Switch on Delete Sample SET STD CAL VAL. 60° 50.4 9 60° 94.5 gauge Read Elcometer 406 System Set-up Exit Set-up Scroll MiniGlossmeter Press Read Key Press Read Key ANGLE VALUE No. To CALIBRATE Stats. Mode 60° 50.4 9... -
Page 32: Storage And Transit
ISO 9000, and other similar standards. For checks and certification contact your local Elcometer supplier. The gauge does not contain any user-serviceable components. In the unlikely event of a fault, the Elcometer 406 should be returned to your local Elcometer supplier or directly to Elcometer. Contact details can be found on the outside cover of these instructions, or on the Elcometer website, www.elcometer.com... - Page 33 CLEANING The Elcometer 406 should always be checked to ensure that the metal base is clean. Care must be taken to ensure that the base remains free of any damage. The optical cavities and lenses must also be free of dust or any other contamination.
-
Page 34: Technical Specification
12 TECHNICAL SPECIFICATION Gloss Range, 60° : 0 GU to 1000 GU Gloss Range, 20° : 0 GU to 2000 GU Resolution: ± 0.1 GU ± 0.2 GU (0 GU to 200 GU) Repeatability ± 0.2% (>200 GU) ± 0.5 GU (0 GU to 200 GU) Reproducibility ±... -
Page 35: Spares
13 SPARES The Elcometer 406 Glossmeter kit is complete with all the items required to get started and take measurements, however over the life of the gauge replacements may be required. The following replacement and optional items are available from Elcometer or your local supplier. -
Page 36: Related Equipment
14 RELATED EQUIPMENT In addition to the Elcometer 406 Novo-Gloss™ Mini Glossmeter, Elcometer produces a wide range of other equipment for measuring the appearance of surface coatings. Users of the Elcometer 406 Novo-Gloss™ Mini Glossmeter may also benefit from the following Elcometer products: •...
Need help?
Do you have a question about the Novo-Gloss 406 and is the answer not in the manual?
Questions and answers