Table of Contents
Advertisement
Quick Links
Advertisement
Table of Contents

Related Manuals for Elcometer 407L


Summary of Contents for Elcometer 407L
- Page 1 User Guide Elcometer 407L Dual &Triple Angle Glossmeters...
-
Page 2: Table Of Contents
12 Legal Notices & Regulatory Information These operating instructions are a short User Guide only. A copy of this Instruction Manual is available for download on our website www.elcometer.com. For the avoidance of doubt, please refer to the original English version. -
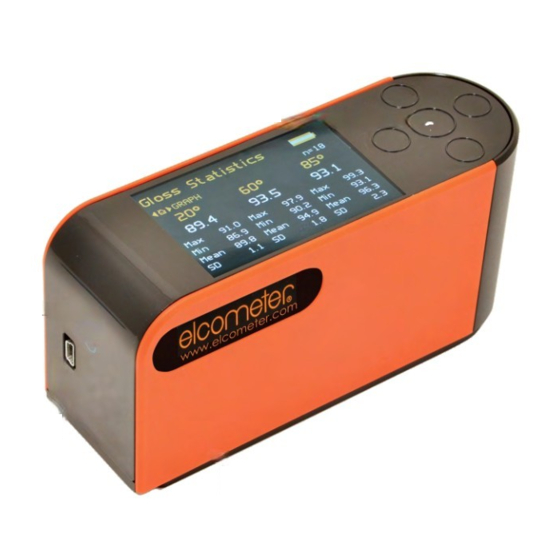
Page 3: Gauge Overview And Box Contents
Down (6) Left (3) Right (4) Measure On/Off Key USB Data Output Socket Calibration Tile (Magnetised) Box Contents Elcometer 407L Glossmeter § ISO 17025 High Gloss Calibration Tile with Certificate § Gloss Tile Cleaning Cloth § Transit Case § Mains Charger (UK, EU & US) §... -
Page 4: Using The Gauge
3.1 SWITCHING ON / OFF Press the On/Off key The Elcometer logo will be displayed followed by the measurement (home) screen To switch off, press and hold the On/Off key for 3 seconds. The gauge will switch off automatically after 30, 60, 90 or 120 seconds of inactivity as set by the User via Menu/Setup/Instrument Setup. - Page 5 “Pass/Fail”, followed by to enable Press the navigation button to edit the pass and fail criteria. °, Dual and Triple Angle Glossmeter - 60 20° & 60° † Triple Angle Glossmeter only - 20° & 60° & 85° www.elcometer.com...
-
Page 6: Calibrating The Gauge
“CONFIRM" followed by to select and save the calibration Note: The calibration values of the tile supplied with the Elcometer 407L are pre-programmed into the gauge. If using a different tile, follow the procedure outlined in Section 4.3. Triple Angle gauge only. -
Page 7: Taking A Reading
4 CALIBRATING THE GAUGE (CONTINUED) 4.3 CALIBRATING WHEN USING DIFFERENT CALIBRATION TILES If using a different tile to the one identified by the Elcometer 407L, the calibration values of the tile must be manually entered, before performing the calibration procedure. -
Page 8: Batching
(home) screen. A trend graph of the individual gloss values can also be viewed by pressing again. Menu/Clear Current Batch deletes all readings from the open batch. Menu/Delete All Batches deletes all readings from all batches stored in the memory. www.elcometer.com... - Page 9 Using ElcoMaster ™ 2.0 Software - supplied with the gauge, and available as a free download at www.elcometer.com - the gauge can transmit readings to a PC for archiving and report generation. Data can be transferred via USB Batches can be saved by connecting the gauge to ElcoMaster 2.0 (using the USB supplied) ™...
- Page 10 Switch OFF and ON to transfer the new batch names to the gauge Select Menu/Setup/Data and Batch Menu Press the navigation button to highlight “Batch Name” followed by to select the required name from those stored in the gauge. www.elcometer.com...
-
Page 11: Menu Structure
Enter PIN Code About Serial Number :xxxxxxx Firmware Version :x.xx Scanner Version :xxxxxx Factory Calibration : xxxx-xx-xx Memory Free :xx% Battery Voltage :x.xxV USB Charge :xxxxx ‡ ® Bluetooth not currently available in Japan * For Elcometer use only www.elcometer.com... -
Page 12: Downloading Data
Resolution 0.1 GU Repeatability 0.2 GU Reproducibility 0.5 GU Power USB rechargeable in 4.5 hours (the Elcometer 407L can only be charged via USB) Battery Life >8hrs continuous operation or 10,000 readings Memory >999 readings Operating Temperature 15-40°C Relative Humidity... -
Page 13: Glossary
Matt surfaces which measure below 10 GU at 60° should be re-measured with the 85° angle Ÿ High gloss surfaces which measure above 70 GU at 60° should be assessed using the 20° Ÿ angle. The 60 degree angle is best employed on mid gloss samples measuring between 10 and 70 GU. www.elcometer.com... -
Page 14: Legal Notices & Regulatory Information
12 LEGAL NOTICES & REGULATORY INFORMATION The Elcometer 407L meets the Radio and Telecommunications Terminal Equipment Directive. This product is Class B, Group 1 ISM equipment according to CISPR 11. Class B product: Suitable for use in domestic establishments and in establishments directly connected to a low voltage power supply network which supplies buildings used for domestic purposes.
Need help?
Do you have a question about the 407L and is the answer not in the manual?
Questions and answers