
Related Manuals for Elcometer 415


Summary of Contents for Elcometer 415
- Page 1 User Guide Elcometer 415 Paint & Powder Gauge (for measuring on smooth surfaces) www.elcometer.com...
-
Page 2: Table Of Contents
156g (5.5oz) including batteries © Elcometer Limited 2015 - 2021. All rights reserved. No part of this document may be reproduced, transmitted, transcribed, stored (in a retrieval system or otherwise) or translated into any language, in any form or by any means (electronic, mechanical, magnetic, optical, manual or otherwise) without the prior written permission of Elcometer Limited. -
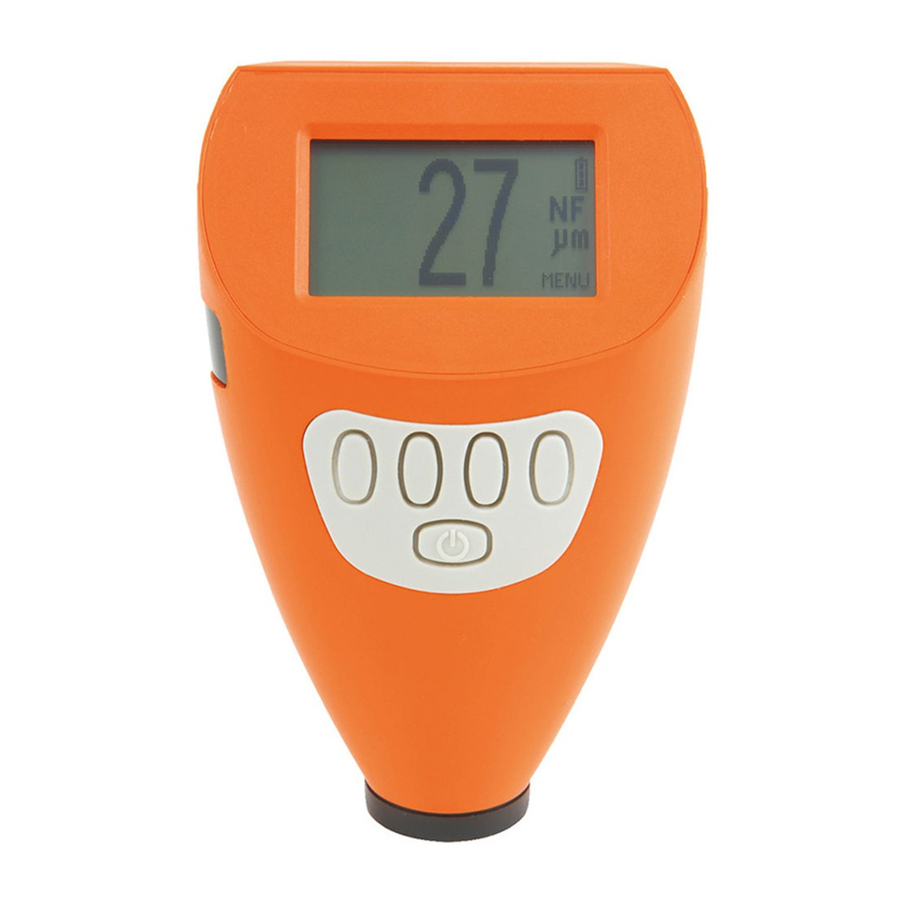
Page 3: Gauge Overview
On/Off Key Integral Probe USB Data Output Socket (below cover) Battery Compartment (¼ turn open/close) Wrist Strap Connection 2 BOX CONTENTS Elcometer 415 Paint & Powder Gauge < Calibration Check Piece; Steel < Calibration Check Piece; Aluminium < (FNF gauges only) Foil Set <... -
Page 4: Using The Gauge
To insert or replace the batteries: Lift the latch on the battery compartment cover and rotate anti-clockwise to remove the cover. Insert 2 batteries taking care to ensure correct polarity. Refit the cover and rotate the latch clockwise to close. en-3 www.elcometer.com... - Page 5 Empty symbol (red, flashing) = batteries at lowest sustainable level 4.3 SWITCHING ON / OFF To switch on: Press and hold the ON/OFF button until the Elcometer logo is displayed. To switch off: Press and hold the ON/OFF button until the screen goes blank.
-
Page 6: Taking A Reading
4 GETTING STARTED (continued) 4.6 SELECTING THE MEASUREMENT UNITS The Elcometer 415 can take measurements in µm and mils. To set the measurement units: Press the ‘ ’ softkey. é Use the softkeys to highlight ‘µm/mil’ and press ‘ ’ to ê... -
Page 7: Statistics
The calibration adjustment method chosen depends on the condition of the substrate to be measured. As the Elcometer 415 has been specifically designed for measuring smooth coatings on thin ferrous and non-ferrous metal surfaces, two calibration options are available;... - Page 8 ‘Zero’ will be displayed and the gauge will return to the main reading screen. Note: FNF gauges must be calibrated in both the ferrous and non-ferrous mode to ensure accuracy of readings. en-7 www.elcometer.com...
-
Page 9: Downloading Data
8.1 USING ELCOMASTER ON A PC ® Using ElcoMaster - supplied with each gauge and available as a free download at elcometer.com - the Elcometer 415 can simultaneously ® transmit the live reading via USB or Bluetooth (Model T only), to a PC ®... -
Page 10: Upgrading Your Gauge
Self Adhesive Screen Protectors, Pack of 10 T99922341 11 WARRANTY STATEMENT Elcometer 415 gauges are supplied with a one year warranty against manufacturing defects, excluding contamination and wear. The warranty can be extended to two years within 60 days of purchase via www.elcometer.com. -
Page 11: Technical Specification
DIN 50984, ECCA T1, EN 13523-1, ISO 2178, ISO 2360, ISO 2808-12, ISO 2808-6A, ISO 2808-6B, ISO 2808-7C, ISO 2808-7D, JIS K 5600-1-7, NF T30-124 When subject to a 2-point calibration: ±1% when calibrated close to the required thickness, ±3% across the range. Rechargeable batteries may differ. www.elcometer.com en-10... -
Page 12: Legal Notices & Regulatory Information
Bluetooth SIG Inc and licensed to Elcometer Limited. Elcometer 415 Model T: Made for iPhone 6 Plus, iPhone 6, iPhone 5s, iPhone 5c, iPhone 5, iPhone 4s, iPhone 4, iPad Air 2, iPad mini 3, iPad Air, iPad mini 2, iPad (3rd and 4th generation), iPad mini, iPad 2, and iPod touch (4th and 5th generation). -
Page 13: Appendix 1: Summary Of Gauge Icons
Screen Brightness Menu Option B, T Automatic Screen Rotation - On / Off B, T Legal Information Menu Option B, T Select / Set Softkey B, T Escape Softkey B, T Elcometer Contact Details Menu Option B, T www.elcometer.com en-12... -
Page 14: Appendix 2: Elcomaster Collect Design
'reading' circle in turn, drag onto the image and adjust the size accordingly. When complete click ‘Save’ and click the 'x' button in the top right to close the design window. en-13 www.elcometer.com... - Page 15 The gauge must be connected to ElcoMaster before it will appear in the list. ‡ The ‘reading circle’ will be green if the measurement is within set limits or no limits have been set and red, if outside set limits. www.elcometer.com en-14...
- Page 16 TMA-0614 Issue 08 - Text with cover 25916...
Need help?
Do you have a question about the 415 and is the answer not in the manual?
Questions and answers