
Subscribe to Our Youtube Channel
Related Manuals for NETGEAR CGD24Nv2


Summary of Contents for NETGEAR CGD24Nv2
- Page 1 DOCSIS 2.0 Advanced Cable Gateway CGD24N v2 User Manual NETGEAR, Inc. 350 East Plumeria Drive San Jose, CA 95134 USA 202-10509-01 August 2009 v1.0...
- Page 2 In the interest of improving internal design, operational function, and/or reliability, NETGEAR reserves the right to make changes to the products described in this document without notice. NETGEAR does not assume any liability that may occur due to the use or application of the product(s) or circuit layout(s) described herein.
- Page 3 Hereby, NETGEAR Inc., declares that this Radiolan is in compliance with the essential requirements and other relevant provisions of Directive 1999/5/EC. Español Por medio de la presente NETGEAR Inc. declara que el Radiolan cumple con los [Spanish] requisitos esenciales y cualesquiera otras disposiciones aplicables o exigibles de la Directiva 1999/5/CE.
- Page 4 [Swedish] väsentliga egenskapskrav och övriga relevanta bestämmelser som framgår av direktiv 1999/5/EG. Íslenska Hér með lýsir NETGEAR Inc. yfir því að Radiolan er í samræmi við grunnkröfur og aðrar [Icelandic] kröfur, sem gerðar eru í tilskipun 1999/5/EC. Norsk NETGEAR Inc. erklærer herved at utstyret Radiolan er i samsvar med de [Norwegian] grunnleggende krav og øvrige relevante krav i direktiv 1999/5/EF.
- Page 5 Connect the equipment into an electrical outlet on a circuit different from that which the radio receiver is connected • Consult the dealer or an experienced radio/TV technician for help. Modifications made to the product, unless expressly approved by NETGEAR, Inc., could void the user's right to operate the equipment. Grounding The cable distribution system should be grounded (earthed) in accordance with ANSI/NFPA 70, the National Electrical Code (NEC), in particular Section 820.93, Grounding of Outer conductive Shield of a Coaxial Cable.
- Page 6 Product and Publication Details Model Number: CGD24N v2 Publication Date: August 2009 Product Family: Gateway Product Name: DOCSIS 2.0 Advanced Cable Gateway CGD24N v2 Home or Business Product: Business Language: English Publication Part Number: 202-10509-01 Publication Version Number: v1.0, August 2009...
-
Page 7: Table Of Contents
Contents DOCSIS 2.0 Advanced Cable Gateway CGD24N v2 User Manual About This Manual Conventions, Formats, and Scope ................... xi Revision History ....................... xii Chapter 1 Connecting the Gateway to the Internet Package Contents ......................1-1 Gateway Front Panel ....................1-1 Gateway Rear Panel ....................1-3 Side Panel ........................1-3 Gateway Label ......................1-4 What You Need Before You Begin .................1-4... - Page 8 DOCSIS 2.0 Advanced Cable Gateway CGD24N v2 User Manual Configuring a Wireless Guest Network ..............2-14 Chapter 3 Content Filtering and Firewall Rules Configuring Logs ......................3-1 Blocking Site ........................3-2 Blocking Keywords and Domains ................3-3 Blocking Services ......................3-4 Chapter 4 Managing Your Network Viewing the Gateway Status ...................4-1 Viewing the Connection Status ..................4-3 Changing the Built-In Passwords ...................4-4...
- Page 9 DOCSIS 2.0 Advanced Cable Gateway CGD24N v2 User Manual Troubleshooting the ISP Connection ................6-4 Troubleshooting a TCP/IP Network Using a Ping Utility ..........6-4 Testing the LAN Path to Your Gateway ..............6-4 Testing the Path from Your PC to a Remote Device ..........6-5 Appendix A Technical Specifications and Factory Default Settings Technical Specifications ....................
- Page 10 DOCSIS 2.0 Advanced Cable Gateway CGD24N v2 User Manual Contents v1.0, August 2009...
-
Page 11: About This Manual
About This Manual The NETGEAR ® DOCSIS 2.0 Advanced Cable Gateway CGD24N v2 User Manual describes how to install, configure and troubleshoot the DOCSIS 2.0 Advanced Cable Gateway CGD24N v2. The information in this manual is intended for readers with intermediate computer and Internet skills. -
Page 12: Revision History
August 2009 For more information about network, Internet, firewall, and VPN technologies, see the links to the NETGEAR website in Appendix B, “Related Documents.” Note: Product updates are available on the NETGEAR, Inc. website at http://kbserver.netgear.com/products/CGD24N v2.asp. Revision History Version... -
Page 13: Connecting The Gateway To The Internet
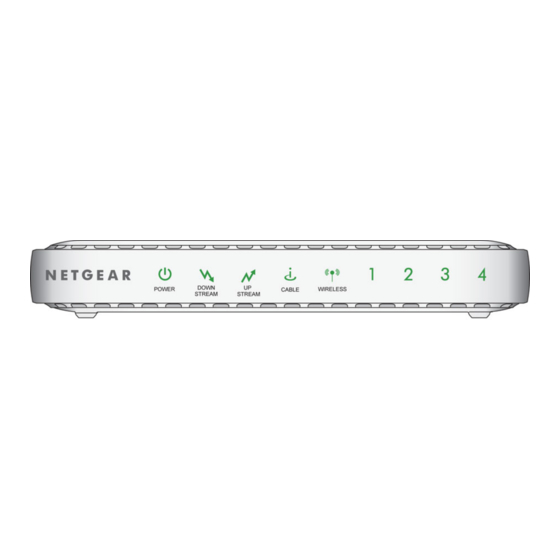
Quick Installation Guide • Resource CD If any of the parts are incorrect, missing, or damaged, contact your NETGEAR dealer. Keep the carton, including the original packing materials, in case you need to return the product for repair. Gateway Front Panel The front panel of the gateway contains status LEDs. - Page 14 DOCSIS 2.0 Advanced Cable Gateway CGD24N v2 User Manual You can use the LEDs to verify connections.The following table lists and describes each LED on the front panel of the Advanced Cable Gateway. Table 1-1. LED Descriptions Description Power • On: Power is supplied to the gateway. •...
-
Page 15: Gateway Rear Panel
DOCSIS 2.0 Advanced Cable Gateway CGD24N v2 User Manual Gateway Rear Panel The rear panel of the gateway contains the connections identified below: Power 4 Ethernet LAN ports Restore Coaxial adapter Factory Cable input Settings Connector Figure 1-2 The rear panel of the gateway contains a WPS button. You can use the Wi-Fi Protected Setup (WPS) feature with clients on the network that are Wi-Fi certified and WPA capable. -
Page 16: Gateway Label
DOCSIS 2.0 Advanced Cable Gateway CGD24N v2 User Manual Gateway Label The bottom label of the gateway contains its serial number and MAC address, as well as the gateway default login IP address, User Name and Password. Figure 1-4 What You Need Before You Begin Before you begin, make sure that you have the following: •... -
Page 17: Logging In To The Gateway
DOCSIS 2.0 Advanced Cable Gateway CGD24N v2 User Manual Logging in to the Gateway Note: To connect to the gateway, your computer must be configured to obtain an IP address automatically via DHCP. For instructions on how to do this, see the link to the online document “Preparing Your Network”... -
Page 18: Configuring The Basic Settings
DOCSIS 2.0 Advanced Cable Gateway CGD24N v2 User Manual Configuring the Basic Settings When you log in to the gateway the Basic Settings screen displays: Figure 1-6 1. Make sure that the Cable Network Settings are correct based on the information from your Internet Service Provider (ISP). - Page 19 Primary DNS. A DNS server is a host on the Internet that translates Internet names (such as www.netgear.com) to numeric IP addresses. Typically your ISP transfers the IP address of one or two DNS servers to your gateway during login. If the ISP does not transfer an address, you must obtain it from the ISP and enter it manually here.
- Page 20 DOCSIS 2.0 Advanced Cable Gateway CGD24N v2 User Manual Connecting the Gateway to the Internet v1.0, August 2009...
-
Page 21: Wireless Configuration
SSID, also called the wireless network name, and the wireless For a wireless connection, the security setting must be the same for the gateway and wireless computers or wireless adapters. NETGEAR strongly recommends that you use wireless security. This chapter includes: • “Planning Your Wireless Network”... -
Page 22: Wireless Placement And Range Guidelines
DOCSIS 2.0 Advanced Cable Gateway CGD24N v2 User Manual Note: NETGEAR’s Push 'N' Connect feature is based on the Wi-Fi Protected Setup (WPS) standard (for more information, see http://www.wi-fi.org). All other Wi- Fi-certified and WPS-capable products should be compatible with NETGEAR products that implement Push 'N' Connect. -
Page 23: Wireless Security Options
DOCSIS 2.0 Advanced Cable Gateway CGD24N v2 User Manual Wireless Security Options Indoors, computers can connect over 802.11g wireless networks at a maximum range of up to 300 feet. Such distances can allow for others outside your immediate area to access your network. Unlike wired network data, your wireless data transmissions can extend beyond your walls and can be received by anyone with a compatible adapter. - Page 24 DOCSIS 2.0 Advanced Cable Gateway CGD24N v2 User Manual To view or manually configure the wireless settings: 1. Log in to the gateway as described in “Logging in to the Gateway” on page 1-5. 2. In the main menu, under Setup, select Wireless Settings. If you make changes, you must click Apply for them to take effect Figure 2-1 Wireless Configuration...
-
Page 25: Configuring Wep (Wired Equivalent Privacy) Wireless Security
You can manually configure wireless security here. • Disable. Wireless security is disabled by default. After the gateway is connected to the Internet, NETGEAR strongly recommends that you implement wireless security. • WEP (Wired Equivalent Privacy) 64-bit encryption or 128-bit encryption. WEP provides data security with WEP Shared Key authentication and WEP data encryption. - Page 26 DOCSIS 2.0 Advanced Cable Gateway CGD24N v2 User Manual To configure WEP data encryption: 1. Log in to the gateway as described in “Logging in to the Gateway” on page 1-5. 2. In the main menu, under Setup, select Wireless Settings. 3.
-
Page 27: Configuring Wpa Or Wpa2 Wireless Security
DOCSIS 2.0 Advanced Cable Gateway CGD24N v2 User Manual • Select which of the four keys will be the default. Data transmissions are always encrypted using the default key. The other keys can only be used to decrypt received data. The four entries are disabled if WPA-PSK or WPA authentication is selected. -
Page 28: Using Push 'N' Connect (Wps) To Configure Your Wireless Network And Security
(SSID) and wireless security settings for the gateway (if the gateway is in its default state) and broadcasts these settings to the wireless client. Note: NETGEAR’s Push 'N' Connect feature based on the Wi-Fi Protected Setup (WPS) standard (for more information, see http://www.wi-fi.org). All other Wi- Fi-certified and WPS-capable products should be compatible with NETGEAR products that implement Push 'N' Connect. -
Page 29: Using A Wps Button To Add A Wps Client
If your wireless network will include a combination of WPS capable devices and non-WPS capable devices, NETGEAR suggests that you set up your wireless network and security settings manually first, and use WPS only for adding additional WPS capable devices. See “Adding Both WPS and Non-WPS Clients”... -
Page 30: Using A Pin Entry To Add A Wps Client
Any wireless computer or wireless adapter that will connect to the gateway wirelessly is a client. The client must support a WPS PIN, and must have a WPS configuration utility, such as the NETGEAR Smart Wizard or Atheros Jumpstart. Note: By default, the gateway is configured with WEP security, which is incompatible with WPS. - Page 31 DOCSIS 2.0 Advanced Cable Gateway CGD24N v2 User Manual To use a PIN to add a WPS client: 1. Log in to the gateway as described in “Logging in to the Gateway” on page 1-5. 2. In the main menu, under Setup, select Add WPS Client, and then click Next. Figure 2-6 3.
-
Page 32: Connecting Additional Wireless Client Devices
DOCSIS 2.0 Advanced Cable Gateway CGD24N v2 User Manual Note: If no WPS-capable client devices are located during the 2-minute timeframe, the SSID will not be changed and no security will be implemented on the gateway. Connecting Additional Wireless Client Devices You can add more WPS clients to your wireless network, or you can add a combination of WPS- enabled clients and clients without WPS. -
Page 33: Guest Networks
DOCSIS 2.0 Advanced Cable Gateway CGD24N v2 User Manual The settings that you configured in Step 2 are broadcast to the WPS devices so that they can connect to the gateway. Guest Networks A wireless guest network allows you to provide guests access to your wireless network without prior authorization of each individual guest. - Page 34 DOCSIS 2.0 Advanced Cable Gateway CGD24N v2 User Manual 4. Fill in the Name (SSID) field. You can enter a value of up to 32 alphanumeric characters. For the guest network, the same name must be assigned to all wireless devices in your network. The name is case-sensitive.
-
Page 35: Configuring Logs
Chapter 3 Content Filtering This chapter describes how to use content filtering and firewall rules for the gateway. Note: Log in to the gateway using its default address of http://192.168.0.1 or at whatever IP address the unit is currently configured. To access the content filtering features you must log in to the gateway with the mso user name and its default password changeme, or whatever new password you have set up. -
Page 36: Blocking Site
The gateway allows you to restrict access to Internet content based on functions such as Web address keywords and Web domains. A domain name is the name of a particular website. For example, for the address www.NETGEAR.com, the domain name is NETGEAR.com. To block keywords and domains: 1. - Page 37 DOCSIS 2.0 Advanced Cable Gateway CGD24N v2 User Manual Figure 3-2 2. To use keyword blocking, select the Keyword Blocking Enable check box. You can enter up to eight keywords. After you have entered a keyword in the field to the left of the Add Keyword button, click Add Keyword.
-
Page 38: Blocking Services
DOCSIS 2.0 Advanced Cable Gateway CGD24N v2 User Manual To remove a domain from the Domain List, select the domain, and then click Remove Domain. 4. Click Apply to save your settings. Blocking Services You can use the Services screen to control which services are enabled or disabled. To enable or disable certain gateway features and web features: 1. - Page 39 DOCSIS 2.0 Advanced Cable Gateway CGD24N v2 User Manual Table 3-1. Services (continued) Settings Description Multicast When multicast is enabled, the gateway passes multicasting streams through the firewall. Web Features Filter Proxy Filter Cookies When enabled, these features are not blocked by the Filter Java Applets firewall.
- Page 40 DOCSIS 2.0 Advanced Cable Gateway CGD24N v2 User Manual Content Filtering v1.0, August 2009...
-
Page 41: Managing Your Network
Chapter 4 Managing Your Network This chapter describes how to perform network management tasks with your Advanced Cable Gateway. When you log in to the gateway, these tasks are grouped under Maintenance. This chapter includes: • “Viewing the Gateway Status” •... - Page 42 DOCSIS 2.0 Advanced Cable Gateway CGD24N v2 User Manual Figure 4-1 The Gateway Status screen fields are explained in the following table. Table 4-1. Gateway Status Fields Field Description Information Standard Specification The specification to which the gateway’s cable interface is Compliant compatible.
-
Page 43: Viewing The Connection Status
DOCSIS 2.0 Advanced Cable Gateway CGD24N v2 User Manual Table 4-1. Gateway Status Fields (continued) Field Description Status System Up Time This is the time since the gateway has registered with your cable service provider. Network Access This field will change to Allowed when the registration with your cable service provider is complete. -
Page 44: Changing The Built-In Passwords
Note: The user names and passwords are not the same as any user name or password you may use to log in to your Internet connection. NETGEAR recommends that you change this password to a more secure password. The ideal password should contain no dictionary words from any language, and should be a mixture of both upper and lower case letters, numbers, and symbols. -
Page 45: Backing Up And Restoring Your Settings
DOCSIS 2.0 Advanced Cable Gateway CGD24N v2 User Manual 2. In the main menu, under Maintenance, select Set Password. The Set Password screen displays. Figure 4-3 3. To change the password, first enter the old password, and then enter the new password twice. 4. -
Page 46: Viewing The Event Log
DOCSIS 2.0 Advanced Cable Gateway CGD24N v2 User Manual You can save a copy of the current configuration settings or restore the saved settings: • To save a copy of the current configuration settings, click Backup. • To restore the saved configuration settings from a backup file: a. - Page 47 DOCSIS 2.0 Advanced Cable Gateway CGD24N v2 User Manual Running the Ping Diagnostic Utility You can use the Diagnostics screen to test connectivity to a PC using the ping command. To start a ping test: 1. Log in to the gateway as described in “Logging in to the Gateway”...
- Page 48 DOCSIS 2.0 Advanced Cable Gateway CGD24N v2 User Manual Managing Your Network v1.0, August 2009...
-
Page 49: Customizing Your Network
DOCSIS 2.0 Advanced Cable Gateway CGD24N v2 User Manual Chapter 5 Customizing Your Network This chapter describes how to customize your network through the advanced settings on your Advanced Cable Gateway. When you log in to the gateway, these tasks are grouped under Advanced. - Page 50 Windows XP, but the data is still fully exposed to a determined snoop using specialized test equipment like wireless sniffers. For this reason NETGEAR recommends that you also enable wireless security. Customizing Your Network v1.0, August 2009...
-
Page 51: Turning On Access Control To Restrict Access By Mac Address
DOCSIS 2.0 Advanced Cable Gateway CGD24N v2 User Manual Table 5-1. Advanced Wireless Settings Advanced Wireless Settings Description Advanced • Fragmentation Threshold The default settings for these fields usually work fine. Configuration • CTS/RTS Threshold Change them only if you have a specific reason for doing •... - Page 52 DOCSIS 2.0 Advanced Cable Gateway CGD24N v2 User Manual 2. In the main menu, under Advanced, select Wireless Settings. Figure 5-2 3. Click the Setup Access List button to display the Wireless Card Access List screen. Note: If you are configuring the gateway from a wireless computer, make sure to add your computer’s MAC address to the Access List.
-
Page 53: Restricting Access By Mac Address
DOCSIS 2.0 Advanced Cable Gateway CGD24N v2 User Manual • Enter the MAC address of the device to be added to the access list in the Add Access Filter fields. The MAC address can usually be found on the bottom of the wireless device. Then click Add. -
Page 54: Configuring Port Blocking
DOCSIS 2.0 Advanced Cable Gateway CGD24N v2 User Manual The Trusted Devices table shows the PCs that are allowed access to the Internet through the gateway. Click Refresh to update the Trusted Devices table. 2. Select a device that will be added to the Add MAC Filter table through one of the following methods: •... - Page 55 DOCSIS 2.0 Advanced Cable Gateway CGD24N v2 User Manual You can use port blocking to block outbound traffic on specific ports. Note: Any outbound traffic that is not blocked by rules that you have created is allowed by the default rule. To configure port blocking and services to block specific outbound traffic: 1.
-
Page 56: Configuring Port Forwarding
DOCSIS 2.0 Advanced Cable Gateway CGD24N v2 User Manual – TCP. Select TCP only. – UDP. Select UDP only. – Both. Select both TCP and UDP. • Local IP Address. Enter the local IP address for the computer that is using the service. Note: To reset the selection in the Services pull-down menu and to clear all the fields in the Add Custom Rules table, click Reset. - Page 57 DOCSIS 2.0 Advanced Cable Gateway CGD24N v2 User Manual 1. Log in to the gateway as described in “Logging in to the Gateway” on page 1-5. 2. In the main menu, under Advanced, select Port Forwarding. The Port Forwarding screen displays.
-
Page 58: Considerations For Port Forwarding
DOCSIS 2.0 Advanced Cable Gateway CGD24N v2 User Manual Note: To reset the selection in the Services field and to clear all the fields in the Add Custom Rules table, click Reset. 5. Perform one of the following actions: • Click Add to save your settings. - Page 59 DOCSIS 2.0 Advanced Cable Gateway CGD24N v2 User Manual Once configured, port triggering operation is as follows: 1. A PC makes an outgoing connection using a port number defined in the Port Triggering table. 2. The gateway records this connection, opens the incoming port or ports associated with this entry in the Port Triggering List, and associates them with the PC.
-
Page 60: Setting Up A Dmz Host
DOCSIS 2.0 Advanced Cable Gateway CGD24N v2 User Manual 3. For each port trigger that you would like to enable, enter the following settings in the Port Trigger List and enable the port trigger: • Trigger Range. The trigger range consists of the range of outgoing ports that will be monitored to trigger the incoming port forwarding rule: –... -
Page 61: Using Lan Ip Setup Options
DOCSIS 2.0 Advanced Cable Gateway CGD24N v2 User Manual Figure 5-7 3. If you want the gateway to respond to a ping from the Internet, select the Respond to Ping on WAN check box. Responding to pings can be useful in a diagnostic situation. 4. - Page 62 DOCSIS 2.0 Advanced Cable Gateway CGD24N v2 User Manual 2. In the main menu, under Advanced, select LAN IP. The LAN IP screen displays. Figure 5-8 3. Enter the following LAN IP settings: • LAN IP Address. Enter the LAN IP address that you would like to assign for your gateway in dotted decimal notation.
-
Page 63: Using The Gateway As A Dhcp Server
DOCSIS 2.0 Advanced Cable Gateway CGD24N v2 User Manual • Starting IP Address. Complete the first of the contiguous addresses in the IP address pool. 192.168.0.10 is the default start address. • Ending IP Address. Complete the last of the contiguous addresses in the IP address pool. 192.168.0.19 is the default end address. -
Page 64: Using Address Reservation
DOCSIS 2.0 Advanced Cable Gateway CGD24N v2 User Manual Using Address Reservation When you specify a reserved IP address for a computer on the LAN, that computer always receives the same IP address each time it accesses the router’s DHCP server. Reserved IP addresses should be assigned to computers or servers that require permanent IP settings. - Page 65 DOCSIS 2.0 Advanced Cable Gateway CGD24N v2 User Manual 2. In the main menu, under Advanced, select Remote Management to display this screen: Figure 5-9 3. Select the Allow Remote Management check box. 4. Enter the following information: • Remote Password. Enter the user name that will be used from the remote PC to manage the gateway.
-
Page 66: Configuring Universal Plug And Play (Upnp)
DOCSIS 2.0 Advanced Cable Gateway CGD24N v2 User Manual Configuring Universal Plug and Play (UPnP) Universal Plug and Play (UPnP) helps devices, such as Internet appliances and computers, access the network and connect to other devices as needed. UPnP devices can automatically discover the services from other registered UPnP devices on the network. - Page 67 DOCSIS 2.0 Advanced Cable Gateway CGD24N v2 User Manual The UPnP Portmap Table displays the IP address of each UPnP device that is currently accessing the router and which internal and external ports of the gateway were opened by that device.
- Page 68 DOCSIS 2.0 Advanced Cable Gateway CGD24N v2 User Manual 5-20 Customizing Your Network v1.0, August 2009...
-
Page 69: Troubleshooting
Troubleshooting This chapter gives information about troubleshooting your DOCSIS 2.0 Advanced Cable Gateway CGD24N v2. For the common problems listed, go to the section indicated. Tip: NETGEAR provides helpful articles, documentation, and the latest software updates at http://www.netgear.com/support. • Have I connected the gateway correctly? Go to “Basic Functions”... -
Page 70: Using Leds To Troubleshoot
Check that you are using the 12VDC power adapter supplied by NETGEAR for this product. If the error persists, you have a hardware problem and should contact technical support. -
Page 71: Connecting To The Gateway's Main Menu
DOCSIS 2.0 Advanced Cable Gateway CGD24N v2 User Manual Connecting to the Gateway’s Main Menu If you are unable to access the gateway’s main menu from a computer on your local network, check the following: • Check the Ethernet connection between the computer and the gateway as described in the previous section. -
Page 72: Troubleshooting The Isp Connection
DOCSIS 2.0 Advanced Cable Gateway CGD24N v2 User Manual Troubleshooting the ISP Connection If your gateway is unable to access the Internet and your Cable Link LED is on, you may need to register the Cable MAC Address and/or Device MAC Address of you gateway with your cable service provider. -
Page 73: Testing The Path From Your Pc To A Remote Device
DOCSIS 2.0 Advanced Cable Gateway CGD24N v2 User Manual If the path is not working correctly, you could have one of the following problems: • Wrong physical connections. – Make sure the LAN port LED is on. If the LED is off, see “Using LEDs to Troubleshoot”... - Page 74 DOCSIS 2.0 Advanced Cable Gateway CGD24N v2 User Manual Troubleshooting v1.0, August 2009...
-
Page 75: Technical Specifications And Factory Default Settings
Appendix A Technical Specifications and Factory Default Settings This appendix provides technical specifications and default factory settings for the DOCSIS 2.0 Advanced Cable Gateway CGD24N v2. Technical Specifications Table A-1. Technical Specifications Specification Description Network Protocol and Standards Compatibility Data and Routing Protocols •... -
Page 76: Factory Default Settings
DOCSIS 2.0 Advanced Cable Gateway CGD24N v2 User Manual Table A-1. Technical Specifications (continued) Specification Description Wireless Radio Data Rates 1, 2, 5.5, 6, 9, 12, 18, 24, 36, 48, 54, and 108 Mbps Auto Rate Sensing Frequency 2.4-2.5 GHz Operating Frequency Ranges 2.412~2.462 GHz (US) 2.412~2.472 GHz (Japan) - Page 77 DOCSIS 2.0 Advanced Cable Gateway CGD24N v2 User Manual Table A-2. Default Configuration Settings (continued) Feature Default Behavior Local Network (LAN) LAN IP 192.168.1.1 Subnet Mask 255.255.255.0 RIP direction None RIP version Disabled RIP authentication None DHCP server Enabled DHCP starting IP address 192.168.1.2 DHCP Ending IP Address 192.168.1.254...
- Page 78 DOCSIS 2.0 Advanced Cable Gateway CGD24N v2 User Manual Table A-2. Default Configuration Settings (continued) Feature Default Behavior Wireless Wireless Communication Disabled SSID Name NETGEAR 802.11 Band 2.4 GHz 802.11 n-mode Auto 802.11 Bandwidth 40 MHz Sideband for channel control (40 MHz...
-
Page 79: Appendix B Related Documents
Appendix B Related Documents This appendix provides links to reference documents you can use to gain a more complete understanding of the technologies used in your NETGEAR product. Document Link Using Microsoft Vista and http://documentation.netgear.com/reference/enu/winzerocfg/index.htm Windows XP to Manage Wireless Network Connections ITCP/IP Networking Basics http://documentation.netgear.com/reference/enu/tcpip/index.htm... - Page 80 DOCSIS 2.0 Advanced Cable Gateway CGD24N v2 User Manual Related Documents v1.0, August 2009...
- Page 81 Index DNS primary and secondary server Downstream Traffic LED adding reserved IP addresses 5-17 e-mailing logs backing up gateway configuration Erase configuration backing up the configuration file Ethernet Basic Settings crossover cable Basic Settings screen blocking event log keywords PCs based on MAC address services sites factory default settings...
- Page 82 DOCSIS 2.0 Advanced Cable Gateway CGD24N v2 User Manual outbound label (bottom of gateway) LAN IP settings 5-14 secondary DNS server LAN LED security options (wireless) LEDs description SSID troubleshooting static IP address Logging in to the gateway TCP/IP, network troubleshooting MAC address technical specifications MAC filtering...
- Page 83 DOCSIS 2.0 Advanced Cable Gateway CGD24N v2 User Manual RADIUS settings WPA2-PSK 2-5, 2-8 WPA-PSK 2-5, 2-8 WPS button. WPS Push ’N’ Connect 2-9, 2-13 Index-3 v1.0, August 2009...
- Page 84 DOCSIS 2.0 Advanced Cable Gateway CGD24N v2 User Manual Index-4 v1.0, August 2009...
Need help?
Do you have a question about the CGD24Nv2 and is the answer not in the manual?
Questions and answers