
Related Manuals for NETGEAR CG3000DCR


Summary of Contents for NETGEAR CG3000DCR
- Page 1 CG3000DCR Advanced Cable Modem Gateway User M anua l 350 East Plumeria Drive San Jose, CA 95134 January 2013 202-11231-01 v1.0...
- Page 2 Trademarks NETGEAR, the NETGEAR logo, and Connect with Innovation are trademarks and/or registered trademarks of NETGEAR, Inc. and/or its subsidiaries in the United States and/or other countries. Information is subject to change without notice. © NETGEAR, Inc. All rights reserved.
-
Page 3: Table Of Contents
Contents Chapter 1 Getting Started Gateway Front Panel ......... . 6 Gateway Rear Panel . - Page 4 CG3000DCR Advanced Cable Modem Gateway Access the Gateway Menu........36 Troubleshoot the ISP Connection .
-
Page 5: Chapter 1 Getting Started
Firmware updates with new features and bug fixes are made available from time to time on downloadcenter.netgear.com. Some products can regularly check the site and download new firmware, or you can check for and download new firmware manually. If the features or behavior of your product do not match what is described in this guide, you might need to update your firmware. -
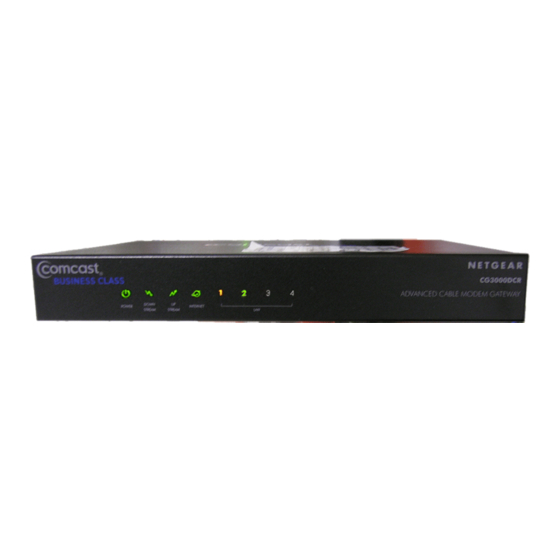
Page 6: Gateway Front Panel
CG3000DCR Advanced Cable Modem Gateway Gateway Front Panel You can use the LEDs to verify status and connections. Figure 1. Gateway front panel The following table lists and describes each LED and button on the front panel of the gateway. -
Page 7: Gateway Rear Panel
CG3000DCR Advanced Cable Modem Gateway Gateway Rear Panel Factory Coaxial Power port Defaults cable adapter button connector input Ethernet LAN ports Figure 2. Gateway rear panel The rear panel includes the following connections, viewed from left to right: • Four Ethernet LAN ports. Use these ports to connect local computers. - Page 8 • To access only the Feature Settings, log in with the user name cusadmin and its default password of highspeed. NETGEAR recommends that you change these to more secure passwords. See Administration on page 11. Enter a user name and password.
-
Page 9: View The Gateway Summary Screen
CG3000DCR Advanced Cable Modem Gateway View the Gateway Summary Screen You can use the Gateway Summary screen to see if the gateway initialization is complete and to check its overall status. To view the Gateway Summary screen: From the Main menu, click the Cable Modem tab. -
Page 10: Chapter 2 Cusadmin Features
Cusadmin Features This chapter describes how to use feature settings when logged in with the cusadmin user name. For information about the Gateway Summary screen, see Viewing the Gateway Summary Screen on page 9. This chapter includes: • Administration • LAN Setup •... -
Page 11: Administration
CG3000DCR Advanced Cable Modem Gateway Administration You can use the Administration features to set up passwords and to run diagnostics. To view administration: From the Main menu, select Administration. The cusadmin user name default password is highspeed. You should change this to a more secure password. -
Page 12: Lan Setup
CG3000DCR Advanced Cable Modem Gateway LAN Setup You can use the LAN screen to configure IP setup, static routing, filtering, and wwitch controls. To display LAN IP setup: From the Main menu, select LAN. You can use this screen to specify the IP information, set up DHCP, or assign DNS manually. -
Page 13: Static Routing
CG3000DCR Advanced Cable Modem Gateway Static Routing Static routes provide more routing information to your gateway. Typically, you do not need to add static routes. You have to configure static routes only for unusual cases such as multiple gateways or multiple IP subnets on your network. -
Page 14: Filtering
CG3000DCR Advanced Cable Modem Gateway Filtering By default, the gateway allows any connected computer to access the Internet. The Filtering screen lets you block specific computers, based on their MAC address, from access to the Internet on selected days and times. -
Page 15: Switch Port Controls
CG3000DCR Advanced Cable Modem Gateway Switch Port Controls To view the Switch Port Controls screen: From the Main menu, select LAN and click the Switch Controls tab. Cusadmin Features... -
Page 16: Firewall Settings
CG3000DCR Advanced Cable Modem Gateway Firewall Settings By default the gateway firewall is enabled to provide security to the network. You can configure firewall settings. To change the firewall settings: From the Main menu, select Firewall. Click the tabs to configure port configuration, website blocking, DMZ, and 1-to-1 NAT. -
Page 17: Port Configuration
CG3000DCR Advanced Cable Modem Gateway Port Configuration You can set up port forwarding, port triggering, port blocking, and true static IP port management. To change the port configuration: From the Main menu, select Firewall and click the Port Configuration tab. -
Page 18: Website Blocking
CG3000DCR Advanced Cable Modem Gateway Port Blocking You can use port blocking to block outbound traffic on specific ports. Outbound traffic rules control access to outside resources from local users. The default rule is to allow all access from the LAN side to the outside. You can use port blocking to add predefined or custom rules to specify exceptions to the default rule. -
Page 19: Set Up A Dmz Host
CG3000DCR Advanced Cable Modem Gateway Set Up a DMZ Host You can set up a computer to be a DMZ host. The computer that is the DMZ host will be available to anyone on the Internet for services that you have not defined. There are security issues with doing this, so set up the DMZ host only if you are willing to risk open access. -
Page 20: Disable Nat
CG3000DCR Advanced Cable Modem Gateway Disable NAT When the gateway uses Network Address Translation (NAT), your network presents only one IP address to the Internet, and outside users cannot directly address any of your local computers. To disable NAT: From the Main menu, select Firewall and click the 1-to-1 NAT tab. -
Page 21: Chapter 3 Mso Access
MSO Access This chapter describes features that are available only when logged in with the MSO user name. The following sections are included: • MSO Welcome Screen • Initial Setup • Administration • WAN IP Setup • RIP Control For information about VPN, see Chapter 4, VPN. -
Page 22: Mso Welcome Screen
CG3000DCR Advanced Cable Modem Gateway MSO Welcome Screen Log in to the gateway with the MSO user name . See Accessing the Gateway Menu page 7. When you connect to the gateway the Welcome screen displays. Initial Setup and WAN are available only for MSO users. -
Page 23: Initial Setup
CG3000DCR Advanced Cable Modem Gateway Initial Setup To view or change initial setup: Log in as MSO. From the Main menu, select Initial Setup. Change the following settings as needed: • LAN IP Address. The LAN IP address for the gateway in dotted decimal notation. The factory default setting is 10.1.10.1. -
Page 24: Administration
CG3000DCR Advanced Cable Modem Gateway Administration When logged in as MSO, the Administration screen includes more tabs for remote management, logging and reporting, and configuration tools. MSO Access... -
Page 25: Wan Ip Setup
CG3000DCR Advanced Cable Modem Gateway WAN IP Setup To view or change the WAN IP setup: While logged in as MSO, from the Main menu, select WAN. You can click Additional Public Subnets to go to the following screen: When you have made changes, click apply. -
Page 26: Rip Control
CG3000DCR Advanced Cable Modem Gateway RIP Control To set up RIP Control: While logged in as MSO, from the Main menu, select WAN and click the RIP Control tab. MSO Access... -
Page 27: Chapter 4 Vpn
This chapter describes how to use the virtual private networking (VPN) features of the gateway. VPN communications paths are called tunnels. VPN tunnels provide secure, encrypted communications between your local network and a remote network or computer. The following sections are included: •... -
Page 28: Vpn Settings
CG3000DCR Advanced Cable Modem Gateway VPN Settings To access VPN settings: From the Main menu, select VPN. The VPN Termination tab is available only when logged in as MSO. Enter the VPN settings. • To configure IpSec, click the IpSec Configuration tab. -
Page 29: Vpn Configuration
CG3000DCR Advanced Cable Modem Gateway • To create user accounts for remote PPTP and L2TP VPN access, click the PPTP/L2TP Configuration tab. VPN Configuration Two common scenarios for configuring VPN tunnels are between a remote computer and a network gateway; and between two or more network gateways. The gateway supports both of these types of VPN configurations. -
Page 30: Gateway-To-Gateway Vpn Tunnels
VPN tunnel Figure 4. VPN tunnel between two gateways A VPN between two or more NETGEAR VPN-enabled routers is a good way to connect branch or home offices and business partners over the Internet. VPN tunnels also enable access to network resources across the Internet. In this case, use gateways on each end of the tunnel to form the VPN tunnel endpoints. - Page 31 CG3000DCR Advanced Cable Modem Gateway • FQDN or Gateway IP (WAN IP Address) To set up a VPN connection, you must configure each endpoint with specific identification and connection information describing the other endpoint. You must configure the outbound VPN settings on one end to match the inbound VPN settings on other end, and vice versa.
-
Page 32: Set Up A Client-To-Gateway Vpn Configuration
CG3000DCR Advanced Cable Modem Gateway Set Up a Client-to-Gateway VPN Configuration Setting up a VPN between a remote computer running the VPN client and a network gateway involves these two steps: Configure the VPN tunnel between the remote computer and the network gateway. - Page 33 CG3000DCR Advanced Cable Modem Gateway Specify the type of encryption (DES or 3DES) for this connection. This selection must match your selection in the gateway configuration. Configure the VPN client key exchange. Specify the type of encryption (DES or 3DES) to be used for this connection. This selection must match your selection in the gateway configuration.
-
Page 34: Chapter 5 Troubleshooting
• I cannot remember the gateway’s configuration password or I want to clear the configuration and start over again. Go to Factory Default Settings on page 40. Tip: NETGEAR provides helpful articles, documentation, and the latest software updates at http://www.netgear.com/support. -
Page 35: Basic Functions
CG3000DCR Advanced Cable Modem Gateway Basic Functions After you have turned on power to the gateway, you should do the following: Check to see that the Power LED is lit. Check that the numbered Ethernet LEDs come on momentarily. After a few seconds, check that the local port link LEDs are lit for any local ports that are connected. -
Page 36: Access The Gateway Menu
CG3000DCR Advanced Cable Modem Gateway Access the Gateway Menu If you are unable to access the gateway’s main menu from a computer on your local network, check the following: • Check the Ethernet connection between the computer and the gateway as described in the previous section. -
Page 37: Troubleshoot A Tcp/Ip Network Using A Ping Utility
CG3000DCR Advanced Cable Modem Gateway Troubleshoot a TCP/IP Network Using a Ping Utility Most TCP/IP terminal devices and routers contain a ping utility that sends an echo request packet to the designated device. The device then responds with an echo reply. You can easily troubleshoot a TCP/IP network by using the ping utility in your computer or workstation. -
Page 38: Test The Path From Your Computer To A Remote Device
CG3000DCR Advanced Cable Modem Gateway Test the Path from Your Computer to a Remote Device After verifying that the LAN path works correctly, test the path from your computer to a remote device. From the Windows run menu, type: ping -n 10 <IP address>... -
Page 39: Appendix A Supplementary Information
Supplementary Information This chapter includes: • Factory Default Settings • Technical Specifications... -
Page 40: Factory Default Settings
CG3000DCR Advanced Cable Modem Gateway Factory Default Settings You can return the gateway to its factory settings. On the rear panel of the gateway, press and hold the Factory Defaults button for over 7 seconds. The gateway resets, and returns to its factory settings. Your device returns to the factory configuration settings shown in the following table. -
Page 41: Technical Specifications
CG3000DCR Advanced Cable Modem Gateway Technical Specifications The following table describes the technical specifications for the gateway. Technical Specifications Network protocol and Data and routing protocols: TCP/IP, DHCP server and client, DNS standards compatibility relay, NAT (many-to-one), TFTP client, VPN pass-through (IPSec,... -
Page 42: Appendix B Notification Of Compliance
This transmitter must not be co-located or operating in conjunction with any other antenna or transmitter. FCC Declaration of Conformity We, NETGEAR, Inc., 350 East Plumeria Drive, San Jose, CA 95134, declare under our sole responsibility that the CG3000DCR Advanced Cable Modem Gateway complies with Part 15 Subpart B of FCC CFR47 Rules. Operation is subject to the following two conditions: •... -
Page 43: Industry Canada
Canadian Department of Communications Radio Interference Regulations This digital apparatus (CG3000DCR Advanced Cable Modem Gateway) does not exceed the Class B limits for radio-noise emissions from digital apparatus as set out in the Radio Interference Regulations of the Canadian Department of Communications. - Page 44 Cet équipement doit être installé et utilisé avec un minimum de 20 cm de distance entre la source de rayonnement et votre corps. Interference Reduction Table The table below shows the recommended minimum distance between NETGEAR equipment and household appliances to reduce interference (in feet and meters). Household Appliance...
Need help?
Do you have a question about the CG3000DCR and is the answer not in the manual?
Questions and answers