Table of Contents
Advertisement
Quick Links
User manual
Gas detection control panel
DEGA UDA III
Reproduction of these operating instructions or parts thereof in any form without the prior written permission of
DEGA CZ s.r.o. is prohibited.
Company DEGA CZ s.r.o. reserves the right to change the specifications of the hardware and software described in
this manual at any time without notice.
Company DEGA CZ s.r.o. shall not be liable for damages resulting from the use of the device.
Advertisement
Table of Contents

Related Manuals for DEGA DEGA UDA III


Summary of Contents for DEGA DEGA UDA III
- Page 1 Reproduction of these operating instructions or parts thereof in any form without the prior written permission of DEGA CZ s.r.o. is prohibited. Company DEGA CZ s.r.o. reserves the right to change the specifications of the hardware and software described in this manual at any time without notice.
-
Page 2: Table Of Contents
DEGA UDA III AI8 ............................... 9 Product description ................................10 3.1.1 DEGA UDA III 100/200 ............................. 10 3.1.2 DEGA UDA III 100/200, PCB (I/O card) ........................11 3.1.3 Processor card ................................. 12 Construction ................................... 13 Control panel assembly ..............................13 Drilling holes for bushings ............................... - Page 3 External IC tab ................................. 44 6.8.1 Relay card UDA III RE16............................45 6.8.2 DEGA AI8 analog input card ............................ 46 6.8.3 UPS ..................................46 Signals tab ..................................47 6.9.1 Digital signals ................................47 6.9.2 Analog signals ................................47 Events tab ..................................49 Settings tab ..................................
- Page 4 Figure 16 CAN termination jumper - expansion cards on the control panel are located near the CAN connector ....... 24 Figure 17 CAN termination jumper on the expansion cards is located between the CAN connectors .......... 24 Figure 18 Description of DEGA UDA III RE16 ..........................26 Figure 19 Description of DEGA UDA III AI8 ............................. 28 Figure 18 First start-up ..................................
- Page 5 Figure 54 LTE modem settings ................................ 65 Figure 55 Ethernet settings ................................67 Figure 56 Relay test ..................................68 Figure 57 Fictitious concentration test ............................69 Figure 58 Transmitter blocking ............................... 70 Figure 59 Service mode ................................... 70...
- Page 6 Table 1 Voltage levels of digital inputs ............................21 Table 2 Address range DEGA UDA III RE16 ............................. 25 Table 3 Meaning of the DEGA UDA III RE16 indicator LEDs ......................26 Table 4 Address range DEGA UDA III AI8 ............................27 Table 5 Meaning of the DEGA UDA III AI8 indicator LEDs .......................
-
Page 7: For Your Safety
1 For your safety Beware of static electricity Electronic components are sensitive to static electricity. Do not touch them directly - the risk of damage! The device is intended for installation by a trained person The product is intended for installation by a certified technician only. The manufacturer is not liable for damages caused by incorrect or unprofessional handling. -
Page 8: Technical Details
Transmitter connection cable: via HART (4-20 mA) shielded cable 3 x 1 mm (max. 1200 m) or 3 x 1.5 mm (max. 2400 m) (only with DEGA UDA III AI8 card) via RS485: shielded cable 4 x 0.8 mm (max. 1200 m) shielded cable 4 x 1.5 mm (max. -
Page 9: Extension Modules
Maximum bus length: 10 m Maximum number of cards: Address range: 201-220 2.2.2 DEGA UDA III AI8 Expansion card with 8 analog 4-20 mA inputs with HART support. Consumption: 40 mA Input: 8x 4-20 mA with HART support Maximum transmitter distance:... -
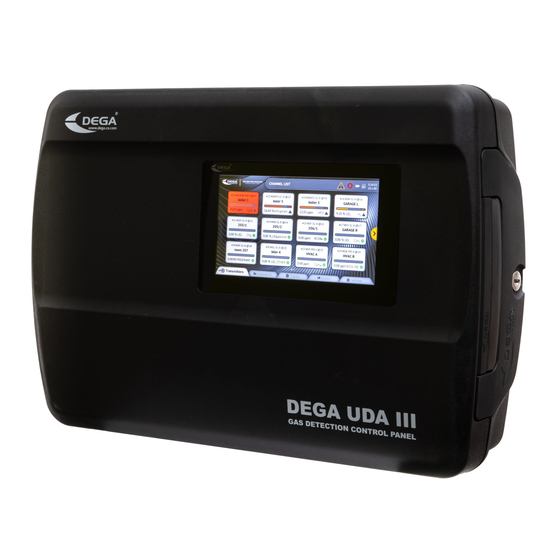
Page 10: Product Description
The graphic display allows clear visualization of the detection status, viewing the alarm history, and also the complete settings of the control panel without the need to use a PC. 3.1.1 DEGA UDA III 100/200 Figure 1 Exterior view Cover... -
Page 11: Dega Uda Iii 100/200, Pcb (I/O Card)
3.1.2 DEGA UDA III 100/200, PCB (I/O card) Figure 2 I/O card Relays 11-13 Relays 1-4 Relay 15-20 Relay 5-10 Output for sound signaling Output for light signaling Output 24V DC 5A max Fuse 5A-T output for sound and Bus connector for DEGA UDA III... -
Page 12: Processor Card
3.1.3 Processor card Figure 3 Processor card USB connector uSD card SIM card LTE modem SMA antenna LTE modem RJ45 - ethernet Battery 2032... -
Page 13: Construction
4 Construction Prior to mounting, read the valid installation standards ČSN EN 60079-29-2 (Selection, installation, use and maintenance of flammable gas and oxygen detectors) and ČSN EN 45544-4 (Instructions for selection, installation, use and maintenance of toxic substance detectors). In explosive areas, the electrical installation must be carried out in accordance with the ČSN EN 60079-14 standard (electrical installation in hazardous areas). -
Page 14: Drilling Holes For Bushings
Put the handle on the lid Press the handle to close the lid Secure with a key Drilling holes for bushings There are 28 holes for the PG11 bushing and 4 holes for the PG21 bushing in the control panel box. Take extra care when drilling holes to avoid damaging the internal electronics. -
Page 15: Selection Of Supply Voltage And Maximum Current Load
Install bushings Note: The bushings must be carefully tightened after cable installation. This is the only way to ensure IP protection according to these instructions. Selection of supply voltage and maximum current load 4.3.1 Supply voltage 100-230V AC The maximum current load of the control panel is 6300 mA (maximum source load). This current is used to power the connected transmitters and the optical and sound signals, which are connected to the "LIGHT_SIG"... - Page 16 Figure 4 Connection of backup power supply and control panel...
-
Page 17: Connection Of Transmitters Via Rs485 Bus
Connection of transmitters via RS485 bus The transmitters can be connected to the control panel via a digital RS485 bus. The control panel has 8 independent RS485 lines. All transmitters can be connected to one line, but it is recommended to balance the transmitters on multiple lines due to power loss on the wires. -
Page 18: Cabling Installation For Rs485
Figure 6 Circular topology Figure 7 Cable break between transmitter 2 and 3. Communication has broken down into 2 independent BUSes. No communication was lost. 4.5.1 Cabling installation for RS485 The cabling must be suitably dimensioned to prevent excessive voltage drops on the bus. It is recommended that for 32 transmitters on the bus/ring, the maximum distance between the control panel and the last transmitter is 500 m. -
Page 19: Termination Resistor
Connection of transmitters using 4-20 mA If it is required to connect transmitters to the control panel using 4-20 mA, it is necessary to use DEGA UDA AI8 expansion modules. Up to 8 transmitters can be connected to each module. The maximum number of modules is 25 pcs. -
Page 20: Connection Of Optical And Sound Signaling
Figure 10 Connection of transmitters using 4-20 mA Connection of optical and sound signaling Figure 11 Signaling connection Note: The outputs are protected by a 5A-T tubular fuse. Output relay Each relay can be configured to activate the following arbitrary number and combination of events: 4 levels of gas leak alarm, PEL, STEL, transmitter failure, and control panel signal states. -
Page 21: Connection Of Temperature Sensor And Sound Stop Button
Figure 12 Termination resistor RS485_HOST Connection of temperature sensor and sound stop button Figure 13 Connecting accessories Digital inputs The control panel is equipped with a pair of digital inputs for general use, such as a flood sensor, smoke detection transmitter, etc. -
Page 22: Installation Din Rail
5) The sound signal is connected to the sound_sig output 6) Optical signaling (non-ATEX) is connected to the light_sig input 7) Optical signaling DEGA MR-EX II (ATEX - ia safety) is connected via a zener barrier to relay 20 and powered from 24V OUT output 8) RE1 controls the actuator - at rest, the contacts are open. - Page 23 Figure 15 Sample connection of the control panel...
-
Page 24: Expansion Cards
It is possible to connect expansion peripherals to the control panel to increase the possibilities of the control panel. They include: DEGA UDA III AI8 - expansion board for 8 transmitters with 4-20 mA current loop with HART support DEGA UDA III RE16 - expansion board with 16 relays. -
Page 25: Dega Uda Iii Re16
The maximum number of cards that are simultaneously connected to the control panel is 20 pcs and they can be operated in the address range 201-220. Each card (UDA III RE16 and UDA III AI8) on the CAN bus must have a unique address set. address address Table 2 Address range DEGA UDA III RE16... - Page 26 Relay 2 Relay 1 LED POWER LED ERROR Description Defective device Functional Flashing Initialization Flashing Flashing Device error Flashing fast Active bootloader Flashing fast at each other Bootloader (CRC flash error) Table 3 Significance of LED indicators DEGA UDA III RE16...
-
Page 27: Dega Uda Iii Ai8
The maximum number of cards that are simultaneously connected to the control panel is 8 pcs and it is possible to operate them in the address range 201-253. Each card must have a unique address set. Address range address address address Table 4 Address range DEGA UDA III AI8... - Page 28 Flashing fast at each other Bootloader (CRC flash error) Table 5 Significance of DEGA UDA III AI8 indicator LEDs Transmitter connection - see the manual for the respective transmitter. The connected analog transmitters receive a virtual address in the range 1-200. Which the control panel then works with. See...
-
Page 29: Graphical User Interface
6 Graphical user interface The control panel is equipped with a TFT touch screen. In the basic state, the concentrations and states of the individual configured channels are displayed. You can switch between channels using the navigation buttons. The user interface is designed for easy control and setup of the control panel using the touch screen. -
Page 30: Menu Structure
Menu structure Transmitters tab Channel details Output configuration matrices External IC tab Signals tab Events tab Channel value history Settings tab Control panel settings Transmitter settings Transmitter settings Output configuration matrices Expansion tab settings AI8 settings... - Page 31 RE16 settings Output settings Output settings Communication interface Relay test Fictitious configuration test Transmitter blocking Service mode Figure 21 Menu structure...
-
Page 32: Transmitters Tab
Channel alarm history Output settings for channel events (read only) 6.2.2 External IC tab Status of external IO cards DEGA UDA III RE16 DEGA UDA III AI8 Uninterruptible power supply UPS Temperature sensor Details of individual cards Channel value history... -
Page 33: Control Panel Screen Structure
Control panel screen structure The control panel screen consists of several parts - a status bar for indicating status information, navigation buttons to move in the selected screen, and a tab bar for switching function screens. Status bar Bookmarks Navigation - more Obr. - Page 34 with the acknowledgment function enabled. Deactivating the output using the Acknowledgment button or ending the alarm that caused the output to be activated will also deactivate the icon. Logged in user + role name (service / user) UPS - mains supply indication UPS - battery powered indication UPS - battery error GSM modem - signal strength indication.
-
Page 35: Control Options Of The Control Panel
Control options of the control panel The touch screen is used exclusively to control the control panel. The alphanumeric keypad dialog on the 'QWERTY' screen is used to enter text values, and the numeric keypad is used to enter numeric values. The dialog is closed either by pressing the Save button or by the Close button. -
Page 36: Control Panel Architecture
Control panel architecture 6.5.1 Control panel channel The control panel channel represents one transmitter connection to the control panel. The control panel channel contains the transmitter settings and processes the measured data by the transmitter. The output of the channel is status information and signals, which are further processed by the control panel. -
Page 37: Digital Outputs
6.5.2 Digital outputs The following figure describes how to control and function the digital outputs. The output of requests for switching the output from individual channels is introduced into the voting block. If the number of requests is higher than the set voting limit for the output, the request continues to the cascade of delayed-on and delayed-off blocks. -
Page 38: Service Mode
Parameter Parameter Description Inhibit acknowledgment Used for outputs controlling acoustic signaling. In the event of an alarm, the output can function be deactivated using the Acknowledgment button. The output will remain deactivated for the duration of the alarm. To reactivate the output, the alarm must end and the next alarm will reactivate the output. -
Page 39: Transmitters Tab
Transmitters tab The basic screen of the control panel where the status and values of individual channels are displayed. Each channel is represented by a graphic element with a description (location) of the transmitter and the measured value. 12 transmitters are displayed on one page, you can switch between the pages using the navigation buttons. -
Page 40: Channel Status
6.6.1 Channel status The status of the channel is indicated by the color background of the channel graphics and the graphic appearance of the channel element. The following table describes the individual states and how they are indicated. This is an overview information, details can be obtained by clicking on the channel and displaying the channel details screen. -
Page 41: Channel Sorting
6.6.2 Channel sorting By default, the channels on the screen are sorted by status. Each state is assigned a priority, channels are displayed from the highest priority. As a result, the home screen first displays channels that are not working and require the user's attention. If several events occur at the same time (e.g. - Page 42 List of status information: Item name Description Type Transmitter / device type name Interface The name of the interface to which the transmitter is connected Serial number Transmitter serial number Gas type Detection of detected gas (chemical symbol) Address Transmitter address on the bus FW version Transmitter firmware version Value...
-
Page 43: Channel Value History Screen
6.6.4 Channel value history screen The dialog is used for graphical display of the history of channel values. The X axis of the graph represents the sampling time of the value and the Y axis the value of the channel. The range of the Y axis is given by the channel 'offset' parameter (lower limit, usually 0) and the ALARM4 value (upper limit). -
Page 44: External Ic Tab
External IC tab The External IO screen displays the status of external devices, such as the UDA III RE16 and UDA III AI8 I/O expansion cards, the status of the UPS, and the status of the temperature sensor. Individual devices are interpreted in the same way as transmitters on the Transmitters tab. The individual UDA III RE16 and UDA III AI8 devices must have a unique address set and cannot be in an address conflict with the transmitters. -
Page 45: Relay Card Uda Iii Re16
6.8.1 Relay card UDA III RE16 Relay card main screen with user selectable label, card information, and the current relay status. Alarms - log of events triggered by the card Outputs - view the configuration matrix of outputs Figure 32 Relay card Figure 33 Configuration matrix... -
Page 46: Dega Ai8 Analog Input Card
6.8.2 DEGA AI8 analog input card Analog card main screen, with user selectable label, card information and current relay status. Alarms - log of events triggered by the card Figure 34 Analog input card 6.8.3 main screen Figure 35 UPS... -
Page 47: Signals Tab
Signals tab The status of the control panel's IO signals is displayed on the signals screen. The IO status of the user signals informs which relays are closed and which inputs are active. The value of analog signals such as event error counters and UPS battery voltage is also displayed. - Page 48 Error Error event counter. A non-zero value of the counter is also indicated by a flashing Error icon in the status bar. The counter can be cleared by pressing the Signal button. Acknowledgment Acknowledgment button. The icon also functions as an Acknowledgment button of the control panel and deactivates outputs with the acknowledgment function enabled.
-
Page 49: Events Tab
Events tab In the Events tab, the control panel displays the history of events. Each record is divided into several columns. The first column contains a button to display the channel values at the time the event occurred and the second channel number. If the event is not channel-bound, both columns are blank. -
Page 50: Settings Tab
Settings tab The control panel settings are password protected. To enter the menu, the user must first log in. Three user roles are defined, the user is selected by entering the appropriate password. Therefore, different users must have different passwords. Figure 39 User login dialog Role Password... -
Page 51: Control Panel Settings
6.11.1 Control panel settings The dialog is used to set general parameters and functions of the control panel. Figure 41 Control panel settings Dialog item Description User Service Device name Control panel description External temperature sensor External control panel temperature sensor - enable / set ... -
Page 52: Temperature Sensor
6.11.2 Temperature sensor The dialog is used to configure the external control panel temperature sensor. The value of the sensor channel is the measured temperature [°C]. Furthermore, the control panel diagnoses the functionality of the sensor and activates the signal of the ERROR channel in the event of a sensor failure. -
Page 53: Ups
6.11.3 UPS The dialog is used to configure the UPS. The sensor channel value is the measured UPS battery voltage [V]. Furthermore, the control panel evaluates the UPS status signals and can be responded to by activating a channel alarm. Figure 43 UPS Dialog item Description... -
Page 54: System Log Dialog
6.11.4 System log dialog Display of the control panel system log. The system log contains detailed information about the events and the status of the control panel. It can be used to diagnose and detect control panel errors/problems or the entire installation. Figure 44 System log 6.11.5 Time setting The dialog is used to manually set the control panel time. -
Page 55: Changing The Password
6.11.6 Changing the password The dialog allows you to change the password of the currently logged-in user. For a successful change, you need to enter the old password and then the new password with confirmation. Successful password change leads to closing the dialog. In case of unsuccess, the user is informed by a messagebox with a description of the error (invalid old password / new confirmation error). -
Page 56: Control Panel Reset
6.11.8 Control panel reset Invokes the control panel reset. Figure 48 Control panel reset... -
Page 57: Transmitter Settings
6.11.9 Transmitter settings The dialog is used to set the transmitters connected to the control panel. The first part of the dialog is a screen with a list of configured transmitters. Figure 49 Settings - selection of transmitters Selecting a transmitter displays the settings dialog for that transmitter. The user has the option to change the transmitter settings by touching the appropriate editbox. - Page 58 Dialog item Description Description Channel description. Touch to call up the value editing dialog Address Transmitter address on the bus Alarm1 The set value for ALARM1 in the transmitter. The units of value are the same as the units of the measured quantity. Alarm2 The set value for ALARM2 in the transmitter.
-
Page 59: Expansion Cards
6.11.11 Expansion cards Settings of individual expansion cards UDA III RE16 and UDA III AI8 Figure 51 Expansion cards UDA III RE16 Label - user label Outputs and RE1-RE16 - Setting of individual output relays. Same logic as for the control panel relay. See chapter 9.11.12 Relay test - manual relay test. -
Page 60: Output Settings
6.11.12 Output settings The dialog is used to set the parameters of the control panel's digital outputs. The first part of the dialog is the screen with the list of outputs and selecting the output will display the dialog of parameters of a specific output. Figure 49-2 Settings - outputs Figure 52 Output parameters Dialog item... - Page 61 Delayed start After deactivation, the output will not be switched off until the specified delay. Vote Necessary number of channels requiring activation in order to close the output. Negated output The negated output is closed in the idle state and opens when ...
-
Page 62: Communication Interface
RS485_BUS Interface for connecting DEGA transmitters USB DEGA slave Enables the DEGA (DegaConfig) protocol on the USB interface. Otherwise, USB is used as a service terminal. LTE modem SMS settings for alarms ... -
Page 63: Rs485_Host Settings
6.11.14 RS485_HOST settings RS485_HOST is a universal RS485 interface that can be used to connect the control panel to a DEGA Visio system or service using DegaConfig (DEGA slave protocol). Or the Modbus protocol can be used to connect to a remote PLC. -
Page 64: Rs485_Bus Settings
6.11.15 RS485_BUS settings RS485 interface for connecting DEGA transmitters to the control panel. The control panel contains a total of 4 interfaces marked RS485_BUS #0 to RS485_BUS #3. Depending on the settings, it is possible to use the individual interface as separate 4 segments or to connect two interfaces as one redundant segment. -
Page 65: Lte Modem Settings
6.11.16 LTE modem settings The LTE modem is used to send SMS messages in the event of an alarm or transmitter failure to the specified telephone numbers. The SMS contains similar information as can be found in the record in the 'Events' tab. The control panel allows you to set a limit on the number of sent SMS to prevent overload of recipients in case of many events on a large network of transmitters. - Page 66 Separator Transmitter Separator Event description occurred location Table 31 SMS - description of events Example of an SMS message: 3/12/19 10:21 AM DEGA UDAIII; CH4: STORAGE A4: No alarm -> Alarm 1; CH4: STORAGE A4: Alarm 1 -> Alarm 2;...
-
Page 67: Ethernet Settings
6.11.17 Ethernet settings The ethernet interface can be used for remote monitoring with the DEGA VISIO visualization tool, to alert the user in the event of an alarm using classic email messages or to connect the control panel to a remote PLC using the Modbus protocol. -
Page 68: Relay Test
6.11.18 Relay test Using the dialog, you can manually activate/deactivate the control panel outputs and test the connected technology. Opening the dialog sets all outputs to the inactive state and pressing the corresponding output changes its state. Figure 58 Relay test Tip: Closing the dialog restores normal relay operation... -
Page 69: Fictitious Concentration Test
6.11.19 Fictitious concentration test The fictitious concentration test is used to test the control panel settings and verify the correct response to alarms from transmitters. When setting a fictitious concentration, the control panel behaves as if the given transmitter was measured by the transmitter itself. -
Page 70: Transmitter Blocking
6.11.20 Transmitter blocking In the event of a transmitter failure, the 'transmitter lock' function can be used to remove a channel from the list of active channels. The control panel with a blocked transmitter does not communicate and deactivates all signals (ALARMS) of the channel. -
Page 71: Faq
6.12.1 How to add a new transmitter 1 Settings → Transmitter settings → 'Add transmitter' button 2 Enter the channel number for which the transmitter is added. It is recommended to use the channel number corresponding to the transmitter address (channel = address). 3 Enter an address (if it does not match the channel number) 4 Press the Load button The parameters are read from the connected... -
Page 72: Acknowledgment Of The Alarm
6.12.2 Acknowledgment of the alarm 1 Settings → Output settings → select output 2 Check the 'Acknowledge button' option 3 If the corresponding output is activated, the acknowledgment icon appears in the status bar 4 The alarm can be acknowledged by pressing an external button or by pressing the Acknowledgment button in the 'Signals' tab Table 35 Acknowledgment of the alarm... -
Page 73: How To Block A Faulty Transmitter
6.12.3 How to block a faulty transmitter 1 Settings → Transmitter blocking 2 Click to select the channels you want to block. 3 The marked channels are now inactive and the control panel ignores them. Table 36 How to block a faulty transmitter 6.12.4 How to name transmitters 1 Settings →... -
Page 74: Operation / Maintenance
Substances for testing fire alarms must not be used for "functional inspection"! Perform the calibration only in certified services with a valid certificate of competence or at the manufacturer. For the Czech Republic, it is only DEGA CZ s.r.o. Battery replacement The battery life is 5-10 years and is used to back up the control panel's internal clock. -
Page 75: Side Dishes
8 Side dishes Modbus communication Modbus RTU specification Node type Slave Baud rate 9600 Data bits Stop bits Parity none Address Can be set in DegaConfig Protocol Supported function code 3 - read holding register Broadcast Table 38 Modbus RTU specification Modbus Modbus Type... -
Page 76: General Warranty Conditions
The complete wording of the General Terms and Conditions and the Complaints Procedure can be found at www.dega.cz Manufacturer: DEGA CZ sro, Malešická 2850 / 22c, 130 00 Prague 3, Czech Republic VAT No.: CZ 279 029 43, Company Identification Number: 279 02 943; Telephone: +420 774 447 660, E-mail: info@dega.cz , Web: www.dega.cz ©...
Need help?
Do you have a question about the DEGA UDA III and is the answer not in the manual?
Questions and answers