Table of Contents
Advertisement
Advertisement
Table of Contents

Subscribe to Our Youtube Channel
Related Manuals for PowerBox Systems Competition SR2


Summary of Contents for PowerBox Systems Competition SR2
- Page 1 INSTRUCTION MANUAL 04/2021 PowErBox CompEtition Sr2...
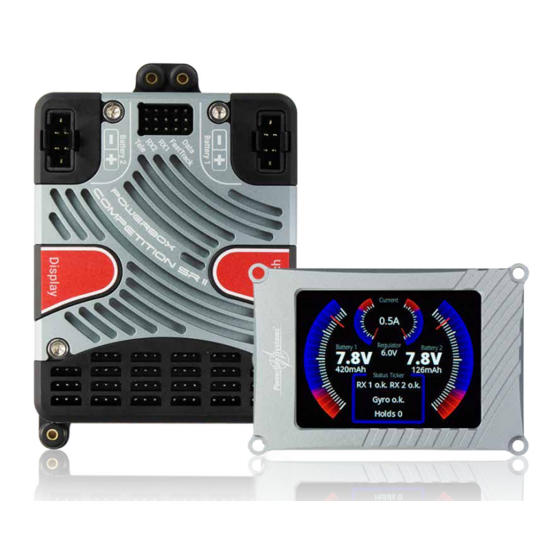
- Page 2 At the same time we were able to reduce the overall size of the Competition SR2 subs- tantially. The associated Sensor-Switch and TFT screen are also housed in a ma- chined aluminium case, matching the quality appearance of the SR2 itself.
- Page 3 The servo matching feature is now displayed in graphic form on the screen, and the PowerBox Competition SR2 also allows the servo response to be adjusted using five curve points. A new development is automatic servo matching. It is a very sim-...
- Page 4 FEATURES + 22 channels + High-performance battery backer with high continuous load capacity + 2.4” TFT-screen, legible in sunlight + Bi-lingual menu system + Consistent duplication of all power electronics + Redundant electronic switch + Servo matching for all 22 outputs + Auto matching function + Two independent door sequencers with Setup Assistant + The latest integrated iGyro technology, using the iGyroSAT as gyro sensor...
- Page 5 When installing the unit it is important to keep to the standard sequence described below, and adhere to the subsequent setup stages, as this ensures that your instal- lation of the Competition SR2 will be swift and problem-free. The individual points are explained in full in the remainder of these instructions:...
- Page 6 PowerBox. b) Receivers Once you have installed the Competition SR2, the screen and the switch, it is time to connect the receivers. In principle all SRS PowerBox systems are totally reliable when used with a single receiver. However, in view of the low cost of a second receiver compared with the value of the model, we always recommend installing a second receiver.
- Page 7 • Spektrum SRXL 2 Connect one or two SPM4651T satellites to the Competition SR2 using the optio- nal adapter lead set (#9192). If only one receiver is to be used, it must be connec- ted to RX1 to provide telemetry transmission. At the transmitter you will now see the battery data displayed under PowerBox Sensor.
-
Page 8: Switching On And Off
Connecting the batteries It is possible to use 2S LiPo, 2S LiIon, 2S LiFePo or 5S NiMH batteries with the Competition SR2. We recommend that you use our PowerPaks, which feature integral charge electronics. The fundamental rule regarding battery size is that one battery on its own should be capable of powering the model reliably. - Page 9 The TFT screen now displays the following image: Analogue battery voltage display, with recorded minimum value. The momen- tary value is indicated by the red line, while the grey line indicates the minimum voltage which occurred during the flight. The scale of the analogue display is automatically adjusted to suit the battery type you have selected.
- Page 10 4. MAIN MENU To access the menu you need to hold the SET button pressed in for about 2 - 3 seconds, after which you can select the desired menu using buttons I and II. Within the individual menus the selected menu point is always displayed in red. Press the SET button once you have selected a menu point.
-
Page 11: General Settings
• Input The transmitter channels are assigned to the iGyro or sequencer here. • General This menu is used to alter fundamental settings such as the language or frame rate. • Assistent Always use the Setup Assistant when you are preparing a new model for its first flight. -
Page 12: Setup Assistent
• Regulator output Here you can select your preferred output voltage: you can choose between 6.0V, 7.4V, 7.8V and unregulated output. We recommend the 7.8V option even for HV servos, as this setting ensures that your servos operate with constant torque and transit speed for a long period after switching on. - Page 13 FastTrack on the Competition SR2. If you are also using a GPS III as telemetry sensor (and for gyro speed compensation), this should also be connected to the FastTrack input using a Y-lead.
- Page 14 You will now see further screen displays which vary according to the data you have already entered. The following illustrations show the aileron channel as an example, based on the above data: The left-hand picture shows the empty display. Now move the aileron stick at the transmitter: the PowerBox checks the input: in this example four channels should move.
- Page 15 You need to assign a channel with +/-100% travel to a rotary control at the transmit- ter. Even if you have not connected an iGyroSAT, this action is recommended as it will make it easier to retro-fit the gyro. If you have selected a thrust vector function, you will see a second query regarding the sensitivity of the thrust vector control system.
- Page 16 This is accomplished by moving the model in the directions shown in the graphic display: first move the tail of the model up and down two or three times. You will see that the elevators follow this movement every time - the direction of effect is not important at this stage.
- Page 17 In this menu the system learns the aileron, elevator and rudder sticks as you hold each stick in the direction shown on the screen, and press the SET button. The Setup Assistant is now finished, but you can still assign additional outputs ma- nually, carry out the Door Sequencer Assistant, or match multiple servos.
- Page 18 Select this menu point if you want to adjust the travel of the selected servo ma- nually using five points. The Competition SR2 switches to this display: The procedure is very simple: use buttons I and II to select the point on the curve which you wish to change, then press the SET button.
- Page 19 How does auto matching work? The Competition SR2 is fitted with the latest generation of micro-controller which is capable of measuring the current drawn from both batteries extremely quickly and precisely. The values for measured current are used to match two or three mechanically linked servos to each other.
- Page 20 Now select Auto Matching. At this moment all the Competition SR2’s other out- puts are switched off, and you will see this message: Now connect the second and - if present - the third servo to the appropriate out- puts, and complete the mechanical linkages. Now use buttons I and II to move the cursor to the sockets to which the servos are connected, and press the SET button.
- Page 21 8.DOORSEQUENZER The Competition SR2 incorporates two independent, fully programmable door se- quencers. For example, Sequencer A can be set up to control the undercarriage and wheel doors, while Sequencer B could be used to implement an opening canopy with latch.
- Page 22 This means: the Assistant renames the doors in accordance with your own data, and this makes it simpler to make adjustments later. More on this below. Regarding the individual menu points: • Sequenzer Select the sequencer you want to set up: Sequencer A or Sequencer B. •...
- Page 23 After this, the Assistant assembles these positions in accordance with your selected mode (1-2-3 - see next page) in a timed sequence. We recommend that you always use the Setup Assistant – it will save you a great deal of adjustment work, and any non-standard movements can subsequently be added at any time using Manual Setup.
- Page 24 Competition SR2. Starting with A the Assistant sear- ches for outputs which have no special functions – i.e. Direct xy outputs, which are not assigned to a gyro or other sequencer function.
- Page 25 Note: it is important to keep to the standard sequence when installing the Competition SR2 for the first time: Setup Assistant (basic setup) –> Sequencer Assistant –> manual output as- signment of all other functions. If you ignore this, the Sequencer Assistant could overwrite Direct functions which are already assigned.
- Page 26 b) Manual Setup You will find an overall view of the sequence for the selected function in the main Sequencer menu. The upper line shows the sequence in the forward direction (extension), the lower line the reverse sequence (retraction). In Manual Setup you can set seven travel points in time and position for each function;...
-
Page 27: Output Mapping
This is shown in the example above, where the three right-hand points on the upper line are at the same position. As a basic rule the time can only be entered between the two points at left and right. If you want to shorten the entire sequence, you must move all the points. - Page 28 Press the SET button to select the output. On the next screen you can now define the output: • Function type Three different function types are available: -Direkt Selecting a Direct channel assigns a transmitter channel directly to the selected output without modification (except for servo matching).
-
Page 29: Input Mapping
If you are using a CORE system, the Failsafe settings are adopted from the trans- mitter; this overwrites any Failsafe settings which you select at the PowerBox Competition SR2. 10. INPUT MAPPING The Input Mapping menu is used to assign the channels coming from the transmitter to functions such as Gyro, Sequencer or capacity reset. - Page 30 The iGyro menu requires an iGyroSAT connected to the FastTrack in- put of the Competition SR2 as sensor unit. An optional GPS III - also connected to FastTrack - can be used to provide speed compensation for gyro gain.
- Page 31 • Range Two ranges are available, each of which can be adjusted separately for each axis: range A and range B. Range A applies to values of the gain control (or gain switch, once set up) between 0% and +100%, while range B runs from 0% to -100%. At 0% the iGyro is completely disabled.
- Page 32 The airspeed factor should be increased if the model displays good gyro respon- se at low to medium speed, but tends to oscillate at high speeds. Over the years the default value of 4 has proved ideal for all kinds of model. •...
- Page 33 • Learning the transmitter stick end-points This setting is very important, and should always be carried out if you alter the centre or end-points of the aileron, elevator or rudder gyro functions. Follow the instructions on the screen to learn the stick end-points. Please note that you must select the stick you wish to learn, and hold it at its end-point while you press the SET button.
- Page 34 This is used to set the optimum gyro response for the vector function in a separate test-flight. Gyro gain for thrust vector control generally requires a value higher than 100%. Since the Competition SR2 features integral gain controls for each individual gyro function, it is possible to implement different flight modes at the transmitter with no great effort.
-
Page 35: Specification
115 g Weight, Sensor-Switch 15 g Temperature range -30 °C to +75 °C 14. SET CONTENTS - PowerBox Competition SR2 - TFT-Display - SensorSwitch - 2 patch-leads - 8 retaining screws - 4 rubber grommets and brass sleeves - Operating instructions... - Page 36 15. DIMENSIONS PowerBox-Systems − World Leaders in RC Power Supply Systems...
- Page 37 16. ACCESSORIES - PowerBox iGyro SAT Order No.: 3610 Features: + Extremely accurate triple-axis MEMS sensor + Special regulatory algorithm designed for fixed-wing model aircraft + Outputs the new FastTrack serial bus + Plug and Play with all PowerBox receivers + Installed orientation can be selected + 16-bit processor for fast, high-resolution signal processing...
-
Page 38: Service Note
They are guaranteed “Made in Germany”! That is why we are able to grant a 24 month guarantee on our Competition SR2 from the initial date of purchase. The guarantee covers proven material faults, which will be corrected by us at no charge to you. -
Page 39: Liability Exclusion
For this reason we deny liability for loss, damage or costs which arise due to the use or operation of the PowerBox Competition SR2, or which are connected with such use in any way. Regardless of the legal arguments employed, our obligation to pay damages is limited to the invoice total of our products which were involved in the event, insofar as this is deemed legally permissible. - Page 40 04/2021 PowerBox-Systems GmbH Ludwig-Auer-Straße 5 86609 Donauwörth Germany +49-906-99 99 9-200 +49-906-99 99 9-209 www.powerbox-systems.com...
Need help?
Do you have a question about the Competition SR2 and is the answer not in the manual?
Questions and answers