
Related Manuals for Universal Robots 3PE Teach Pendant


Summary of Contents for Universal Robots 3PE Teach Pendant
- Page 1 Teach Pendant with 3- Position Enabling Device Installation Guide Original instructions (en)
- Page 3 You can download this document in English from the location listed below: 您可以从下面所列位置下载本文档的中文版本: 您可以從下方列出的位置下載本文件的中文版: Tento dokument si můžete stáhnout v češtině z níže uvedeného umístění: Du kan downloade dette dokument på dansk fra den placering, der er angivet nedenfor: Sie können dieses Dokument in deutscher Sprache von dem unten aufgeführten Speicherort herunterladen: Puede descargar la versión en español de este documento desde la siguiente ubicación: Vous pouvez télécharger ce document en français depuis l'emplacement ci-dessous :...
-
Page 4: Table Of Contents
5.1. Required items 5.2. Removing the Teach Pendant 5.3. Installing the 3PE Teach Pendant 6. Software installation 6.1. Configuring the 3PE Teach Pendant software 7. 3PE Teach Pendant button functions 7.1. Using the 3PE buttons 7.2. Using Freedrive 7.3. Using Move Robot into Position 8. Copyright and disclaimers 9. Compliance... -
Page 5: Introduction
This guide describes how to install a Universal Robots Teach Pendant with 3-Position Enabling (3PE) Device on a Universal Robots e-Series robot and how to configure the software. In this document the product is also referred to as the 3PE Teach Pendant. 1.2. What's in the box The box contains the following parts: •... -
Page 6: Product Description
2. Product description The Teach Pendant with 3-Position Enabling Device is a Universal Robots Teach Pendant with built-in 3-Position Enabling Device functionality. The 3-Position Enabling Device is accessible via the buttons on the underside of the Teach Pendant, as illustrated below. You can use either button, according to your preference. Power button Emergency Stop button USB port (comes with a dust cover) -
Page 7: Use Of Product
The Teach Pendant with 3-Position Enabling Device consists of the following components: • 3PE Teach Pendant with attached Teach Pendant cable 2.3. Requirements The robot system software, using the 3PE Teach Pendant must be newer than V5.8.0 NOTICE Installing an Teach Pendant with 3-Position Enabling Device in a robot system using software version older than V5.8.0 can result in damage to equipment or... -
Page 8: Cleaning Your Robot
3. Cleaning your robot 3.1. Everyday cleaning You can wipe away any dust/dirt/oil observed on the robot arm and/or Teach Pendant using a cloth and one of the following cleaning agents: Water, Isopropyl alcohol, 10% Ethanol alcohol or 10% Naphtha. In rare cases, very small amounts of grease can be visible from the joint. This does not affect the function, use, or lifetime of the joint. -
Page 9: Safety
4. Safety 4.1. Safety message types Safety messages in this document contain information to help you avoid injury or equipment damage. This document contains the following safety message types. WARNING This safety message indicates a hazardous situation that, if not avoided, could result in death or serious injury. - Page 10 WARNING Incorrect connection of the power source or ground wires can result in equipment damage or personnel injury. Damage caused by invalid power source connection is not covered by warranty. Before starting the operation: • Ensure that the power source wiring is correct. •...
-
Page 11: Hardware Installation
5. Hardware installation This section describes how to replace a standard Teach Pendant with the 3PE Teach Pendant. For information on configuring the 3PE Teach Pendant software, see 6. Software installation on page 13. 5.1. Required items You need the following items to install the 3PE Teach Pendant: • 3PE Teach Pendant 5.2. Removing the Teach Pendant NOTICE Replacing the Teach Pendant can result in the system reporting a fault on start- •... -
Page 12: Installing The 3Pe Teach Pendant
5. Gently remove the Teach Pendant cable and Teach Pendant. Clips Plastic grommet Cable ties 5.3. Installing the 3PE Teach Pendant 1. Place the Teach Pendant plug and cable in through the bottom of the control box and fully close/tighten the plastic grommet. 2. Push the Teach Pendant plug into the Teach Pendant port to connect. 3. -
Page 13: Software Installation
6. Software installation This section describes how to configure the 3PE Teach Pendant software. For information on installing the 3PE Teach Pendant hardware, see 5. Hardware installation on page 11. 6.1. Configuring the 3PE Teach Pendant software 1. On PolyScope, in the Header, tap Installation and select Safety. 2. Tap Hardware and unlock the options on the Select available hardware screen. A password is required to unlock this screen. - Page 14 3. In the Teach Pendant drop-down list, select 3PE Enabled. 4. Tap Apply to restart the system. PolyScope continues to run. 5. Tap Confirm Safety Configuration to complete the 3PE Teach Pendant software installation. 6. As the robot restarts and initializes, light-press the 3PE button and tap Start on PolyScope. Teach Pendant with 3-Position Installation Guide Enabling Device...
-
Page 15: Pe Teach Pendant Button Functions
7. 3PE Teach Pendant button functions This section describes the functions of the 3-Position Enabling Device buttons on the 3PE Teach Pendant. 7.1. Using the 3PE buttons The following table contains the available functions of the 3PE buttons. Position Description Action... -
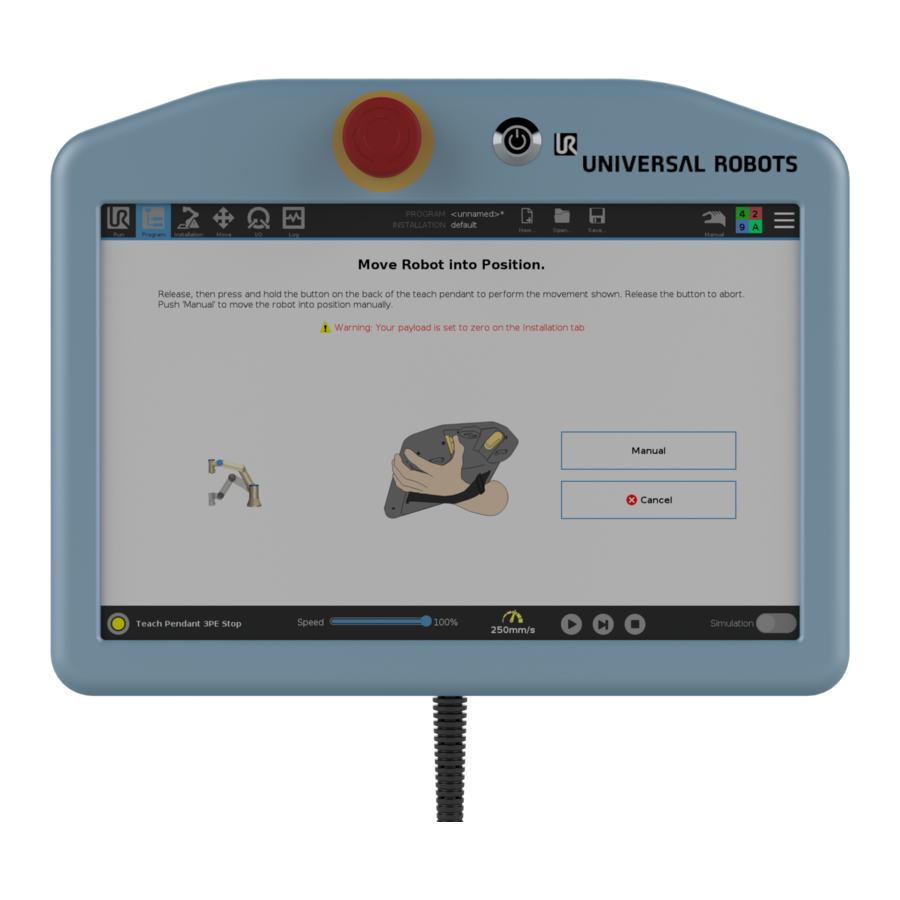
Page 16: Using Freedrive
7.2. Using Freedrive Freedrive allows the robot arm to be manually pulled into desired positions and/or poses. For more information, refer to the Freedrive section in the robot User Manual. To use the 3PE button to freedrive the robot arm: 1. - Page 17 4. If your robot is in Manual mode, maintain a light-press on the 3PE button to run your program. Release the 3PE button to stop your program. 5. If your robot is in Automatic mode, light-press the 3PE button one time start your program. The program coninues to run without pressing the 3PE button.
-
Page 18: Copyright And Disclaimers
8. Copyright and disclaimers The information contained herein is the property of Universal Robots A/S and shall not be reproduced in whole or in part without prior written approval of Universal Robots A/S. The information herein is subject to change without notice and should not be construed as a commitment by Universal Robots A/S. -
Page 19: Compliance
9. Compliance This section contains information about recommendations, certificates and declarations valid for Universal Robots Teach Pendant with integrated 3-position enabling (3PE) device. 9.1. Shipping Materials As stated by our suppliers, Universal Robots e-Series robots shipping materials comply with the ISPM-15 requirements for producing wood packaging material and are marked accordingly. 9.2. - Page 20 Software Version: 5.10 Document Version:...
Need help?
Do you have a question about the 3PE Teach Pendant and is the answer not in the manual?
Questions and answers