Table of Contents
Advertisement
Quick Links
Advertisement
Table of Contents

Related Manuals for Viavi OneExpert DSL


Summary of Contents for Viavi OneExpert DSL
- Page 1 OneExpert DSL User's Guide...
- Page 2 Copyright/Trademarks © Copyright 2020 VIAVI Solutions Inc. All rights reserved. No part of this guide may be reproduced or transmitted, electronically or otherwise, without written permission of the publisher. VIAVI Solutions and the VIAVI logo are trademarks of VIAVI Solutions Inc. (“Viavi”).
-
Page 3: Federal Communications Commission (Fcc) Notice
– Consult the dealer or an experienced radio/TV technician for help. In order to maintain compliance with the limits of a Class A digital device VIAVI requires that quality interface cables be used when connecting to this equipment. Any changes or modifications not expressly approved by VIAVI could void the user’s authority to operate the... - Page 4 VIAVI has established a take-back processes in compliance with the EU Waste Electrical and Electronic Equipment (WEEE) Directive, 2012/19/EU, and the EU Battery Directive, 2006/66/EC. Instructions for returning waste equipment and batteries to VIAVI can be found in the WEEE section of VIAVI Standards and Policies web page.
-
Page 5: California Proposition
California and the state’s drinking water and environment from excessive exposure to chemicals known to the state to cause cancer, birth defects or other reproductive harm. For the VIAVI position statement on the use of Proposition 65 chemicals in VIAVI products, see the Hazardous Substance Control section of the VIAVI Standards and Policies web page. - Page 6 OneExpert DSL User's Guide 22052280, Rev. 016 May 2020...
- Page 7 Available test modules ................23 Software options ..................24 Additional resources ..................25 Features and capabilities ..................26 What ships with the OneExpert DSL? .............28 Preparation for use ....................28 Attaching or removing a test module ..............29 Removing a test module ................29 Attaching a test module ................30...
- Page 8 Specifying the location for saved files ............51 Automatically saving DSL test results ............51 Restoring factory defaults ................52 Powering off and rebooting the unit ............52 Specifying user information................ 52 Customizing the user interface theme ............. 53 OneExpert DSL User's Guide 22052280, Rev. 016 May 2020...
- Page 9 Viewing the User’s Guide on your instrument ..........78 Remotely operating the instrument ..............78 Setting up the ONX for VNC ...............79 Connecting to your ONX via VNC on your PC ........80 Using a PC keyboard ..................80 OneExpert DSL User's Guide May 2020 22052280, Rev. 016...
- Page 10 Return loss testing ..................113 Return loss sweep testing .................114 Impedance testing ..................114 Impedance sweep testing ................115 Running a OneCheck copper test ..............116 Editing profiles ..................... 117 DVOM ....................118 Narrowband / Voice Frequency ............119 OneExpert DSL User's Guide 22052280, Rev. 016 May 2020...
- Page 11 Connecting to a single pair at the NID/demarc ........143 Connecting to bonded pairs at the NID/demarc ........144 Testing the physical layer .................144 Testing line quality .....................144 Terminating the loop (SELT) ................145 Running a OneCheck DSL test ................. 145 OneExpert DSL User's Guide May 2020 22052280, Rev. 016...
- Page 12 QoS Expert .....................173 VoIP Testing ......................173 Accessing the VoIP application ..............174 Specifying test settings ................174 Connecting to the line ................177 Placing and receiving calls .................177 Placing a call ..................177 OneExpert DSL User's Guide 22052280, Rev. 016 May 2020...
- Page 13 Chapter 9 WiFi Testing About the WiFi tests ..................206 To access the WiFi tests ................206 Scanning for WiFi networks ................207 Running Receiver Diagnostics .................207 Verifying IP connectivity .................. 208 OneExpert DSL User's Guide May 2020 22052280, Rev. 016...
- Page 14 Getting Started ................... 240 Controlling the OneExpert from your Mobile Device ....... 240 Updating the iOS application software ............242 Connecting to StrataSync from the VIAVI Mobile Tech App ....243 Mobile Tech Main Menu ................244 OneExpert DSL User's Guide 22052280, Rev. 016...
- Page 15 SmartID results ....................268 Test Summary ..................... 268 Detailed View ....................268 Network Map ....................268 Sweep Data ....................268 Copper results ..................... 269 AC voltage ....................269 DC voltage ....................270 OneExpert DSL User's Guide May 2020 22052280, Rev. 016...
- Page 16 Resolving problems .....................278 General testing ..................278 Copper testing ..................278 Copper testing ..................278 Data testing ..................279 WiFi Advisor ......................280 Getting Technical Assistance ................281 Additional Information ..................281 Specifications ......................282 OneExpert DSL User's Guide 22052280, Rev. 016 May 2020...
-
Page 17: About This Guide
About this Guide Thank you for purchasing the OneExpert DSL. This prefix explains how to use this manual to get you up and running with the instrument as soon as possible. Purpose and scope The purpose of this guide is to help you successfully use the OneExpert DSL features and capabilities. -
Page 18: Safety And Compliance Information
A vertical bar | means “or”: only one option can appear in a single platform [a|b|e] command. Square brackets [ ] indicate an login [platform name] optional argument. Slanted brackets < > group <password> required arguments. OneExpert DSL User's Guide 22052280, Rev. 016 May 2020... -
Page 19: Symbol Conventions
This symbol represents a risk of a hot surface. It may be associated with either a DANGER, WARNING, CAUTION, or ALERT message. See "Safety definitions" on page 20 for more information. OneExpert DSL User's Guide May 2020 22052280, Rev. 016... -
Page 20: Safety Definitions
Indicates that there is an action that must be ALERT performed in order to protect equipment and data or to avoid software damage and service interruption. OneExpert DSL User's Guide 22052280, Rev. 016 May 2020... - Page 21 Introduction This chapter provides a general description of the OneExpert DSL, including the following: "About the OneExpert DSL" on page 22 "Features and capabilities" on page 26 "What ships with the OneExpert DSL?" on page 28 "Preparation for use" on page 28 "Attaching or removing a test module"...
-
Page 22: About The Oneexpert Dsl
Chapter 1 Introduction About the OneExpert DSL OneExpert DSL is a modular test platform that addresses the emerging need for an installation tool supporting the service provider technicians responsible for installing triple play services, in particular, Broadband Data services at customer premises. Technicians use it to test broadband delivery to the home, supporting wiring inside of the home, and the proper operation of delivered services. - Page 23 Chapter 1 Introduction Available mainframes The following OneExpert DSL mainframes are currently available: The ONX-580 and ONX-580P support DSL, copper, services, and home network testing. The ONX-580A supports DSL, services, and home network testing; copper testing is not supported. NOTE:...
-
Page 24: Software Options
Chapter 1 Introduction Software options You can order software options to add functionality to the OneExpert DSL. Part Number Description Provides the ability to run the RFC 6349 ONX-TRUESPEED TCP throughput test (“TrueSpeed”) against a Virtual TrueSpeed server. Allows wireless connectivity to either connect/... -
Page 25: Additional Resources
Provides the DSL Helper option. If you received an option file from a VIAVI representative, copy it to USB, insert the USB in the instrument, copy the file to the internal file system, turn the power off, then turn the power back on. -
Page 26: Features And Capabilities
Chapter 1 Introduction Features and capabilities Features and capabilities of the OneExpert DSL include the following: A multi-touch user interface that is similar to those provided on smart devices A mobile-connectivity iOS application that provides remote control, data enhancements, and technical support, including tutorials Bluetooth and WiFi connectivity. - Page 27 ONX-580A functions without Copper board to reduce cost Customizable work order integration (contact your sales representative for information): – Sending multiple work orders to OneExpert DSL via iOS mobile application (app- to-app share) and USB – Including customers’ work order information in the test reports –...
-
Page 28: What Ships With The Oneexpert Dsl
Before using the OneExpert DSL for the first time, do the following: Turn the OneExpert DSL ON (use the green button on the front of the instrument), and then verify that it is operating properly by navigating through a few menus. - Page 29 1. Loosen the four screws using a screwdriver or a coin. 2. Pull the module from the base. You may have to slightly wiggle the module to loosen it from the gasket. The module is removed. OneExpert DSL User's Guide May 2020 22052280, Rev. 016...
- Page 30 3. Tighten the four screws: Tighten by hand until the housing and screw contact each other. Turn the fastener one complete turn, using a screwdriver or a coin. The module is connected. OneExpert DSL User's Guide 22052280, Rev. 016 May 2020...
-
Page 31: Quick Tour
"Exploring the bottom panel" on page 35 "Exploring the right side panel" on page 36 "Exploring the ONX-580 / ONX-580P top panel" on page 39 "Navigating the user interface" on page 41 OneExpert DSL User's Guide May 2020 22052280, Rev. 016... -
Page 32: Exploring The Front Panel
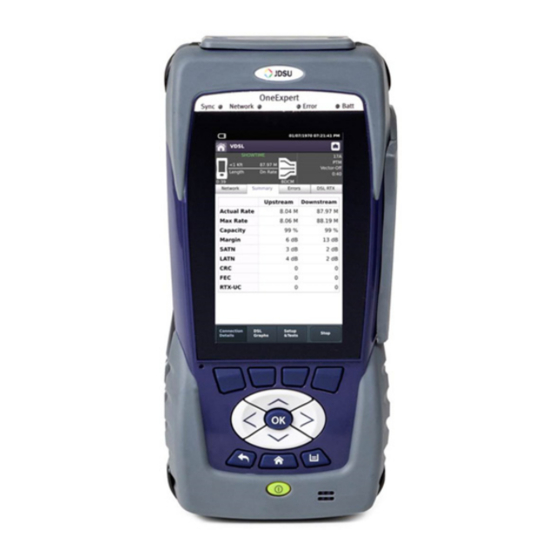
Chapter 2 Quick Tour Exploring the front panel The controls and indicators on the front panel are used to operate the OneExpert DSL, set up tests, and view data. The following sections describe each of the controls and indicators on the front panel. -
Page 33: Status Indicators
Chapter 2 Quick Tour Status indicators The controls and indicators on the front panel are used to operate the OneExpert DSL, set up tests, and view data detailed below. Sync – Reports the status of G.fast/xDSL modem synchronization. Blinking green indicates that the modems are training. -
Page 34: Touch Screen Display
Tray – Displays the Tray menu to save test reports, turn on/off Bluetooth, or enable/disable remote operation, etc. Power button Press and hold the Power button to turn the OneExpert DSL on or off. OneExpert DSL User's Guide 22052280, Rev. 016... -
Page 35: Exploring The Bottom Panel
Chapter 2 Quick Tour Exploring the bottom panel The OneExpert DSL +12 VDC connector is located on the bottom end of the instrument. This connector is used to power the OneExpert DSL and to charge the lithium battery inside. Charge... - Page 36 The connector panel, located on the right side of the instrument (under a rubber flap), provides the ports required to connect your OneExpert DSL to the line under test. When the connectors are not being used, close the rubber flap to keep out dust and rain.
-
Page 37: Usb Connectors
RJ45 toning Wire mapping to smart remote CAUTION: DAMAGE TO INSTRUMENT Never insert an RJ-11 plug into the RJ-45 connector of the OneExpert; doing so may cause permanent damage to the connector. OneExpert DSL User's Guide May 2020 22052280, Rev. 016... -
Page 38: Rj11 Wiring Connector
To reduce the risk of fire, use only 26 AWG or larger telecommunications line cord between the DSL connector and the wall. NOTE: ELECTROSTATIC DISCHARGE IMMUNITY When using an Ethernet crossover cable, VIAVI recommends using a shielded crossover cable for the best immunity to electrostatic discharge (ESD). Rings The D-rings on the corners of the instrument can be used to attach a carry strap. - Page 39 These connectors are not provided on the ONX-580A. The copper connectors are used for: Multimeter – AC volts – DC volts Opens (distance) and capacitance Balance Load coil detect POTS Spectral Noise Impulse Noise RX Tones OneExpert DSL User's Guide May 2020 22052280, Rev. 016...
- Page 40 Electrical shock may result in serious injury or death. Use care when connecting to telecommunications circuits, to be sure that you do not come in contact with exposed conductors or power mains. Connect TNV signals to TNV ports only. OneExpert DSL User's Guide 22052280, Rev. 016 May 2020...
-
Page 41: Navigating The User Interface
When you power up the OneExpert, the Home screen appears. The Home screen indicates the options enabled on your instrument and may vary depending on the module connected. The ONX-580 is shown here. OneExpert DSL User's Guide May 2020 22052280, Rev. 016... -
Page 42: Selecting Applications
After you expand a collapsible menu, you can select a specific option by doing either of the following: Press the menu option. Use the arrow buttons to highlight the desired menu option, and then press OK. OneExpert DSL User's Guide 22052280, Rev. 016 May 2020... -
Page 43: Running Applications
The application will keep running and the icon on the home screen will be highlighted, showing that it’s active. To quit an app, press the Back button or back arrow on the icon. OneExpert DSL User's Guide May 2020 22052280, Rev. 016... -
Page 44: Entering Data
To create a shortcut, press and hold the icon for the function and then drag it to the bottom of the screen to the shortcut bar. To remove a shortcut, press and hold the icon and then drag it off of the shortcut bar. OneExpert DSL User's Guide 22052280, Rev. 016 May 2020... - Page 45 "Viewing your work orders" on page 70 "Managing files" on page 76 "Managing files with StrataSync" on page 77 "Viewing the User’s Guide on your instrument" on page 78 "Remotely operating the instrument" on page 78 OneExpert DSL User's Guide May 2020 22052280, Rev. 016...
-
Page 46: Displaying The System Settings Menu
USB software updates. 1. From the Main menu, press the System menu item. 2. Press the System Settings icon. The System Settings menu appears. OneExpert DSL User's Guide 22052280, Rev. 016 May 2020... - Page 47 You can also take screenshots of the user interface and review a PDF of this guide on your instrument. To bring up the Tray menu, do either of the following: Press the Tray button Swipe downward from the top of the screen OneExpert DSL User's Guide May 2020 22052280, Rev. 016...
-
Page 48: Setting Up Your Instrument
Press the menu item that corresponds to the setting. Select the value for the setting from the list. 4. Press Back/Cancel to exit the menu. 5. Turn off the power, then turn back on to reboot the instrument. OneExpert DSL User's Guide 22052280, Rev. 016 May 2020... -
Page 49: Setting The Date And Time
1. Press Time Synchronization. 2. If synchronization is required, select NTP. If synchronization is not needed, select None. When enabled, Network Time Protocol (NTP) synchronizes your system clock to a central time server. OneExpert DSL User's Guide May 2020 22052280, Rev. 016... -
Page 50: Set The Backlight Timeout
2. Select the amount of time to wait before the backlight dims. Set the power off delay 1. Press Power Off Delay. 2. Select the amount of idle time to wait before the instrument automatically powers itself off. OneExpert DSL User's Guide 22052280, Rev. 016 May 2020... -
Page 51: Setting The Volume
The XML result file will be saved on your instrument for 90 days or until you synchronize the instrument to the StrataSync server. After synchronizing to the StrataSync server, the result file will automatically be deleted. OneExpert DSL User's Guide May 2020 22052280, Rev. 016... -
Page 52: Restoring Factory Defaults
2. Specify the user’s first and last name, workgroup, company, email address, and other information. 3. Press the Back/Cancel button to save and exit the menu. The user information is specified. OneExpert DSL User's Guide 22052280, Rev. 016 May 2020... -
Page 53: Enabling Password Protection
Enter Password to Enable Editing and enter a password. 3. Select the checkmarks for Allow editing and Enable Password Protection, as necessary. 4. Press the Back/Cancel button to save and exit the menu. OneExpert DSL User's Guide May 2020 22052280, Rev. 016... -
Page 54: Establishing Network Connections
Access Point (letting other devices connect to the ONX). However, you can use Bluetooth when the ONX is acting as a WiFi Client (when the ONX is connecting to an Access Point). OneExpert DSL User's Guide 22052280, Rev. 016 May 2020... -
Page 55: Establishing An Ethernet Connection
Use User Class – Enter your User Class if your network requires a User Class Use Arp Announce – Enable Arp Announce to have the instrument do the Arp announce after the DHCP request. OneExpert DSL User's Guide May 2020 22052280, Rev. 016... - Page 56 IPv6 DNS Address Mode DHCPv6 – No additional settings to specify. Manual – Enter the IPv6 DNS Server address. If you specified IPv4/IPv6 Dual Stack as your network mode, specify the following settings: OneExpert DSL User's Guide 22052280, Rev. 016 May 2020...
- Page 57 Stateless – See the IPv6 Address Mode in this section. 7. Display the Tray menu, and then press Network to establish the connection. The instrument establishes an Ethernet connection to the LAN. OneExpert DSL User's Guide May 2020 22052280, Rev. 016...
-
Page 58: Establishing A Wifi Connection
SSID – The SSID (Service Set Identifier) of the WiFi network. Password – The password required to authenticate to the network. A password is not required if Key Management is set to None. Key Management – Open, WEP, or WPA/WPA2 Personal. OneExpert DSL User's Guide 22052280, Rev. 016 May 2020... -
Page 59: Connecting To A Wi-Fi Network
The status of the connection (Network Up), and details concerning the connection (IP address, netmask, gateway, and DNS server) appear at the top right of the menu. The instrument is connected to the WiFi network. OneExpert DSL User's Guide May 2020 22052280, Rev. 016... -
Page 60: Establishing A Bluetooth Connection
If pairing was successful, you can use the instrument with the paired device. NOTE: You can also pair your mobile device from the Home screen. Follow the instructions on the meter to pair. OneExpert DSL User's Guide 22052280, Rev. 016 May 2020... - Page 61 Chapter 3 Utilities Updating the instrument’s firmware The OneExpert DSL firmware can be upgraded in the field using 1) a wired network or intranet connection, 2) a WiFi connection, or 3) a USB drive with a copy of the firmware.
-
Page 62: Installing Software Options
8. Optional. Press the System menu and then select File Browser to verify that the option file was copied to the unit. 9. Reboot the instrument (turn off the power, then turn it back on). The option is installed. OneExpert DSL User's Guide 22052280, Rev. 016 May 2020... -
Page 63: Synchronizing To The Stratasync Server
To obtain the latest configuration settings, software options and updates, work orders, and ownership registration information, the OneExpert can synchronize with a VIAVI server via the internet. The synchronization also stores any user files saved on the unit to the StrataSync server. - Page 64 FTP passwords. This can be used to create a “golden” unit. NOTE: If an Option Code was entered as a part of synchronization, power must be cycled to the unit to complete the process and initialize the option. OneExpert DSL User's Guide 22052280, Rev. 016 May 2020...
- Page 65 2. Load up a OneCheck profile by selecting an icon under OneCheck Copper, DSL, Fiber, or Ethernet. 3. Insert the USB drive. 4. Press Icon to see the available icons. 5. Select an icon, press Back, and press Save to save your changes and exit. OneExpert DSL User's Guide May 2020 22052280, Rev. 016...
- Page 66 If you need to edit test profiles and passwords, you will have to use the associated password(s). OneExpert DSL User's Guide 22052280, Rev. 016 May 2020...
-
Page 67: Generating Reports
Each time a test is run, the file name increments by 1, 2, 3, etc. If you reboot the unit, the default file name will be used again until you change it. You can also select Use Default Name to reset it. OneExpert DSL User's Guide May 2020 22052280, Rev. 016... -
Page 68: Viewing A Report
If you indicated that you want to view the report immediately, the report output also appears on your instrument’s LCD. NOTE: VIAVI offers a proprietory XML schema definition file (XSD) available online (referenced in the XML report). Viewing a report You can view saved reports on the LCD of your instrument. -
Page 69: Capturing A Screenshot
To capture the tray menu or a popup menu If you wish to capture a screen of the tray menu itself, or if you wish to capture a popup menu, press and hold the Tray button for 5 seconds. OneExpert DSL User's Guide May 2020 22052280, Rev. 016... - Page 70 – with a smooth, simple process. Get confirmation that techs and contractors have performed the work with geo-tagged test reports uploaded via the Mobile Tech App. OneExpert DSL User's Guide 22052280, Rev. 016 May 2020...
- Page 71 Deploy work order to instrument (with test profile reference). Sync to StrataSync with work order info after testing and saving CDM reports (JSON). View test results & associated work order on StrataSync and/or (contractor) transfer to customer. OneExpert DSL User's Guide May 2020 22052280, Rev. 016...
- Page 72 OneCheck DSL has been enhanced to incorporate an even fuller range of test features, including VoIP, video, and offers variety of speed testing configuration choices. This helps to ensure complete test processes for performance to standards and to minimize return service calls. OneExpert DSL User's Guide 22052280, Rev. 016 May 2020...
- Page 73 Information to add comments, location ID, or circuit number, etc. 4. To create a new work order, select the New button and name the work order. Creating a new work order automatically activates it. OneExpert DSL User's Guide May 2020 22052280, Rev. 016...
- Page 74 You can also create a new order order or choose to deactivate the current order order by choosing None when you save it. "Saving a report" on page 67 for more information. OneExpert DSL User's Guide 22052280, Rev. 016 May 2020...
-
Page 75: Workflow Settings
1. From the Tray menu, select Workflow Settings at the bottom. (Workflow Manager needs to be running to see this). 2. From the Workflow Settings screen, select the setting you want to edit and adjust as necessary. OneExpert DSL User's Guide May 2020 22052280, Rev. 016... -
Page 76: Managing Files
Opening files or folders 1. Go to the file browser and select the file or folder. 2. Press Open. The contents of the folder appear or the file is displayed on the screen. OneExpert DSL User's Guide 22052280, Rev. 016 May 2020... - Page 77 StrataSync cloud, such as test reports, screenshots, OneCheck profiles, work orders, and configurations. You can access these files via the StrataSync website. For more information see "Synchronizing to the StrataSync server" on page 63. OneExpert DSL User's Guide May 2020 22052280, Rev. 016...
-
Page 78: Remotely Operating The Instrument
"Establishing an Ethernet connection" on page 55 – "Establishing a WiFi connection" on page 58 Enabling remote operation using VNC Control the instrument using a PC keyboard Each of these operations is described in the following sections. OneExpert DSL User's Guide 22052280, Rev. 016 May 2020... - Page 79 2. Select Smart Access Anywhere and VNC. The Smart Access Anywhere menu appears. 3. Select Enable VNC Server and note the VNC password underneath: viavi- vnc. You will need it to connect via VNC Viewer. OneExpert DSL User's Guide May 2020...
-
Page 80: Using A Pc Keyboard
The following table shows how the PC keys map to the OneExpert keypad. PC key OneExpert key F1–F4 Correspond to the OneExpert system keys Home Tray menu AutoTest Escape Cancel Enter OneExpert DSL User's Guide 22052280, Rev. 016 May 2020... -
Page 81: Vnc Availability
The SmartAccess Anywhere client (PC, Android, or Apple) can connect to your device via local area connection or Internet connection. For client downloads and more information, see: https://www.viavisolutions.com/en-us/software-download/smart-accessanywhere-saa VIAVI provides links to Android and PC only. You can find the iOS version in the Apple App store. OneExpert DSL User's Guide May 2020... - Page 82 Chapter 3 Utilities OneExpert DSL User's Guide 22052280, Rev. 016 May 2020...
- Page 83 Copper Testing This chapter provides instructions for using the optional OneExpert DSL copper testing features, including the following: "About copper testing" on page 84 "Testing with an UltraFED far end device" on page 86 "Measuring voltage" on page 88 "Measuring resistance and leakage" on page 89 "Measuring the distance to a short"...
-
Page 84: About Copper Testing
Opens (distance) and capacitance Balance Load coil detect POTS Spectral Wideband TIMS Narrowband and wideband Rx tones Narrowband and wideband Tx tones Narrowband noise Each of these tests is described in the following sections. OneExpert DSL User's Guide 22052280, Rev. 016 May 2020... - Page 85 System Settings / International menu. See Configuring International Settings on page 48. OneExpert DSL User's Guide May 2020 22052280, Rev. 016...
- Page 86 Using the UltraFED Control menu, you can control a far-end device (FED) to allow two-ended pair testing with a single piece of test equipment. After a technician connects a VIAVI UltraFED to the far end of the pair under test, and connects your instrument to the near end, your instrument controls the FED using DTMF tones.
- Page 87 Verify that your leads are properly connected to the line under test. Verify that the UltraFED is connected at the far end. Issue the Wake UltraFED command using the button at the bottom right side of the menu. OneExpert DSL User's Guide May 2020 22052280, Rev. 016...
-
Page 88: Measuring Voltage
7. To switch between continuous and snapshot mode, use the left system keys Snapshot or Continuous. 8. To save the results to a report, use the Tray menu. 9. To learn what your results mean, see “AC voltage” and “DC voltage” on page 269. OneExpert DSL User's Guide 22052280, Rev. 016 May 2020... - Page 89 DC and AC Volts are listed for each test (these values are available on the 580P instrument only). 4. For greatest accuracy, VIAVI recommends that you compensate the measurement to remove the effects of the test leads. To compensate the opens measurements: Swipe downward on the screen to access the Tray menu.
- Page 90 5. Press + or – to change the temperature or wire gauge, if needed. NOTE: For the resistive distance to be accurate, it is critical that you enter the correct gauge and temperature. OneExpert DSL User's Guide 22052280, Rev. 016 May 2020...
-
Page 91: Measuring Opens
The result can be used to determine if there are any bad splices. Resistive Balance requires the VIAVI UltraFED or a manual strap to ground at the far end. 1. Connect the Tip (A), Ring (B), and Ground (Earth) leads to the line under test. - Page 92 5. For greatest accuracy, VIAVI recommends that you compensate the opens measurement to remove the effects of the test leads. To compensate the opens measurements: Swipe downward on the screen to access the Tray menu.
- Page 93 If you are on the Continuous menu, select Clear to restart the test. 8. To save the results to a report, use the Tray menu. 9. To learn what your results mean, see "Opens/Capacitance" on page 272. OneExpert DSL User's Guide May 2020 22052280, Rev. 016...
-
Page 94: Measuring Current
7. To change the current measurement, press Continuous/Snapshot. The current selection is a larger text size. 8. To save the results to a report, use the Tray menu. 9. To learn what your results mean, see "DC current" on page 272. OneExpert DSL User's Guide 22052280, Rev. 016 May 2020... -
Page 95: Locating Faults Using The Tdr
The TDR must be running for Stress Mode to be available. It is grayed out when the TDR is stopped. 7. Using the Peak Hold mode, the OneExpert DSL can display minimum, maximum, and current TDR traces over a test period. This feature is useful for analyzing faults that occur intermittently. - Page 96 14. You can also view and compare current and saved TDR traces using the Results key. For information on saving your results in graphical form, see "DSL/G.fast Results" on page 248. 15. To learn what your results mean, see "TDR" on page 274. OneExpert DSL User's Guide 22052280, Rev. 016 May 2020...
- Page 97 Chapter 4 Copper Testing Running a OneCheck TDR test The OneCheck TDR test is a VIAVI out-of-service pair quality test that examines a copper pair to determine how far out the TDR can see on the pair, identify anomalies (faults) and their approximate location, then graphically show the location of the identified anomalies.
- Page 98 4. Press the Start button if the test isn’t already running. The test will give you the distance measurement where there is a connection between the two lines. 5. To stop, press Stop. OneExpert DSL User's Guide 22052280, Rev. 016 May 2020...
- Page 99 4. Select Clear to restart the test. 5. To save the results to a report, use the Tray menu. 6. To learn what your results mean, see "Longitudinal balance" on page 273. OneExpert DSL User's Guide May 2020 22052280, Rev. 016...
-
Page 100: Detecting Load Coils
Detecting load coils The OneExpert DSL can detect up to five load coils that may exist on the line, out to 27,000 (8,200 meters) feet. It will also report a short, open, or a high noise condition, if detected. For accurate load coil detection, test on a pair without voltage (supplied by a battery). - Page 101 Press the On Hook system key to end the call. 5. Receive a call. Request someone to call you. When the OneExpert DSL indicates an incoming call, press the Off Hook system key. For lines that have caller ID, the name and number information appears in the box.
- Page 102 1. Connect the Tip (A), Ring (B), and Ground (Earth) leads to the line under test. 2. From the Copper menu, press the RFL button. The RFL screen appears. 3. For greatest accuracy, VIAVI recommends that you compensate the opens measurement to remove the effects of the test leads. To compensate the opens measurements: Swipe downward on the screen to access the Tray menu.
- Page 103 It can be run manually or use a FED to automatically provide the correct conditions for the test. 1. Press Start. 2. The test runs then displays the results. The results for the specific fault appear. OneExpert DSL User's Guide May 2020 22052280, Rev. 016...
- Page 104 Chapter 4 Copper Testing The OneExpert DSL assumes that the fault is on the red lead. If the fault is not on the red lead, it will automatically flip Tip (A) and Ring (B) and run the test again. Thus, your screen may show swapped leads.
- Page 105 Return Loss – wideband (ONX580P only) and narrowband; single frequency and sweep Impedance – wideband (ONX580P only) and narrowband; single frequency and sweep NOTE: For additional information about OneExpert DSL options and services, contact your local VIAVI representative or visit www.viavisolutions.com.
- Page 106 7. Press the Results softkey to save or clear the results. For informa tion on saving your results in graphical form, see "DSL/G.fast Results" on page 248. 8. Press the Stop softkey. 9. To save the results to a report, use the Tray menu. OneExpert DSL User's Guide 22052280, Rev. 016 May 2020...
-
Page 107: Measuring Impulse Noise
5. To select the type of test, press Options and then select Timed or Counter (untimed). 6. Specify the Dead Time. This is how long the OneExpert DSL will wait before attempting to detect the next impulse event. 7. To use an external bridge, press Options and then select the checkbox for Use External Bridge. - Page 108 8. To specify dead time, press Options and then select Dead Time. This is how long the OneExpert DSL will wait before attempting to detect the next impulse event. 9. To use an external bridge, press Options and then select the checkbox for Use External Bridge.
- Page 109 The OneExpert DSL can receive tones to measure wideband and narrowband loss. 1. Connect the Tip and Ring (A and B) leads to the line under test. 2. Select Mode, and then select RX Tones. The OneExpert DSL begins measuring the frequency and level of each tone.
- Page 110 1. Connect the Tip and Ring (A and B) leads to the line under test. 2. Select Mode, and then select TX Tones. The OneExpert DSL begins measuring the frequency and level of each tone.
- Page 111 274. Sweep loss testing The OneExpert DSL can measure loss (in dBm) of various tones across the supported frequency range, using the UltraFED technology. 1. You need the UltraFED connected to the line before starting the test. Make sure the blue Pair One cable is connected to the line under test at the far end.
- Page 112 4. You can view NEXT results for different frequencies by moving the cursor. Use the left and right arrow keys or press and drag the cursor to move the cursor to different frequencies. OneExpert DSL User's Guide 22052280, Rev. 016 May 2020...
- Page 113 Narrowband – 600 ohm, 900 ohm 8. Press Frequency and enter a value or use the arrows. 9. Press the Start softkey. 10. To save the results to a report, use the Tray menu. OneExpert DSL User's Guide May 2020 22052280, Rev. 016...
- Page 114 5. To specify the range, press Technology, and then select: Wideband – 20 KHz – 10 MHz (ONX580P only) Narrowband – 200 Hz – 10 KHz (ONX580 only) ; 200 Hz – 20 KHz (ONX580P only) OneExpert DSL User's Guide 22052280, Rev. 016 May 2020...
- Page 115 7. Press the Start softkey. The ONX begins measuring impedance across the frequency range. A graph appears to show the results. 8. To save the results to a report, use the Tray menu. OneExpert DSL User's Guide May 2020 22052280, Rev. 016...
-
Page 116: Running A Onecheck Copper Test
Chapter 4 Copper Testing Running a OneCheck copper test The OneCheck Copper test is a VIAVI out-of-service pair quality test. It automatically performs a series of enabled tests including: DVOM (AC/DC volts, resistance), Opens/Capacitance, Balance, and Load Coil. It also compares results to user-defined threshold values and provides a pass, marginal, or fail indication. -
Page 117: Editing Profiles
Copy. The following sections detail how to configure and run each test. You can also run a test from any configuration screen by pressing the Launch button. OneExpert DSL User's Guide May 2020 22052280, Rev. 016... - Page 118 Tests button on the DVOM screen. You can use the left and right arrow keys to go between the subtests and the Back button on the unit to go back to the main categories. OneExpert DSL User's Guide 22052280, Rev. 016 May 2020...
- Page 119 Press the Back arrow to return to the configuration screen. Loss Tones This test mode measures tones for loss using VIAVI UltraFED. Press Loss Tones on the configuration screen. On the next screen you can add and remove items or edit them by pressing each item and using the thresholds editor.
- Page 120 You can create new custom RFL and DTS cables, either by calculating the length or by entering manually. Press New to create a new cable, choose Manual Entry or Calculated, and enter the measurements. OneExpert DSL User's Guide 22052280, Rev. 016 May 2020...
- Page 121 To Edit, select the contact and press Edit, then update the information. To Delete, select the contact and press Delete. Compensate Opens You can compensate for all opens test leads. Press Compensate to get started. OneExpert DSL User's Guide May 2020 22052280, Rev. 016...
- Page 122 You can compensate for resistance on your test leads. Press Compensate to get started. Compensate RFL You can also compensate for RFL on your test leads. Press Compensate to get started. OneExpert DSL User's Guide 22052280, Rev. 016 May 2020...
- Page 123 Copper Expert, that runs consecutive testing sessions to check the quality of the copper line. It locates and identifies various problems, helping the user eliminate them in the process. Copper Expert is a software option. Check with your VIAVI representative for more information.
- Page 124 If there are no major faults on the line, and you have accepted the true length, the next step checks whether the copper pair is evenly balanced. OneExpert DSL User's Guide 22052280, Rev. 016 May 2020...
- Page 125 UFED is required for best results. Once the problem is identified and located, you can fix it and run the test again. A good copper line will have all the results with green check marks. OneExpert DSL User's Guide May 2020 22052280, Rev. 016...
-
Page 126: Bonding And Grounding
In each case, the application provides instructions in the Expert Advice section on if and how the problem can be fixed. An example of a problem and its solution are shown here. OneExpert DSL User's Guide 22052280, Rev. 016 May 2020... - Page 127 5. The following test results with pass/fail indicators will be displayed: DC current (mA), narrowband loss (dB), circuit noise (dBr nC), power influence (dBr nC) and balance (dB). Press the Show Details button for more information. OneExpert DSL User's Guide May 2020 22052280, Rev. 016...
- Page 128 - Fail: > -70 dBm Balance If the Power Influence is < 80 dBrnC (-10 dBm), then Longitudinal Balance is used. Balance Pass: > 60 dB Balance Margin: > 50 dB OneExpert DSL User's Guide 22052280, Rev. 016 May 2020...
- Page 129 2. On the next screen select the type of cable for the test. 3. Press the Start button. 4. You will see a series of prompts, asking you to connect the copper leads and then the SmartID accessory. OneExpert DSL User's Guide May 2020 22052280, Rev. 016...
-
Page 130: Routing The Cables Through The Glove
The glove accessory is designed to hold the copper test leads so you don’t have to disconnect them from the instrument. 1. Turn the OneExpert DSL over, onto the front panel. 2. Unzip the back flap of the glove. 3. Push the cables through the opening at the bottom and pull them up to the copper connectors. - Page 131 / G.fast Testing This chapter provides task-based instructions for using the OneExpert DSL to gather DSL (VDSL, ADSL2+/2/1, and G.fast) statistics and verify connectivity, including the following: "About xDSL and G.fast testing" on page 132 "Selecting the test mode" on page 133 "Specifying test settings"...
- Page 132 Broadcom G.fast testing also requires the ONX580-GFAST software option. Sckipio G.fast testing requires the ONX580- GFASTSCKIPIO software option. NOTE: For additional information about OneExpert DSL options and services, contact your local VIAVI representative or visit www.viavisolutions.com. OneExpert DSL User's Guide 22052280, Rev.
-
Page 133: Selecting The Test Mode
It is recommended that the unit not be operated flat on its back (heat sink down) in any DSL mode, for more than 15 minutes. OneExpert DSL User's Guide May 2020 22052280, Rev. 016... -
Page 134: Specifying Test Settings
Chapter 5 xDSL / G.fast Testing Specifying test settings Before you begin testing, make sure the test settings on the OneExpert DSL match the settings of the line that you are testing. To access the setup screen, select Tests & Settings at the bottom or use the tray menu (swipe down from the top or press the Tray and then Modem Settings buttons). - Page 135 ADSL standard and annex (such as Auto + Annex M or ADSL2+ Annex If you selected VDSL as the xDSL Technology, specify the VDSL Profile (such as 8A, 12B, or 35b). OneExpert DSL User's Guide May 2020 22052280, Rev. 016...
- Page 136 Set the VC Count between 1 and 4. Specify the VC settings for each virtual channel (VC 1 through VC 4): VPI, VCI, and VC Mode (Tx Rx or Rx only) OneExpert DSL User's Guide 22052280, Rev. 016 May 2020...
- Page 137 V43 tones are typically used during training, but some test requirements may necessitate disabling the tones. For example, if vectoring is enabled, it is recommended that V43 tones be disabled. OneExpert DSL User's Guide May 2020 22052280, Rev. 016...
- Page 138 Use Data from Negotiated Band Definitions – Select this setting if you want to count all of the tones in a given band in the calculation. 11. Select Network Settings and then specify the following: OneExpert DSL User's Guide 22052280, Rev. 016 May 2020...
- Page 139 Select Network Type and then specify one of the following to indicate how IP addressing will be handled: Terminate – The OneExpert DSL replaces the modem and test interface. Through-Bridge – The OneExpert DSL replaces the modem, hub, and test interface.
- Page 140 2. Enable the VLAN checkbox 3. Specify the following: VLAN ID VLAN Priority. Select IP mode and then specify the network mode: IPv4, IPv6, or IPv4/IPv6 Dual Stack. 4. Enable the following: OneExpert DSL User's Guide 22052280, Rev. 016 May 2020...
- Page 141 3. Enable the Use Provider checkbox 4. Enter Provider name or leave the default. 5. Specify the network settings as described in step 6 of "Establishing an Ethernet connection" on page OneExpert DSL User's Guide May 2020 22052280, Rev. 016...
- Page 142 Use User Class Use Arp announce 3. Specify the network settings as described in step 6 of "Establishing an Ethernet connection" on page Press the Back/Cancel button to return to the main screen. OneExpert DSL User's Guide 22052280, Rev. 016 May 2020...
-
Page 143: Connecting To The Line
1. Using the RJ-45 to telco clips cable, connect the RJ-45 to bed of nails test lead to the DSL connector on the right panel of the OneExpert DSL. 2. Connect the RJ-45 to bed of nails test leads to the desired pair, black to tip (A) and red to ring (B). -
Page 144: Connecting To Bonded Pairs At The Nid/Demarc
Testing the physical layer You can use the OneExpert DSL to test the physical layer of the xDSL link. To perform a basic DSL link test Connect to the line and allow the unit to train on the line. If the unit achieves sync, you have verified the physical layer. -
Page 145: Terminating The Loop (Selt)
This test sets the VDSL modem to provide a line termination where the modem is idle and not transmitting. 1. On the right panel of the OneExpert DSL, connect one end of the test cable to the DSL connector, and the other end to the line under test. - Page 146 Show Details and scroll down to the Remote Identity Results section. In the saved report, scroll down to the Overall Results section. Here you will see the Broadcom information, including the xTU-O S/N (DSLAM or DPU serial number). OneExpert DSL User's Guide 22052280, Rev. 016 May 2020...
-
Page 147: Editing Profiles
6. To copy a profile and then edit from there, use the arrows to select the profile you want to copy, then select Copy. You can also run a test from any configuration screen by pressing the Launch button. OneExpert DSL User's Guide May 2020 22052280, Rev. 016... -
Page 148: After Running The Test
When you finish your test, you can put away the test cables in the glove. Wrap the cable in a circle and put into the pocket on the front of the glove. OneExpert DSL User's Guide 22052280, Rev. 016 May 2020... -
Page 149: Data Testing
Data Testing This chapter provides task-based instructions for using the Data testing features of the OneExpert DSL. The data layer tests allow you to test for connectivity and throughput. These tests can be performed on DSL or Ethernet circuits, including the following: "Ping and Traceroute testing"... -
Page 150: Ping And Traceroute Testing
If you are specifying settings for a Ping test, specify the Transmit Count (how many total ping packets to send), Transmit Interval (amount of time between packet transmittals), and Transmit Size (how many ping messages are in each packet). 5. Press the Results button. OneExpert DSL User's Guide 22052280, Rev. 016 May 2020... - Page 151 "File Transfer results" on page 258 TrueSpeed testing The OneExpert DSL’s optional TrueSpeed test provides a repeatable, standards-based test methodology to resolve complaints about poor network performance. With TrueSpeed, you can quickly evaluate the customer experience of their network and provide actionable information to resolve problems.
- Page 152 If the test fails, an error message appears (for example, Server Busy or Aborted Due to Excessive Loss). 7. If you wish to test again with a different profile, select the Profiles button, select the profile, and then press Start. OneExpert DSL User's Guide 22052280, Rev. 016 May 2020...
- Page 153 3. To edit or delete a profile, select the check box next to the profile, and then do one of the following: To edit the profile 1. Select Edit. 2. Change the profile as necessary. 3. Press OK. To delete the profile 1. Select Delete. OneExpert DSL User's Guide May 2020 22052280, Rev. 016...
- Page 154 The server needs to be placed in the network in a way that will allow it to deliver very high data rate traffic to the ONX for downstream and upstream throughput testing. VIAVI recommends the Apache HTTP server (v 2.4) that is readily available from Apache and supports multiple operating systems.
- Page 155 3. Press the configuration to edit or use the arrows to highlight and press Enter. The upstream and downstream URL settings are configurable from this screen. OneExpert DSL User's Guide May 2020 22052280, Rev. 016...
- Page 156 4. When finished editing the configuration, press the Back icon or Back button to return to the main Speed Check screen. 5. The test can now be performed with the desired configuration, as shown here. OneExpert DSL User's Guide 22052280, Rev. 016 May 2020...
- Page 157 Speed Check test time. However, if the workflow time is longer, then the probability of simultaneous tests becomes much lower and the server over-provisioning could be higher. OneExpert DSL User's Guide May 2020 22052280, Rev. 016...
-
Page 158: Before You Begin
URLs in the settings. This button remains active only while the test is stopped. Press the Server Settings button or press the soft key to edit these configurations. OneExpert DSL User's Guide 22052280, Rev. 016 May 2020... -
Page 159: Server Settings
If the network is not active, then the softkey is not active. When done, press the Back arrow or the Back sofkey at the top to return to the main Speedtest screen. OneExpert DSL User's Guide May 2020 22052280, Rev. 016... -
Page 160: Latency Measurement
The unit opens multiple connections to the Speedtest server. The download transfer then begins followed by updates of percentage complete and average download rate (in bytes/sec). Once the download transfer has completed, the final download rate measurement is provided. OneExpert DSL User's Guide 22052280, Rev. 016 May 2020... - Page 161 An HTTP connection then opens to the URL: http://www.speedtest.net/api/ embed/api. php, and the measurements are uploaded. The Speedtest results are also available in all Save Report formats (XML, HTML, and PDF). OneExpert DSL User's Guide May 2020 22052280, Rev. 016...
- Page 162 The Server Settings button is used to configure the server IP address, port number, or target rate (kbps). This button remains active only while the test is stopped. Press the Server Settings button or press the soft key to edit these configurations. OneExpert DSL User's Guide 22052280, Rev. 016 May 2020...
- Page 163 Use the keypad to change the setting and press Enter. When done, press the Back arrow or the Back sofkey at the top to return to the main Speed Service screen. OneExpert DSL User's Guide May 2020 22052280, Rev. 016...
- Page 164 If the test fails, an error message appears (for example, "Failed to get IP address" or "Failed to connect to server"). If you wish to test again with a different profile, select the Profiles button, select the profile, and then press Start. OneExpert DSL User's Guide 22052280, Rev. 016 May 2020...
- Page 165 (in bytes/sec). Once the transfer has completed, the final upload/ download rate measurements are then provided. The Broadcom Speed Service results can be saved to multiple report formats (XML, HTML, PDF, and JSON). OneExpert DSL User's Guide May 2020 22052280, Rev. 016...
- Page 166 Chapter 6 Data Testing Video testing The OneExpert DSL’s optional IP video testing features allow verification of video service. The capabilities of the IP video feature include the following: Physical medium test IP connectivity test Video service verification IP multicast test – Broadcast video service Generate IGMP “join”...
-
Page 167: Specifying Test Settings
Chapter 6 Data Testing Specifying test settings Before you begin testing, make sure the test settings on the OneExpert DSL match the settings of the line and network configuration you are testing. TIP: Test configurations can be stored for easy recall and use (see “Saving a report”... - Page 168 Packet Gap – Enter the packet gap, in milliseconds. Packet gap is the time interval between subsequent packets in a video stream. When the packet gap exceeds the threshold set here, the “Gap Errors” statistic will increment. OneExpert DSL User's Guide 22052280, Rev. 016 May 2020...
-
Page 169: Specifying Stream Settings
2. Specify the following: Stream Name – Enter a name for the stream. Stream Type – Select the video stream type. Stream IP Address – Enter the IP address of the stream. OneExpert DSL User's Guide May 2020 22052280, Rev. 016... -
Page 170: Mapping Channels
MPEG2-TS-RTP-TCP (interleaved) for media transport. rtsp-isma – An RTSP negotiated unicast stream using ISMA over UDP for transport. rtsp-isma-tcp – An RTSP negotiated unicast stream using ISMA over TCP for transport. OneExpert DSL User's Guide 22052280, Rev. 016 May 2020... - Page 171 – Set the Field delimiter to “{Tab}”. – Set the Text delimiter to nothing (delete the quote character in the text box). 9. Transfer the ChannelList.txt file to the OneExpert DSL’s file system, in the “documents” directory. 10. Launch the Video feature.
-
Page 172: Connecting To The Line
143. Analyzing video streams The OneExpert DSL analyzes the video data packet flow at the packet level. Since the initial video quality is established by the source material and encoding process at the head end, and the decoding quality is established by the receiver, the effects of the transport and access networks on the video streams are the variables requiring analysis. - Page 173 The VoIP phone test involves the following steps: Specifying test settings Connecting to the line Placing and receiving calls NOTE: For additional information about OneExpert DSL options and services, contact your local VIAVI representative or visit www.viavisolutions.com. OneExpert DSL User's Guide May 2020...
- Page 174 Accessing the VoIP application Select an interface (Ethernet TE, DSL, or G.fast), and then select VoIP. Specifying test settings Before you begin testing, make sure that the OneExpert DSL settings match the settings of the phone you are emulating. NOTE: You must specify the interface settings before specifying VoIP settings.
- Page 175 Some systems only accept RTP traffic on certain port numbers. (It must be a factor of 2.) RTP Port Maximum – Specify the RTP port maximum number. (It must be a factor of 2.) OneExpert DSL User's Guide May 2020 22052280, Rev. 016...
- Page 176 NOTE: If STUN is enabled, the VoIP network will not come up until the STUN client on the OneExpert DSL has determined the type of NAT used between the OneExpert DSL and the STUN server. Press the right arrow next to Quality of Service, and then specify the QoS settings.
-
Page 177: Placing And Receiving Calls
5. Optional. To save a report, use the Save Report button or Tray menu. See "Saving a report" on page OneExpert DSL User's Guide May 2020 22052280, Rev. 016... -
Page 178: Answering Calls Automatically
1. Select the Options function key, and then check the Auto Answer box. 2. Place a call to the OneExpert DSL from a VoIP phone (or a second OneExpert DSL). The OneExpert DSL answers the call with a voice announcement, and then basic call statistics are provided. -
Page 179: Browsing The Web
Ethernet interfaces, allowing you to surf the web from the customer’s NID or demarcation point using only the OneExpert DSL. For DSL applications, the browser is a separate mode that allows you to connect to any public web site on the Internet through an internet service provider. -
Page 180: Adding Bookmarks
When you are finished demonstrating internet access to the user, you should exit the browser. Press the Home function key or tap the home icon on the browser menu. The browser closes. OneExpert DSL User's Guide 22052280, Rev. 016 May 2020... -
Page 181: Fiber Testing
"Running a OneCheck Fiber test" on page 187 "Editing profiles" on page 188 "Saving the profile and launching the test" on page 190 "Fiber Certification" on page 191 "SmartOTDR" on page 193 OneExpert DSL User's Guide May 2020 22052280, Rev. 016... -
Page 182: About The Optical Tools
OneExpert. Inspecting fiber The optional VIAVI microscope accessory is used to view a live video of a simplex fiber to determine if the fiber is clean. It can also capture a snap-shot and provide pass/fail analysis. 1. Connect the fiber microscope to the USB connector on the side of the instrument. - Page 183 8. To save the results, press Save and then specify the file name for the still image. The filename can be up to 50 characters, so if desired, details such as the company name, technician, and location could be included. OneExpert DSL User's Guide May 2020 22052280, Rev. 016...
-
Page 184: Measuring Optical Power
Measuring optical power The Optical Power Meter is a VIAVI accessory used to measure optical power. The MP-60 meter measures 850, 1300, 1310,1490, and 1550 nm wavelengths The MP-80 meter measures 980, 1310,1480, and 1550 nm wavelengths 1. - Page 185 If your OneExpert is configured and optioned to do so, you can perform specific measurements for the following tests: Fiber Check Fiber Cert SmartOTDR Each of these tests is described in the following sections. OneExpert DSL User's Guide May 2020 22052280, Rev. 016...
- Page 186 Chapter 7 Fiber Testing OneCheck Fiber These tests check whether the fiber connectors are clean, monitor the power of the fiber connection, and can run tests on your VIAVI Smart OTDR E126A or SL. The tests require these accessories: VIAVI fiberscope P5000i (USB).
- Page 187 1. Connect your instrument to the fiber line under test using a VIAVI optical power meter MP60. Attach the MP60 and fiber scope to the USB jacks on the right side of the unit.
-
Page 188: Editing Profiles
To save the profile to a USB, have it inserted in the unit and then save the profile. The application will save it both to the unit and to the USB. OneExpert DSL User's Guide 22052280, Rev. 016 May 2020... - Page 189 It's enabled by default. To change the power threshold, select it and adjust using the keyboard. When finished, press the Back arrow to go back to the configuration screen. OneExpert DSL User's Guide May 2020 22052280, Rev. 016...
- Page 190 The Save and Launch button will save the profile and launch the test. Once the test is launched, you can go back to the configuration screen by pressing the Thresholds and Settings button. OneExpert DSL User's Guide 22052280, Rev. 016 May 2020...
- Page 191 Toggle Zoom button to zoom in on the image. 7. If the test detected a dirty fiber connection, you will need to clean it and retry the test before proceeding to the next step. OneExpert DSL User's Guide May 2020 22052280, Rev. 016...
- Page 192 When finished, the tests for both the fiber certification and power meter will show if they passed or failed. 10. The test results can be saved in PDF, SOR, JSON, or XML formats. OneExpert DSL User's Guide 22052280, Rev. 016 May 2020...
- Page 193 Chapter 7 Fiber Testing SmartOTDR These tests can run fiber measurements on your VIAVI Smart OTDR E126A or SL. 1. Make sure your SmartOTDR is turned on. It will create a WiFi network that you can connect your ONX shortly.
- Page 194 6. When the test is complete, you can use the arrow buttons to navigate through the test and show more detail. 7. The test results can be saved in PDF, SOR, JSON, or XML formats. OneExpert DSL User's Guide 22052280, Rev. 016 May 2020...
-
Page 195: Ethernet Testing
Ethernet Testing This chapter provides task-based instructions for using the Ethernet testing features of the OneExpert DSL, including the following: "About Ethernet testing" on page 196 "Specifying Ethernet settings" on page 196 "Connecting to the line" on page 200 "Viewing results" on page 200 "Running a OneCheck Ethernet test"... -
Page 196: About Ethernet Testing
Viewing results Specifying Ethernet settings Before you begin testing, make sure the test settings on the OneExpert DSL match the settings of the line that you are testing. To access the setup screen, select the Tests & Settings system key or use the tray menu (swipe down from the top or press the tray system key). - Page 197 Dual Stack. If you selected IPv4, choose Static or DHCP address mode. If you chose Static, you need to add the IP addresses for: IPV4 Address IPV4 Netmask IPV4 Gateway IPV4 DNS server OneExpert DSL User's Guide May 2020 22052280, Rev. 016...
- Page 198 3. Each interface can be enabled for VLAN. If you disable VLAN, you will proceed to IP Mode as the next step. If you enable VLAN, then you need to specify: VLAN ID VLAN Priority OneExpert DSL User's Guide 22052280, Rev. 016 May 2020...
-
Page 199: Saving Test Profiles
1. Press the Save button. 2. Enter a name for the profile. 3. Specify whether the profile will be shown on the Home screen. 4. Press Save. The profile is saved. OneExpert DSL User's Guide May 2020 22052280, Rev. 016... -
Page 200: Connecting To The Line
ID, location, work order information, and other settings as needed. 3. To clear the results, use the asterisk (*) key. Chapter 15 Test Results to learn what your results mean. OneExpert DSL User's Guide 22052280, Rev. 016 May 2020... - Page 201 Regardless of the format you chose, there will be also a JSON file saved with the same name. It is accessible on the unit and on StrataSync after syncing. OneExpert DSL User's Guide May 2020 22052280, Rev. 016...
- Page 202 6. To copy a profile and then edit from there, use the arrows to select the profile you want to copy, then select Copy. You can also run a test from any configuration screen by pressing the Launch button. OneExpert DSL User's Guide 22052280, Rev. 016 May 2020...
- Page 203 The application will save it both to the unit and to the USB. Testing the data layer Using the data layer tests, you can test for connectivity and throughput. See Chapter 5 Data Testing. OneExpert DSL User's Guide May 2020 22052280, Rev. 016...
- Page 204 Chapter 8 Ethernet Testing OneExpert DSL User's Guide 22052280, Rev. 016 May 2020...
-
Page 205: Wifi Testing
"Verifying IP connectivity" on page 208 "Providing WiFi hotspot access" on page 208 "WiFi Coverage Expert" on page 209 "WiFi Troubleshooting using WiFi Coverage Expert" on page 210 "Managing WiFi Advisor Devices" on page 212 OneExpert DSL User's Guide May 2020 22052280, Rev. 016... - Page 206 Access Point (letting other devices connect to the ONX). However, you can use Bluetooth when the ONX is acting as a WiFi Client (when the ONX is connecting to an Access Point). OneExpert DSL User's Guide 22052280, Rev. 016 May 2020...
-
Page 207: Scanning For Wifi Networks
4. Configure the mobile device’s WiFi connection, and then wait for a wireless connection to be established between the OneExpert DSL and the mobile device. You must enter “jdsu” in the Client ID field for the WiFi connection in order for the mobile device to receive the correct IP address to run the diagnostic application. -
Page 208: Verifying Ip Connectivity
6. On your device or laptop, open your WiFi settings and connect to the OneExpert's hotspot. It will appear in the list as the serial number on the side of the unit. OneExpert DSL User's Guide 22052280, Rev. 016 May 2020... - Page 209 If either action is impossible, the application issues a warning to add an extender for the areas that have low signal strength. OneExpert DSL User's Guide May 2020 22052280, Rev. 016...
- Page 210 SmartChannel Wizard summary tab, return to the WiFi Advisor Home screen. The settings can be accessed by pulling down the drawer located on the top of that screen. OneExpert DSL User's Guide 22052280, Rev. 016 May 2020...
- Page 211 1. Take a WiFi Advisor and mobile device to the location where WiFi performance is to be assessed. 2. Connect the OneExpert DSL to the residential gateway using an Ethernet cable. 3. Follow the procedure “Assessing WiFi performance throughout a site” in the WiFi Advisor User’s...
- Page 212 If you do not wish to unregister the device, press the Back arrow button (either on the screen or the physical key on the OneExpert). Select OK to unregister your device. The device is unregistered and no longer appears in the Registered Devices list. OneExpert DSL User's Guide 22052280, Rev. 016 May 2020...
- Page 213 If you do not wish to update the device, press the Back arrow. Select OK to update the firmware. 5. Select Yes. The update begins. The status bar at the top indicates the update progress. OneExpert DSL User's Guide May 2020 22052280, Rev. 016...
- Page 214 Chapter 9 WiFi Testing OneExpert DSL User's Guide 22052280, Rev. 016 May 2020...
-
Page 215: Wiring Tools
"About the Wiring Tools" on page 216 "Wire Mapping" on page 216 "Hub Flash" on page 218 "Port discovery" on page 219 "Ping Tool" on page 219 OneExpert DSL User's Guide May 2020 22052280, Rev. 016... -
Page 216: About The Wiring Tools
Select Reset Length..To hide the Length Constant bar, swipe down on the screen to view the tray menu. Select Hide Length Constant. OneExpert DSL User's Guide 22052280, Rev. 016 May 2020... - Page 217 52.5 18AWG, Unjacketed 17.0 55.5 4. For greatest accuracy, VIAVI recommends that you perform a wiring compensation to remove the effects of the test leads. Swipe down on the screen to view the tray menu Select Wiring Compensation. Follow the instructions on the screen to connect or disconnect the leads to perform the compensation.
-
Page 218: Sending Tones
1. Connect an Ethernet cable from the Residential Gateway port to an Ethernet connector on the side of the OneExpert DSL. 2. From the Wiring Tools menu, select Hub Flash. 3. If needed, change the settings for Cadence, Rate, Duplex, or NIC Wiring by either pressing the setting or using the arrow keys to highlight a setting and then press the OK button. -
Page 219: Port Discovery
4. To set a Ping Target, do the following: Select Ping Target. Select a target. Enter an address such as www.yahoo.com Select OK. 5. Press Start. The OneExpert DSL pings the Gateway, DNS and any specified Ping Targets. OneExpert DSL User's Guide May 2020 22052280, Rev. 016... - Page 220 Chapter 10 Wiring Tools OneExpert DSL User's Guide 22052280, Rev. 016 May 2020...
- Page 221 "About the Full Sweep Coax Test" on page 230 "Locating SmartIDs" on page 230 "Coax Check" on page 232 "About HPNA Testing" on page 235 "Monitoring the HPNA network" on page 236 OneExpert DSL User's Guide May 2020 22052280, Rev. 016...
-
Page 222: Locating Smartids
Do one of the following: - Use the up and down arrows to highlight the label letter for the SmartID and then press OK. - Press the letter for the SmartID. OneExpert DSL User's Guide 22052280, Rev. 016 May 2020... - Page 223 If testing with a mobile device, it does not affect the connection; you can move around with the mobile device. Similarly, if the mobile app looses connection to the OneExpert, it will not affect the SmartID test in progress. OneExpert DSL User's Guide May 2020 22052280, Rev. 016...
-
Page 224: Coax Map Test
A cable with a 2-way splitter may have two opens at close to -7 dBrl. y A cable with a 3-way splitter may have two opens at -14 dBrl and one open at -7 dBrl OneExpert DSL User's Guide 22052280, Rev. 016 May 2020... - Page 225 NOTE: The cable ID won't work properly if there's a cable plugged into the side of the unit (you must only use the coax connector on the top). OneExpert DSL User's Guide May 2020 22052280, Rev. 016...
-
Page 226: Troubleshooting Tip
The following shows several cable topologies on the left and the corresponding coax map table on the right. The dBrl level at each splitter will be relatively low and depend on the quality of the splitter. Lower return loss indicates a better splitter. OneExpert DSL User's Guide 22052280, Rev. 016 May 2020... -
Page 227: Whole-Home Check
3. Place other SmartIDs at any location in the home wherever network qualification or troubleshooting is desired, such as TVs, set top boxes or cable modems. There are three possible test configurations: OneExpert DSL User's Guide May 2020 22052280, Rev. 016... - Page 228 Test fails if there is filter(s) or amplifier(s) present in the network Note that the “RG – Through Diplexer” test allows a diplexer in the network. After the test completes, the result test summary appears. OneExpert DSL User's Guide 22052280, Rev. 016 May 2020...
- Page 229 The left side of the screen will show the frequency sweep and noise ingress measurement results for each highlighted box, which corresponds to the two points between SmartIDs in the coax network. 7. To save the results to a report, use the Tray menu. OneExpert DSL User's Guide May 2020 22052280, Rev. 016...
- Page 230 ONX 580 via mini-USB, and load test files. It may also be used to locate RFIDs in the network. The application opens to the default tab Locate SmartIDs. OneExpert DSL User's Guide 22052280, Rev. 016 May 2020...
- Page 231 SmartID Plus probes as well as update the firmware on any probe. The user may also load an existing test file to view the past results. These functions are the same as "Locating SmartIDs" on page 222. OneExpert DSL User's Guide May 2020 22052280, Rev. 016...
- Page 232 Firstly, the frequency sweep is conducted between 2 MHz and 1.6 GHz, unlike the Whole Home Check application that sweeps from 2 MHz to 52 MHz. Full Sweep Coax Check Whole Home Check OneExpert DSL User's Guide 22052280, Rev. 016 May 2020...
- Page 233 Test Summary page is white. However, Cable Faults and Ingress pass/marginal/fail limits have been preserved, similar to the Whole Home Check application. Full Sweep Coax Check Whole Home Check Test Summary Page Test Summary Page OneExpert DSL User's Guide May 2020 22052280, Rev. 016...
- Page 234 Any filter in the network, be it low-pass, high-pass or MoCA, is now identified in the Path Detail results as Filter. OneExpert DSL User's Guide 22052280, Rev. 016 May 2020...
-
Page 235: About Hpna Testing
The capabilities of the OneExpert DSL OneExpert DSL’s optional HPNA testing features include the following: Operational mode — This mode monitors the active network during its normal operation and periodically updates statistics. -
Page 236: Monitoring The Hpna Network
Minimum Rate – The minimum rate, in Mbps, that will pass. Minimum SNR – The minimum SNR, in dB, that will pass. Quick Max Packets Lost – The maximum packet loss, in number of packets, allowed for the Quick Test. OneExpert DSL User's Guide 22052280, Rev. 016 May 2020... - Page 237 Save Report. Next, specify the report settings such as report name, report format, technician ID, location, and other settings as needed. For more information on the results, see "HPNA results" on page 265. OneExpert DSL User's Guide May 2020 22052280, Rev. 016...
- Page 238 Chapter 11 In Home Testing OneExpert DSL User's Guide 22052280, Rev. 016 May 2020...
- Page 239 Using the OneExpert with a Mobile Device This chapter provides task-based instructions for using the two optional applications that are available for mobile devices: OneExpert DSL and VIAVI Mobile Tech, including the following: "OneExpert DSL app" on page 240 "Controlling the OneExpert from your Mobile Device" on page 240 "Updating the iOS application software"...
-
Page 240: Getting Started
To verify your options, go to the Options menu in the System Settings. Controlling the OneExpert from your Mobile Device To control the user interface of a OneExpert DSL, the mobile device must pair with the OneExpert DSL over Bluetooth. Then, using the OneExpert DSL application on the mobile device, you can connect to a OneExpert DSL and control the user interface. - Page 241 You can now control the instrument as if you were pressing the actual buttons on the device, allowing you to run most of the tests that are available on the OneExpert DSL. Notice the Back button on the left and the Tray and Camera buttons on the right, as shown below.
- Page 242 2. As the process runs, the application icon has a circle inside that rotates. When the update is finished, the rotating circle disappears and the icon has a “badge” (a blue dot next to the icon), showing it is updated. OneExpert DSL User's Guide 22052280, Rev. 016 May 2020...
- Page 243 Chapter 12 Using the OneExpert with a Mobile Device Connecting to StrataSync from the VIAVI Mobile Tech App You can connect to StrataSync using your smart phone or tablet anytime, anywhere using the VIAVI Mobile Tech app. Mobile Tech supports sync and file management between your OneExpert and DSP meters and StrataSync using an iOS or Android mobile device.
- Page 244 Instrument Sync – Sync your instrument to StrataSync and deploy configuration files File Manager – Manage files on the unit, including screenshots you can save to your phone or tablet OneExpert DSL User's Guide 22052280, Rev. 016 May 2020...
- Page 245 Settings– Configure advanced settings for the Mobile Tech app, including when the unit syncs and clearing local data Product Support – Contact the VIAVI Technical Assistance Center, request repair or calibration, or watch quick tip videos OneExpert DSL User's Guide May 2020 22052280, Rev.
- Page 246 Chapter 12 Using the OneExpert with a Mobile Device OneExpert DSL User's Guide 22052280, Rev. 016 May 2020...
-
Page 247: Test Results
"Video results" on page 260 "VoIP results" on page 258 "HPNA results" on page 265 "SmartID results" on page 268 "Copper results" on page 269 "WiFi Advisor results" on page 275 OneExpert DSL User's Guide May 2020 22052280, Rev. 016... -
Page 248: Context-Sensitive Help
Press and hold to activate the help dialog box for that result. You can swipe the screen left/right to scroll through the tabs. In this example, the DSL Summary Margin results are selected. OneExpert DSL User's Guide 22052280, Rev. 016 May 2020... - Page 249 The elapsed time (duration) since reaching Sync Time Showtime. T1.413, READSL, ADSL2+, The DSL line format agreed upon during Trained Mode ADSL2, G.Lite, training (appears in the menu heading). G.DMT, VDSL2, G.fast OneExpert DSL User's Guide May 2020 22052280, Rev. 016...
- Page 250 1 Gbps The percentage of total bandwidth Capacity currently used by the actual connect 0–100% rate upstream and downstream. SNR marigin upstream and -51.1–+51.1 Margin downstream. OneExpert DSL User's Guide 22052280, Rev. 016 May 2020...
- Page 251 Start Time is the time of day when the DSL modem achieves Showtime. The Start time is updated if you clear errors. Stop Time is the time of day when the report is generated or DSL sync is lost. OneExpert DSL User's Guide May 2020 22052280, Rev. 016...
- Page 252 – For transmitted collisions, a count of the number of times the unit has transmitted a frame, and then received a jam signal in the time slot for the frame. These counts are provided for both Port 1 and Port 2. OneExpert DSL User's Guide 22052280, Rev. 016 May 2020...
- Page 253 LAN. IPv4 or IPv4/IPv6 Dual Stack Address – The OneExpert DSL’s IPv4 address to the access the provider network. Netmask – The OneExpert DSL’s netmask address. IP devices use a netmask IP address to determine if IP packets are to be routed to other networks or sub- networks.
- Page 254 Global Address – The OneExpert DSL OneExpert DSL’s IPv6 address used to the access the global network (beyond the router). Local Address – The OneExpert DSL’s IPv6 address used to the access the local network. Gateway – The OneExpert DSL’s IPv6 gateway address. When an IP device has...
- Page 255 SATN – Signal attenuation. Attenuation average of the bins/tones that contain the actual signal (empty bins are not included). For a description of the settings impacting this calculated value, see step 10 "Specifying test settings" on page 134. OneExpert DSL User's Guide May 2020 22052280, Rev. 016...
-
Page 256: Dsl Graphs
134. Tx Power – Power level, in dBm, of the signal, downstream (from the DSLAM) and upstream (transmitted by the OneExpert DSL). INTLV Delay – Interleaving depth set by the DSLAM. This is a measure of latency introduced on the link due to the scrambling of DSL frames to protect data and create a more reliable link. -
Page 257: Ip Data Results
Replies RX – The number of echo reply messages returned to the OneExpert DSL from the destination. Replies Lost – The number of pings that did not return to the OneExpert DSL. This could be caused by an unresponsive target (destination) or by heavy congestion on the network;... -
Page 258: File Transfer Results
(bad shows a red X) Delay – End to end delay in milliseconds. Jitter – Deviation in packet arrival times, in milliseconds). Loss – Packet loss based as a percentage lost divided by total packets. OneExpert DSL User's Guide 22052280, Rev. 016 May 2020... - Page 259 Remote Throughput Bytes – The number of Bytes that the remote entityreports that it has transmitted (sent via RTCP). Remote Throughput Packets – The number of Packets that the remote entity reports that it has transmitted (sent via RTCP) OneExpert DSL User's Guide May 2020 22052280, Rev. 016...
- Page 260 Video results After the OneExpert DSL is setup and a data connection is established, video streams become available for analysis. In the upper area of the screen, the graphic indicates the network status (up/down), the number of active streams, and the combined rate indicates the total video bandwidth (current and max).
- Page 261 (MPEG-2 TS Video over RTP) NOTE: The State, Type, IP address, and Port results refer to the media stream, not the signaling protocol (IGMP or RTSP) that brought up the stream. OneExpert DSL User's Guide May 2020 22052280, Rev. 016...
- Page 262 ETHERNET RX Errors – Number of Ethernet errors received. (Appears only if testing on Ethernet interface) ETHERNET RX Drops – Number of dropped Ethernet frames received. (Appears only if testing on Ethernet interface) OneExpert DSL User's Guide 22052280, Rev. 016 May 2020...
-
Page 263: Packet Statistics
PMT Errors – Number of errors in the Program Map Table. Error conditions include any of the following: – Scrambling is ON – Repetition rate is less than the configured threshold value – PMT not found OneExpert DSL User's Guide May 2020 22052280, Rev. 016... - Page 264 NOTE: The PAT and PMT items are table data inserted into the stream to enable the decoder to perform correctly. These two items should always be present. OneExpert DSL User's Guide 22052280, Rev. 016 May 2020...
-
Page 265: Hpna Results
Chip ID = Chipset 3010 The device’s firmware 3110 Ver–Chip revision-chip id version and Copper Gate™ chip ID. 3210 3310 3320 Node details Node details provides details for a particular node. OneExpert DSL User's Guide May 2020 22052280, Rev. 016... -
Page 266: Network Test
Packets broadcast packets. The number of mcast transmitted or received Packets multicast packets. The number of transmitted or received dropped Packets packets dropped due to lack of resources. OneExpert DSL User's Guide 22052280, Rev. 016 May 2020... -
Page 267: Protocol Messages
(CERT protocol). The number of control ctrl_rem_req requests from a remote host (CERT protocol). The number of control ctrl_rem_rec replies to a remote host (CERT protocol). OneExpert DSL User's Guide May 2020 22052280, Rev. 016... -
Page 268: Smartid Results
SmartIDs on the map. Press OK to see details of a particular segment. Sweep Data This category shows a graph of the frequency sweep. Use the # key to reverse the direction. OneExpert DSL User's Guide 22052280, Rev. 016 May 2020... -
Page 269: Copper Results
AC peak + [VDC] ≤ 300 2% ± 1.0V WARNING: INSTRUMENT DAMAGE Although the OneExpert DSL OneExpert DSL is designed to measure hazardous voltage, it is designed to do so on telecom circuits, not power mains. Hazardous voltages may be on the power lines. 220 mains (RMS) are equivalent to 308 peak. - Page 270 You measure resistance to test line continuity and quality, and to detect corrosion, shorts, opens, and faults. The OneExpert DSL is able to measure resistance in the presence of noise and foreign voltage, but the accuracy may be reduced, depending on the noise level.
-
Page 271: Distance To Short
Resolution (Ω) Accuracy 0 to 49.99 2% ± 2.5Ω 50 to 999 5% ± 2.5Ω 1.0K to 9.99K 10.0K to 99.9K 100.0K to 999K 1.0M to 9.9M 10.0M to 100M 100K OneExpert DSL User's Guide May 2020 22052280, Rev. 016... - Page 272 DC current on Tip (A) to Ring (B) should be ≥ 23 mA at the NID. Anything less will not allow for differences in temperature and phone equipment will not operate during extremes. The following table describes the DC current result. Range Resolution Accuracy 0 to 110 mA 2% ± 1mA OneExpert DSL User's Guide 22052280, Rev. 016 May 2020...
-
Page 273: Longitudinal Balance
ADSL or ISDN). Load coil detection and elimination is essential in the installation of an xDSL circuit The following table describes the load coil result. Range Resolution Accuracy Up to 27,000 ft (8229.6 m) up to 5 ± 1 OneExpert DSL User's Guide May 2020 22052280, Rev. 016... -
Page 274: Impulse Noise
Velocity of Propagation (VoP) is the speed of the TDR signal traveling down the wire pair relative to the speed of light. The OneExpert DSL uses this value to convert reflections to distance. It is important to select the correct cable gauge and fill for an accurate distance calculation.The default value is appropriate for 24–26 AWG (4–5 mm) telco aerial cable and... - Page 275 If the channel view shows utilization in the wrong channels, the likely issue is that a high energy 802.11 transmitter is very close to the OneExpert DSL. For example, a high energy 802.11ac transmitter is using channels 149, 153, 157, and 161. The channel view should show utilization in these channels only.
- Page 276 Bluetooth will impact throughput. Channels can “bleed over” into adjacent channels. The width of the signal (due to RF considerations) can affect nearby channels. This bleed over is treated as noise. OneExpert DSL User's Guide 22052280, Rev. 016 May 2020...
- Page 277 "Cleaning the instrument" on page 278 "Resolving problems" on page 278 "Getting Technical Assistance" on page 281 "WiFi Advisor" on page 280 "Additional Information" on page 281 "Specifications" on page 282 OneExpert DSL User's Guide May 2020 22052280, Rev. 016...
-
Page 278: Cleaning The Instrument
The modem cannot achieve sync with the CO – Inability to sync can have many causes. Perform the following steps to troubleshoot: - Disconnect the customer’s DSL modem - Verify tester connection to the correct pair - Verify the Data mode OneExpert DSL User's Guide 22052280, Rev. 016 May 2020... -
Page 279: Data Testing
Make sure that the Ethernet interface cabling is correct. If the Ethernet cable is not hooked up, or is hooked up incorrectly, a packet will not be sent. Thus the Ethernet statistics will not increment. OneExpert DSL User's Guide May 2020 22052280, Rev. 016... - Page 280 – Slow a/b/g PHY rates occupy the channel longer than modern PHY rates for the same amount of information transfer. – Old security types (WEP/WEPA1) limit connection to lower 802.11 rates OneExpert DSL User's Guide 22052280, Rev. 016 May 2020...
-
Page 281: Getting Technical Assistance
The WiFi Advisor is unresponsive Press and hold the power button for 5 seconds. (locked-up) Getting Technical Assistance If you require technical assistance, call 1-844-GO-VIAVI / 1.844.468.4284. For the latest TAC information, visit http://www.viavisolutions.com/en/services-and-support/support/technical-assistance Additional Information For more detailed information, contact us at CATVsupport@viavisolutions.com... -
Page 282: Specifications
Humidity 10% to 90% RHNC Maximum operating altitude 4000 meters (13,123 feet) Vibration sinusoidal vibration testing per IEC 60068-2-6 (Sinusoidal Vibration) Shock shock testing to IEC 60068-2-29 Ed. 2.0 “Continuous Bumps.” OneExpert DSL User's Guide 22052280, Rev. 016 May 2020... - Page 283 5 hours for a fast charge; for a full charge, allow to trickle charge overnight Power supply input 100-240VAC, 1.5A, 50-60 Hz Power supply output 12VDC, 5.0A Max Power supply operating temperature 0° to +40° C (-22° to 104° F) range OneExpert DSL User's Guide May 2020 22052280, Rev. 016...
- Page 284 22052280 Rev. 016, May 2020 English VIAVI Solutions North America: 1.844.GO VIAVI / 1.844.468.4284 Latin America +52 55 5543 6644 EMEA +49 7121 862273 APAC +1 512 201 6534 All Other Regions: viavisolutions.com/contacts email CATVsupport@viavisolutions.com...
Need help?
Do you have a question about the OneExpert DSL and is the answer not in the manual?
Questions and answers