Viavi ONX-580 User Manual
Hide thumbs
Also See for ONX-580:
- Manual (22 pages) ,
- Quick start manual (2 pages) ,
- Quick start manual (2 pages)
Table of Contents
Advertisement
Quick Links
Advertisement
Table of Contents

Related Manuals for Viavi ONX-580


Summary of Contents for Viavi ONX-580
- Page 1 ONX-580 User's Guide...
-
Page 2: Copyright Release
Copyright/Trademarks © Copyright 2021 VIAVI Solutions Inc. All rights reserved. No part of this guide may be reproduced or transmitted, electronically or otherwise, without written permission of the publisher. VIAVI Solutions and the VIAVI logo are trademarks of VIAVI Solutions Inc. (“Viavi”). -
Page 3: Federal Communications Commission (Fcc) Notice
– Consult the dealer or an experienced radio/TV technician for help. In order to maintain compliance with the limits of a Class A digital device VIAVI requires that quality interface cables be used when connecting to this equipment. Any changes or modifications not expressly approved by VIAVI could void the user’s authority to operate the... -
Page 4: Industry Canada Requirements
VIAVI has established a take-back processes in compliance with the EU Waste Electrical and Electronic Equipment (WEEE) Directive, 2012/19/EU, and the EU Battery Directive, 2006/66/EC. Instructions for returning waste equipment and batteries to VIAVI can be found in the WEEE section of VIAVI Standards and Policies web page. -
Page 5: California Proposition
California and the state’s drinking water and environment from excessive exposure to chemicals known to the state to cause cancer, birth defects or other reproductive harm. For the VIAVI position statement on the use of Proposition 65 chemicals in VIAVI products, see the Hazardous Substance Control section of the VIAVI Standards and Policies web page. - Page 6 ONX-580 User's Guide 22052280 July 2021...
- Page 7 Removing a test module ................31 Attaching a test module ................32 Chapter 2 Quick Tour Exploring the front panel ..................34 Status indicators ..................... 35 Touchscreen display ..................36 Softkeys ......................36 Arrow buttons ....................36 OK button ......................36 System buttons....................36 ONX-580 User's Guide July 2021 22052280...
- Page 8 RJ45 Wiring connector .................39 RJ11 Wiring connector ................. 40 xDSL / G.fast connector ................40 Rings ......................... 40 Exploring the ONX-580 / ONX-580P top panel ........... 41 Navigating the user interface ................43 Battery status and time ................44 Expanding a menu ..................44 Selecting applications ..................
- Page 9 Viewing the User’s Guide on your instrument ..........80 Remotely operating the instrument ............... 80 Setting up the ONX for VNC ............... 81 Connecting to your ONX via VNC on your PC ........82 Using a PC keyboard ..................82 ONX-580 User's Guide July 2021 22052280...
- Page 10 Return loss testing ..................115 Return loss sweep testing .................116 Impedance testing ..................116 Impedance sweep testing ................117 Running a OneCheck copper test ..............118 Editing profiles .....................119 DVOM ....................120 Narrowband / Voice Frequency ............121 ONX-580 User's Guide 22052280 July 2021...
- Page 11 Connecting to a single pair at the NID/demarc ........146 Connecting to bonded pairs at the NID/demarc ........ 147 Testing the physical layer ................. 147 Testing line quality ..................... 147 Terminating the loop (SELT) ................148 ONX-580 User's Guide July 2021 22052280...
- Page 12 Analyzing video streams .................. 176 Terminate mode ..................176 QoS Expert .....................177 VoIP Testing ......................177 Accessing the VoIP application ..............178 Specifying test settings ................178 Connecting to the line ................181 Placing and receiving calls .................181 ONX-580 User's Guide 22052280 July 2021...
- Page 13 Multi Interface data mode ............206 Saving test profiles ..................207 Connecting to the line ..................208 Viewing results ....................208 Running a OneCheck Ethernet test .............. 209 Editing profiles .....................210 Testing the data layer ..................211 ONX-580 User's Guide July 2021 22052280...
- Page 14 About the Full Sweep Coax Test ..............242 Locating SmartIDs ....................242 Coax Check ......................244 About HPNA Testing ..................247 Connecting to the line ..................248 Monitoring the HPNA network ..............248 Testing the HPNA network ................248 ONX-580 User's Guide 22052280 July 2021...
- Page 15 Contents Chapter 12 Using the OneExpert with a Mobile Device VIAVI Mobile Tech app ..................252 Connecting to StrataSync ..................252 Using the Mobile Tech app ................253 Logging in to StrataSync ................253 Pairing the OneExpert to your mobile device ........254 Mobile Tech Main Menu ................255 Connecting to your OneExpert via Remote Display .........
- Page 16 RX and TX tones ..................296 WiFi Advisor results ...................297 BSSID results ....................297 Channel results ....................297 RSSI view .....................297 Utilization graph ................297 Noise graph ..................297 Channel score ..................297 Best Channels ................... 298 Spectral results ................... 298 ONX-580 User's Guide 22052280 July 2021...
- Page 17 Loss Sweep (UFED) ..................318 NEXT Sweep ....................319 FEXT (UFED) ....................320 SNR ........................321 Balance Sweep ....................322 Return Loss ....................323 Impedance ......................325 WiFi Advisor ......................327 Getting technical assistance ................328 Additional information ..................328 Specifications ......................329 ONX-580 User's Guide July 2021 22052280...
- Page 18 Contents ONX-580 User's Guide 22052280 July 2021...
-
Page 19: About This Guide
Purpose and scope The purpose of this guide is to help you successfully use the OneExpert DSL features and capabilities. Additionally, this guide provides a complete description of the VIAVI warranty, services, and repair information. Assumptions This guide is intended for novice, intermediate, and experienced users who want to use the OneExpert DSL effectively and efficiently. -
Page 20: Safety And Compliance Information
A vertical bar | means “or”: only one option can appear in a single platform [a|b|e] command. Square brackets [ ] indicate an login [platform name] optional argument. Slanted brackets < > group <password> required arguments. ONX-580 User's Guide 22052280 July 2021... -
Page 21: Symbol Conventions
This symbol represents a risk of a hot surface. It may be associated with either a DANGER, WARNING, CAUTION, or ALERT message. See "Safety definitions" on page 22 for more information. ONX-580 User's Guide July 2021 22052280... -
Page 22: Safety Definitions
Indicates that there is an action that must be ALERT performed in order to protect equipment and data or to avoid software damage and service interruption. ONX-580 User's Guide 22052280 July 2021... - Page 23 "About the OneExpert DSL" on page 24 "Features and capabilities" on page 28 "What ships with the OneExpert DSL" on page 30 "Preparation for use" on page 30 "Attaching or removing a test module" on page 31 ONX-580 User's Guide July 2021 22052280...
-
Page 24: About The Oneexpert Dsl
The combination of its multi-touch user interface and unique VIAVI OneCheck automated tests provides field technicians with ease of use and more expertise when performing complex tasks. This equips technicians to fix problems the first time while improving access and home network quality. - Page 25 Chapter 1 Introduction Available mainframes The following OneExpert DSL mainframes are currently available: The ONX-580 and ONX-580P support DSL, copper, services, and home network testing. The ONX-580A supports DSL, services, and home network testing; copper testing is not supported. NOTE:...
-
Page 26: Software Options
Score (MOS) scaling method and obtain call scores. Requires the ONX-VOIP software option. ONX580-RFL Allows Resistive Fault Locater (RFL) testing. ONX580-TIMS Allows Transmission Impairment and spectral testing. ONX580-V35B Provides a 35b profile for VDSL2 testing. ONX-580 User's Guide 22052280 July 2021... -
Page 27: Additional Resources
Provides the DSL Helper option. If you received an option file from a VIAVI representative, copy it to USB, insert the USB in the instrument, copy the file to the internal file system, turn the power off, then turn the power back on. -
Page 28: Features And Capabilities
A mobile-connectivity iOS application that provides remote control, data enhancements, and technical support, including tutorials Bluetooth and WiFi connectivity. The ONX-580 supports both 2.4 GHz and 5 GHz. The StrataSync™ cloud-enabled architecture for easy asset and test data management G.fast / xDSL testing, including: –... - Page 29 Chapter 1 Introduction Full Sweep Coax testing, including: – Full Bandwidth 1.6 GHz SmartID testing Copper testing (ONX-580 or ONX-580P platforms required) features: – Multimeter (AC volts, DC volts, Resistance) – TDR (including OneCheck™ TDR) – Crosstalk TDR for ONX-580P only –...
-
Page 30: What Ships With The Oneexpert Dsl
This section explains how to start using the OneExpert. When you unpack your instrument, do the following: Inspect the OneExpert for damage. If the instrument is damaged, put it back in the box and contact VIAVI customer service (see "Technical assistance" on page 19). - Page 31 1. Loosen the four screws using a screwdriver or a coin. 2. Pull the module from the base. You may have to slightly wiggle the module to loosen it from the gasket. The module is removed. ONX-580 User's Guide July 2021 22052280...
- Page 32 2. Gently push the module to mate the connectors. 3. Tighten the four screws: Tighten by hand until the housing and screw contact each other. Turn the fastener one complete turn, using a screwdriver or a coin. The module is connected. ONX-580 User's Guide 22052280 July 2021...
-
Page 33: Quick Tour
"Exploring the front panel" on page 34 "Exploring the bottom panel" on page 37 "Exploring the right side panel" on page 38 "Exploring the ONX-580 / ONX-580P top panel" on page 41 "Navigating the user interface" on page 43 ONX-580 User's Guide... -
Page 34: Exploring The Front Panel
The following sections describe each of the controls and indicators on the front panel. Status indicators High-sensitivity touchscreen display Softkeys Shortcut buttons Arrows / OK buttons Back, Home, and Tray buttons Power button ONX-580 User's Guide 22052280 July 2021... -
Page 35: Status Indicators
Solid amber indicates the battery is getting low, the charge is between 10% and 30%. Solid red indicates the battery charge is critically low, less than 10%. An audible beep occurs 30 seconds before shutdown. ONX-580 User's Guide July 2021 22052280... -
Page 36: Touch Screen Display
Tray – Displays the Tray menu to save test reports, turn on/off Bluetooth, or enable/disable remote operation, etc. Power button Press and hold the Power button to turn the OneExpert DSL on or off. ONX-580 User's Guide 22052280 July 2021... -
Page 37: Exploring The Bottom Panel
Fast flashing red – Charging was suspended due to a fault and user intervention is necessary (for example, the wrong charger is attached) Solid red – Charging was suspended due to overheating. The unit can continue to run, no user intervention necessary Solid amber – Battery is charging ONX-580 User's Guide July 2021 22052280... - Page 38 OneExpert DSL to the line under test. When the connectors are not being used, close the rubber flap to keep out dust and rain. ONX-580 and ONX-580P connector panel xDSL / G.fast connector ONX-580A connector panel xDSL / G.fast connector...
-
Page 39: Usb Connectors
POTS connector The POTS connector is used on the ONX-580 / ONX-580P modules for POTS testing. Network connectors Two Ethernet/Network ports are used to connect to Ethernet networks to allow testing (such as hub flash, port discovery, and ping), synchronize with StrataSync, upgrade software, and remotely connect to the OneExpert. -
Page 40: Rj11 Wiring Connector
To reduce the risk of fire, use only 26 AWG or larger telecommunications line cord between the DSL connector and the wall. NOTE: ELECTROSTATIC DISCHARGE IMMUNITY When using an Ethernet crossover cable, VIAVI recommends using a shielded crossover cable for the best immunity to electrostatic discharge (ESD). Rings The D-rings on the corners of the instrument can be used to attach a carry strap. - Page 41 Chapter 2 Quick Tour Exploring the ONX-580 / ONX-580P top panel The upper area of the back panel of the ONX-580 / ONX-580P module houses the connectors for Copper or G.fast/xDSL testing. These connectors are not provided on the ONX-580A.
- Page 42 Electrical shock may result in serious injury or death. Use care when connecting to telecommunications circuits, to be sure that you do not come in contact with exposed conductors or power mains. Connect TNV signals to TNV ports only. ONX-580 User's Guide 22052280 July 2021...
-
Page 43: Navigating The User Interface
When you power up the OneExpert, the Home screen appears. The Home screen indicates the options enabled on your instrument and may vary depending on the module connected. The ONX-580 is shown here. ONX-580 User's Guide July 2021 22052280... -
Page 44: Selecting Applications
After you expand a collapsible menu, you can select a specific option by doing either of the following: Press the menu option. Use the arrow buttons to highlight the desired menu option, and then press OK. ONX-580 User's Guide 22052280 July 2021... -
Page 45: Running Applications
(by pressing the home icon in the upper-left corner of the application’s screen). The application will keep running and the icon on the home screen will be highlighted, showing that it’s active. To quit an app, press the Back button or back arrow on the icon. ONX-580 User's Guide July 2021 22052280... -
Page 46: Entering Data
To create a shortcut, press and hold the icon for the function and then drag it to the bottom of the screen to the shortcut bar. To remove a shortcut, press and hold the icon and then drag it off of the shortcut bar. ONX-580 User's Guide 22052280 July 2021... - Page 47 "Managing files" on page 78 "Managing files with StrataSync" on page 79 "Viewing the User’s Guide on your instrument" on page 80 "Remotely operating the instrument" on page 80 "SmartAccess Anywhere – Remote Coaching" on page 83 ONX-580 User's Guide July 2021 22052280...
-
Page 48: Displaying The System Settings Menu
USB software updates. 1. From the Main menu, press the System menu item. 2. Press the System Settings icon. The System Settings menu appears. ONX-580 User's Guide 22052280 July 2021... - Page 49 You can also take screenshots of the user interface and review a PDF of this guide on your instrument. To bring up the Tray menu, do either of the following: Press the Tray button Swipe downward from the top of the screen ONX-580 User's Guide July 2021 22052280...
-
Page 50: Setting Up Your Instrument
Press the menu item that corresponds to the setting. Select the value for the setting from the list. 4. Press Back/Cancel to exit the menu. 5. Turn off the power, then turn back on to reboot the instrument. ONX-580 User's Guide 22052280 July 2021... -
Page 51: Setting The Date And Time
Control Time Synchronization 1. Press Time Synchronization. 2. If synchronization is required, select NTP. If synchronization is not needed, select None. When enabled, Network Time Protocol (NTP) synchronizes your system clock to a central time server. ONX-580 User's Guide July 2021 22052280... -
Page 52: Set The Backlight Timeout
2. Select the amount of time to wait before the backlight dims. Set the power off delay 1. Press Power Off Delay. 2. Select the amount of idle time to wait before the instrument automatically powers itself off. ONX-580 User's Guide 22052280 July 2021... -
Page 53: Setting The Volume
The XML result file will be saved on your instrument for 90 days or until you synchronize the instrument to the StrataSync server. After synchronizing to the StrataSync server, the result file will automatically be deleted. ONX-580 User's Guide July 2021 22052280... -
Page 54: Restoring Factory Defaults
1. Go to the System Settings menu, then select User Information. 2. Specify the user’s first and last name, workgroup, company, email address, and other information. 3. Press the Back/Cancel button to save and exit the menu. The user information is specified. ONX-580 User's Guide 22052280 July 2021... -
Page 55: Enabling Password Protection
2. From the Password Protection Settings screen, select Enter Password to Enable Editing and enter a password. 3. Select the checkmarks for Allow editing and Enable Password Protection, as necessary. 4. Press the Back/Cancel button to save and exit the menu. ONX-580 User's Guide July 2021 22052280... -
Page 56: Establishing Network Connections
You cannot use Bluetooth when the ONX is acting as a WiFi Access Point (letting other devices connect to the ONX). However, you can use Bluetooth when the ONX is acting as a WiFi Client (when the ONX is connecting to an Access Point). ONX-580 User's Guide 22052280 July 2021... -
Page 57: Establishing An Ethernet Connection
Use User Class – Enter your User Class if your network requires a User Class Use Arp Announce – Enable Arp Announce to have the instrument do the Arp announce after the DHCP request. ONX-580 User's Guide July 2021 22052280... - Page 58 IPv6 DNS Address Mode DHCPv6 – No additional settings to specify. Manual – Enter the IPv6 DNS Server address. If you specified IPv4/IPv6 Dual Stack as your network mode, specify the following settings: ONX-580 User's Guide 22052280 July 2021...
- Page 59 Static – See the IPv4 Address Mode in this section. Stateless – See the IPv6 Address Mode in this section. 7. Display the Tray menu, and then press Network to establish the connection. The instrument establishes an Ethernet connection to the LAN. ONX-580 User's Guide July 2021 22052280...
-
Page 60: Establishing A Wifi Connection
NOTE: Most ONX models support both 2.4 GHz and 5 GHz WiFi. Some earlier ONX-580 models only support 2.4 GHz. Adding a WiFi network profile If an access point does not broadcast its Service Set Identifier (SSID), you can manually create a profile for a WiFi network. -
Page 61: Connecting To A Wi-Fi Network
The status of the connection (Network Up), and details concerning the connection (IP address, netmask, gateway, and DNS server) appear at the top right of the menu. The instrument is connected to the WiFi network. ONX-580 User's Guide July 2021 22052280... -
Page 62: Establishing A Bluetooth Connection
If pairing was successful, you can use the instrument with the paired device. NOTE: You can also pair your mobile device from the Home screen. Follow the instructions on the meter to pair. ONX-580 User's Guide 22052280 July 2021... - Page 63 2) a WiFi connection, or 3) a USB drive with a copy of the firmware. Download the firmware to a USB drive If you’re using a USB drive, you can download the firmware from: The VIAVI OneExpert DSL page at: http://www.viavisolutions.com/enus/products/ network-test-and-certification/copper-dsl-WiFi-and-broadband/oneexpert-dsl- modular-field-test-platform.
-
Page 64: Installing Software Options
8. Optional. Press the System menu and then select File Browser to verify that the option file was copied to the unit. 9. Reboot the instrument (turn off the power, then turn it back on). The option is installed. ONX-580 User's Guide 22052280 July 2021... -
Page 65: Synchronizing To The Stratasync Server
To obtain the latest configuration settings, software options and updates, work orders, and ownership registration information, the OneExpert can synchronize with a VIAVI server via the internet. The synchronization also stores any user files saved on the unit to the StrataSync server. - Page 66 FTP passwords. This can be used to create a “golden” unit. NOTE: If an Option Code was entered as a part of synchronization, power must be cycled to the unit to complete the process and initialize the option. ONX-580 User's Guide 22052280 July 2021...
- Page 67 2. Load up a OneCheck profile by selecting an icon under OneCheck Copper, DSL, Fiber, or Ethernet. 3. Insert the USB drive. 4. Press Icon to see the available icons. 5. Select an icon, press Back, and press Save to save your changes and exit. ONX-580 User's Guide July 2021 22052280...
- Page 68 Once you set one or several passwords, you will see little images of a lock next to the affected tests. If you need to edit test profiles and passwords, you will have to use the associated password(s). ONX-580 User's Guide 22052280 July 2021...
-
Page 69: Generating Reports
Each time a test is run, the file name increments by 1, 2, 3, etc. If you reboot the unit, the default file name will be used again until you change it. You can also select Use Default Name to reset it. ONX-580 User's Guide July 2021 22052280... -
Page 70: Viewing A Report
If you indicated that you want to view the report immediately, the report output also appears on your instrument’s LCD. NOTE: VIAVI offers a proprietory XML schema definition file (XSD) available online (referenced in the XML report). Viewing a report You can view saved reports on the LCD of your instrument. -
Page 71: Capturing A Screenshot
To capture the tray menu or a popup menu If you wish to capture a screen of the tray menu itself, or if you wish to capture a popup menu, press and hold the Tray button for 5 seconds. ONX-580 User's Guide July 2021 22052280... - Page 72 – with a smooth, simple process. Get confirmation that techs and contractors have performed the work with geo-tagged test reports uploaded via the Mobile Tech App. ONX-580 User's Guide 22052280 July 2021...
- Page 73 Deploy jobs to instrument (with test profile reference). Sync to StrataSync with job info after testing and saving CDM reports (JSON). View test results & associated job on StrataSync and/or (contractor) transfer to customer. ONX-580 User's Guide July 2021 22052280...
- Page 74 OneCheck DSL has been enhanced to incorporate an even fuller range of test features, including VoIP, video, and offers variety of speed testing configuration choices. This helps to ensure complete test processes for performance to standards and to minimize return service calls. ONX-580 User's Guide 22052280 July 2021...
-
Page 75: Editing Jobs
3. To edit information for the job, select Information to add comments, location ID, or circuit number, etc. 4. To create a new job, select the New button and name the job. Creating a new job automatically activates it. ONX-580 User's Guide July 2021 22052280... - Page 76 Any reports you create will be saved to the active job, unless you choose otherwise. You can also create a new job or choose to deactivate the current job by choosing None when you save it. "Saving a report" on page 69 for more information. ONX-580 User's Guide 22052280 July 2021...
-
Page 77: Job Settings
1. From the Tray menu, select Job Manager Settings at the bottom. (Job Manager needs to be running to see this). 2. From the Job Settings screen, select the setting you want to edit and adjust as necessary. ONX-580 User's Guide July 2021 22052280... -
Page 78: Managing Files
The files or folders are selected. Opening files or folders 1. Go to the file browser and select the file or folder. 2. Press Open. The contents of the folder appear or the file is displayed on the screen. ONX-580 User's Guide 22052280 July 2021... - Page 79 StrataSync cloud, such as test reports, screenshots, OneCheck profiles, work orders, and configurations. You can access these files via the StrataSync website. For more information see "Synchronizing to the StrataSync server" on page 65. ONX-580 User's Guide July 2021 22052280...
-
Page 80: Remotely Operating The Instrument
"Establishing an Ethernet connection" on page 57 – "Establishing a WiFi connection" on page 60 Enabling remote operation using VNC Control the instrument using a PC keyboard Each of these operations is described in the following sections. ONX-580 User's Guide 22052280 July 2021... - Page 81 2. Select Smart Access Anywhere and VNC. The Smart Access Anywhere menu appears. 3. Select Enable VNC Server and note the VNC password underneath: viavi- vnc. You will need it to connect via VNC Viewer. ONX-580 User's Guide July 2021...
-
Page 82: Using A Pc Keyboard
2. In the viewer’s server address field, enter the OneExpert’s IP address, and click OK. A password entry box appears. 3. Enter the VNC password you noted before, viavi-vnc (found in the Remote Operation menu) and then click OK. The OneExpert user interface appears in the VNC viewer, and works similarly to using the unit itself. -
Page 83: Vnc Availability
The SmartAccess Anywhere client (PC, Android, or Apple) can connect to your device via local area connection or Internet connection. For client downloads and more information, see: https://www.viavisolutions.com/en-us/software-download/smart-accessanywhere-saa VIAVI provides links to Android and PC only. You can find the iOS version in the Apple App store. ONX-580 User's Guide July 2021... - Page 84 Chapter 3 Utilities ONX-580 User's Guide 22052280 July 2021...
- Page 85 "Testing TIMS" on page 107 "Running a OneCheck copper test" on page 118 "Editing profiles" on page 119 "Copper Settings" on page 122 "Copper Expert" on page 125 "Routing the cables through the glove" on page 132 ONX-580 User's Guide July 2021 22052280...
-
Page 86: About Copper Testing
Chapter 4 Copper Testing About copper testing NOTE: The copper testing is available on the ONX-580 and ONX- 580P but not available on the ONX-580A. The copper features provided by the ONX-580 tester allow technicians to quickly turn up and perform basic troubleshooting of the copper local loop. - Page 87 System Settings / International menu. See Configuring International Settings on page 50. NOTE: For additional information and tips, See "Copper testing" on page 302 ONX-580 User's Guide July 2021 22052280...
- Page 88 Using the UltraFED Control menu, you can control a far-end device (FED) to allow two-ended pair testing with a single piece of test equipment. After a technician connects a VIAVI UltraFED to the far end of the pair under test, and connects your instrument to the near end, your instrument controls the FED using DTMF tones.
- Page 89 Verify that your leads are properly connected to the line under test. Verify that the UltraFED is connected at the far end. Issue the Wake UltraFED command using the button at the bottom right side of the menu. ONX-580 User's Guide July 2021 22052280...
-
Page 90: Measuring Voltage
7. To switch between continuous and snapshot mode, use the left system keys Snapshot or Continuous. 8. To save the results to a report, use the Tray menu. 9. To learn what your results mean, see “AC voltage” and “DC voltage” on page 291. ONX-580 User's Guide 22052280 July 2021... - Page 91 DC and AC Volts are listed for each test (these values are available on the 580P instrument only). 4. For greatest accuracy, VIAVI recommends that you compensate the measurement to remove the effects of the test leads. To compensate the opens measurements: Swipe downward on the screen to access the Tray menu.
- Page 92 4. Select Options and then select Distance To Short. The Distance to Short menu appears. 5. Press + or – to change the temperature or wire gauge, if needed. NOTE: For the resistive distance to be accurate, it is critical that you enter the correct gauge and temperature. ONX-580 User's Guide 22052280 July 2021...
-
Page 93: Measuring Opens
The result can be used to determine if there are any bad splices. Resistive Balance requires the VIAVI UltraFED or a manual strap to ground at the far end. 1. Connect the Tip (A), Ring (B), and Ground (Earth) leads to the line under test. - Page 94 5. For greatest accuracy, VIAVI recommends that you compensate the opens measurement to remove the effects of the test leads. To compensate the opens measurements: Swipe downward on the screen to access the Tray menu.
- Page 95 If you are on the Continuous menu, select Clear to restart the test. 8. To save the results to a report, use the Tray menu. 9. To learn what your results mean, see "Opens/Capacitance" on page 294. ONX-580 User's Guide July 2021 22052280...
-
Page 96: Measuring Current
7. To change the current measurement, press Continuous/Snapshot. The current selection is a larger text size. 8. To save the results to a report, use the Tray menu. 9. To learn what your results mean, see "DC current" on page 294. ONX-580 User's Guide 22052280 July 2021... -
Page 97: Locating Faults Using The Tdr
9. To help identify small or distant faults, use the up or down arrow keys to gain the vertical axis and enhance the reflection of faults. Do not apply excessive gain. This makes a normal condition appear as a fault. ONX-580 User's Guide July 2021 22052280... - Page 98 14. You can also view and compare current and saved TDR traces using the Results key. For information on saving your results in graphical form, see "DSL/G.fast results" on page 270. 15. To learn what your results mean, see "TDR" on page 296. ONX-580 User's Guide 22052280 July 2021...
- Page 99 Chapter 4 Copper Testing Running a OneCheck TDR test The OneCheck TDR test is a VIAVI out-of-service pair quality test that examines a copper pair to determine how far out the TDR can see on the pair, identify anomalies (faults) and their approximate location, then graphically show the location of the identified anomalies.
- Page 100 3. Use the Mode button to select the Crosstalk TDR. 4. Press the Start button if the test isn’t already running. The test will give you the distance measurement where there is a connection between the two lines. 5. To stop, press Stop. ONX-580 User's Guide 22052280 July 2021...
- Page 101 4. Select Clear to restart the test. 5. To save the results to a report, use the Tray menu. 6. To learn what your results mean, see "Longitudinal balance" on page 295. ONX-580 User's Guide July 2021 22052280...
-
Page 102: Detecting Load Coils
(B), and Ground (Earth) leads. 2. From the Copper menu, press POTS. The POTS Dialer menu appears. 3. Press the Options system key and then specify which interface (A/B or RJ-11) is connected to the line under test. ONX-580 User's Guide 22052280 July 2021... - Page 103 Mute Microphone (or Un Mute Microphone to return to the call). The mute feature is only available when off hook. Press the On Hook system key to end the call. 6. To save the results to a report, use the Tray menu. ONX-580 User's Guide July 2021 22052280...
- Page 104 1. Connect the Tip (A), Ring (B), and Ground (Earth) leads to the line under test. 2. From the Copper menu, press the RFL button. The RFL screen appears. 3. For greatest accuracy, VIAVI recommends that you compensate the opens measurement to remove the effects of the test leads. To compensate the opens measurements: Swipe downward on the screen to access the Tray menu.
- Page 105 It can be run manually or use a FED to automatically provide the correct conditions for the test. 1. Press Start. 2. The test runs then displays the results. The results for the specific fault appear. ONX-580 User's Guide July 2021 22052280...
- Page 106 Press Options and then select Spectral PSD Mask. Select a technology. 10. To save the results to a report, use the Tray menu. 11. To learn what your results mean, see "Spectral" on page 296. ONX-580 User's Guide 22052280 July 2021...
- Page 107 Impedance – wideband (ONX580P only) and narrowband; single frequency and sweep NOTE: For additional information about OneExpert DSL options and services, contact your local VIAVI representative or visit www.viavisolutions.com. From the Copper menu, select TIMS. The WB Noise menu appears (or the last test used).
- Page 108 7. Press the Results softkey to save or clear the results. For informa tion on saving your results in graphical form, see "DSL/G.fast results" on page 270. 8. Press the Stop softkey. 9. To save the results to a report, use the Tray menu. ONX-580 User's Guide 22052280 July 2021...
-
Page 109: Measuring Impulse Noise
8. To save the results to a report, use the Tray menu. 9. To learn what your results mean, see “"Impulse noise" on page 296. ONX-580 User's Guide July 2021 22052280... - Page 110 ±10 μs of when the impulse occurred. 10. Use the Zoom or Pan button to view specific sections of the graph. 11. To save the results to a report, use the Tray menu. ONX-580 User's Guide 22052280 July 2021...
- Page 111 6. To use an external bridge, press Options and then select the checkbox for Use External Bridge. 7. To save the results to a report, use the Tray menu. 8. To learn what your results mean, see "RX and TX tones" on page 296. ONX-580 User's Guide July 2021 22052280...
- Page 112 Narrowband – 600 ohm, 900 ohm 5. To select a frequency, press Tx Frequency, then enter a value, and press OK. 6. To select an amplitude, press Tx Amplitude, then enter a value, and press OK. ONX-580 User's Guide 22052280 July 2021...
- Page 113 The timer window will show how much time remains for the current part of the test. 8. The Save Results button saves the results from a fully or partially completed test to an XML, HTML or PDF files. ONX-580 User's Guide July 2021 22052280...
- Page 114 The graph cursor is a vertical line that shows the position of the current frequency. 4. You can view NEXT results for different frequencies by moving the cursor. Use the left and right arrow keys or press and drag the cursor to move the cursor to different frequencies. ONX-580 User's Guide 22052280 July 2021...
- Page 115 Narrowband – 600 ohm, 900 ohm 8. Press Frequency and enter a value or use the arrows. 9. Press the Start softkey. 10. To save the results to a report, use the Tray menu. ONX-580 User's Guide July 2021 22052280...
- Page 116 5. To specify the range, press Technology, and then select: Wideband – 20 KHz – 10 MHz (ONX580P only) Narrowband – 200 Hz – 10 KHz (ONX580 only) ; 200 Hz – 20 KHz (ONX580P only) ONX-580 User's Guide 22052280 July 2021...
- Page 117 Narrowband – 600 ohm, 900 ohm 7. Press the Start softkey. The ONX begins measuring impedance across the frequency range. A graph appears to show the results. 8. To save the results to a report, use the Tray menu. ONX-580 User's Guide July 2021 22052280...
-
Page 118: Running A Onecheck Copper Test
Chapter 4 Copper Testing Running a OneCheck copper test The OneCheck Copper test is a VIAVI out-of-service pair quality test. It automatically performs a series of enabled tests including: DVOM (AC/DC volts, resistance), Opens/Capacitance, Balance, and Load Coil. It also compares results to user-defined threshold values and provides a pass, marginal, or fail indication. -
Page 119: Editing Profiles
Copy. The following sections detail how to configure and run each test. You can also run a test from any configuration screen by pressing the Launch button. ONX-580 User's Guide July 2021 22052280... - Page 120 Tests button on the DVOM screen. You can use the left and right arrow keys to go between the subtests and the Back button on the unit to go back to the main categories. ONX-580 User's Guide 22052280 July 2021...
-
Page 121: Wideband Noise
Press the Back arrow to return to the configuration screen. Loss Tones This test mode measures tones for loss using VIAVI UltraFED. Press Loss Tones on the configuration screen. On the next screen you can add and remove items or edit them by pressing each item and using the thresholds editor. - Page 122 You can create new custom RFL and DTS cables, either by calculating the length or by entering manually. Press New to create a new cable, choose Manual Entry or Calculated, and enter the measurements. ONX-580 User's Guide 22052280 July 2021...
- Page 123 To Edit, select the contact and press Edit, then update the information. To Delete, select the contact and press Delete. Compensate Opens You can compensate for all opens test leads. Press Compensate to get started. ONX-580 User's Guide July 2021 22052280...
- Page 124 Chapter 4 Copper Testing Compensate Resistance You can compensate for resistance on your test leads. Press Compensate to get started. Compensate RFL You can also compensate for RFL on your test leads. Press Compensate to get started. ONX-580 User's Guide 22052280 July 2021...
- Page 125 Copper Expert, that runs consecutive testing sessions to check the quality of the copper line. It locates and identifies various problems, helping the user eliminate them in the process. Copper Expert is a software option. Check with your VIAVI representative for more information.
- Page 126 If there are no major faults on the line, and you have accepted the true length, the next step checks whether the copper pair is evenly balanced. ONX-580 User's Guide 22052280 July 2021...
- Page 127 UFED is required for best results. Once the problem is identified and located, you can fix it and run the test again. A good copper line will have all the results with green check marks. ONX-580 User's Guide July 2021 22052280...
-
Page 128: Bonding And Grounding
In each case, the application provides instructions in the Expert Advice section on if and how the problem can be fixed. An example of a problem and its solution are shown here. ONX-580 User's Guide 22052280 July 2021... - Page 129 It is accessed via its own icon on the home page under the OneCheck Copper section. The OneCheck POTS Closeout is available to all ONX-580 products and does not require any option. 1. Press the OneCheck POTS Closeout icon to open the configuration screen.
- Page 130 - Pass: <= -70 dBm - Fail: > -70 dBm Balance If the Power Influence is < 80 dBrnC (-10 dBm), then Longitudinal Balance is used. Balance Pass: > 60 dB Balance Margin: > 50 dB ONX-580 User's Guide 22052280 July 2021...
- Page 131 2. On the next screen select the type of cable for the test. 3. Press the Start button. 4. You will see a series of prompts, asking you to connect the copper leads and then the SmartID accessory. ONX-580 User's Guide July 2021 22052280...
-
Page 132: Routing The Cables Through The Glove
Wind the ends of the cable and fit them into the zippered pocket on the inside of the front of the glove. 8. Close the front of the glove and then pull the strap from the back over the top and into the connector just above the VIAVI logo. ONX-580 User's Guide 22052280... - Page 133 "Testing the physical layer" on page 147 "Testing line quality" on page 147 "Terminating the loop (SELT)" on page 148 "Running a OneCheck DSL test" on page 148 "Editing profiles" on page 150 "Testing the data layer" on page 151 ONX-580 User's Guide July 2021 22052280...
- Page 134 35b testing requires the ONX580-V35B software option. Broadcom G.fast testing requires the ONX580-GFAST software option. G.fast 212MHz testing requires the ONX580-GFAST-212 option. NOTE: For additional information about OneExpert DSL options and services, contact your local VIAVI representative or visit www.viavisolutions.com. ONX-580 User's Guide 22052280 July 2021...
-
Page 135: Selecting The Test Mode
It is recommended that the unit not be operated flat on its back (heat sink down) in any DSL mode, for more than 15 minutes. ONX-580 User's Guide July 2021 22052280... - Page 136 DSL Expert for additional troubelshooting. It locates and identifies various problems, helping eliminate them in the process. DSL Expert is a software option. Check with your VIAVI representative for more information. 1. From the DSL main menu, select Single xDSL or Bonded xDSL.
-
Page 137: Specifying Test Settings
Deleting a test profile 1. Press the Delete button near the top. A list of modem settings profiles you created appears. 2. Select the profile to delete. A screen asks you to confirm. Press OK. ONX-580 User's Guide July 2021 22052280... - Page 138 If you selected VDSL as the xDSL Technology, specify the VDSL Profile (such as 8A, 12B, or 35b). 7. If you selected either VDSL or Auto as the Technology, select VDSL Vectoring, then specify Full, Friendly, or Off. ONX-580 User's Guide 22052280 July 2021...
- Page 139 Select Encapsulation and then select LLC or VC-MUX. Set the VC Count between 1 and 4. Specify the VC settings for each virtual channel (VC 1 through VC 4): VPI, VCI, and VC Mode (Tx Rx or Rx only) ONX-580 User's Guide July 2021 22052280...
- Page 140 (and re-assembled by the modem). This is effective for lines susceptible to bursts of noise. ONX-580 User's Guide 22052280 July 2021...
- Page 141 13. Select Network Settings and then specify the following: Select Network Type and then specify one of the following to indicate how IP addressing will be handled: Terminate – The OneExpert DSL replaces the modem and test interface. ONX-580 User's Guide July 2021 22052280...
- Page 142 Ethernet), Multi Interface, PPPoA (PPP over ATM), or IPoA (IP over ATM). None turns the data layer off. 14. If you selected IPoE, PPPoE, Multi Interface, PPPoA, or IPoA refer to their corresponding Data Mode sections in the following section. ONX-580 User's Guide 22052280 July 2021...
- Page 143 1. Select whether to do Automatic Login. 2. Enable the VLAN checkbox 3. Specify the following: VLAN ID VLAN Priority. Select IP mode and then specify the network mode: IPv4, IPv6, or IPv4/IPv6 Dual Stack. 4. Enable the following: ONX-580 User's Guide July 2021 22052280...
- Page 144 2. Enter Username and Password or leave the defaults 3. Enable the Use Provider checkbox 4. Enter Provider name or leave the default. 5. Specify the network settings as described in step 6 of "Establishing an Ethernet connection" on page ONX-580 User's Guide 22052280 July 2021...
- Page 145 Use Vendor ID Use User Class Use Arp announce 3. Specify the network settings as described in step 6 of "Establishing an Ethernet connection" on page Press the Back/Cancel button to return to the main screen. ONX-580 User's Guide July 2021 22052280...
-
Page 146: Connecting To The Line
1. Connect the single end of the test cable to the jack on the side of the OneExpert DSL. 2. Connect the blue end of the cable to Modem on the NID/demarc. The line is connected. NOTE: The RJ-45 "Y" cable is not used with the ONX-TM-BDCM-212 module. ONX-580 User's Guide 22052280 July 2021... -
Page 147: Connecting To Bonded Pairs At The Nid/Demarc
If the unit achieves sync at the desired data rates, noise margins, and attenuation, the DSL link is good. 3. Use the Tray menu to save the results. See "Saving a report" on page 4. For more information on the results, see "DSL/G.fast results" on page 270. ONX-580 User's Guide July 2021 22052280... -
Page 148: Terminating The Loop (Selt)
After initializing the modem, the SELT verification screen is displayed. 5. The far-end technician can continue testing. Running a OneCheck DSL test The OneCheck DSL test is a VIAVI out-of-service single or bonded pair closeout test. It automatically performs a series of DSL measurements, and compares results to user-defined threshold values and provides a pass, marginal, or fail indication. - Page 149 Show Details and scroll down to the Remote Identity Results section. In the saved report, scroll down to the Overall Results section. Here you will see the Broadcom information, including the xTU-O S/N (DSLAM or DPU serial number). ONX-580 User's Guide July 2021 22052280...
-
Page 150: Editing Profiles
6. To copy a profile and then edit from there, use the arrows to select the profile you want to copy, then select Copy. You can also run a test from any configuration screen by pressing the Launch button. ONX-580 User's Guide 22052280 July 2021... -
Page 151: After Running The Test
After running the test When you finish your test, you can put away the test cables in the glove. Wrap the cable in a circle and put into the pocket on the front of the glove. ONX-580 User's Guide July 2021 22052280... - Page 152 Chapter 5 xDSL / G.fast Testing ONX-580 User's Guide 22052280 July 2021...
-
Page 153: Data Testing
"Speed Check testing" on page 158 "Speedtest by Ookla data testing" on page 162 "Broadcom Speed Service data testing" on page 166 "Video testing" on page 170 "VoIP Testing" on page 177 "Browsing the web" on page 183 ONX-580 User's Guide July 2021 22052280... -
Page 154: Ping And Traceroute Testing
If you are specifying settings for a Ping test, specify the Transmit Count (how many total ping packets to send), Transmit Interval (amount of time between packet transmittals), and Transmit Size (how many ping messages are in each packet). 5. Press the Results button. ONX-580 User's Guide 22052280 July 2021... - Page 155 Enter the name of the profile. – Specify the up/download CIR (committed information rate). For each direction, this should be configured to either the physical line rate or the provisioned rate, whichever is lower. The TrueSpeed test screen appears. ONX-580 User's Guide July 2021 22052280...
- Page 156 If the test fails, an error message appears (for example, Server Busy or Aborted Due to Excessive Loss). 7. If you wish to test again with a different profile, select the Profiles button, select the profile, and then press Start. ONX-580 User's Guide 22052280 July 2021...
- Page 157 3. To edit or delete a profile, select the check box next to the profile, and then do one of the following: To edit the profile 1. Select Edit. 2. Change the profile as necessary. 3. Press OK. To delete the profile 1. Select Delete. ONX-580 User's Guide July 2021 22052280...
- Page 158 The server needs to be placed in the network in a way that will allow it to deliver very high data rate traffic to the ONX for downstream and upstream throughput testing. VIAVI recommends the Apache HTTP server (v 2.4) that is readily available from Apache and supports multiple operating systems.
- Page 159 3. Press the configuration to edit or use the arrows to highlight and press Enter. The upstream and downstream URL settings are configurable from this screen. ONX-580 User's Guide July 2021 22052280...
- Page 160 4. When finished editing the configuration, press the Back icon or Back button to return to the main Speed Check screen. 5. The test can now be performed with the desired configuration, as shown here. ONX-580 User's Guide 22052280 July 2021...
- Page 161 Speed Check test time. However, if the workflow time is longer, then the probability of simultaneous tests becomes much lower and the server over-provisioning could be higher. ONX-580 User's Guide July 2021 22052280...
-
Page 162: Before You Begin
The Server Settings button is used to configure the download and upload URLs in the settings. This button remains active only while the test is stopped. Press the Server Settings button or press the soft key to edit these configurations. ONX-580 User's Guide 22052280 July 2021... -
Page 163: Server Settings
Saved Server URL, and Saved Server Location settings. If the network is not active, then the softkey is not active. When done, press the Back arrow or the Back sofkey at the top to return to the main Speedtest screen. ONX-580 User's Guide July 2021 22052280... -
Page 164: Latency Measurement
The unit opens multiple connections to the Speedtest server. The download transfer then begins followed by updates of percentage complete and average download rate (in bytes/sec). Once the download transfer has completed, the final download rate measurement is provided. ONX-580 User's Guide 22052280 July 2021... - Page 165 Download stage duration An HTTP connection then opens to the URL: http://www.speedtest.net/api/ embed/api. php, and the measurements are uploaded. The Speedtest results are also available in all Save Report formats (XML, HTML, and PDF). ONX-580 User's Guide July 2021 22052280...
- Page 166 The Server Settings button is used to configure the server IP address, port number, or target rate (kbps). This button remains active only while the test is stopped. Press the Server Settings button or press the soft key to edit these configurations. ONX-580 User's Guide 22052280 July 2021...
- Page 167 OK. Use the keypad to change the setting and press Enter. When done, press the Back arrow or the Back sofkey at the top to return to the main Speed Service screen. ONX-580 User's Guide July 2021 22052280...
- Page 168 If the test fails, an error message appears (for example, "Failed to get IP address" or "Failed to connect to server"). If you wish to test again with a different profile, select the Profiles button, select the profile, and then press Start. ONX-580 User's Guide 22052280 July 2021...
- Page 169 (in bytes/sec). Once the transfer has completed, the final upload/ download rate measurements are then provided. The Broadcom Speed Service results can be saved to multiple report formats (XML, HTML, PDF, and JSON). ONX-580 User's Guide July 2021 22052280...
- Page 170 The IP Video tests are available if you purchase the IP Video test option: Option Description Part Number IP Video Allows testing of IP Video services ONX580-IPVIDEO NOTE: For additional information about OneExpert DSL options and services, contact your local VIAVI representative or visit www.viavisolutions.com. ONX-580 User's Guide 22052280 July 2021...
-
Page 171: Specifying Test Settings
A value between good and poor is considered fair and is indicated by an exclamation mark. If the value is greater than the poor threshold, it is considered poor and is indicated by an ONX-580 User's Guide July 2021 22052280... - Page 172 Packet Gap – Enter the packet gap, in milliseconds. Packet gap is the time interval between subsequent packets in a video stream. When the packet gap exceeds the threshold set here, the “Gap Errors” statistic will increment. ONX-580 User's Guide 22052280 July 2021...
-
Page 173: Specifying Stream Settings
1. From the Video testing menu, tap on the stream. 2. Specify the following: Stream Name – Enter a name for the stream. Stream Type – Select the video stream type. Stream IP Address – Enter the IP address of the stream. ONX-580 User's Guide July 2021 22052280... -
Page 174: Mapping Channels
– An RTSP negotiated unicast stream using MPEG2 TS-TCP or MPEG2-TS-RTP-TCP (interleaved) for media transport. rtsp-isma – An RTSP negotiated unicast stream using ISMA over UDP for transport. rtsp-isma-tcp – An RTSP negotiated unicast stream using ISMA over TCP for transport. ONX-580 User's Guide 22052280 July 2021... - Page 175 9. Transfer the ChannelList.txt file to the OneExpert DSL’s file system, in the “documents” directory. 10. Launch the Video feature. 11. Tap on a stream. 12. Select Channel Selection at the bottom of the screen. Your saved channels appear in the Channel Map section of the list. ONX-580 User's Guide July 2021 22052280...
-
Page 176: Connecting To The Line
Press the tab for the desired result (for example, press “Loss” to view the loss results). 5. Use the Tray menu (swipe down from the top or press the tray system key) to save the results. See "Saving a report" on page ONX-580 User's Guide 22052280 July 2021... - Page 177 The VoIP phone test involves the following steps: Specifying test settings Connecting to the line Placing and receiving calls NOTE: For additional information about OneExpert DSL options and services, contact your local VIAVI representative or visit www.viavisolutions.com. ONX-580 User's Guide July 2021 22052280...
- Page 178 If you have a network that uses one server for registration and another for placing and receiving calls, the Proxy Address specifies the address for placing and receiving calls (“Alias” specifies the registrar address). ONX-580 User's Guide 22052280 July 2021...
- Page 179 Some systems only accept RTP traffic on certain port numbers. (It must be a factor of 2.) RTP Port Maximum – Specify the RTP port maximum number. (It must be a factor of 2.) ONX-580 User's Guide July 2021 22052280...
- Page 180 MOS option. SIP IP ToS – Session Initiation Protocol (SIP) Type of Service (ToS). Select the SIP type of service for VoIP signaling. ONX-580 User's Guide 22052280 July 2021...
-
Page 181: Placing And Receiving Calls
The Summary results appear. Additional results are available on other tabs. To view additional results, press the tab or swipe right or left. 5. Optional. To save a report, use the Save Report button or Tray menu. See "Saving a report" on page ONX-580 User's Guide July 2021 22052280... -
Page 182: Answering Calls Automatically
2. Place a call to the OneExpert DSL from a VoIP phone (or a second OneExpert DSL). The OneExpert DSL answers the call with a voice announcement, and then basic call statistics are provided. ONX-580 User's Guide 22052280 July 2021... -
Page 183: Browsing The Web
There are two ways to open a web page: Enter the address – Tap the address box, and then use the keypad on the screen to enter the address. Use a bookmark – Press the Bookmarks button and then select a bookmark. ONX-580 User's Guide July 2021 22052280... -
Page 184: Adding Bookmarks
Exiting the browser When you are finished demonstrating internet access to the user, you should exit the browser. Press the Home function key or tap the home icon on the browser menu. The browser closes. ONX-580 User's Guide 22052280 July 2021... -
Page 185: Fiber Testing
"Running a OneCheck Fiber test" on page 191 "Editing profiles" on page 192 "Saving the profile and launching the test" on page 194 "Fiber Certification" on page 195 "SmartOTDR" on page 198 "NSC-100 Companion" on page 200 ONX-580 User's Guide July 2021 22052280... -
Page 186: About The Optical Tools
OneExpert USB Connector. Inspecting fiber The optional VIAVI microscope accessory is used to view a live video of a simplex fiber to determine if the fiber is clean. It can also capture a snap-shot and provide pass/fail analysis. - Page 187 8. To save the results, press Save and then specify the file name for the still image. The filename can be up to 50 characters, so if desired, details such as the company name, technician, and location could be included. ONX-580 User's Guide July 2021 22052280...
-
Page 188: Measuring Optical Power
Measuring optical power The Optical Power Meter is a VIAVI accessory used to measure optical power. The MP-60 meter measures 850, 1300, 1310,1490, and 1550 nm wavelengths The MP-80 meter measures 980, 1310,1480, and 1550 nm wavelengths 1. - Page 189 Chapter 7 Fiber Testing About fiber testing NOTE: Fiber testing is available on the ONX-580 and ONX-580P, but not the ONX-580A. The fiber optic features provided by the ONX-580 tester allow technicians to quickly turn up and perform basic troubleshooting of the fiber local loop. To access the fiber tests, select Fiber from the Main menu.
- Page 190 Chapter 7 Fiber Testing OneCheck Fiber These tests check whether the fiber connectors are clean, monitor the power of the fiber connection, and can run tests on your VIAVI Smart OTDR E126A or SL. The tests require these accessories: VIAVI fiberscope P5000i (USB)
- Page 191 1. Connect your instrument to the fiber line under test using a VIAVI optical power meter MP60. Attach the MP60 and fiber scope to the USB jacks on the right side of the unit.
-
Page 192: Editing Profiles
You can also run a test from any configuration screen by pressing the Start Test button. NOTE: To save the profile to a USB, have it inserted in the unit and then save the profile. The application will save it both to the unit and to the USB. ONX-580 User's Guide 22052280 July 2021... -
Page 193: Optical Power
Here you can choose the power meter device, MP60/80 or SmartOTDR. To change the power threshold, select it and adjust using the keyboard. When finished, press the Back arrow to go back to the configuration screen. ONX-580 User's Guide July 2021 22052280... - Page 194 Manage, Add New Test, or Start Test buttons. The Start Test button will save the profile and launch the test. Once the test is launched, you can go back to the configuration screen by pressing the Thresholds and Settings button. ONX-580 User's Guide 22052280 July 2021...
- Page 195 5. The OneExpert will need to connect to the SmartOTDR via WiFi. Follow the prompts to connect. 6. You will be prompted to enter the password for your SmartOTDR. See your SmartOTDR's user's guide for more information. ONX-580 User's Guide July 2021 22052280...
- Page 196 Toggle Zoom button to zoom in on the image. 11. If the test detected a dirty fiber connection, you will need to clean it and retry the test before proceeding to the next step. ONX-580 User's Guide 22052280 July 2021...
- Page 197 13. Select the wavelength you want to use. When finished, the tests for both the fiber certification and power meter will show if they passed or failed. 14. The test results can be saved in PDF, SOR, JSON, or XML formats. ONX-580 User's Guide July 2021 22052280...
- Page 198 Chapter 7 Fiber Testing SmartOTDR These tests can run fiber measurements on your VIAVI Smart OTDR E126A or SL. 1. Make sure your SmartOTDR is turned on. It will create a WiFi network that you can connect your ONX shortly.
- Page 199 6. When the test is complete, you can use the arrow buttons to navigate through the test and show more detail. 7. The test results can be saved in PDF, SOR, JSON, or XML formats. ONX-580 User's Guide July 2021 22052280...
- Page 200 Chapter 7 Fiber Testing NSC-100 Companion If you have a VIAVI Network & Service Companion™, you can connect to it from your ONX via Bluetooth to run all of your tests and advanced setup. The user interface is very similar to the Mobile Tech app, including all of the OneCheck tests, profiles, jobs, file management, reports, and testing locations.
- Page 201 Like similar full functionality in the Mobile Tech app, you can also sync to StrataSync and update the Companion firmware from your ONX. Use the Tray menu to manage your files for both the ONX and Companion. For more details, see the NSC-100 Companion User's Guide. ONX-580 User's Guide July 2021 22052280...
- Page 202 Chapter 7 Fiber Testing ONX-580 User's Guide 22052280 July 2021...
-
Page 203: Ethernet Testing
"Specifying Ethernet settings" on page 204 "Connecting to the line" on page 208 "Viewing results" on page 208 "Running a OneCheck Ethernet test" on page 209 "Editing profiles" on page 210 "Testing the data layer" on page 211 ONX-580 User's Guide July 2021 22052280... -
Page 204: About Ethernet Testing
To access the setup screen, select the Tests & Settings system key or use the tray menu (swipe down from the top or press the tray system key). ONX-580 User's Guide 22052280 July 2021... - Page 205 5. Select IP mode and then specify the network mode: IPv4, IPv6, or IPv4/IPv6 Dual Stack. If you selected IPv4, choose Static or DHCP address mode. If you chose Static, you need to add the IP addresses for: IPV4 Address IPV4 Netmask IPV4 Gateway IPV4 DNS server ONX-580 User's Guide July 2021 22052280...
- Page 206 3. Each interface can be enabled for VLAN. If you disable VLAN, you will proceed to IP Mode as the next step. If you enable VLAN, then you need to specify: VLAN ID VLAN Priority ONX-580 User's Guide 22052280 July 2021...
-
Page 207: Saving Test Profiles
After specifying the test settings, you can save them as a test profile. 1. Press the Save button. 2. Enter a name for the profile. 3. Specify whether the profile will be shown on the Home screen. 4. Press Save. The profile is saved. ONX-580 User's Guide July 2021 22052280... -
Page 208: Connecting To The Line
Save Report. Next, specify the report settings such as report name, report format, technician ID, location, work order information, and other settings as needed. 3. To clear the results, use the asterisk (*) key. Chapter 15 Test Results to learn what your results mean. ONX-580 User's Guide 22052280 July 2021... - Page 209 Regardless of the format you chose, there will be also a JSON file saved with the same name. It is accessible on the unit and on StrataSync after syncing. ONX-580 User's Guide July 2021 22052280...
-
Page 210: Editing Profiles
6. To copy a profile and then edit from there, use the arrows to select the profile you want to copy, then select Copy. You can also run a test from any configuration screen by pressing the Launch button. ONX-580 User's Guide 22052280 July 2021... - Page 211 The application will save it both to the unit and to the USB. Testing the data layer Using the data layer tests, you can test for connectivity and throughput. See Chapter 5 Data Testing. ONX-580 User's Guide July 2021 22052280...
- Page 212 Chapter 8 Ethernet Testing ONX-580 User's Guide 22052280 July 2021...
-
Page 213: Wifi Testing
"WiFi Troubleshooting using WiFi Coverage Expert" on page 218 "Managing WiFi Advisor Devices" on page 220 "NSC-100 Companion" on page 222 "Running a OneCheck WiFi test" on page 224 "Editing profiles" on page 225 ONX-580 User's Guide July 2021 22052280... - Page 214 You cannot use Bluetooth when the ONX is acting as a WiFi Access Point (letting other devices connect to the ONX). However, you can use Bluetooth when the ONX is acting as a WiFi Client (when the ONX is connecting to an Access Point). ONX-580 User's Guide 22052280 July 2021...
-
Page 215: Scanning For Wifi Networks
IP address to run the diagnostic application. 5. Run the diagnostics application from the mobile device. The receiver can now be power cycled per the receiver instructions to initialize the file transfer. ONX-580 User's Guide July 2021 22052280... -
Page 216: Verifying Ip Connectivity
OneExpert and your device. 6. On your device or laptop, open your WiFi settings and connect to the OneExpert's hotspot. It will appear in the list as the serial number on the side of the unit. ONX-580 User's Guide 22052280 July 2021... - Page 217 If either action is impossible, the application issues a warning to add an extender for the areas that have low signal strength. ONX-580 User's Guide July 2021 22052280...
- Page 218 To change the threshholds that determine Pass or Fail for the items on the SmartChannel Wizard summary tab, return to the WiFi Advisor Home screen. The settings can be accessed by pulling down the drawer located on the top of that screen. ONX-580 User's Guide 22052280 July 2021...
- Page 219 1. Take a WiFi Advisor and mobile device to the location where WiFi performance is to be assessed. 2. Connect the OneExpert DSL to the residential gateway using an Ethernet cable. 3. Follow the procedure “Assessing WiFi performance throughout a site” in the WiFi Advisor User’s Guide. ONX-580 User's Guide July 2021 22052280...
- Page 220 If you do not wish to unregister the device, press the Back arrow button (either on the screen or the physical key on the OneExpert). Select OK to unregister your device. The device is unregistered and no longer appears in the Registered Devices list. ONX-580 User's Guide 22052280 July 2021...
- Page 221 If you do not wish to update the device, press the Back arrow. Select OK to update the firmware. 5. Select Yes. The update begins. The status bar at the top indicates the update progress. ONX-580 User's Guide July 2021 22052280...
- Page 222 Chapter 9 WiFi Testing NSC-100 Companion If you have a VIAVI Network & Service Companion™, you can connect to it from your ONX via Bluetooth to run all of your tests and advanced setup. The user interface is very similar to the Mobile Tech app, including all of the OneCheck tests, profiles, jobs, file management, reports, and testing locations.
- Page 223 Like similar full functionality in the Mobile Tech app, you can also sync to StrataSync and update the Companion firmware from your ONX. Use the Tray menu to manage your files for both the ONX and Companion. For more details, see the NSC-100 Companion User's Guide. ONX-580 User's Guide July 2021 22052280...
- Page 224 Regardless of the format you chose, there will be also a JSON file saved with the same name. It is accessible on the unit and on StrataSync after syncing. Network1 ONX-580 User's Guide 22052280 July 2021...
- Page 225 6. To copy a profile and then edit from there, use the arrows to select the profile you want to copy, then select Copy. You can also run a test from any configuration screen by pressing the Launch button. ONX-580 User's Guide July 2021 22052280...
- Page 226 Chapter 9 WiFi Testing NOTE: To save the profile to a USB, have it inserted in the unit and then save the profile. The application will save it both to the unit and to the USB. ONX-580 User's Guide 22052280 July 2021...
-
Page 227: Wiring Tools
This chapter provides instructions for gathering test statistics and verifying connectivity, including the following: "About the Wiring Tools" on page 228 "Wire Mapping" on page 228 "Hub Flash" on page 230 "Port discovery" on page 231 "Ping Tool" on page 231 ONX-580 User's Guide July 2021 22052280... -
Page 228: About The Wiring Tools
Select Show Length..To reset the Length Constant to the default, swipe down on the screen to view the tray menu. Select Reset Length..To hide the Length Constant bar, swipe down on the screen to view the tray menu. Select Hide Length Constant. ONX-580 User's Guide 22052280 July 2021... - Page 229 52.5 18AWG, Unjacketed 17.0 55.5 4. For greatest accuracy, VIAVI recommends that you perform a wiring compensation to remove the effects of the test leads. Swipe down on the screen to view the tray menu Select Wiring Compensation. Follow the instructions on the screen to connect or disconnect the leads to perform the compensation.
-
Page 230: Sending Tones
5. Go to the location of the hub and observe the link activity LEDs. The port that is connected to the instrument will blink. 6. To end the Hub Flash test, press the Stop softkey. ONX-580 User's Guide 22052280 July 2021... -
Page 231: Port Discovery
4. To set a Ping Target, do the following: Select Ping Target. Select a target. Enter an address such as www.yahoo.com Select OK. 5. Press Start. The OneExpert DSL pings the Gateway, DNS and any specified Ping Targets. ONX-580 User's Guide July 2021 22052280... - Page 232 Chapter 10 Wiring Tools ONX-580 User's Guide 22052280 July 2021...
- Page 233 "Whole-Home Check" on page 239 "About the Full Sweep Coax Test" on page 242 "Locating SmartIDs" on page 242 "Coax Check" on page 244 "About HPNA Testing" on page 247 "Monitoring the HPNA network" on page 248 ONX-580 User's Guide July 2021 22052280...
-
Page 234: Locating Smartids
If the Registration doesn’t automatically come up, select Actions, and then press SmartID Registration. Do one of the following: - Use the up and down arrows to highlight the label letter for the SmartID and then press OK. - Press the letter for the SmartID. ONX-580 User's Guide 22052280 July 2021... - Page 235 If testing with a mobile device, it does not affect the connection; you can move around with the mobile device. Similarly, if the mobile app looses connection to the OneExpert, it will not affect the SmartID test in progress. ONX-580 User's Guide July 2021 22052280...
-
Page 236: Coax Map Test
A cable with a 2-way splitter may have two opens at close to -7 dBrl. y A cable with a 3-way splitter may have two opens at -14 dBrl and one open at -7 dBrl ONX-580 User's Guide 22052280 July 2021... - Page 237 NOTE: The cable ID won't work properly if there's a cable plugged into the side of the unit (you must only use the coax connector on the top). ONX-580 User's Guide July 2021 22052280...
-
Page 238: Troubleshooting Tip
The following shows several cable topologies on the left and the corresponding coax map table on the right. The dBrl level at each splitter will be relatively low and depend on the quality of the splitter. Lower return loss indicates a better splitter. ONX-580 User's Guide 22052280 July 2021... -
Page 239: Whole-Home Check
3. Place other SmartIDs at any location in the home wherever network qualification or troubleshooting is desired, such as TVs, set top boxes or cable modems. There are three possible test configurations: ONX-580 User's Guide July 2021 22052280... - Page 240 Test fails if there is filter(s) or amplifier(s) present in the network Note that the “RG – Through Diplexer” test allows a diplexer in the network. After the test completes, the result test summary appears. ONX-580 User's Guide 22052280 July 2021...
- Page 241 The left side of the screen will show the frequency sweep and noise ingress measurement results for each highlighted box, which corresponds to the two points between SmartIDs in the coax network. 7. To save the results to a report, use the Tray menu. ONX-580 User's Guide July 2021 22052280...
- Page 242 ONX 580 via mini-USB, and load test files. It may also be used to locate RFIDs in the network. The application opens to the default tab Locate SmartIDs. ONX-580 User's Guide 22052280 July 2021...
- Page 243 SmartID Plus probes as well as update the firmware on any probe. The user may also load an existing test file to view the past results. These functions are the same as "Locating SmartIDs" on page 234. ONX-580 User's Guide July 2021 22052280...
- Page 244 Firstly, the frequency sweep is conducted between 2 MHz and 1.6 GHz, unlike the Whole Home Check application that sweeps from 2 MHz to 52 MHz. Full Sweep Coax Check Whole Home Check ONX-580 User's Guide 22052280 July 2021...
- Page 245 Test Summary page is white. However, Cable Faults and Ingress pass/marginal/fail limits have been preserved, similar to the Whole Home Check application. Full Sweep Coax Check Whole Home Check Test Summary Page Test Summary Page ONX-580 User's Guide July 2021 22052280...
- Page 246 Any filter in the network, be it low-pass, high-pass or MoCA, is now identified in the Path Detail results as Filter. ONX-580 User's Guide 22052280 July 2021...
-
Page 247: About Hpna Testing
Network test mode — This transient mode performs a disruptive network test that transfers a configurable number of packets across each unidirectional logical link in the network and gathers statistics. These features are available if the HPNA software option is enabled. ONX-580 User's Guide July 2021 22052280... -
Page 248: Monitoring The Hpna Network
Minimum Rate – The minimum rate, in Mbps, that will pass. Minimum SNR – The minimum SNR, in dB, that will pass. Quick Max Packets Lost – The maximum packet loss, in number of packets, allowed for the Quick Test. ONX-580 User's Guide 22052280 July 2021... - Page 249 Save Report. Next, specify the report settings such as report name, report format, technician ID, location, and other settings as needed. For more information on the results, see "HPNA results" on page 287. ONX-580 User's Guide July 2021 22052280...
- Page 250 Chapter 11 In Home Testing ONX-580 User's Guide 22052280 July 2021...
- Page 251 Using the OneExpert with a Mobile Device This chapter provides steps for using the VIAVI Mobile Tech app, including the following: "VIAVI Mobile Tech app" on page 252 "Connecting to StrataSync" on page 252 "Using the Mobile Tech app" on page 253 "Connecting to your OneExpert via Remote Display"...
- Page 252 The OneExpert is designed to be paired with a mobile device or tablet (such as an iPhone, iPad, or similar Android device), and leverages the user interface of those devices along with the VIAVI Mobile Tech App to provide a smooth user experience.
- Page 253 1. Launch the Mobile Tech app on your mobile device. 2. Press the Login to StrataSync button. The Login screen will be displayed. 3. Enter your Username and Password, then press the Sign In button. The Mobile Tech Main menu will be displayed. ONX-580 User's Guide July 2021 22052280...
- Page 254 Discover Devices. 4. Select the OneExpert you want to connect to and the devices will begin pairing. 5. When connected, your ONX-580 should appear in the Mobile Tech app. You can now transfer files and sync your OneExpert to StrataSync through the Mobile Tech App.
- Page 255 Near the top of the Main menu, you can click Show more to see details on your instrument, including all of the installed options. Job Manager – Attach jobs to tests, including customer info and work orders, and track test results ONX-580 User's Guide July 2021 22052280...
- Page 256 Instrument Sync – Sync your instrument to StrataSync and deploy configuration files ONX-580 Files and Mobile Tech Files – Manage files on the unit that you can save to your phone or tablet. Use the ONX-580 Files menu to manage files stored on your meter, use the Mobile Tech Files menu to manage those stored on your mobile device.
- Page 257 Remote Display – Connect directly to the OneExpert remotely to configure your unit and run tests Documentation – View and download various documentation for your instrument, including applications notes, software release notes, and quick reference guides ONX-580 User's Guide July 2021 22052280...
- Page 258 From the Main menu, select Remote Display to get started. NOTE: You need to enable Remote Operation to remote control the meter through the VIAVI Mobile Tech app. See "Remotely operating the instrument" on page 80. ONX-580 User's Guide 22052280...
- Page 259 The update will begin and the meter will power off when finished. Please wait as this could take 10-15 minutes, based on the size of the update file and connection speed. NOTE: You need the appropriate permissions in StrataSync to update the firmware. ONX-580 User's Guide July 2021 22052280...
- Page 260 You can easily see more detail about your OneExpert, including the software version, serial number, Tech ID, and installed software options. From the Main menu, select Show More near the top of the screen. Scroll down to see more details. Show more ONX-580 User's Guide 22052280 July 2021...
- Page 261 OneExpert can sync with a VIAVI server via the internet. The synchronization also stores any user files saved on the unit to the StrataSync server. You should sync immediately upon receipt of the unit and on a regular (daily) basis thereafter to ensure that the unit is as up-to-date as possible and to allow all user information to be backed up.
- Page 262 Deploy – Shows any files from StrataSync that are ready to be deployed to the unit Completed – Shows files that have been synced or deployed. Select the arrow to the right for more detail Instrument Sync ONX-580 User's Guide 22052280 July 2021...
- Page 263 This can be used to create a “golden” unit. Lastly, if any updates are available, you will be prompted that you can update When synchronization is complete, the Status will indicate “Sync Complete”. ONX-580 User's Guide July 2021 22052280...
- Page 264 The OneExpert's file management is separated into 2 menus, ONX-580 Files and Mobile Tech Files. Use the ONX-580 Files menu to manage files stored on your meter, while the Mobile Tech Files menu is used to manage those stored on your mobile device,...
- Page 265 To select multiple files, press the Select Multiple button at the bottom, and then select the files to download or delete. Then select Download or Delete. ONX-580 User's Guide July 2021 22052280...
- Page 266 To view PDF files, you may need to download a PDF reader app, such as Adobe PDF Reader. 1. From the Main menu, select Mobile Tech Files. The Mobile Tech Files screen appears, showing the list of files on your mobile device. Mobile Tech Files ONX-580 ONX-580 User's Guide 22052280 July 2021...
- Page 267 The file will also be deployed or uploaded to StrataSync, if selected. To delete a file, select the file and swipe to the left. Then select Delete. ONX-580 ONX-580 User's Guide July 2021 22052280...
- Page 268 Network | Ping .92&company= Server IP 4.2.2.1 Requests Sent Replies Received Replies Lost Average Delay (ms) 14.0 Replies Lost (%) Network | IP Address bh001 2 / 4 NSC-100 / RRSO0071990071 0.0.99-2049 ONX-580 User's Guide 22052280 July 2021...
-
Page 269: Test Results
"TrueSpeed results" on page 280 "Video results" on page 282 "VoIP results" on page 280 "HPNA results" on page 287 "SmartID results" on page 290 "Copper results" on page 291 "WiFi Advisor results" on page 297 ONX-580 User's Guide July 2021 22052280... -
Page 270: Context-Sensitive Help
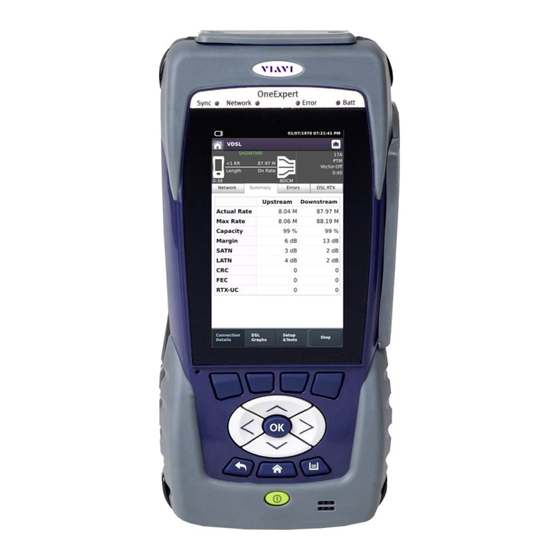
Press and hold to activate the help dialog box for that result. You can swipe the screen left/right to scroll through the tabs. In this example, the DSL Summary Margin results are selected. ONX-580 User's Guide 22052280 July 2021... - Page 271 (appears in the menu heading). SHOWTIME The elapsed time (duration) since reaching Sync Time Showtime. T1.413, READSL, ADSL2+, The DSL line format agreed upon during Trained Mode ADSL2, G.Lite, training (appears in the menu heading). G.DMT, VDSL2, G.fast ONX-580 User's Guide July 2021 22052280...
- Page 272 Upstream downstream aggregate net data rates up to 1 Gbps The percentage of total bandwidth Capacity currently used by the actual connect 0–100% rate upstream and downstream. SNR marigin upstream and -51.1–+51.1 Margin downstream. ONX-580 User's Guide 22052280 July 2021...
- Page 273 Start Time is the time of day when the DSL modem achieves Showtime. The Start time is updated if you clear errors. Stop Time is the time of day when the report is generated or DSL sync is lost. ONX-580 User's Guide July 2021 22052280...
- Page 274 – For transmitted collisions, a count of the number of times the unit has transmitted a frame, and then received a jam signal in the time slot for the frame. These counts are provided for both Port 1 and Port 2. ONX-580 User's Guide 22052280 July 2021...
- Page 275 Gateway – The OneExpert DSL’s IPv4 gateway address. When an IP device has determined that a packet is not addressed to it or devices on the same sub- network (subnet), it sends all such packets to the gateway address for further routing to the correct address. ONX-580 User's Guide July 2021 22052280...
- Page 276 Primary DNS – The address of the preferred DNS server. When using internet addresses such as www.viavi.com, the OneExpert DSL (and all IP devices) must translate the address to an IP address (such as 157.234.12.20) in order to route the packets or data.
- Page 277 SATN – Signal attenuation. Attenuation average of the bins/tones that contain the actual signal (empty bins are not included). For a description of the settings impacting this calculated value, see step 10 "Specifying test settings" on page 137. ONX-580 User's Guide July 2021 22052280...
-
Page 278: Dsl Graphs
Bits per tone is defined as bits assigned per DMT tone. Examine the portions of the graphs where there are dips or breaks. These dips represent areas where interference is degrading the DSL signal. ONX-580 User's Guide 22052280 July 2021... -
Page 279: Ip Data Results
Ping Time – The current, minimum, maximum, and average time in milliseconds it has taken one transmitted ping to reach its destination and receive a reply back to the OneExpert DSL. ONX-580 User's Guide July 2021 22052280... -
Page 280: File Transfer Results
(bad shows a red X) Delay – End to end delay in milliseconds. Jitter – Deviation in packet arrival times, in milliseconds). Loss – Packet loss based as a percentage lost divided by total packets. ONX-580 User's Guide 22052280 July 2021... - Page 281 Remote Throughput Bytes – The number of Bytes that the remote entityreports that it has transmitted (sent via RTCP). Remote Throughput Packets – The number of Packets that the remote entity reports that it has transmitted (sent via RTCP) ONX-580 User's Guide July 2021 22052280...
- Page 282 (rightpointing arrow / square box) a stream, or QoS Expert to compare streams, The test results used for analysis are split among several categories, displayed on separate tabs. To view the different categories of statistics, press the tab for the results that you wish view. ONX-580 User's Guide 22052280 July 2021...
- Page 283 (for MPEG-2 TS Video over UDP) rtp (MPEG-2 TS Video over RTP) NOTE: The State, Type, IP address, and Port results refer to the media stream, not the signaling protocol (IGMP or RTSP) that brought up the stream. ONX-580 User's Guide July 2021 22052280...
- Page 284 Video Continuity Err. – Number of MPEG continuity errors detected. ETHERNET RX Errors – Number of Ethernet errors received. (Appears only if testing on Ethernet interface) ETHERNET RX Drops – Number of dropped Ethernet frames received. (Appears only if testing on Ethernet interface) ONX-580 User's Guide 22052280 July 2021...
-
Page 285: Packet Statistics
PMT Errors – Number of errors in the Program Map Table. Error conditions include any of the following: – Scrambling is ON – Repetition rate is less than the configured threshold value – PMT not found ONX-580 User's Guide July 2021 22052280... - Page 286 This category provides the PIDs (Packet Identifiers) for each piece (video, audio, and data) of the video program stream. NOTE: The PAT and PMT items are table data inserted into the stream to enable the decoder to perform correctly. These two items should always be present. ONX-580 User's Guide 22052280 July 2021...
-
Page 287: Hpna Results
00–FF network Chip ID = Chipset 3010 The device’s firmware 3110 Ver–Chip revision-chip id version and Copper Gate™ chip ID. 3210 3310 3320 Node details Node details provides details for a particular node. ONX-580 User's Guide July 2021 22052280... -
Page 288: Network Test
The number of bcast transmitted or received Packets broadcast packets. The number of mcast transmitted or received Packets multicast packets. The number of transmitted or received dropped Packets packets dropped due to lack of resources. ONX-580 User's Guide 22052280 July 2021... -
Page 289: Protocol Messages
The number of control ctrl_log_rec replies to the local host (CERT protocol). The number of control ctrl_rem_req requests from a remote host (CERT protocol). The number of control ctrl_rem_rec replies to a remote host (CERT protocol). ONX-580 User's Guide July 2021 22052280... -
Page 290: Smartid Results
SmartIDs on the map. Press OK to see details of a particular segment. Sweep data This category shows a graph of the frequency sweep. Use the # key to reverse the direction. ONX-580 User's Guide 22052280 July 2021... -
Page 291: Copper Results
Hazardous voltages may be on the power lines. 220 mains (RMS) are equivalent to 308 peak. Connecting to these circuits may result in damage to equipment or serious injury. ONX-580 User's Guide July 2021 22052280... - Page 292 The following table describes the resistance result (no ambient). Range (Ω) Resolution (Ω) Accuracy 0 to 999 2% ± 2.5Ω 1.0K to 9.99K 10.0K to 99.9K 100.0K to 999K 1.0M to 9.9M 6.5% 10.0M to 100M 100K ONX-580 User's Guide 22052280 July 2021...
-
Page 293: Distance To Short
The following table describes the leakage result (no ambient). Range (Ω) Resolution (Ω) Accuracy 0 to 49.99 2% ± 2.5Ω 50 to 999 5% ± 2.5Ω 1.0K to 9.99K 10.0K to 99.9K 100.0K to 999K 1.0M to 9.9M 10.0M to 100M 100K ONX-580 User's Guide July 2021 22052280... - Page 294 DC current on Tip (A) to Ring (B) should be ≥ 23 mA at the NID. Anything less will not allow for differences in temperature and phone equipment will not operate during extremes. The following table describes the DC current result. Range Resolution Accuracy 0 to 110 mA 2% ± 1mA ONX-580 User's Guide 22052280 July 2021...
-
Page 295: Longitudinal Balance
ADSL or ISDN). Load coil detection and elimination is essential in the installation of an xDSL circuit The following table describes the load coil result. Range Resolution Accuracy Up to 27,000 ft (8229.6 m) up to 5 ± 1 ONX-580 User's Guide July 2021 22052280... -
Page 296: Impulse Noise
Impulse noise is used to check for the presence of noise spikes that disrupt digital services. RX and TX tones You use tones to check cable performance (attenuation) at higher frequencies used for digital services (wideband) or in voice frequencies (narrowband). ONX-580 User's Guide 22052280 July 2021... - Page 297 Move the WiFi Advisor away from the high energy transmitter and test again. Noise graph The noise graph displays the noise per channel. Channel score The channel score provides a score per channel which determines the best channels. ONX-580 User's Guide July 2021 22052280...
- Page 298 The systems are designed to be inter- operable, but Bluetooth will impact throughput. Channels can “bleed over” into adjacent channels. The width of the signal (due to RF considerations) can affect nearby channels. This bleed over is treated as noise. ONX-580 User's Guide 22052280 July 2021...
- Page 299 "Cleaning the instrument" on page 300 "Resolving problems" on page 300 "Copper testing" on page 302 "Getting technical assistance" on page 328 "WiFi Advisor" on page 327 "Additional information" on page 328 "Specifications" on page 329 ONX-580 User's Guide July 2021 22052280...
-
Page 300: Cleaning The Instrument
The modem cannot achieve sync with the CO – Inability to sync can have many causes. Perform the following steps to troubleshoot: - Disconnect the customer’s DSL modem - Verify tester connection to the correct pair - Verify the Data mode ONX-580 User's Guide 22052280 July 2021... -
Page 301: Data Testing
Make sure that the Ethernet interface cabling is correct. If the Ethernet cable is not hooked up, or is hooked up incorrectly, a packet will not be sent. Thus the Ethernet statistics will not increment. ONX-580 User's Guide July 2021 22052280... - Page 302 All pairs have loss. The larger the gauge or diameter the less it will be. Loss is not uniform for all frequencies. Higher frequencies experience more loss than lower frequencies on the same pair. ONX-580 User's Guide 22052280 July 2021...
- Page 303 Some impulse noise occurs at specific rates (like 60 times a second) because it originates from a device that is commercial AC powered. If its strong enough to wipe ONX-580 User's Guide July 2021 22052280...
- Page 304 Shading indicates where the main graph is in the capture. The Capture Display defaults the trigger event to the center of the captured data. If needed, the data can be captured leading up to or trailing the trigger event. ONX-580 User's Guide 22052280 July 2021...
- Page 305 The graphs can be stored and catalogued for future reference. Options External Bridge mode is used for testing an active line with the Viavi Monitor cable. Active line testing allows evaluating the interference while in service.
- Page 306 Noise sources external (outside) to the cable are usually Radio Frequency Interreference (RFI). Bonding, grounding, and shielding reduces RFI on the pair under test. Shorter pairs tolerate higher noise. Testing for one Noise pass threshold will not work. ONX-580 User's Guide 22052280 July 2021...
- Page 307 The test starts with the far end open and does measurements to look for faults. With the far end shorted, it finishes and shows the results. The Viavi UltraFED can be used to provide open and short conditions at the far end.
- Page 308 Run if the temperature of the ONX changes drastically Run if you desire the highest accuracy for digging to repair buried cable A self-test can be done with the test leads shorted. Look for close to zero results. ONX-580 User's Guide 22052280 July 2021...
- Page 309 Crosstalk – Use this mode to locate where a pair is split with another pair. Launch pulse is sent on red / black leads and the ONX looks for reflections on blue / yellow. A peak or valley occurs at the cross. ONX-580 User's Guide July 2021 22052280...
- Page 310 A bridged tap longer than the length to end of the cable may not show the "peak" on the trace. Bridged taps less than 20 feet (6m) long are hard to see beyond 200 feet (60m) from the tester. ONX-580 User's Guide 22052280 July 2021...
-
Page 311: Specifications
The larger the wire diameter, the less the attenuation is for both directions. On long loops, having the Viavi UltraFED at the far end in the “TDR Helper” mode makes it clear on the trace where the end of the cable is. The UltraFED slowly shorts and opens the pair. - Page 312 Note: Load coils add length to the measurement. You can compare loop ohms distance to Opens (Capacitance) for a bridge tap check. ONX-580 User's Guide 22052280 July 2021...
- Page 313 This mode looks at “two terminals” or leads at a time (TR/AB, TG/AE, or RG/BE) and gives a result of the capacitance seen only on those leads. There is a mathematical way to do 3 terminal capacitances, which we do not do at this time. ONX-580 User's Guide July 2021 22052280...
- Page 314 The Opens length result to ground/earth might be used for locating an issue. Other issues can potentially be located with the TDR. Balance problems may have to be found by sectionalizing the cable. ONX-580 User's Guide 22052280 July 2021...
- Page 315 A calculation of the balance is done and displayed. This can be a more accurate and consistent measurement of balance. And this method also allows you to get accurate measurements on unterminated lines. Longitudinal Balance and PI/Noise/Balance are both valuable tests. ONX-580 User's Guide July 2021 22052280...
- Page 316 It can help identify power company and Bonding / Grounding issues. The box below the main trace, shows the entire range. When zoomed in, noise outside the main trace show here. Shading indicates where the main trace is in the viewable range. ONX-580 User's Guide 22052280 July 2021...
- Page 317 DSL performance. Focus on reducing noise to get the desired service level. Options External Bridge mode is used for testing an active line with the VIAVI Monitor cable. Active line testing allows evaluating the technology and interference while in service.
- Page 318 ADSL2+ frequencies used are: 100, 150, 200, 300, 400, 500, 600, 700, 800, and 900kHz. 1, 1.1, 1.2, 1.3, 1.4, 1.5, 1.6, 1.7, 1.8, 1.9, 2, 2.1, and 2.2 MHz. VDSL frequencies used are 150, 300, 600kHz, and 1 to 30 MHz in 1 MHz steps. ONX-580 User's Guide 22052280 July 2021...
- Page 319 Voice frequencies used are: 300–1,000Hz in 100Hz steps, 1000–10,000Hz in 1,000Hz steps, 12.5, 15, 17.5, and 20 kHz. ADSL2+ frequencies used are: 100kHz–2.2 MHz in 100kHz steps. VDSL frequencies used are 150, 300, 600kHz, and 1 to 30 MHz in 1 MHz steps. ONX-580 User's Guide July 2021 22052280...
-
Page 320: Specification
UFED transmitter is active. This provides the signal level of that frequency that coupled from one pair to the other. The result is the received level compared to the known transmitted level. Specification FEXT (UFED) range: 10kHz–30MHz Wideband only ONX-580 User's Guide 22052280 July 2021... - Page 321 If noise level is unacceptable, use the Spectral analyser to see noise sources and level. The VIAVI UFED is a convenient way to send a tone from the far end. In the Voice Frequency band, the SNR measurement uses an 820 or 1020 Hz tone.
- Page 322 The resistance of the wires should be close in value. If not, there might be bad splices / joints. Use the Resistive Balance Option in Resistance. Bad splices might be located with the TDR. ONX-580 User's Guide 22052280 July 2021...
-
Page 323: Return Loss
Look for a slope or a mostly flat line on the graph. It is normal for the result go down as the frequency goes up. Large variations could indicate a fault. Return Loss will only detect faults on part of long cable sections due to loss at high frequencies. ONX-580 User's Guide July 2021 22052280... - Page 324 Select Tray in the application. Run when you first get the ONX or change leads. Specifications Voice frequencies used are: 200–20kHz in 200Hz steps. DSL frequencies used are 20, 40, 45, 65, 85kHz, 100kHz to 1MHz in 50kHz steps, and 1 to 10MHz in 500kHz steps. ONX-580 User's Guide 22052280 July 2021...
- Page 325 Making balance better for the pair under test can improve the result. Resistance of the wires should be close in value. If not, there might be bad splices/ joints. Use the Resistive Balance Option in Resistance. Bad splices may be located with the TDR. ONX-580 User's Guide July 2021 22052280...
- Page 326 Select Tray in the application. Run when you first get the ONX or change test leads. Specifications Voice frequencies used are: 200–20kHz in 200Hz steps. Wideband frequencies used are 20, 40, 45, 65, 85kHz, 100kHz to 1MHz in 50kHz steps, and 1 to 10MHz in 500kHz steps. ONX-580 User's Guide 22052280 July 2021...
- Page 327 Detect and advise replacement of old gear. – Slow a/b/g PHY rates occupy the channel longer than modern PHY rates for the same amount of information transfer. – Old security types (WEP/WEPA1) limit connection to lower 802.11 rates ONX-580 User's Guide July 2021 22052280...
-
Page 328: Getting Technical Assistance
(ideally 0 to 20 feet). The WiFi Advisor is unresponsive Press and hold the power button for 5 seconds. (locked-up) Getting technical assistance If you require technical assistance, call 1-844-GO-VIAVI / 1.844.468.4284. Outside US: +1-855-275-5378 Email: CATVsupport@viavisolutions.com For the latest TAC information, visit https://support.viavisolutions.com... - Page 329 -10° to +60° C (14° to 140° F) Humidity 10% to 90% RHNC Maximum operating altitude 4000 meters (13,123 feet) Vibration sinusoidal vibration testing per IEC 60068-2-6 (Sinusoidal Vibration) Shock shock testing to IEC 60068-2-29 Ed. 2.0 “Continuous Bumps.” ONX-580 User's Guide July 2021 22052280...
- Page 330 5 hours for a fast charge; for a full charge, allow to trickle charge overnight Power supply input 100-240VAC, 1.5A, 50-60 Hz Power supply output 12VDC, 5.0A Max Power supply operating temperature 0° to +40° C (-22° to 104° F) range ONX-580 User's Guide 22052280 July 2021...
- Page 332 22052280 July 2021 English VIAVI Solutions North America: 1.844.GO VIAVI / 1.844.468.4284 Latin America +52 55 5543 6644 EMEA +49 7121 862273 APAC +1 512 201 6534 All Other Regions: viavisolutions.com/contacts email CATVsupport@viavisolutions.com...
Need help?
Do you have a question about the ONX-580 and is the answer not in the manual?
Questions and answers