Table of Contents
Advertisement
Quick Links
Advertisement
Table of Contents

Related Manuals for sauter FL


Summary of Contents for sauter FL
- Page 1 Sauter GmbH Ziegelei 1 Phone : +49- [0]7433- 9933-0 D-72336 Balingen Fax: +49- [0]7433-9933-149 e-mail: info@kern-sohn.com Internet: www.sauter.eu Instruction manual digital force gauge SAUTER FL Version 2.0 01/2020 PROFESSIONAL MEASURING FL-BA-e-2020...
-
Page 2: Table Of Contents
Congratulations on purchasing a digital force measuring device with internal or external measuring cell from SAUTER. We hope you will enjoy your quality measuring device with a wide range of functions. Please do not hesitate to contact us if you have any questions, requests or suggestions. -
Page 3: Introduction
If you want to connect an FL with the combination test bench and software (AFH-LD or AFH-FD) to a PC, you must connect the FL to the equipment port of the test bench via the FL-A04 cable (Sub-D 9-pin to PS2) and connect the test bench to the PC via the computer port. -
Page 4: Technical Data
4 Technical data 4.1 Technical data FL with internal loadcell up to 1kN Measuring FL 5 FL 10 FL 20 FL 50 FL 100 FL 200 FL 500 FL 1K device Capacity 100N 200N 500N 1000N Measurement ±0.2% of Max (measuring range) -
Page 5: Technical Data Fl With External Loadcell From 2Kn
4.2 Technical data FL with external loadcell from 2kN Measuring FL 2k FL 5k FL 10k FL 20k device capacity] 2000N 5000N 10000N 20000N Measurement ±0.2% of Max (measuring range) uncertainty Working 15°C to 35°C temperature Relative air 15% to 80% Humidity... -
Page 6: Technical Data External Load Cell (From 2Kn)
4.3 Technical data external load cell (from 2kN) Maximum Cable LxWxH Thread type load length 2 kN 76x51x19mm M12x1.75 5 kN 76x51x28mm M12x1.75 Approx. 2,5m 10 kN 76x51x28mm M12x1.75 20 kN 76x51x28mm M12x1.75 FL-BA-e-2020... -
Page 7: Technical Data Fl Tm
160x75x30mm (LxWxH) 4.4.1 Sensors Sensor must be ordered separately. Service FL-C01 necessary. 4.4.2 Load cell connection Solder the cable from the measuring cell to the supplied connector. The pin assignment at the connector is as follows: Pin 1: Supply ( - ) -
Page 8: Battery Indicator / Power Supply
• If the battery voltage is less than 3.9V, a message appears that the battery is exhausted and the device switches off automatically The FL is equipped with four Nickel Metal Hybrid (NiMH) batteries type AAA. For safety reasons during transport, the batteries are supplied uncharged. For maximum... -
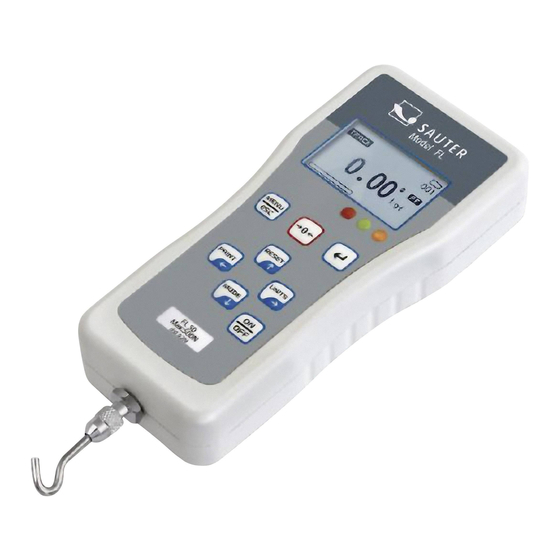
Page 9: Control Buttons
• Press the key briefly: Switch between N, gf, kgf, ozf, lbf, mN Mode (mode change): Assignment with three functions: • Track mode (continuous measurement) • Peak Mode Train • Peak Mode Print ON / OFF: • On / Off button (press button for approx. 1 s) FL-BA-e-2020... -
Page 10: Functions
8.3 Store measured value in memory Any measured value can be stored in the memory at any time by pressing the ENTER key. A maximum of 500 readings can be stored. FL-BA-e-2020... -
Page 11: Memory / Storage
When DELETE is selected and the ENTER button is pressed to confirm, the currently stored measurement is deleted and the instrument returns to the memory page. When DELETE ALL is selected and the ENTER button is pressed to confirm, all stored measurements are deleted and the instrument returns to the memory page. FL-BA-e-2020... -
Page 12: Diagnostics
75N in compression direction, then + 1.5V is present at the analog output. If the instrument is in PASS - Fail mode, 2V for PASS and 0V for FAIL are present at the analog output. FL-BA-e-2020... -
Page 13: Computer Control Of The Force Gauge
Perform reset on the device 10 RS232 output signal The reading of the FL shown on the display can be transferred to the PC by pressing the PRINT button or by issuing a command instruction to the force gauge from the... -
Page 14: Interface Protocol
= pull) | |____>-------- the remaining 6 digits describe the measured value as ASCII character string or: 1021.15 means +21.15 N (tractive force) 10.2 Assignment of the RS232 data interface Signal Illustration Data output Ground Input for control signal FL-BA-e-2020... -
Page 15: Warnings
Do not apply a continuous load to measuring instruments with external measuring cell. Overloads Please prevent the measuring instrument from being overloaded beyond the specified maximum load (Max), minus any tare load that may already be present. This can damage the measuring instrument (danger of breakage!) FL-BA-e-2020... - Page 16 • The measuring instrument may only be operated or maintained by trained personnel. • The measuring instrument may only be used in accordance with the described specifications. • SAUTER must give written approval for any other areas of use / applications. Warranty The warranty is void if •...
-
Page 17: Adjustment Instruction Fl
12 Adjustment instruction FL Introduction: This manual describes the adjustment procedure, although some programming modes are password protected. Important! During the adjustment procedure, all weights for loading the sensor should be calibrated. Tempering: Before the measuring instrument is handed over to the calibration laboratory, the respective instrument must be checked for possible damage and the order specification. - Page 18 SETTING MAX. LOAD 2/2 4. Use the UP and DOWN arrow keys to select the maximum load, press the selected value and hold for a moment. Press the ENTER key to save the selected value. Then return to the calibration menu. FL-BA-e-2020...
- Page 19 • touch the ENTER key to save the results for the entire voltage scale. 6. Compression calibration: In the calibration menu, use the UP and DOWN arrow keys to select the COMPRESSION GAIN menu function and then press ENTER. The display will show a menu window for compression gain. FL-BA-e-2020...
- Page 20 7. After successful calibration, remove all accessories from the meter and place the meter on a flat surface with its backside facing up. Select the voltage increase menu window, press the ZERO key to obtain the primary calibration offset, date and time and reset the overload counter. FL-BA-e-2020...
-
Page 21: Technical Drawings
13 Technical drawings FL-BA-e-2020...
Need help?
Do you have a question about the FL and is the answer not in the manual?
Questions and answers