
Related Manuals for AMX Epica DG


Summary of Contents for AMX Epica DG
- Page 1 Instruction Manual Epica DG Digital Generation Distribution Matrix M a t r i x S w i t c h e r s R e l e a s e : 0 7 / 0 3 / 2 0 0 8...
-
Page 2: Amx Limited Warranty And Disclaimer
Products repaired under this policy will carry a ninety (90) day warranty on material and labor. • AMX will notify the AMX Authorized Partner with the cost of repair, if cost is greater than the Standard Repair Fee, within five (5) days of receipt. -
Page 3: Software License And Warranty Agreement
LICENSE GRANT. AMX grants to Licensee the non-exclusive right to use the AMX Software in the manner described in this License. The AMX Software is licensed, not sold. This license does not grant Licensee the right to create derivative works of the AMX Software. -
Page 4: Table Of Contents
Applying Power & Startup... 35 Redundant Power Supply (RPS) ... 37 Executing a Test Switch... 38 Technical Support... 40 Epica DG DVI (Digital Visual Interface) Boards ...41 Specifications Epica DG DVI ... 42 Attaching Cables ... 43 ® Epica DG MTP Fiber Boards ...45... - Page 5 Installing the EDID Programmer ... 62 Reading and Saving EDID Data from a Destination Device ... 63 Writing EDID Data to an Epica DG DVI Input Connector... 63 Appendix B – Managing Configuration Files ... 67 Installing XNConnect ... 68 Opening a Configuration File ...
-
Page 6: Esd Warning
Grounding straps, conductive smocks, and conductive work mats are specifically designed for this purpose. Anyone performing field maintenance on AMX AutoPatch equipment should use an appropriate ESD field service kit complete with at least a dissipative work mat with a ground cord and a UL listed adjustable wrist strap with another ground cord. -
Page 7: Important Safety Information & Instructions
There are no user serviceable parts inside an AMX AutoPatch product; service should only be done by qualified personnel. If you see smoke or smell a strange odor coming from your AMX AutoPatch product, turn it off immediately and call technical support. -
Page 8: Information Et Directives De Sécurité Importantes
Placez uniquement des fusibles de calibre exact dans les boîtiers. Veillez à ce que la prise de courant soit proche de l’appareil et facile d’accès. Veillez à ce que votre appareil AMX AutoPatch soit installé sur une surface stable ou qu’il y soit fermement maintenu. -
Page 9: Notices
AMX. Copyright protection claimed extends to AMX hardware and software and includes all forms and matters copyrightable material and information now allowed by statutory or judicial law or herein after granted, including without limitation, material generated from the software programs which are displayed on the screen such as icons, screen display looks, etc. -
Page 10: Warnings And Cautions
Warning: The icon to the left indicates text that cautions readers against actions or conditions that could cause potential injury to themselves. Caution: The icon to the left indicates text that cautions readers against actions that could cause potential injury to the product or the possibility of serious inconvenience. Epica DG Instruction Manual... - Page 11 Notices Epica DG Instruction Manual...
-
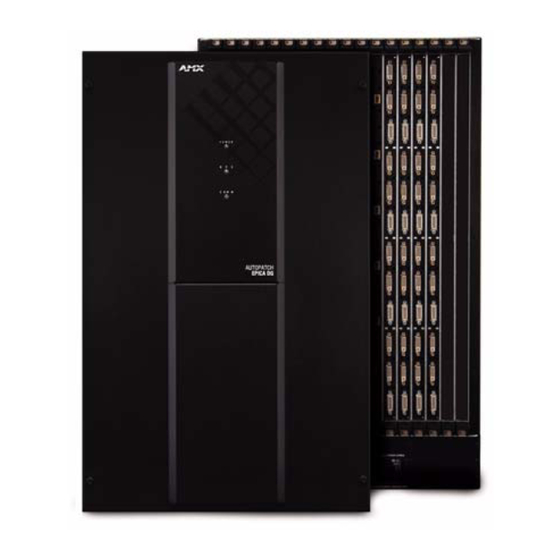
Page 12: Overview & General Specifications
FG1055-437 Product Notes The Epica DG is available in a variety of input to output configuration sizes and can contain an assortment of I/O boards in a single enclosure. Note: Because the Epica DG Distribution Matrix is available in various board configurations, the illustrations in this manual may differ from the model(s) you purchased. -
Page 13: Control Features
Note: Features and specifications described in this document are subject to change without notice. Front View The enclosure, which is the structural basis of the Epica DG Distribution Matrix, is custom built for each installation. The Epica DG enclosure is controlled using control software or an external controller (see page 13). -
Page 14: Rear View
CPU/Control board Up to 4 power supplies with receptacles and the power specifications Serial number Note: The Epica DG has two inset hand holds, one on each side. Epica DG Instruction Manual Input boards (up to 9) Output boards (up to 9) Overview &... -
Page 15: Power Supply Units
(see page 19) – for attaching an external control device (see page 29) – for Ethernet / linking communication activity – for system status – Indicator LEDs Leave switch on (flipped right) Epica DG Instruction Manual... - Page 16 (RGBHV) depending on the type of input/output boards. Epica DG enclosures have 18 vertical board slots (9 slots each for input and output boards with up to 16 channels per board), allowing for a maximum configuration of 144x144.
-
Page 17: General Specifications
Each system is programmed (configured) at the factory according to customer specifications. Configuration Information The custom configuration file is provided on the AMX AutoPatch CD that is shipped with each system. The software provided on the CD can be used to further customize the configuration file (see page 67). -
Page 18: Control Options
Control Panel If the Epica DG is linked to an Optima, Modula, or 8Y-3000 that has a CP-10 or a CP-20A Control Panel (local or remote), the panel can fully control the Epica DG. When other types of AMX AutoPatch Control Panels (whether front panels or remote panels) are used to control the Epica DG, some limitations apply. - Page 19 Overview & General Specifications Epica DG Instruction Manual...
-
Page 20: Installation & Setup
110° (43° C) and follow the clearance recommendation below for adequate airflow. Airflow Restriction Epica DG enclosures are designed to adequately dissipate the heat they produce under normal operating conditions; however, this design is defeated when high heat producing equipment is placed directly above or below an enclosure. -
Page 21: Circuit Overloading
Unpacking The Epica DG is shipped with one enclosure per shipping box. The invoice is sent separately; a packing slip is attached to the outside of each box. Each box contains the following items: Enclosure on pallet... -
Page 22: Rack Installation & System Setup
Rack Installation & System Setup The Epica DG Distribution Matrix enclosure is mounted in a standard EIA 19 in. (48.26 cm) rack. Placing an Epica DG in a rack requires a minimum of three people. Important: The system requires at least one empty rack unit above and below the enclosure to allow adequate airflow;... - Page 23 Caution: On systems with fiber connectors, we recommend using lacer bars or some other type of cable management system to avoid damage (and for service) to the fiber cables. Due to the size of Epica DG enclosures, other cables (such as, DVI) may also need the support of a cable management system.
-
Page 24: Rack Installation
(three empty rack units are recommended). Verify that the openings on the sides of the enclosure are not blocked and do not have restricted air flow. The Epica DG has an inset hand-hold on each side. Do not attempt to lift the enclosure from the pallet to the rack by yourself. - Page 25 AMX provides link cables and equipment for enclosures that are ordered as part of a linked system. Linking from one Epica DG enclosure to another Epica DG enclosure is currently not supported, but the Epica DG can link to other AMX AutoPatch Distribution Matrices using the cable and equipment specified in the table below.
-
Page 26: Ethernet Connector Leds
Ethernet Connector LEDs The Link, 10Base-T Ethernet (RJ-45), connector on the Epica DG has two LEDs that indicate communication status when the enclosure is linked to an active system. FIG. 7 Ethernet connector LEDs The LEDs indicate the following: Green LED on – speed status is 100 Mbps Green LED off –... - Page 27 Installation & Setup Linking between an Epica DG and an Optima or Precis 500 MHz An Epica DG can be directly linked to an Optima or to a Precis 500 MHz enclosure via their 10Base-T Ethernet ports using an RJ-45 crossover cable.
- Page 28 Linking an Epica DG to a Modula, 8Y-3000, Epica-128, or Epica-256 An Epica DG enclosure can be linked to an enclosure with an Ethernet 10Base-2 connector (Modula, 8Y-3000, Epica-128, or Epica-256) by using a Media Converter. Additional 10Base-2 enclosures can be daisy-chained off the first one.
- Page 29 Depending on the other types of enclosures, a Media converter(s) and RG-58 coax cable(s) may also be required. FIG. 10 shows an Epica DG enclosure linked to an Optima and to an 8Y-3000 using a 5-Port Switch and a Media Converter.
- Page 30 * Applies to Modula, 8Y-3000, Epica-128, and Epica-256 enclosures. ** The total length of all RG-58 coax cables between the Media Converter and the last enclosure in the daisy chain cannot exceed 10 ft. (3.05 m). Epica DG Instruction Manual Installation & Setup...
-
Page 31: Attaching External Controllers
The APWeb Server (for control, diagnostics, and third-party access) is accessed through a TCP/IP interface, such as, a web browser (e.g., Internet Explorer). The Epica DG serial port (DB-9) is used to access APWeb. Additional equipment is required for APWeb. For setup and operation information, see the APWeb Server Module’s documentation on the AMX AutoPatch CD and at www.amx.com. - Page 32 (null modem) or RS-422 serial cable attached to the serial port (DB-9) on the enclosure’s CPU. PCs are common serial controllers. Once a PC is attached to the Epica DG, the system can be controlled by running APControl software on the attached PC (see the AMX AutoPatch CD). The system can also be controlled by entering BCS commands into a terminal emulation program (e.g., HyperTerminal).
-
Page 33: Serial Communication Settings
Plug the other end of the serial cable (RS-422 uses platform specific pinout) into the serial port on the serial controller. If not already on, apply power first to the Epica DG enclosure and then to the source and destination devices (see “Applying Power & Startup” on page 35). - Page 34 To attach a PC to the USB (Mini-B) port: Apply power to the Epica DG (see page 35). Connect the Epica DG to a PC running Windows using the USB cable provided by AMX (FIG. 14). FIG. 14 Connect to USB port If establishing a new connection, complete Steps 3, 4, and 5.
- Page 35 Note: The following dialog boxes appear only during the initial USB connection. Once the virtual COM port has been assigned to the Epica DG, the dialog boxes do not appear again. If they do appear, you have connected the USB plug to a different COM port than the initial one.
- Page 36 Select CD-ROM drives to locate APBridge.inf on the AMX AutoPatch CD (Configuration\APConfig\USB) that shipped with your Epica DG. Click Next. Select Specify a location to find APBridge.inf in the folder that holds your AMX AutoPatch software. Click Next. In the Browse for Folder box, navigate to and select the folder containing the APBridge.inf file.
- Page 37 Terminal emulation – Open the program. Check to be sure the Communications Port option is set for the port determined in Step 3 above. Set the settings to match the default ones in the Epica DG Serial Port Settings table above. Click OK. A short splash screen appears.
-
Page 38: Attaching Inputs & Outputs
Input and output connectors are the attachment points for source and destination devices that connect to the system. Epica DG enclosures have 18 vertical board slots (9 slots each for the input and the output boards with up to 16 channels per board), allowing for a maximum configuration of 144x144. Viewed from the rear of the enclosure, the input boards (for attaching sources) are on the left, and the output boards (for attaching destinations) are on the right. -
Page 39: Attaching Cables
Connector Guide” that is shipped with each system. The guide shows you where to attach each signal cable on the rear of each enclosure. The system and enclosure numbers are on the rear of the Epica DG (if not on the rear, the numbers are on the side). Follow the guide exactly; the system was programmed at the factory to operate only as indicated on the “AutoPatch Epica DG Connector Guide.”... -
Page 40: Applying Power & Startup
(also listed on page 12). Always use an earth-grounded power cord / system with an Epica DG. The source electrical outlet should be installed near the Epica DG, easily accessible, and properly grounded. Power should come from a building branch circuit. We strongly recommend using a dedicated line for the system’s power. -
Page 41: Indicator Leds
NetLinx Compatible AMX AutoPatch Distribution Matrices are NetLinx information, please contact your AMX NetLinx representative. APControl 3.0 If you are using APControl 3.0, install and open the program. Follow the directions in the setup wizard. As part of the setup wizard, APControl will discover the system’s configuration information. From the Launchbar menu, select Views / CrossBar and click on the crosspoints to execute switches. -
Page 42: Redundant Power Supply (Rps)
FIG. 18 Power-up splash screen in HyperTerminal Note: AMX reserves the right to add to the contents of the splash screen at any time, without notice. Redundant Power Supply (RPS) Each enclosure ships with up to four mutually-redundant (hot-swappable) power supplies. -
Page 43: Executing A Test Switch
Before executing the test switch, make sure the first two source devices and the first two destination devices are connected to the input and output connectors exactly as shown on the “AutoPatch Epica DG Connector Guide” that is shipped with each system. Any applicable signal conversion modules must also be installed (see the module’s documentation). -
Page 44: Troubleshooting
The following test switch routes Input 1 to Output 2 on Level 0 (or use the level indicated on your “AutoPatch Epica DG Connector Guide”). To execute the test switch: Enter the following BCS command line: CL0I1O2T When the “T” appears, the system has successfully executed the command. If any other character(s) appears, the command was not successful. -
Page 45: Technical Support
Technical Support Before contacting technical support with a question, please consult this manual. If you still have questions, contact your AMX representative or technical support. Have your system’s serial number (normally located on the rear of the enclosure) ready. We recommend recording your system’s serial number in an easily accessible location. -
Page 46: Epica Dg Dvi (Digital Visual Interface) Boards
Epica DG DVI boards Epica DG enclosures are built to hold up to eighteen DG DVI boards with eight DVI-I and four DMS-59 connectors each. The DMS-59 connectors break out to allow two DVI connections each for a total of 16 inputs or outputs per board. -
Page 47: Specifications Epica Dg Dvi
1024x768 1024x768 1280x1024 1152x870 AMX reserves the right to modify its products and their specifications without notice. 1.65 Gbps Up to 1920x1200 @ 60 Hz refresh rate (with reduced sync blanking) DVI 1.0, DVI-D single link Up to 50 ft. (15.24 m) -
Page 48: Attaching Cables
Attaching Cables When attaching DVI input and output cables, refer to the sheet labeled “AutoPatch Epica DG Connector Guide” that shipped with the system. The sheet shows where to attach each cable on the rear of each enclosure. Follow the sheet exactly; the system was programmed at the factory to operate only as indicated on the sheet. -
Page 49: Dvi Pinout
Epica DG DVI (Digital Visual Interface) Boards DVI Pinout Pinout information for the DVI-I connector on the DG DVI input and output boards is provided in the chart below FIG. 22. FIG. 22 DVI-I connector pinout DVI-I Pinout Information 1. Data 2- 2. -
Page 50: Epica Dg Mtp ® Fiber Boards
144x144, as well as subsets (for example, 128x64 or 80x112). ® DG MTP Fiber input boards route signals to any other type of Epica DG boards, and ® DG MTP Fiber output boards can accept signals from any other type of Epica DG boards. -
Page 51: Specifications Epica Dg Mtp ® Fiber (& Epica Dg Dvi)
1920x1200 (uses reduced sync blanking) 1600x1200 1920x1080 (uses reduced sync blanking) 1280x1024 1680x1050 ** Additional resolutions may be supported through local DDC. AMX reserves the right to modify its products and their specifications without notice. ® Fiber (& Epica DG DVI) ®... -
Page 52: Attaching Cables
When attaching MTP fiber and DVI input and output cables, refer to the sheet labeled “AutoPatch Epica DG Connector Guide” that shipped with the system. The sheet shows where to attach each cable on the rear of each enclosure. Follow the sheet exactly; the system was programmed at the factory to operate only as indicated on the sheet. - Page 53 Fiber input and output boards is provided in 17. Data 0- C1. No connect 18. Data 0+ C2. No connect 19. Ground C3. No connect 20. No connect C4. No connect 21. No connect C5. No connect 22. Ground 23. CLK+ 24. CLK- Epica DG Instruction Manual...
-
Page 54: Epica Dg Rgbhv/Hd-15 Boards
FIG. 26 Epica DG RGBHV/HD-15 boards Epica DG enclosures are built to hold up to eighteen DG RGBHV/HD-15 boards with sixteen HD-15 connectors each. Each enclosure holds a maximum of nine input and nine output boards, accommodating connector configurations up to a maximum of 144x144, as well as subsets (e.g., 128x64 or 80x112). -
Page 55: Specifications Epica Dg Rgbhv/Hd-15
AMX reserves the right to modify its products and their specifications without notice. Attaching Cables When attaching HD-15 input and output cables, refer to the sheet labeled “AutoPatch Epica DG Connector Guide” included with each shipment. The sheet shows where to attach each cable on the rear of each enclosure. - Page 56 3. Blue 4. ID Bit 5. GND 10. GND * 55 mA supplied on output pin 9; power draw not to exceed 50 mA per port. Epica DG Instruction Manual Red GND 11. ID Bit Green GND 12. DDC SDA Blue GND 13.
-
Page 57: Board Configuration
The Control PC is connected with a null modem cable to the serial port on the Epica DG. Once the boards have been configured, the Control PC can be disconnected, unless further changes to the display settings are necessary. - Page 58 Install the DG-HD15 Wizard on the Control PC. (We recommend uninstalling any versions of BoardConfig software prior to v1.4.0 first.) Connect the Control PC via a null modem cable to the serial port on the Epica DG. Transfer the test image files from the Control PC to the Source PC.
- Page 59 Epica DG RGBHV/HD-15 Boards To adjust the video display using the DG-HD15 Wizard: Route the signal from the Source PC to the Destination Monitor. On the wizard, select the source in the navigation tree in the upper left corner that corresponds to the input connector number for the source signal to be adjusted.
- Page 60 The settings from the highlighted source are applied to all sources that were selected in Step 3. Complete Steps 13 through 17 in the adjustment procedure instructions above. Epica DG Instruction Manual Epica DG RGBHV/HD-15 Boards Select source whose settings need copying...
- Page 61 Epica DG RGBHV/HD-15 Boards Epica DG Instruction Manual...
-
Page 62: Epica Dg Hd-Sdi Boards
DG HD-SDI boards can be used to route HD-SDI signals or SD-SDI signals (see supported resolutions on page 58). DG HD-SDI input boards can also route signals to other types of Epica DG output boards, and DG HD-SDI output boards can accept signals from other types of Epica DG input boards. When routing signals between different board types, the Epica DG automatically converts the signal format to match the output board. -
Page 63: Specifications Epica Dg Hd-Sdi
DVI or RGBHV to SDI. When utilizing signal format conversion to SDI in an Epica DG system, DVI is the preferred source signal type. You must use the correct timing pertaining to the SMPTE standards listed above. -
Page 64: Attaching Cables
Attaching Cables When attaching BNC input and output cables, refer to the sheet labeled “AutoPatch Epica DG Connector Guide” included with shipment. The sheet shows where to attach each cable on the rear of each enclosure. Follow the sheet exactly; the system was programmed at the factory to operate only as indicated on the sheet. - Page 65 Epica DG HD-SDI Boards Epica DG Instruction Manual...
-
Page 66: Appendix A - Edid Programmer
Matrix Switchers and EDID Matrix switchers, such as the Epica DG, provide the ability to route one source signal to many potentially different types of display devices. As long as the source signal being routed is supported by all of the display devices, the result would be a good image on each display. -
Page 67: Determining The Need For Edid Programming
Epica DG to each of the destination devices. -
Page 68: Reading And Saving Edid Data From A Destination Device
To install EDID Programmer software: Locate and open the installer <EDIDProgrammer_1.0.exe> on the AMX AutoPatch CD or at www.amx.com. Follow the directions in the wizard. Reading and Saving EDID Data from a Destination Device Tip: The Save button in the EDID Programmer can be used to save the EDID information as an .edid file, which can be opened as a text file (click on the Open button) and edited or opened... - Page 69 Click the Query AutoPatch Device button to obtain the enclosure address from the Epica DG. Connect a DVI video cable to the PC using the PC’s spare monitor port. Connect the open end of the DVI video cable to the DVI input connector on the Epica DG that requires programming.
- Page 70 12. If applicable – Repeat any of the steps necessary for any of the other DVI input connectors. 13. Disconnect the DVI video cable from the PC and from the Epica DG input board. 14. Disconnect the serial cable from the PC and from the Epica DG enclosure.
- Page 71 Appendix A – EDID Programmer Epica DG Instruction Manual...
-
Page 72: Appendix B - Managing Configuration Files
Make a copy of the current file every time the file is modified. A copy of the configuration file (with an .xcl file extension) is found on the AMX AutoPatch CD shipped with each system. If you lose the AMX AutoPatch CD, either download XNConnect from the AMX website and see Discovering a System on page 70 or contact technical support (see page 40) with your system’s serial number for a replacement file. -
Page 73: Installing Xnconnect
800x600 screen resolution (1024x768 is recommended) Serial port and RS-232 null modem cable If you cannot locate the AMX AutoPatch CD that shipped with your system, see Discovering a System on page 70. To install XNConnect from the AMX AutoPatch CD: Close all other applications currently running on your PC. - Page 74 Use the standard Open dialog box to locate and open your configuration (.xcl) file. The default location is in the MyXCL folder on the AMX AutoPatch CD. Using Save As (under the File menu), make a duplicate copy of the file with a new name and save it to the PC.
-
Page 75: Discovering A System
To discover a system: Disconnect any third-party control devices from the Epica DG enclosure’s serial port or USB port. Connect the enclosure* to your computer (page 27). Launch XNConnect (see page 69). -
Page 76: Navigating The Interface
Virtual Matrices Tab Primary Device This view will also show linked AMX AutoPatch Primary Devices Communication Settings Epica DG Instruction Manual Appendix B – Managing Configuration Files Highlighted Device Components of the Primary Device Device Firmware Version Properties of Highlighted Device... -
Page 77: Modifying A Configuration File
Configure \ Configure Special – Virtual Matrix). Caution: The system must not be actively switching when loading this information onto the system. Name Field (displays selected channel) Customized Channel Name Enter Channel Name Default Channel Name Epica DG Instruction Manual... - Page 78 Optional – Enter a different preset number (local presets do not need to be numbered sequentially). Enter a name for the new preset. Optional – Enter a description. Click OK. The Modify Preset dialog box opens. Epica DG Instruction Manual Appendix B – Managing Configuration Files...
- Page 79 Preset 1: Input 2 to Output 5 Input 3 to Output 6 Input 7 to Output 8 The Disconnected Channels box shows that Output 1 will be disconnected as part of Preset 1. Epica DG Instruction Manual...
-
Page 80: Loading A Configuration File
(see the BCS Protocol Instruction Manual) that have already been defined for the system. To load the modified configuration file from XNConnect to the Epica DG CPU: Using Save As (under the File menu), make a duplicate copy of the modified file with a new name and save it to the PC. - Page 81 Appendix B – Managing Configuration Files Epica DG Instruction Manual...
-
Page 82: Appendix C - Apdiagnostics
APDiagnostics is a software application that monitors and displays advanced diagnostic information about the Epica DG (and other AMX AutoPatch products that are capable of reporting such data). This application is available on the AMX AutoPatch CD or at www.amx.com. - Page 83 Attach a null modem serial cable without hardware flow control to the serial port (DB-9) on the Epica DG. Use a null modem cable that matches the pin diagram below for RS-232. AMX AutoPatch equipment uses pins 3, 3, and 5 only.
-
Page 84: Modes
AutoPatch Distribution Matrix. For this mode to be used effectively, we recommend using a dedicated PC because the Epica DG must be connected to your PC via the Ethernet port (default) or serial port and the program must be running continuously to acquire data. This data consists of system-critical operating parameters, as well as general information about hardware and control configuration. -
Page 85: Main Screen & Menus
Load Log Files (Emulation mode only) Zip Log File Options Show > Activity Log Reload (Acquisition mode only) Window Color Preferences Comm (Acquisition mode only) Connect Disconnect Settings (Serial port or Ethernet) Help Event Status Notebook Epica DG Instruction Manual... - Page 86 The five buttons on the System tab offer general information for the following: To display general information for a particular component: Epica DG Instruction Manual In the Categories pane, select the Diagnostics tab. Click either the Temperature or System button in the Categories pane.
-
Page 87: Information Pane
Warning or Error setpoint, the color of the meter changes from green (Good) to yellow (Warning) or red (Error), making it easy to identify problem areas at a glance. Epica DG Instruction Manual... - Page 88 In the Categories pane, select the System tab. Click the desired System button to display its corresponding details in the Information pane: Epica DG Instruction Manual To access graph options: Right click on the graph and select a shortcut menu item.
- Page 89 APDiagnostics changes the color of the Categories buttons in the Categories pane (top arrow) to yellow for warning or red for error and displays the information as Warnings or Errors in the Event Status Notebook (bottom arrow). Epica DG Instruction Manual...
- Page 90 Reset Selected Item* Reset All Items * These menu items only appear when a data line is outlined in yellow or red. Epica DG Instruction Manual Appendix C – APDiagnostics Tabs Data Lines...
-
Page 91: Application Preferences
Cached Probe History Click OK. * If this preference is “off,” the program will use the last XNNet ID stored in its registry (and expects that enclosure to be present). Click to enable Edit in place Epica DG Instruction Manual... -
Page 92: To Change Settings
APDiagnostics is running in Acquisition mode. You can also specify how big the active Log file should get before it is archived and a new one is started. These parameters are specified on the Logging tab Epica DG Instruction Manual Appendix C – APDiagnostics Click to enable... - Page 93 Select multiple, consecutive files by holding down the Shift key and clicking the first and last files in a range of files. Select multiple, nonconsecutive files by holding down the Control key and clicking on individual files. Click the Zip Files button at the bottom. Browse Parent Directory for Log Files Epica DG Instruction Manual...
-
Page 94: Activity Log
(Clear Pad). The level of logging can be specified as: Critical, General (default), or Detailed. To select options in the Activity Log: Select Options > Show > Activity Log. Click Pause Logging or Clear Pad as needed (change Log Level if desired). Epica DG Instruction Manual Appendix C – APDiagnostics... -
Page 95: Communications
To change the Comm Settings (in Acquisition mode only): Select Comm > Settings. Ethernet – Select the Ethernet tab to set the NIC ID. Serial Port – Select the Serial Port tab to set the Comm ID and baud rate. Click Accept. Epica DG Instruction Manual... -
Page 96: Appendix D - Programmer's Interface For System Diagnostics
PC. * AMX reserves the right to add to the contents of the splash screen at any time, without notice. ** Verbosity (i.e., wordiness) refers to the amount of information provided; the higher the verbosity setting, the more information is displayed. - Page 97 Enter the verbosity level setting v# and the component (index) setting i#. Either may be specified first. Enter ! (to send the command). Example ~scrv3i6! or ~scri6v3! (displays the highest level of detail for the Power System) ID Number Epica DG Instruction Manual...
-
Page 98: Splash Screen Examples
[required system power] 990w [ac power slot 1] good [status flags] 0x0000 [available power] 806w [output power] 150.850w [voltage] 12.248V [current] 12.248v FIG. 40 Display for v3i6 (verbosity 3, component 6) Epica DG Instruction Manual Appendix D – Programmer’s Interface for System Diagnostics... - Page 99 [mtx driver 1] M21151 144 x 144 driver [revision code] 0x4 [product code] 0xc0 [mtx driver 2] M21151 144x144 driver [revision code] 0x4 [product code] 0xc0 [mtx driver 3] M21151 144x144 driver FIG. 41 Display for v3i4 (verbosity 3, component 4) Epica DG Instruction Manual...
-
Page 100: Appendix E - Board Replacement
Appendix E – Board Replacement This appendix covers the removal and replacement procedure for an Epica DG board. The procedure can be done while the system is powered up. Important: Adding or replacing boards should only be done by personnel trained to handle ESD sensitive parts and assemblies. -
Page 101: Replacing The Board
Replacing the Board Important: Be sure to install the new board(s) in the correct slot (see the AutoPatch Epica DG Connector Guide). The board’s location must match the system’s configuration information. If boards are installed in the wrong order, signal routing is affected. -
Page 102: Updating The System Configuration
XNConnect. We recommend keeping a copy of the former configuration file for reference. To update the system configuration: Attach a PC to the serial port on the Epica DG with an RS-232 null modem cable. Install XNConnect from the AMX AutoPatch CD sent with the new board. (If XNConnect is already installed on the PC, we strongly recommend uninstalling the old version before installing a new version). - Page 103 Appendix E – Board Replacement Epica DG Instruction Manual...
-
Page 104: Appendix F - Replacing Epica Dg Redundant Power Supplies
Appendix F – Replacing Epica DG Redundant Power Supplies This appendix provides instructions for removing and installing a redundant power supply (RPS) for an Epica DG Distribution Matrix. The procedure can be done while the enclosure is in a rack and with power applied. Fault Indicators Depending on how many power supplies are in the system and the load of the system, the RPS indicator on the front of the enclosure may blink (red or green) if there is a problem. -
Page 105: Removal & Installation
Caution: Do not remove a failed power supply until you have the replacement and are ready to install it (unless directed to do so by technical support). The Epica DG enclosure is able to operate normally with a failed RPS. - Page 106 When fully inserted, the front of the power supply should allow just enough room for the faceplate to fit around it and to sit flush with the back metal. Epica DG Instruction Manual Appendix F – Replacing Epica DG Redundant Power Supplies Do not loosen captive screw for installation...
- Page 107 Appendix F – Replacing Epica DG Redundant Power Supplies 10. Replace the faceplate with four screws (FIG. 47). Replace screws Replace 4 screws FIG. 47 11. Plug in the external AC power cord. 12. Check the LEDs on the replacement power supply for the following indications of normal display:...
- Page 108 It’s Your World - Take Control™ 3000 RESEARCH DRIVE, RICHARDSON, TX 75082 USA • 800.222.0193 • 469.624.8000 • 469-624-7153 fax • 800.932.6993 technical support • www.amx.com...
Need help?
Do you have a question about the Epica DG and is the answer not in the manual?
Questions and answers