
Related Manuals for AMX Precis DSP


Summary of Contents for AMX Precis DSP
- Page 1 Instruction Manual Precis DSP Distribution Matrix A u t o P a t c h M a t r i x S w i t c h e r s R e l e a s e : 7 / 0 6 / 2 0 0 9...
-
Page 2: Amx Limited Warranty And Disclaimer
Products repaired under this policy will carry a ninety (90) day warranty on material and labor. • AMX will notify the AMX Authorized Partner with the cost of repair, if cost is greater than the Standard Repair Fee, within five (5) days of receipt. -
Page 3: Software License And Warranty Agreement
LICENSE GRANT. AMX grants to Licensee the non-exclusive right to use the AMX Software in the manner described in this License. The AMX Software is licensed, not sold. This license does not grant Licensee the right to create derivative works of the AMX Software. -
Page 5: Table Of Contents
Information et directives de sécurité importantes..........3 Notices ........................4 Overview & Specifications ...................7 Product Notes ......................... 7 Enclosure Hardware ........................ 8 Precis DSP Specifications......................9 Configuration & Control ......................10 Installation & Setup ...................11 Site Recommendations ......................11 General Hazard Precautions ....................11 Unpacking.......................... - Page 6 Contents Precis DSP Instruction Manual...
-
Page 7: Esd Warning
Grounding straps, conductive smocks, and conductive work mats are specifically designed for this purpose. Anyone performing field maintenance on AMX AutoPatch equipment should use an appropriate ESD field service kit complete with at least a dissipative work mat with a ground cord and a UL listed adjustable wrist strap with another ground cord. -
Page 8: Important Safety Information & Instructions
There are no user serviceable parts inside an AMX AutoPatch product; service should only be done by qualified personnel. If you see smoke or smell a strange odor coming from your AMX AutoPatch product, turn it off immediately and call technical support. -
Page 9: Information Et Directives De Sécurité Importantes
Placez uniquement des fusibles de calibre exact dans les boîtiers. Veillez à ce que la prise de courant soit proche de l’appareil et facile d’accès. Veillez à ce que votre appareil AMX AutoPatch soit installé sur une surface stable ou qu’il y soit fermement maintenu. -
Page 10: Notices
AMX. Copyright protection claimed extends to AMX hardware and software and includes all forms and matters copyrightable material and information now allowed by statutory or judicial law or herein after granted, including without limitation, material generated from the software programs which are displayed on the screen such as icons, screen display looks, etc. - Page 11 Lithium Batteries Notice Switzerland requires the following notice for products equipped with lithium batteries. This notice is not applicable for all AMX equipment. Upon shipment of the products to Switzerland, the requirements of the most up-to-date Swiss Ordinance Annex 4.10 of SR 814.013 will be met by providing the necessary documents and annual reports relative to the disposal of the batteries to the Swiss Authorities.
- Page 12 Notices Precis DSP Instruction Manual...
-
Page 13: Overview & Specifications
APGraphic EQ software program (or BCS commands). Product Notes Note: Because the Precis DSP is available in two models, some of the illustrations in this manual may differ from the model you purchased. -
Page 14: Enclosure Hardware
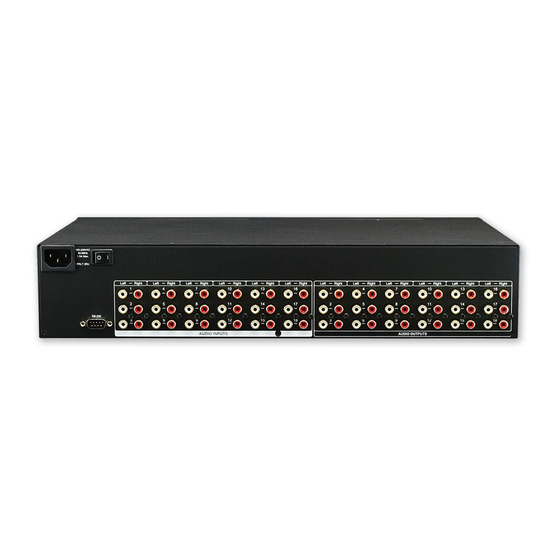
Front & rear view of model FGP37-1818-00P Enclosure Front Precis DSP models come with a blank front panel and a power indicator in the upper right corner. Enclosure Rear Descriptions follow for the hardware on the rear of a Precis DSP. -
Page 15: Precis Dsp Specifications
-12 dB to +12 dB 1 kHz, 2 kHz, 4 kHz, 8 kHz, and 16 kHz (in 0.5 dB increments) ADC/DAC 96 kHz / 24 bit AMX reserves the right to modify its products and their specifications without notice. Precis DSP Instruction Manual... -
Page 16: Configuration & Control
BCS Serial Control Protocol The Precis DSP can be controlled with an external serial controller that sends and receives ASCII characters via the CONTROL (RS-232) port. AMX AutoPatch has developed a command language, BCS (Basic Control Structure) Protocol, for programming control operations and for diagnostic purposes. -
Page 17: Installation & Setup
These recommendations address potential hazards that are common to all installations: Elevated Operating Temperature The maximum rated ambient temperature for Precis DSP enclosures is 95° F (35° C). All equipment should be installed in an environment compatible with the manufacturer’s maximum rated ambient temperature. -
Page 18: Unpacking
Caution: We recommend attaching all power cords to a surge protector and/or an AC line conditioner. Unpacking The Precis DSP is shipped with one enclosure per shipping box. The invoice is sent separately; a packing list is attached to the outside of each box. Each box contains the following items:... -
Page 19: Rack Installation
Installation Recommendations Write the system’s serial number in an easily accessible location before installing the Precis DSP in a rack. Viewed from the rear, the system’s serial number is located to the left on the end of the enclosure. Use earth-grounded power cords / system with the Precis DSP. - Page 20 To install and set up a Precis DSP in a rack: On the side of the Precis DSP, remove the bottom two screws closest to the front panel (FIG. 3). Align the holes on one of the rack ears with the empty holes on the side of the enclosure and replace the screws (three screws for the 1 RU;...
-
Page 21: Attaching Inputs & Outputs
Input and output connectors are the attachment points for source and destination devices that connect to the system. Viewed from the rear of a Precis DSP enclosure, the inputs (for sources) are on the left side of the enclosure, and the outputs (for destinations) are on the right side. -
Page 22: Applying Power
(also listed on page 9). Always use an earth-grounded power cord / system with a Precis DSP. The source electrical outlet should be installed near the Precis DSP, easily accessible, and properly grounded. Power should come from a building branch circuit. We strongly recommend using a dedicated line for the system’s power. -
Page 23: Attaching An External Controller
Installation & Setup Attaching an External Controller The Precis DSP can be controlled externally by attaching an external control device/system that uses one of the communication protocols listed below: BCS (Serial) – ASCII sent over a null modem serial cable via the CONTROL (RS-232) port XNNet –... -
Page 24: Installing Apgraphic Eq Software
Before installing, see the “PC Requirements for APGraphic EQ” on page 17. To install and open the APGraphic EQ program: Close any software on the PC that could communicate with the Precis DSP over its serial port (e.g., HyperTerminal). Insert the AutoPatch CD with APGraphic EQ into the CD drive. -
Page 25: Executing A Test Switch Using Apgraphic Eq
Click crosspoints to route test switch Click the crosspoints for Input 1 to Output 1 and Input 1 to Output 2 (inputs are on the left and outputs are across the top). The system is ready for fine-tuning; see page 21. Precis DSP Instruction Manual... -
Page 26: Technical Support
Before contacting technical support with a question, please consult this manual. If you still have questions, contact your AMX representative or technical support. Have your system’s serial number ready. Viewed from the rear, the system’s serial number is located to the left on the end of the enclosure. -
Page 27: Fine-Tuning With Apgraphic Eq
Overview APGraphic EQ software is used for system setup and adjusting audio functionality.* The software is found on the AMX AutoPatch CD that ships with the Precis DSP. For more information, see the Release Notes and the Readme file. These topics are covered in the “Installation & Setup” chapter... -
Page 28: Executing Switches
Using the CrossBar, route an input to the output needing adjustment. From the main interface, select the output from the Output Device list and adjust the Volume slider. Output Device list Volume slider Mute / Unmute button Precis DSP Instruction Manual... -
Page 29: Adjusting Digital Input Gain
10 dBr when it is combined with the gain (volume) of an output, the command will be accepted (and will be indicated in status results) but will not result in an audible difference of more than 10 dBr. Precis DSP Instruction Manual... -
Page 30: Adjusting Equalization Bands & Balance
Fine-Tuning with APGraphic EQ Adjusting Equalization Bands & Balance Precis DSP models provide a 10-band graphic equalizer to boost or cut the various frequencies (bands) for each output. Each equalization band spans one octave and is identified by its center frequency. The bands are set for a flat response (0 dB) at the factory. -
Page 31: Adjusting Tone
Tip: The Tone bands for an output can be set to 0 (flat response) by clicking the Reset button. Repeat Steps 1 through 4 for additional outputs as required. Click the EQ button to return to the main interface. Precis DSP Instruction Manual... - Page 32 Fine-Tuning with APGraphic EQ Precis DSP Instruction Manual...
-
Page 33: Controlling The System
Enter 8 or 18 (depending on the configuration) in the # Input Channels field and in the # Output Channels field (the VM Number can be left at 0; the Precis DSP switches on either VM 0 or VM 2). -
Page 34: Apweb
Note: APGraphic EQ has a drop down list with two virtual matrix choices, VM 0 (all) and VM 2 (audio); either virtual matrix can be used since the Precis DSP has a single (stereo audio) virtual matrix. Executing Switches Using the CrossBar The crosspoint images in the CrossBar field represent the intersections of the input channels (buttons on the left) and the output channels (buttons along the top). - Page 35 From the CrossBar View menu, select Window Color. Select the color. Click OK. Note: The background color of the APGraphic EQ and Input Gain views can also be changed. Check each view’s menu options for Window Color. Precis DSP Instruction Manual...
-
Page 36: Bcs Commands
To establish communication between the Precis DSP and HyperTerminal: Open HyperTerminal (or other terminal emulation software program). Select the COM port and check that the settings match those in the Precis DSP Serial Port Settings table on page 18. Click OK. - Page 37 Executing a Test Switch with BCS The following test switch routes Input 2 to Output 1 (the level does not need to be specified since the Precis DSP only switches audio). To execute a test switch using BCS commands: Enter the following BCS command line: CI2O1T When the “T”...
- Page 38 Controlling the System Precis DSP Instruction Manual...
-
Page 39: Appendix A - Programmer's Interface For System Diagnostics
The order in which the verbosity and component settings are entered is interchangeable. * AMX reserves the right to add to the contents of the splash screen at any time, without notice. ** Verbosity (i.e., wordiness) refers to the amount of information provided; the higher the verbosity setting, the more information is displayed. -
Page 40: Using Bcs To Access System Diagnostic Information
Enter the verbosity level setting v# and the component’s identity setting i#. Either may be specified first. Enter ! (to send the command). Example ~scrv3i5! or ~scri5v3! (Either displays the highest level of detail for the VM Configuration.) Precis DSP Instruction Manual... -
Page 41: Splash Screen Examples
[nvram magic] 0xdedafaba FIG. 10 Display for v3i1 (verbosity 3, component 1) ~scrv3i3! [3:Communication Interfaces] count = 1 [interface 1] detected [type] BCS mode RS232 port, 9600 (8/1/N/E/NS) FIG. 11 Display for v3i3 (verbosity 3, component 3) Precis DSP Instruction Manual... - Page 42 [5:VM Configuration] count = 2 [VM 0] ‘All’ 8x8x1 [VM 2] ‘A2’ 8x8x1 [VM 0 master] 0x0 0 0 1 (self) [VM 2 master] 0x0 0 0 1 (self) FIG. 13 Display for v3i5 (verbosity 3, component 5) Precis DSP Instruction Manual...
- Page 43 It’s Your World - Take Control™ 3000 RESEARCH DRIVE, RICHARDSON, TX 75082 USA • 800.222.0193 • 469.624.8000 • 469-624-7153 fax • 800.932.6993 technical support • www.amx.com...
Need help?
Do you have a question about the Precis DSP and is the answer not in the manual?
Questions and answers