Table of Contents
Advertisement
Quick Links
Advertisement
Table of Contents

Related Manuals for Compak PKE


Summary of Contents for Compak PKE
- Page 1 INSTRUCTIONS MANUAL COFFEE GRINDER...
- Page 2 ORIGINAL INSTRUCTIONS | Ref. quality process 002/03 | v. 12/02/2021 | K07173H01...
- Page 3 INDEX COFFEE GRINDER SAFETY MEASURES DESCRIPTION INSTRUCTIONS IDENTIFICATION TECHNICAL CHARACTERISTICS EXTERNAL COMPONENTS INSTALLATION REGULATION OPERATION CONFIGURATION CLEANING MAINTENANCE EC CONFORMITY ORIGINAL INSTRUCTIONS | Ref. quality process 002/03 | v. 12/02/2021 | K07173H01...
-
Page 4: Safety Measures
SAFETY MEASURES SAFETY MEASURES INCORPORATED INTO OUR GRINDERS: • Special screw to maintain the hopper fixed in place. • Access restrictor in the grind group. The grinder should be used Children should not play with the device. exclusively for the function for which it was designed: grinding whole bean coffee. - Page 5 SAFETY MEASURES PLEASE PAY CAREFUL ATTENTION WITH THE FOLLOWING INSTRUCTIONS In case of any damage to parts or components, we recommend contacting your local service professional to help with repair or replacement of such parts, thereby guaranteeing the maintenance of Any other use of the the security standards of the grinder.
- Page 6 DESCRIPTION Your new grinder has been For the optimum functionality of the designed using the most grinder models described in this user sophisticated technologies in manual, the maximum work cycles are existence. as follows: Working cycle Model Function Stop The result is a product of high quality 8 sec.
- Page 7 INSTRUCTIONS 3.1. This manual is designed to provide the Example: ( Hopper lid necessary information to correctly install, Icons: use and maintain the grinder, as well as to highlight precautions for users to keep in mind. Information Warning Equipotential To ensure the best operation of the coffee grinder, please follow the instructions as outlined in this manual.
- Page 8 IDENTIFICATION In the grinder information plaque is the following manufacturing/ product information. NOTE: The manufacturer reserves the right to change components/configurations of any model, according to the different geographic market demands. ORIGINAL INSTRUCTIONS | Ref. quality process 002/03 | v. 12/02/2021 | K07173H01...
-
Page 9: Technical Characteristics
TECHNICAL CHARACTERISTICS 5.1. USAGE The coffee grinders are intended for use on commercial premises and facilities where ground coffee is required, or in small stores that sell coffee. The grinder must only be used to grind coffee beans. Any use other than this will be considered improper and dangerous. -
Page 10: Technical Data
TECHNICAL CHARACTERISTICS 5.2. TECHNICAL DATA 100 V 100 V 110 V 220 V 230 V 240 V 380 V 50 Hz 60 Hz 60 Hz 60 Hz 50 Hz 50 Hz 50 Hz Electrical Power Spin 332,5 412,5 Speed Ø Production Production Dose Time... -
Page 11: External Components
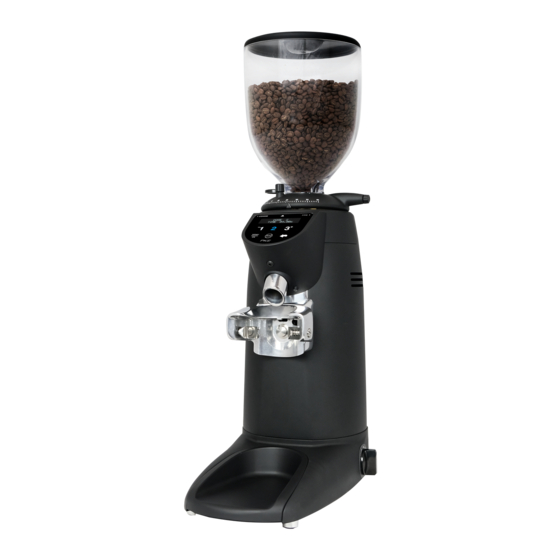
EXTERNAL COMPONENTS Hopper lid Coffee bean hopper Hand protector Break option stepped Hopper grind shutter Position indicator Setting roller hopper block LCD screen Grind regulator Refill button Upper Tamper portafilter (optional) holder Fork Exit chute adjustment screw Dose Lower button portafilter holder Refill... -
Page 12: Installation
INSTALLATION 7.1. GENERAL WARNINGS 7.2. IMPORTANT WARNINGS The person installing the grinder The operator of the grinder should should carefully read this instruction be a responsible adult, and a never a minor manual before installation. or person incapable of safely using such equipment. -
Page 13: Instalación
INSTALACIÓN 7.3. WHERE TO USE • 7.4. GRINDER INSTALLATION The grinder should be installed on a Before grinder installation, the following flat, stable surface. should be considered: The minimum dimensions of • The grinder information plaque data the work space should be as coincides with the electrical system follows: on site. - Page 14 REGULATION 8.1. GRINDER SET UP Place the hopper ( ) on the grind regulator ) and make sure the bean trap ( ) is in the closed position. Lock the hopper ( ) in place using a flat head screw driver to Embellisher gently tighten the hopper security screw making it match to the hole at the bean...
- Page 15 REGULATION Coarse Fine Fig. 2 ORIGINAL INSTRUCTIONS | Ref. quality process 002/03 | v. 12/02/2021 | K07173H01...
- Page 16 Assembly the portafilter holder will enter into the fork and will be fixed. Engraving indicating the position Serial configuration NOTA: In the case of PKE model, the fork is not adjustable. ORIGINAL INSTRUCTIONS | Ref. quality process 002/03 | v. 12/02/2021 | K07173H01...
- Page 17 REGULACIÓN Portafilter spring clamp Screw Fig. 3 ORIGINAL INSTRUCTIONS | Ref. quality process 002/03 | v. 12/02/2021 | K07173H01...
- Page 18 REGULATION 8.2.1. ADJUSTING THE LOWER PORTAFILTER SUPPORT In order to ensure the proper distribution of ground coffee in the portafilter, while supporting the portafilter in a hands-free position during dosing, it is possible to adjust the height of the lower portafilter support ( To do this adjustment operation: Loosen the screw (...
- Page 19 REGULATION 8.3. GRIND ADJUSTMENT SYSTEM Rotate the grind regulator ( ) until reaching the grind level desired. Rotating the grind regulator clockwise will result in a courser grind; turning the regulator counter clockwise will result in a finer grinder* (Fig. 5). Once you reach the desired grinding point, you can fix the grinding regulation ( )using the regulation break ( ) (Fig.
- Page 20 REGULACIÓN 8.4. PREPARATION OF THE DETECTOR HOLDER (OPTIONAL) Place the detector on the double portafilter (Fig. 1). Check that the detector ring tab is properly closed (Fig. 2). Make sure that the arrow is in the correct position on the lower side (Fig. 3). Fig.
- Page 21 OPERATION 9.1. GENERAL SWITCH The general switch ( ) has 3 positions of use: AUTOMATIC / OFF / MANUAL (Fig. 7.3.) The electronic functions of the AUTOMATIC equipment act. Equipment off. Manual mode of the equip- ment. Security system that allows to use the equipment MANUAL in case of failure of the power...
-
Page 22: Operation
OPERATION 9.3. AUTOMATIC MODE Pausing the grind cycle can be done by selecting MENU / SET UP SETTINGS / SET UP GRIND PAUSE. Dose selection via dose button ( (version 2 doses / 3 doses): Selection of doses by lower pulse button ) (2 doses / 3 doses version): ACTIVATION OF LOWER PULSE BUTTON (... -
Page 23: Instant Mode
OPERATION 9.4. PRESELECT MODE button ( ). First, set up by following these steps: MENU / SET UP SETTINGS / SET UP GRIND PAUSE. In this mode, pause grinding may also be In the PRESELECT mode, a pre- performed by pressing the active icon on programmed single, double or triple the LCD display ( ). - Page 24 OPERATION The grinding pause can be activated 9.7. DOSE BUTTON (GRIND O REFILL) or deactivated by pressing the lower coffee dose button ( ). To do this, we access MENU / CONFIGURE SETTINGS / CONFIGURE GRIND PAUSE. If you keep pressing the fill ( ) or refill ( ), button, you can manually fill the holder In this operating mode, the grinding pause...
- Page 25 OPERATION 9.8. TAMPER 9.8.1. FIXED TAMPER (OPTIONAL) Position the portafilter below the tamper ) and push up to tamp the ground coffee (Fig. 8). Fig. 8 ORIGINAL INSTRUCTIONS | Ref. quality process 002/03 | v. 12/02/2021 | K07173H01...
- Page 26 CONFIGURATION 10.1. DISPLAY ICON GUIDE Access to menu. Value or selection aproval. Return. Up shift in menu. Decrease value. Down shift in menu. Increase value. 10.2. GRIND TIME CONFIGURATIONS The grind times can be configured for the There are two ways to modify the time: Automatic, Preselect and Instant modes.
- Page 27 CONFIGURATION 10.3. CHANGING THE CONFIGURATION MENU To enter the configuration menú, press the icon. Once in the menu, use the buttons ) to toggle through the menu options, and confirm/choose the desired option with the button. Press the icon to return to the previous option. To exit the menú, press the button until the main menu screen is reached, or simply...
- Page 28 ENGLISH ENGLISH ACTIVE FRANÇAIS FRANÇAIS ACTIVE DEUTSCHE DEUTSCHE AKTIV SET UP LANGUAGE ITALIANO ITALIANO ATTIVO PORTUGUESE PORTUGUESE ATIVA ESPAÑOL ESPAÑOL ACTIVO COFFEE COUNTER ABSOLUTE NUMBER OF SINGLE SERVINGS VIEW USAGE DATA COFFEE COUNTER RELATIVE BURR WEAR DATA ALARM 00000 Kg GROUND 000000 Kg OPERATING PRESELECT OPERATING INSTANT OPERATING MODE...
- Page 29 COFFEE COUNTER DOSE 1 01/01/2015 0000000 COFFEE COUNTER DOSE 2 01/01/2015 0000000 COFFEE COUNTER DOSE 3 (*) 01/01/2015 0000000 COFFEE COUNTER DOSE 1 01/01/2015 0000000 COFFEE COUNTER DOSE 2 01/01/2015 0000000 COFFEE COUNTER DOSE 3 (*) 01/01/2015 0000000 PRESELECT MODE ON INSTANT MODE ON AUTOMATIC MODE ON DETECTION MODE ON...
-
Page 30: General Cleaning
CLEANING 11.1. GENERAL CLEANING Clean the hopper ( ) with a moist soft cloth or with a small amount of water and soap to eliminate any oily residue from the beans. Replace the bean hopper ( ) following the same steps as the removal To ensure that the grinder functions process, but in reverse. -
Page 31: Cleaning The Touch Screen
It is recommended that the grind changing burrs, or removing a blockage/ chamber be cleaned monthly with a obstruction in the grind chamber cleaner as recommended by Compak. Removal of the grind assembly should This process will eliminate smelly be performed by a qualified service residues from the coffee remains, which technician. -
Page 32: General Warning
MAINTENANCE 12.1. GENERAL WARNING 12.2. GENERAL MAINTENANCE Before performing any type of maintenance To guarantee the efficiency and correct you should: operation of the grinder, it is essential to follow manufacturer instructions and ensure that all maintenance work is carried Always turn OFF the main power •... - Page 33 MAINTENANCE 12.3. GRINDING GROUP MAINTENANCE / CHANGING BURRS To perform grind chamber maintenance Embellisher please observe the following steps: Lock Turn off the grinder by making sure the main power switch ( ) is on the OFF position. Disconnect the plug from the Unlock power source.
- Page 34 MAINTENANCE Loosen the propeller with Hexagonal key H6. Tighten the extractor stud (Fig. 11) with a flat screwdriver until the lower burr carrier is released and removed. LOWER BURR CARRIER • Unscrew the three screws with the Philips PH2 screwdriver of the lower burr carrier.
- Page 35 MAINTENANCE Clean the inside of the grinding chamber with a brush or vacuum cleaner and remove all coffee residues as well as residual lubricant from the threads of the upper burr carrier and the grind chamber. Open Close Position the extractor stud by loosening it by the lower part of the same holder and place the lower holder.
- Page 36 MAINTENANCE 12.3.1. ADJUSTING THE PARALLEL SYSTEM Loosen the screws of the grinding regulator ( ) with the help of a Torx T20 screwdriver, Punto 0 according to (Fig.10.) For grinder models with micrometric system PARALLEL, before removing the grinding regulator ), turn the regulating brake ( ) counterclockwise to free it from the PARALLEL fixing shoe.
- Page 37 MAINTENANCE 12.4. REPLACEMENT OF GRID STAINLESS Remove the coffee outlet ( ), by removing the two retaining screws using a Philips PH2. At this point, access to grid stainless is possible. The grid is replaced without removing any screws. The exit grid ensures consistency in the ENSURE PLACEMENT IN CORRECT dose.
-
Page 38: Battery Replacement
MAINTENANCE 12.5. BATTERY REPLACEMENT TAKE OUT On Demand models have a built-in battery back-up for saving operating information when the grinder is shut down. When this battery is spent, it must be replaced SET IN by another of the same characteristics CR2032 (Lithium Cell 3V). - Page 39 Molí Barri, Parcela B - Pol. Ind. Can Barri - 08415 Bigues i Riells - Barcelona - Spain Ph. 34 93 703 13 00 - Fax 34 93 703 13 23 - www.compak.es ORIGINAL INSTRUCTIONS | Ref. quality process 002/03 | v. 12/02/2021 | K07173H01...
- Page 40 NOTES ORIGINAL INSTRUCTIONS | Ref. quality process 002/03 | v. 12/02/2021 | K07173H01...
- Page 41 NOTES ORIGINAL INSTRUCTIONS | Ref. quality process 002/03 | v. 12/02/2021 | K07173H01...
- Page 42 Ref. Quality process 002/03 | v.12/02/2021 | K07173H01 CONTACTO Molí Barri, Parcela B Teléfono: +34 93 703 13 00 Website: www.compak.es Polígono Industrial Can Barri Fax: +34 93 703 13 23 08415 Bigues i Riells Barcelona - Spain E-mail: info@compak.es...
Need help?
Do you have a question about the PKE and is the answer not in the manual?
Questions and answers