Advertisement
Advertisement
Table of Contents

Related Manuals for Compak PKF


Summary of Contents for Compak PKF
- Page 1 INSTRUCTION MANUAL COFFEE GRINDER BUILT-IN SCALES...
- Page 2 ORIGINAL INSTRUCTIONS | QUALITY PROCESS REF. | V. 09|10|2020 | K07185...
-
Page 3: Table Of Contents
CONTENTS COFFEE GRINDER PKF F8 BUILT-IN SCALES SAFETY DESCRIPTION INSTRUCTIONS IDENTIFICATION TECHNICAL CHARACTERISTICS EXTERNAL COMPONENTS INSTALLATION ADJUSTMENT OPERATION SETTINGS CLEANING MAINTENANCE DECLARATION OF CONFORMITY ORIGINAL INSTRUCTIONS | QUALITY PROCESS REF. | V. 09|10|2020 | K07185... - Page 4 SAFETY ADDITIONAL SAFETY MEASURES BUILT-IN TO OUR GRINDER: • Special screw to keep the hopper fixed. • Access restriction for the grinding unit. This coffee grinder should only Cleaning and maintenance be used for the function for which of the device should not be it was designed: grinding coffee carried out by children without beans.
- Page 5 SAFETY USERS SHOULD PAY SPECIAL ATTENTION TO, AND SCRUPULOUSLY OBEY THE FOLLOWING SAFETY INSTRUCTIONS In the event of any component breaking, or for any intervention we recommend contacting a technical services centre, who will carry out Any other use will be the repair or replacement, guaranteeing considered improper that safety standards are adhered to.
-
Page 6: Pkf F8
67,8 dB 72,2 dB For the best results from the grinders described in this manual, the maximum operating/resting times are: Work cycle Model Operating Resting PKF/F8 8 sec. 20 sec. ORIGINAL INSTRUCTIONS | QUALITY PROCESS REF. | V. 09|10|2020 | K07185... -
Page 7: Instructions
INSTRUCTIONS Example: ( Hopper Lid. 3.1. This manual provides the information needed for correct assembly, handling and Icons: maintenance of the device and emphasises the precautions that must be borne in mind by the operator. information Warning Equipotential To ensure you get the best out of coffee grinders, it is essential to carefully follow the instructions given in this manual. -
Page 8: Identification
IDENTIFICATION The technical characteristics plate is indelibly marked with the following information: NOTE: The manufacturer reserves the right to change the machine components, according to the requirements of each market, and also for technological advances. ORIGINAL INSTRUCTIONS | QUALITY PROCESS REF. | V. 09|10|2020 | K07185... -
Page 9: Technical Characteristics
TECHNICAL CHARACTERISTICS 5.1. SCOPE The coffee grinders are intended for businesses and communities where ground coffee must be used, or in small shops selling coffee. This grinder should only be used to grind coffee beans. Any other use is considered improper and dangerous. - Page 10 TECHNICAL CHARACTERISTICS 5.2. TECHNICAL DATA 100 V 100 V 110 V 220 V 230 V 240 V 380 V 50 Hz 60 Hz 60 Hz 60 Hz 50 Hz 50 Hz 50 Hz Electrical Power Rotational 332,5 412,5 342,5 velocity Electrical Power Rotational...
-
Page 11: External Components
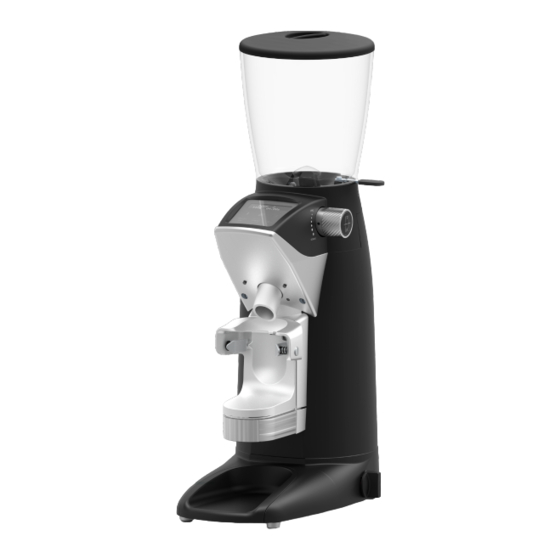
EXTERNAL COMPONENTS Hopper lid Coffee bean hopper Safety Screw Hand protector Coffee bean shutter Display Control knob Dose filling button Exit Support Chute adjustment screw Upper Portafilter holder spring clamp support Scale Filling button Coffee collection Three position tray main switch ORIGINAL INSTRUCTIONS | QUALITY PROCESS REF. -
Page 12: Installation
INSTALLATION 7.2. IMPORTANT WARNINGS 7.1. LEGAL NOTICES The operator must be a responsible The installer must read this adult. Never a child nor someone without instruction manual carefully before the ability to accept that responsibility. installing the machine. When handling the grinder, the following precautions should be obeyed: The installation of the device must be carried out by qualified... - Page 13 INSTALLATION 7.3. WHERE TO USE IT 7.4. INSTALLING THE COFFEE GRINDER Before connecting the coffee grinder, check the following: The appliance must be installed on a solid. flat surface. • The characteristics on the data plate must match those of the electrical The minimum size for the mains network.
-
Page 14: Adjustment
INSTALLATION ADJUSTMENT 8.1. PREPARING THE COFFEE 7.5. TRANSPORT PROTECTION GRINDER Before mounting the coffee hopper, loosen The installer must remove the the hopper safety screw ( ). Slide the transport protection before installing the hopper ( ) into the upper part of the machine. - Page 15 ADJUSTMENT Safety screw Coarse Fine Fig. 1 ORIGINAL INSTRUCTIONS | QUALITY PROCESS REF. | V. 09|10|2020 | K07185...
- Page 16 ADJUSTMENT 8.2. PK MODEL SUPPORT ADJUSTMENT The standard configuration is useful for For portafilters with diagonal wings, the most portafilters on the market. However, standard runners must be replaced by the depending on the geometry of each ones supplied separately. portafilter, it can be adjusted as follows for a good fit: Release the runners, for this, release...
- Page 17 ADJUSTMENT Screw Portafilter spring clamp Fig. 3 ORIGINAL INSTRUCTIONS | QUALITY PROCESS REF. | V. 09|10|2020 | K07185...
- Page 18 ADJUSTMENT 8.2.1. SCALE CALIBRATION zeroing at the beginning of the process, due to the deformation properties of the load cell materials. Once the grinder has been installed in its normal position, calibrate the scale using the standard 200 g weight. Supplied with the machine.
- Page 19 ADJUSTMENT 8.3. SETTING THE GRINDING FINENESS Place the portafilter in the upper coffee holder( ) and press the dose fill button ) causing ground coffee to come out Control through the exit chute ( knob To change the grinding fineness, turn the grinding control knob ( ).
-
Page 20: Operation
OPERATION 9.1. MAIN SWITCH The main switch ( ) has the following positions: AUTOMATIC / OFF / MANUAL The equipment's electronic AUTOMATIC functions are activated Equipment off Equipment in manual mode. Backup system that allows the equipment to be used in the event of a fault in the power MANUAL board or keypad. - Page 21 OPERATION 9.2. 9.3. AUTOMATIC MODE Operating considerations. This allows 10 distinct portaportafilters or dispensing cups of different weights to Taring the Portafilter: be stored by assigning a distinct weight The grinder will respond to a minimum to each of them (improves workflow and weight by going into the tare state.
- Page 22 OPERATION 9.6. INSTANT MODE 9.4. MANUAL GRIND MODE This operating mode allows you to use the In this operating mode, you can select weighing system manually. 1, 2 or 3 coffee doses by pressing the corresponding number icon on the LCD To do this, insert the portafilter or dosing screen once ( ).
-
Page 23: Settings
SETTINGS The grinder settings descriptions are split If you want to delete any of the previously into two sections: saved portafilters: • Setting the grinding times for one, SETTINGS / PORTAFILTER SETTINGS / two and three doses. DELETE Portafilter / PASSWORD: 0000 / DELETE HOLDER MEMORIES •... - Page 24 SETTINGS 10.2. THE GRINDER SETTINGS MENU To access the settings menu, press the icon . From the menu, you can use the ( and ) buttons and confirm an option using the . Press to go back one menu level. To exit the menu, press the button as many times as necessary to get to the...
- Page 25 SETTINGS 10.3. ERROR MESSAGES AND stop. The display shows the message SOLUTIONS “GRINDING TIME EXCEEDED. REMOVE Portafilter”. Extra weight detected during grinder start-up: During the grinder’s start-up time, there must be no weight on the support, Portafilter not saved: in automatic mode, if it is turned on with the portafilter or the portafilter is not in the memory.
- Page 26 ENGLISH ENGLISH ACTIVE FRANÇAIS FRANÇAIS ACTIVE DEUTSCHE DEUTSCHE AKTIV SET LANGUAGE ITALIANO ITALIANO ATTIVO PORTUGUESE PORTUGUESE ATIVA ESPAÑOL ESPAÑOL ACTIVO NUMBER OF DOSE 1 COFFEES TOTAL NUMBER OF COFFEES NUMBER OF DOSE 2 COFFEES NUMBER OF DOSE 3 (*) COFFEES NUMBER OF COFFEES VIEW NUMBER OF DOSE 1 COFFEES...
- Page 27 01/01/2015 0000000 01/01/2015 0000000 01/01/2015 0000000 01/01/2015 0000000 01/01/2015 0000000 01/01/2015 0000000 NEW PASSWORD 0000 PASSWORD CHANGED TIME CHANGED DATE FORMAT CHANGED DATE FORMAT CHANGED DATE CHANGED kg. CHANGE BURRS 00500 kg ALARM CHANGED TARING PROGR. X WEIGHT ._g PROG. X SAVED REMOVE FILTER DELETE HOLDER MEMORIES 1, 2, 3 CALIBRATING...
-
Page 28: Cleaning
CLEANING 11.1. GENERAL CLEANING the hopper safety screw ( ) and remove the grinder’s hopper by turning it a quarter turn anti-clockwise and pulling it upwards. The hopper ( ) can be cleaned with a To guarantee proper operation of the damp cloth or with soap and water to grinder, as well as good quality ground remove the oily residues produced by the... - Page 29 ( moistened with saline, distilled water or any product meant for touch screens. • Grind up all the Compak cleaning product to a medium fineness so it works properly. Turn off the machine and then wipe it •...
-
Page 30: Maintenance
MAINTENANCE 12.1. GENERAL NOTICE 12.2. GENERAL MAINTENANCE Before performing any type of maintenance As well as the cleaning operations operation: described in the previous section, to ensure the grinder operates properly and to ensure the best quality of ground coffee, periodic •... - Page 31 MAINTENANCE 12.3. MAINTENANCE OF THE GRINDING UNIT / CHANGING THE BURRS NOTE: These operations must be carried out by a qualified technical service. To carry out the maintenance of the grinding unit, the following instructions must be followed: Always switch off the grinder at the main switch ( ) putting it into the OFF position.
- Page 32 MAINTENANCE Turn the grinding control knob clockwise until it comes out of its housing. Loosen the screw with an H6 Allen key. Tighten the extraction worm screw with a flat head screwdriver until the lower burr holder pops out and remove it. LOWER BURR HOLDER •...
- Page 33 MAINTENANCE Clean the inside of the grinding cavity with a brush or vacuum cleaner and remove all Open Close coffee residue as well as the lubricant from the threads of the upper burr holder and the grinding cavity. Position the extraction worm screw by loosening it through the upper part of the lower holder and fit the burr holder.
- Page 34 MAINTENANCE 12.4. REPLACING THE STAINLESS Loosen the mouth of coffee outlet STEEL GRILLE ) without removing it out with a Philips PH2 screwdriver. Remove the four fixing screws of the cover, using a PH2 Philips screwdriver. Remove the mouth of the coffee The grinder’s grille ensures uniformity outlet ( ), after loosening the two...
- Page 35 MAINTENANCE 12.5. REPLACING THE BATTERY The On-Demand models have a built-in battery so that the operating statistics are not lost when the grinder is turned off. When this battery is flat, it must be replaced by another one of the same CR2032 (Lithium Cell 3V) type.
-
Page 36: Declaration Of Conformity
Molí Barri, Parcela B - Pol. Ind. Can Barri - 08415 Bigues i Riells - Barcelona - Spain Ph. 34 93 703 13 00 - Fax 34 93 703 13 23 - www.compak.es ORIGINAL INSTRUCTIONS | QUALITY PROCESS REF. | V. 09|10|2020 | K07185... - Page 37 NOTES ORIGINAL INSTRUCTIONS | QUALITY PROCESS REF. | V. 09|10|2020 | K07185...
- Page 38 NOTES ORIGINAL INSTRUCTIONS | QUALITY PROCESS REF. | V. 09|10|2020 | K07185...
- Page 39 NOTES ORIGINAL INSTRUCTIONS | QUALITY PROCESS REF. | V. 09|10|2020 | K07185...
- Page 40 Quality process Ref. 002/03 | v. 09-10-2020 | K07185 CONTACT Molí Barri, Parcela B Phone: +34 93 703 13 00 Website: www.compak.es Polígono Industrial Can Barri Fax: +34 93 703 13 23 08415 Bigues i Riells Barcelona - Spain E-mail: info@compak.es...
Need help?
Do you have a question about the PKF and is the answer not in the manual?
Questions and answers