Table of Contents
Advertisement
Advertisement
Table of Contents

Related Manuals for Compak RETAIL R140


Summary of Contents for Compak RETAIL R140
- Page 1 RETAIL R140 R120 R100...
- Page 2 Congratulations on your new Compak grinder! Compak Coffee Grinders is the result of a tireless dedication in the pursuit of perfection from more than 4 decades operating in the world of coffee. We have made this possible through a combination of experience, a passion for innovation, and the goal of excellence, in attaining the satisfaction of our valued customers.
- Page 3 index 1. Safety meaSureS 2. deScription 3. inStructionS 4. identification 5. tecHnicaL caracteriSticS 6. inStaLLation 7. reguLation 8. operation 9. configuration 10. cLeaning 11. maintenance 12. ec conformity...
- Page 4 1. Security NOTE: The manufacturer will not be held responsible for any damages resulting from improper use of the equipment, or for not following the safety measures as outlined below. Safety measures incorporated into our grinders: • Special screw to maintain the hopper fixed in place. • Access restrictor in the grind group. Owners: Please pay careful attention with the following instructions: • The grinder should be used exclusively for the function for which it was designed: grinding whole bean coffee.
- Page 5 Working cycle Model R8, R80, R100 1 minute 2 minutes R120, R140 2 minutes 1 minute R120 ψ , R140 ψ continuous continuous K04673 | v. 30/04/2014 | Ref. quality process 002/03 | ORIGINAL INSTRUCTIONS...
- Page 6 3. inStructionS 3.1. This manual is designed to provide the necessary information to correctly install, use and maintain the grinder, as well as to highlight precautions for users to keep in mind. To ensure the best operation of the coffee grinder, please follow the instructions as outlined in this manual.
-
Page 7: Technical Data
1.050 1.000 1.700 1.000 1.000 power R120 Spin 1.130 1.400 1.150 1.400 1.400 1.650 speed Electric 1.500 1.700 1.600 1.600 power R140 Spin 1.400 1.400 1.400 1.620 speed K04673 | v. 30/04/2014 | Ref. quality process 002/03 | ORIGINAL INSTRUCTIONS... - Page 8 Model R100 R120 R140 3.26 3.14 3.93 Ø burrs 3.30 lb/min Production* 50Hz Kg/min 1.17 1.17 2.64 lb/min Production* 60Hz Kg/min 0,53 0,53 1,85 2,95 4.85 4.85 Hopper capacity 46.2 48.57 55.19 81.57 80.08 Net weight 21,1 22,08 22,09 37,08 36,4 23.20...
-
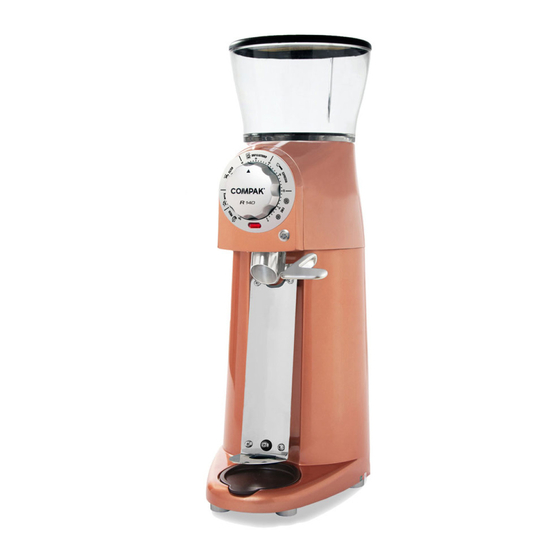
Page 9: External Components
6. eXternaL componentS K04673 | v. 30/04/2014 | Ref. quality process 002/03 | ORIGINAL INSTRUCTIONS... -
Page 10: Installation
7. inStaLLation 7.1. General warnings The person installing the grinder should carefully read this instruction manual before installation. The installation of this machine should be completed by qualified and authorized personnel, and all norms of safety and sanitation should be followed. 7.2. Important warnings The operator of the grinder should be a responsible adult, and a never a minor or person incapable of safely using such equipment. -
Page 11: Where To Use
7.3. Where to use The grinder should be installed on a flat, stable surface. The minimum dimensions of the work space should be as follows: Model R8, R80, R100 R120, R140 28.35 35.43 Height 9.45 10.43 Width 13.78 16.34 Depth 7.4. Grinder installation Before grinder installation, the following should be considered: • The grinder information plaque data coincides with the electrical system on... -
Page 12: Operation
Please, check that the three-phase factory installation is correct. Make sure our socket is EN 60529 and has 3F+N+T and the distribution of the connection should be as in Figure 2. Obtain 380V 50Hz or 220V 60 Hz between phases (F) and 230V 50Hz or 110V 60Hz between Phase and Neutral (F-N). In order for a correct grind, the burrs have to turn in a counter-clockwise direction. When plugging in a three-phase grinder for the first time, check that the burrs turn in the right direction by opening the cover and looking into the hopper. - Page 13 8.2. Hopper placement Remove the upper body ( ) by unscrewing the two screws on the backside of the grinder. Place the hopper ( ) on the upper body and make sure that the hinge of the hopper lid ( ) lines up with the backside of the grinder. Push down and turn clockwise until the hopper clicks into place on the upper body ( ) (Fig.
- Page 14 Push the handle two or three more times against the outlet to remove so that any remaining traces of coffee which may have stuck to the discharge tube ( NOTE: The amount of coffee ground will depend on the chosen grinding point. 1 coffee bean 100 - 300 particles French Press...
- Page 15 The grinder comes with an extension to distance the bag shaker from the machine, allowing the possibility to use bigger bags (>0.55 lb for R80 & R100 and >1.1 lb for R120 & R140) and therefore grinder larger amounts coffee. To put the extension in place, remove the screw ( ) on the lower part of the bag shaker as indicated in Fig.
- Page 16 10.2. bean hopper cleaning It is recommended that the grind chamber be cleaned monthly with a cleaner as recommended by Compak. This process will eliminate smelly residues from the coffee remains, which can negatively affect the quality of the brewed coffee. The steps to follow are: • Grind out the remaining coffee in the grind chamber.
- Page 17 10.3. Cleaning the coffee discharge tube To clean the tube ( ) use the brush that comes with the grinder and insert it several times to remove any coffee remains. ALERT: It is recommended to follow the cleaning instruction described in this point at least once a month. 10.4. Cleaning the outside of the grinder To clean the outside, use a dry brush and then a cloth that has been slightly dampened in soapy water.
-
Page 18: Maintenance
5.000 Kg / 11.020 lb 8.000 Kg / 17.250 lb R100 10.500 Kg / 23.000 lb R120 13.000 Kg / 28.750 lb R140 18.000 Kg / 40.250 lb ORIGINAL INSTRUCTIONS | Ref. quality process 002/03 | v. 30/04/2014 | K04673... - Page 19 11.3. Grinding group maintenance Not following the recommended burr life guidelines can compromise the safety of the grinder. These operations should be done by a qualified service tecnician. • To effect grinding group maintenance work, the following instructions should be followed: • Turn the front setting dial ( ) all the way to the left. • Turn the machine off, using the ON-OFF switch ( • Disconnect the cable from the power supply.
- Page 20 11.4. Reset the burrs to the 0 / Calibration Position 0 is the point in which the burrs no longer touch. Following these instructions allows the user to make small adjustments to adapt the desired particle size for each of the types of coffee referenced on the front control knob ( • Turn the front dial ( ) clockwise until the burrs are as close as possible without touching. • Loosen, with the help of the key wrench that comes with the grinder, the screw (b), until the chain is released. • Turn the front dial ( ) clockwise as far as possible.
- Page 21 By doing this, you will help to preserve the environment. The Legal Representative Jesús Ascaso Compak Coffee Grinders, s.a. molí Barri, parcela B - pol. ind. can Barri - 08415 Bigues i riells - Barcelona - Spain ph. 34 93 703 13 00 - fax 34 93 703 13 23 - www.compak.es...
Need help?
Do you have a question about the RETAIL R140 and is the answer not in the manual?
Questions and answers