Advertisement
Quick Links
Advertisement

Subscribe to Our Youtube Channel
Related Manuals for Javad TRIUMPH-3


Summary of Contents for Javad TRIUMPH-3
- Page 1 Last revised - May 20, 2020 TRIUMPH-3 Start Guide...
- Page 2 The USB port is used for high-speed data transfer and com- munication between the receiver and an external device. The Ethernet port allows connect- ing a local network. The bottom 3/8-16 thread connector allows mounting TRIUMPH-3 on the monopode. Ethernet port USB port USB port...
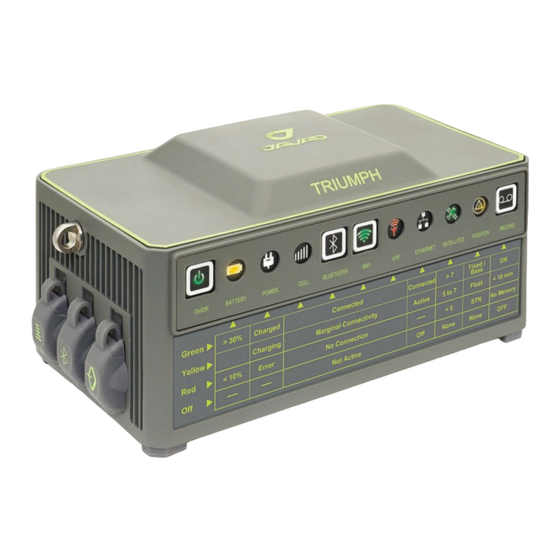
- Page 3 TRIUMPH-3 START GUIDE 1. On/Off button 5.Bluetooth status 9. Satellites status 2. Battery status 6. WiFi status 10. Position 3. Power status 7. UHF status 11. Recording status 4. GSM status 8. Ethernet status 12. Bluetooth antenna connector 95.2* 91.2* 181.8*...
- Page 4 TRIUMPH-3 START GUIDE OPTION AUTHORIZATION FILE (OAF) JAVAD GNSS issues an Option Authorization File (OAF) to enable the specific options that cus- tomers purchase. An Option Authorization File allows customers to customize and configure the receiver according to particular needs, thus only purchasing those options needed.
-
Page 5: Bluetooth Connection
1. Start the NetView&Modem on your PC, connect to the TRIUMPH-3 receiver using USB or Bluetooth, then click Network- ing-Server. Note: To connect your TRIUMPH-3 to PC, use the USB cable. Figure 1. Server tab parameters 2. Save the password to have it near at hand during the first connection. - Page 6 Tap on it, and confirm to start the pairing. 5. Confirm the pairing request (Figure 3). 6. Tap the JAVAD label on the top of the screen to return to JMT. Figure 2. Connection parameters Figure 3.
- Page 7 View&Modem software on your PC. Per- form the following steps: 1. Open the Server tab (Figure 5) and con- figure the access to the TRIUMPH-3: enter TCP Port (e.g. 8002) and your own TCP/FTP Passwordd. Click “Apply”. 2. Open Network | WLAN Parameters.
- Page 8 TRIUMPH-3 in NetView&Modem. If all settings are right, the WiFi connection should be established. Now your TRIUMPH-3 is ready to be managed using your iPhone. Tap JAVAD on the top of the screen return Javad Mobile Tools.
- Page 9 TRIUMPH-3 START GUIDE surveying but unnecessary for OPUS pro- cessing. To start the Static site surveying or Kinematic Trajectory surveying, tap the appropriate button. The Surveying page will appear, and you will be able to mon- itor your surveying progress (Figure 9).
- Page 10 TRIUMPH-3 START GUIDE Receiver files downloading After the survey is complete, switch to the Files tab. There is the list of receiver’s raw files in this tab. The raw file name and the file size with creation date are shown. Se- lect the file by tapping.
-
Page 11: Data Exchange
TRIUMPH-3 START GUIDE Data exchange There are two abilities to get the data from the application: you can export loaded files to a cloud server like DropBox, One- Drive etc., or to activate the FTP server and connect to the device from PC. - Page 12 Select the WiFi (with MobileAP) ra- dio button on the Connection page to try to find TRIUMPH-3 connected via WiFi. Af- ter that you can connect to TRIUMPH-3 by selecting it from the green list. Login and password to access TRIUMPH-3 will be re- quired.
- Page 13 TRIUMPH-3 START GUIDE You can save all settings to the profile. Next time you need to select the profile from the list of profiles. Note: Each connection will be stored as a connection profile. List of the connection profiles are on the top of the connection screen.
- Page 14 TRIUMPH-3 START GUIDE Downloading raw data from TRIUMPH-3 The raw data can be downloaded from TRIUMPH-3 with File Manager. There are two buttons: Delete and Download. Check the needed file(s) and tap Download, to download it from receiver to your Android device, or tap Delete to delete the file(s).
- Page 15 TRIUMPH-3 START GUIDE...
- Page 16 900 Rock Avenue, San Jose, CA 95131, USA Phone: +1(408)770-1770 Fax : +1(408)770-1799 www.javad.com All rights reserved © JAVAD GNSS, Inc., 2020...
Need help?
Do you have a question about the TRIUMPH-3 and is the answer not in the manual?
Questions and answers