
Related Manuals for progeo DUKE


Summary of Contents for progeo DUKE
- Page 1 S E R V I C E M A N U A L D U K E SERVICE MANUAL Rev. 0 - 06/05/2020 ENGLISH Service Manual DUKE 1 REHATEAM s.r.l.—vicolo Negrelli 5—31040 Castagnole di Paese TV - www.rehateamprogeo.com...
- Page 2 RehaTEAM® disclaims any responsibility for damage to the product or the peo- ple due to any modification that is not properly performed or that, in any case, does not guarantee safety to the user. Service Manual DUKE 2 REHATEAM s.r.l.—vicolo Negrelli 5—31040 Castagnole di Paese TV - www.rehateamprogeo.com...
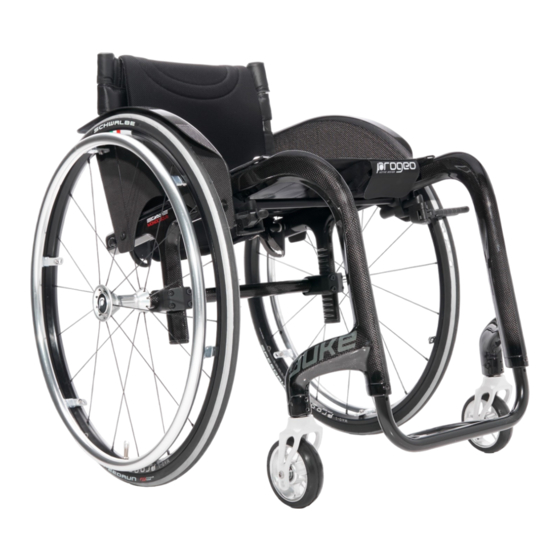
- Page 3 “U” TUBE ALUMINIUM FOOTPLATE BACKREST HEIGHT Aluminium or titanium backrest BACKREST HEIGHT Carbon fibre backrest BACKREST ANGLE BACKREST POSITIONING SEAT WIDTH ENLARGEMENT QUICK RELEASE AXLE (rear wheel) Service Manual DUKE 3 REHATEAM s.r.l.—vicolo Negrelli 5—31040 Castagnole di Paese TV - www.rehateamprogeo.com...
- Page 4 Pay attention to the spacers between caster and fork. It is advisable to spread a drop of mild lock thread glue on the bolts V. Service Manual DUKE 4 REHATEAM s.r.l.—vicolo Negrelli 5—31040 Castagnole di Paese TV - www.rehateamprogeo.com...
- Page 5 Check the perpendicularity again and, if necessary, correct it. It is advisable to pread a drop of mild lock thread glue on all grab screws G. Service Manual DUKE 5 REHATEAM s.r.l.—vicolo Negrelli 5—31040 Castagnole di Paese TV - www.rehateamprogeo.com...
- Page 6 If the wheelchair TURN LEFTT, the cause is one or more of the following: The LEFT fork is tilted inwardly and/or backward Follows next page The RIGHT fork is tilted outwardly and/or frontward Service Manual DUKE 6 REHATEAM s.r.l.—vicolo Negrelli 5—31040 Castagnole di Paese TV - www.rehateamprogeo.com...
- Page 7 Until 2019 the axles had no inserts C0 or C1. There were 0°, 1°rh and 1°lh axles. To adjust the directionality, it is necessary to change the axle. SIDE VIEW Service Manual DUKE 7 REHATEAM s.r.l.—vicolo Negrelli 5—31040 Castagnole di Paese TV - www.rehateamprogeo.com...
- Page 8 Adapt the mudguard, see adjustment sheet “side guard”. It is advisable to spread a drop of mild lock thread glue on the on the bolts A and B. Service Manual DUKE 8 REHATEAM s.r.l.—vicolo Negrelli 5—31040 Castagnole di Paese TV - www.rehateamprogeo.com...
- Page 9 SETTING (point of balance) SERVICE MANUAL The model DUKE has three different settings (prudential, stand- ard, active). There are three lengths of rear wheel plate, each of which gives a different setting. Thus, you can adjust the setting by changing the rear wheel plate.
- Page 10 If the two measures are equal or the front one is slightly narrower (max. 5 mm), you have a good convergence as drawing 2 or 3. If different, you have to adjust the convergence. Se differente, è necessario regolare la campanatura. Follows next page Service Manual DUKE 10 REHATEAM s.r.l.—vicolo Negrelli 5—31040 Castagnole di Paese TV - www.rehateamprogeo.com...
- Page 11 A. To remove it, unscrew (no need to remove it) the two grab screws C, screw off the bolt D and slide the support off. Service Manual DUKE 11 REHATEAM s.r.l.—vicolo Negrelli 5—31040 Castagnole di Paese TV - www.rehateamprogeo.com...
- Page 12 The adjustment for the sport brake is the same except for the distance D, in fact, the brake, in its resting position is far away from the tyre. Just make a few tries. Service Manual DUKE 12 REHATEAM s.r.l.—vicolo Negrelli 5—31040 Castagnole di Paese TV - www.rehateamprogeo.com...
- Page 13 Start screwing the two bolts B all the way down and then the two nuts G. Should the brake movement be hard, slightly loosen the bolts B. Service Manual DUKE 13 REHATEAM s.r.l.—vicolo Negrelli 5—31040 Castagnole di Paese TV - www.rehateamprogeo.com...
-
Page 14: Side Guard
Note: with the carbon fibre rigid seat, the axle is not present and the bolt is fixed with a nut. Note: in these pictures, the wheelchair is a Joker R2. for the model Duke, the assembly is the same, just the section of the frame and, thus, of the clamps changes. - Page 15 DO NOT tighten the bolt/nut too much; you may damage the carbon fibre tube. When you feel the nut starts to tighten, the torque is enough to make the side guard rigid. Follows next page Service Manual DUKE 15 REHATEAM s.r.l.—vicolo Negrelli 5—31040 Castagnole di Paese TV - www.rehateamprogeo.com...
- Page 16 According to the adjustment, you may need to cut off a a little part of the rear side of the side guard to prevent interference with the nut B. Follows next page Service Manual DUKE 16 REHATEAM s.r.l.—vicolo Negrelli 5—31040 Castagnole di Paese TV - www.rehateamprogeo.com...
- Page 17 Between the new hole and the edge of the sideguard there must be at least 3 mm. Adjust the brakes and the fork angle. When changing both the setting and the rear height, proceed combining the two instructions. min. 3 mm Service Manual DUKE 17 REHATEAM s.r.l.—vicolo Negrelli 5—31040 Castagnole di Paese TV - www.rehateamprogeo.com...
- Page 18 Then, use and let a M5 tap through the threaded hole of the blade and out of the side guard. At each adjustment, spread some mild lock thread glue on the bolts C and H. Follows next page Service Manual DUKE 18 REHATEAM s.r.l.—vicolo Negrelli 5—31040 Castagnole di Paese TV - www.rehateamprogeo.com...
- Page 19 When you change both the rear height and the setting, you have to move the side guard up or down and forward or backward. Continue with instruction and, if necessary, instruction B, too At each adjustment, spread some mild lock thread glue on the bolts C and H. Service Manual DUKE 19 REHATEAM s.r.l.—vicolo Negrelli 5—31040 Castagnole di Paese TV - www.rehateamprogeo.com...
- Page 20 After adjustment, check that between the lower side of the footplate and the ground there is at least 2 cm and that there is no interference between footplate and casters. FRONT REAR Service Manual DUKE 20 REHATEAM s.r.l.—vicolo Negrelli 5—31040 Castagnole di Paese TV - www.rehateamprogeo.com...
- Page 21 2 positions: internal; external. To change position, remove bolts that fix the footplate tubes to the frame (see “footplate distance”); remove the footplate and mount it reversed. 8 cm Service Manual DUKE 21 REHATEAM s.r.l.—vicolo Negrelli 5—31040 Castagnole di Paese TV - www.rehateamprogeo.com...
-
Page 22: Position Adjustment
To make inserting the tubes easier, if possible, remove the rubber adaptor from the frame and slide it along the footplate tube; that will cre- ate more room for the passage of footplate tubes. It will be necessary to adjust the inclination. 7 cm INTERNA 2/3 INTERNA 2/3 ESTERNA ESTERNA Service Manual DUKE 22 REHATEAM s.r.l.—vicolo Negrelli 5—31040 Castagnole di Paese TV - www.rehateamprogeo.com... - Page 23 If you tighten the two bolts hard, the plate will results nearly fixed. At each adjustment, spread some mild lock thread glue on the bolts B. Service Manual DUKE 23 REHATEAM s.r.l.—vicolo Negrelli 5—31040 Castagnole di Paese TV - www.rehateamprogeo.com...
- Page 24 (see “footplate distance”) and remove the footplate. Reverse the assembly, fix the tube at the necessary height and adjust the angle as above mentioned. 11 cm INTERNAL EXTERNAL Pedana esterna Service Manual DUKE 24 REHATEAM s.r.l.—vicolo Negrelli 5—31040 Castagnole di Paese TV - www.rehateamprogeo.com...
-
Page 25: Angle Adjustment
Service Manual DUKE 25 REHATEAM s.r.l.—vicolo Negrelli 5—31040 Castagnole di Paese TV - www.rehateamprogeo.com... -
Page 26: Backrest Height
Note: if the backrest tube is in carbon fibre, follow the instructions of the adjustment sheet “backrest height—carbon fibre backrest”. The titanium backrest structure includes a plastic adaptor, just follow the same instructions above. Plastic adaptor Service Manual DUKE 26 REHATEAM s.r.l.—vicolo Negrelli 5—31040 Castagnole di Paese TV - www.rehateamprogeo.com... - Page 27 The carbon fibre backrest tube is not suitable to fixing any clamps, such as those used for a postural system hardware. Note: if the backrest tube is assembled on a aluminium or titanium backrest structure, follows these same instructions. Service Manual DUKE 27 REHATEAM s.r.l.—vicolo Negrelli 5—31040 Castagnole di Paese TV - www.rehateamprogeo.com...
-
Page 28: Backrest Angle
Remember that the backrest angle can affect the point of balance of the wheelchair. In fact, with tilted backward backrest (open angle), the wheelchair becomes less stable. Service Manual DUKE 28 REHATEAM s.r.l.—vicolo Negrelli 5—31040 Castagnole di Paese TV - www.rehateamprogeo.com... - Page 29 Drill an 8 mm hole on the side guard. If you want to remove the side guard to drill it, it is Point where to necessary to free it from the from fixing point – see adjustment sheet “side guard”. drill a new hole Follows next page Service Manual DUKE 29 REHATEAM s.r.l.—vicolo Negrelli 5—31040 Castagnole di Paese TV - www.rehateamprogeo.com...
- Page 30 Carry out the same operation on the other side. Finally, adjust the backrest inclination – see adjustment sheet “backrest angle”. At each adjustment, spread some mild lock thread glue on the bolts C. Service Manual DUKE 30 REHATEAM s.r.l.—vicolo Negrelli 5—31040 Castagnole di Paese TV - www.rehateamprogeo.com...
- Page 31 To assemble the side guard, follow the instructions of the adjust- ment sheet “side guard”. At each adjustment, it is advisable to spread a drop of mild lock thread glue on the bolts V2. Service Manual DUKE 31 REHATEAM s.r.l.—vicolo Negrelli 5—31040 Castagnole di Paese TV - www.rehateamprogeo.com...
-
Page 32: Quick Release Axle
Check and if necessary do the same with another half turn. Do not unscrew the button too much: the pin will come off and, consequently, the balls will fall to the ground. Service Manual DUKE 32 REHATEAM s.r.l.—vicolo Negrelli 5—31040 Castagnole di Paese TV - www.rehateamprogeo.com...
Need help?
Do you have a question about the DUKE and is the answer not in the manual?
Questions and answers