Table of Contents
Advertisement
Quick Links
Advertisement
Table of Contents

Related Manuals for progeo Basic Light


Summary of Contents for progeo Basic Light
- Page 1 BASIC LIGHT User’s manual ENGLISH - rev. 10 - 20/06/2019...
- Page 2 Basic Light...
- Page 3 CE marking Crash Tested MAXIMUM LOAD (kg) Check the warranty certificate is fully filled up by the dealer Non subject to and keep it with care. Read the user’s Crash Test manual before using Basic Light the wheelchair.
-
Page 4: Table Of Contents
Quick release rear wheels Inspection of components Folding/unfolding the wheelchair Storage Footplate Disposal/recycling of materials Front frame with removable footplate Trouble shooting guide Calf strap TECHNICAL DATA Adjustable backrest upholstery EC CERTIFICATE Armrests WARRANTY 2.10 Fasteners 2.11 Wheelchair lifetime Basic Light... -
Page 5: Intended Use And Condition Of Use
It is important that a general check of all the functional parts of the wheelchair IS CARRIED OUT BY QUALIFIED AND AUTHORISED PERSONNEL ONLY, both to The wheelchair BASIC LIGHT is self-propelled which means that it can be moved manually by assess its suitability and to provide the user and his/her possible attendant with using the hand rims on the rear wheels. -
Page 6: Tyre Pressure
However, during normal use, they are less fluent than traditional tyres. the way while the user is moving from or to the wheelchair, it is possible to fold the lever. In order to do so, pull the lever up first and then fold it forward. Basic Light... -
Page 7: Quick Release Rear Wheels
Should the wheel come off, it is necessary to adjust the quick release axle. Only qualified and authorized personnel can perform the adjustment. Basic Light... -
Page 8: Folding/Unfolding The Wheelchair
To do so, take hold on the backrest and slightly lift the wheelchair. The model BASIC LIGHT has a crossbar system foldable seat. Now, with your free hand on the seat tube, position A or B, push the seat tube down on the supports S. -
Page 9: Footplate
Before setting the lock unit C free by releasing the lock lever P, always take hold of the footplate’s frame on its lower side, otherwise it will drop all of a sudden arising a potential risk to the user. Basic Light... -
Page 10: Front Frame With Removable Footplate
Rotation, removal and insertion of the elevating footplate is the same. positioning. Front frame with removable footplate One of the characteristics of the model BASIC LIGHT consists of a particular footplate front frame that you can swing away or completely remove. These functions have the purpose of reducing the encumbrance and the weight of the wheelchair as well as helping the user to get closer to objects such as a bed or a table. -
Page 11: Calf Strap
To carry out the adjustment, lift or remove the upholstery, tighten or slacken the Velcro straps as calf strap. The calf strap has to be adjusted in such a way that the user’s feet never touch the required and place the upholstery back. casters. You can easily adjust the calf strap via Velcro straps. Basic Light... -
Page 12: Armrests
If correctly locked, the armrest does not turn but it will allow just a little play. The model BASIC LIGHT can be equipped with Tubular, Desk or Flip-up armrests. The Flip-up armrests are included in the standard configuration of this model, whereas, the Desk and Tubular armrests considered as an accessory and they have to be ordered separately. - Page 13 To lock the armrest in its using position, first, make sure the lever L is lowered. SA L Then, turn the armrest until inserting it into the support SA. Finally, raise the lever L. Check the armrest is securely locked as above- mentioned. Basic Light...
- Page 14 To lock the armrest in its using position, first, make sure the lever A is lowered. Then, insert the tube T into the support S. Finally, raise the lever A. Check the armrest is securely locked as above-mentioned. Basic Light...
-
Page 15: Fasteners
However, the daily use of the wheelchair may cause bolts and nuts to loosen. Under normal daily use the PROGEO® wheelchair has a lifetime of 5 years provided that it receives careful maintenance at the correct intervals. -
Page 16: Safety
While getting into or out of the wheelchair do not place your feet on the footplate. The Progeo® wheelchair is a medical device and therefore it MUST NOT BE This could result in the wheelchair tipping up, possibly causing harm both to the LENT NOR GIVEN TO OTHER USERS even for short period. -
Page 17: Starting To Drive Your Wheelchair
Tip the wheelchair forward until the front wheels are on top of the obstacle. Lean forward in the chair so that the rear of the chair is lighter. Hold the hand rims tightly and move the rear wheels forwards bringing them over the top of the obstacle. Basic Light... -
Page 18: Dealing With Slopes Or Inclines
Hold on to the hand rims on the rear wheels and allow them to slide slowly through your hands. The occupant should be able to stop the wheelchair at any time simply by blocking the motion of the hand rims. Basic Light... -
Page 19: Ensuring Stability
Ensure that the front wheels of the chair are pointing forwards. In order to do this, move the wheelchair forwards and then backwards. Do not engage the brakes. Lean backwards without changing your sitting position. Do not lean too far back over the backrest, wheelchair could overbalance. Basic Light... -
Page 20: Trasport Of The Wheelchair
Finally load the rear wheels. Basic Light... -
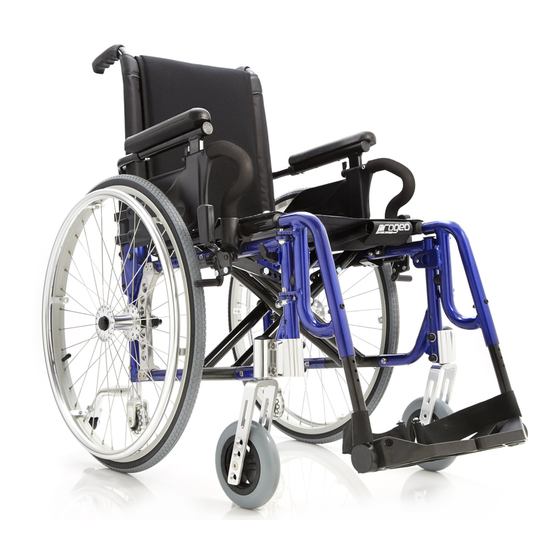
Page 21: General Description Of Parts
9 Quick release axle 10 Tyre 11 Rear frame 12 Crossbar 13 Transit wheel and anti-tip wheel unit 14 Fork support 15 Fork 16 Caster 17 Footplate frame 18 Front frame 19 Footplate tube 20 Heel band 21 Footplate Basic Light... -
Page 22: Adjustments
After every adjustment made to the wheelchair, check carefully that all parts are correctly fixed. Check that all screws and nuts are tightened and that all moving parts The PROGEO® BASIC LIGHT wheelchair is a medical device based on the patient detailed are functioning correctly. -
Page 23: Accessories
To use this accessory, you have to remove the rear wheels. This way, the wheelchair becomes narrower and shorter. When using this accessory, you have to turn the anti-tip wheels upward. Note that, when using the transit wheels, (rear wheels removed), the brakes do not work. Basic Light... -
Page 24: Push Handles For Attendant
L are tightly screwed, in fact, this condition prevents the tubes from sliding up off. or down or even coming off accidentally. Before pushing the wheelchair, make sure the two tubes are safely locked. Rehateam s.r.l. cannot be responsible for any damage or injury due to neglecting this warning. Basic Light... -
Page 25: Headrest
After each adjustment, screw the knob and make sure the system is stable. Always make a check; in fact, if the system is unstable, it may be cause risky situations. After loosening the knob of each adjustment, you can also remove the corresponding parts. Basic Light... -
Page 26: Lateral Support
Once seated in the chair with the belt or harness in place the occupant can close the buckles by fastening the two parts together. Both belts can be easily adjusted by pulling the extremities of their bands. Basic Light... -
Page 27: Rear Wheels
7.13 Hand rims According to the functional and/or aesthetical needs, you can choose among different rear wheels For this model of PROGEO wheelchair, special hand rims are available. available for this model. These hand rims with special features ensure improved grip, and therefore a more efficient pushing motion, especially for users with limited strength or mobility of the hands and fingers. -
Page 28: Tyres
This condition is the ideal while driving as well as for inserting and removing the bar A. for the wheelchair. In this case, the wheels are interchangeable and, thus, you just have to remove one pair and put the other on. Basic Light... -
Page 29: Spoke Guard
(1 cm), etc. will be easier. The “soft” caster is more comfortable then the “active” (hard) caster. The pneumatic caster is the most comfortable, but it often needs to be inflated. 4” soft 5” soft 6” soft or pneumatic 7” soft Basic Light... -
Page 30: Maintenance
MAINTENANCE For any questions relating to the adjustment and maintenance of your PROGEO wheelchair, the experienced technical staff at RehaTEAM are at the complete disposal of all our clients. You can contact us directly at the address below: Periodic inspection of the wheelchair is vital to guarantee maximum performance and a long life. A ®... -
Page 31: Inspection Of Components
• Carbon fiber: frame, side guards, footplates • Upholstery: textile with expanded foam • Packaging: plastic bags made of soft polyethylene, cardboard Contact your authorized disposal center for disposal or recycling. Alternatively, the wheelchair can be returned to the retailer for disposal. Basic Light... -
Page 32: Technical Data
– standard – active (point of balance) (adjustable) declares that the product defined as FRONT FRAME ANGLE 105° WHEELCHAIR FOR DISABLED PEOPLE, PROGEO SERIES, TOTAL WIDTH Seat width + 200 mm BASIC LIGHT TOTAL LENGTH 970 mm kg approx. -
Page 33: Warranty
WARRANTY With reference to our production line that is labelled with the marks PROGEO and PHYSIO, being these products manufactured to measure and with artisanal and not industrial procedures, minor imperfections, minor imprecisions on colours and The warranty agreement exists only between RehaTEAM® s.r.l. and its authorised carbon fibre weaves are not to be considered as defects. - Page 34 NOTES Basic Light...
- Page 35 Basic Light...
- Page 36 By RehaTEAM® Srl Vicolo Negrelli, 5 – 31040 Castagnole di Paese (TV) Italy Tel. +39 0422 484657 ra Fax +39 0422 484661 http//www.rehateamprogeo.com progeo@rehateamprogeo.com Medical device Class 1 directive 93/42/EEC s.m.i. WARRANTY CERTIFICATE LIGHT WHEELCHAIR Place of production: Castagnole di Paese (TV) - ITALY...
Need help?
Do you have a question about the Basic Light and is the answer not in the manual?
Questions and answers