Table of Contents
Advertisement
Advertisement
Table of Contents

Related Manuals for Assa Abloy Sargent PASSPORT 1000 P1


Summary of Contents for Assa Abloy Sargent PASSPORT 1000 P1
- Page 1 PASSPORT 1000 Mortise Lock Installation Instructions A8032G 04/16 Copyright 2016, Sargent Manufacturing Company, an ASSA ABLOY Group company. All rights reserved. Reproduction in whole or in part without the express written permission of Sargent Manufacturing Company is prohibited.
-
Page 3: Table Of Contents
Table of Contents Warning ...................3 General Description ..............4 Hardware Specifications ............4 Electronic Specifications ............4 Installation Wiring ..............5 Parts Breakdown ..............9 Installation Instructions ............10 Operational Check ..............21 Warning Changes or modifications to this unit not expressly approved by the party responsible for compliance could void the user’s authority to operate the equipment. -
Page 4: General Description
Passport 1000 P1 PoE Mortise Lock General Description An ANSI/BHMA Grade 1 lock utilizing Power over Ethernet (PoE) technology, the Passport 1000 P1 provides a cost-effective, future-proof solution for campuses. Featuring multiCLASS SE Technology from ® HID Global , it provides simultaneous support for multiple credentials and offers an easy migration path ®... -
Page 5: Installation Wiring
Passport 1000 P1 PoE Mortise Lock Installation Wiring Overview SARGENT Passport Series PoE P1 Typical Application Supplied by Others Network Cable Surface Mount RJ45 Network Switch (802.3af) LMT: Lock Management Tool A. PoE frame harness assembly B. PoE data hinge from McKinney (patent pending) C. - Page 6 Passport 1000 P1 PoE Mortise Lock Installation Wiring (Continued) Supplied by CI Certified Integrator (CI) supplies and terminates Supplied by End User the B-Splice connector and the PoE Switch male RJ45 connector from harness to end user provided facility cable B-Splice Crimp Connector Patch Cable...
- Page 7 Passport 1000 P1 PoE Mortise Lock Installation Wiring (Continued) Frame Harness Installation Components and wire harness supplied by McKinney. Suggested installation: Supplied by CI Cut end / ceiling-side PoE harness: B-Splice Crimp Connector TIA/EIA 568-B Standard Wiring Wire Pair Number White/Orange Orange RJ45-M...
- Page 8 Passport 1000 P1 PoE Mortise Lock PoE Door Harness Order of installation may vary. Refer to appropriate sections for instructions. Hinge-side harness connectors: • 4-pin male Molex connector • 6-pin male Molex connector with ground wire Lock-side harness connectors: • Ring terminal •...
-
Page 9: Parts Breakdown
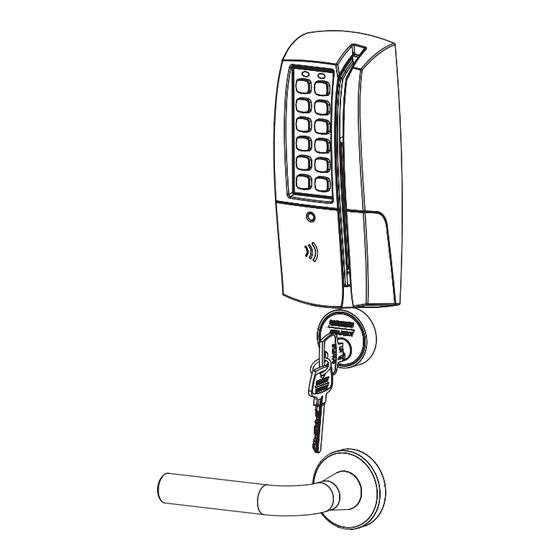
Passport 1000 P1 PoE Mortise Lock Parts Breakdown P1 PoE Lock with Magnetic Card Swipe With or Without Keypad ITEM No. PART No. DESCRIPTION 52-3583-[finish] Outside Escutcheon Assembly, mag stripe 52-3582-[finish] Outside Escutcheon Assembly, mag stripe and Keypad (shown) 52-4244-[finish] Outside Escutcheon Assembly, Mag Swipe, Keypad, and HID 125 kHz Prox 52-4759-[finish] Outside Escutcheon Assembly, iCLASS, keypad, mag stripe, Prox, smart card (MIFARE, DESFIRE) -
Page 10: Tools Required
Passport 1000 P1 PoE Mortise Lock Parts Breakdown (Continued) Tools Required: • #2 Phillips screwdriver • Flat head • T20 Torx driver ® • Security allen wrench ITEM PART No. DESCRIPTION See catalog #41 Cylinder (1-1/8" Minimum Length) Consult Factory Cylinder Rosette P1-82276-[finish]* Lock body with deadbolt &... -
Page 11: Installation Instructions
Passport 1000 P1 PoE Mortise Lock Installation Instructions Door Preparation A. Verify Hand and Bevel of Door Left Hand Left Hand Right Hand Right Hand Hinges Left. Reverse Bevel Hinges Right. Reverse Bevel Open Inward. Hinges Left. Open Inward. Hinges Right. “LH”... - Page 12 Passport 1000 P1 PoE Mortise Lock 2 Prepare Lock Body 1. Reverse Lock Hand Red surface of locking piece must face the outside/locked side of door. To rotate locking piece (Fig. 2A): Right Hand a. Position lock body with red surface Lock Shown of locking piece visible.
- Page 13 Passport 1000 P1 PoE Mortise Lock 3 Install Lock Body Note: Do not pull the lock into the pocket using the harness alone. Ensure that the wire harness is not pinched between the lock and the mortise pocket. 1. Feed the wire harness into the mortise pocket and through inside preparation hole as depicted in Figure 3.
- Page 14 Passport 1000 P1 PoE Mortise Lock 4 Outside Cylinder Installation 1. Slide the spring and the rosette onto the cylinder. 2. Rotate the cylinder into cylinder hole with fingers. 3. Insert key 75% of the way and utilize the key to rotate the cylinder into the rest of the cylinder hole.
- Page 15 Passport 1000 P1 PoE Mortise Lock 5 Assemble Outside Trim 1. With outside lever horizontal, insert the mounting posts through outside of door and lock body. Make certain the lever spindle is properly engaged inside the lock body (Fig 5A). 2.
- Page 16 Passport 1000 P1 PoE Mortise Lock 6 Install Inside Rose and Inside Lever Assembly 1. Place inside rose flush against door surface and rotate first counter-clockwise to seat the threads, then clockwise to securely tighten. Inside of Door 2. Slide lever onto spindle until fully seated. Be sure handle is horizontal and facing the hinge side of the door.
- Page 17 Passport 1000 P1 PoE Mortise Lock 8 Install Gasket (Optional) and Outside Escutcheon Note: Gasket is optional, for non-fire rated doors only. For non-fire rated door applications, a gasket (Part number 52-0782) may be used as a weather seal between the escutcheon and the Outside of Door outside door surface.
- Page 18 Passport 1000 P1 PoE Mortise Lock 10 Installation of Connectors CAUTION - Do not touch or allow debris to enter connector contacts. Secure the following connectors to their respective terminals (Fig. 10A): A. Secure the 10-pin lock body assembly connector. IMPORTANT: Do not run wires through bottom hole in plate (Fig.
- Page 19 Passport 1000 P1 PoE Mortise Lock 11 Install Inside Module Component Assembly 1. Insert top tabs of controller into slots on mounting plate (Fig. 11A). 2. Ensure proper alignment of board-to-board connectors while pivoting bottom of controller toward door until tab on bottom snaps securely into place on mounting plate.
- Page 20 Passport 1000 P1 PoE Mortise Lock 12 Install Inside Escutcheon 1. Position inside escutcheon as shown (Fig. 12). Verify that all wires are positioned within the es- cutcheon to avoid pinching. Inside of Door 2. Attach escutcheon with (2) #8-32 x 1/2” T-20 Torx pan head screws.
-
Page 21: Operational Check
Passport 1000 P1 PoE Mortise Lock Operational Check IMPORTANT: Be sure to test functions prior to closing door. In all cases, perform the following checks: 1. Ensure that inside lever retracts latch. • For units with cylinders, the following checks apply: Insert key into cylinder and rotate: a. - Page 22 Passport 1000 P1 PoE Mortise Lock Notes 1-800-810-WIRE • www.sargentlock.com • A8032G...
- Page 24 The company’s customer base includes commercial construction, institutional, and industrial markets. Copyright © 2016, Sargent Manufacturing Company, an ASSA ABLOY Group company. All rights reserved. Reproduction in whole or in part without the express written permission of Sargent Manufacturing Company is prohibited.
Need help?
Do you have a question about the Sargent PASSPORT 1000 P1 and is the answer not in the manual?
Questions and answers