Table of Contents
Advertisement
Quick Links
Advertisement
Table of Contents

Subscribe to Our Youtube Channel
Related Manuals for CAE CathLabVR Simulator


Summary of Contents for CAE CathLabVR Simulator
- Page 1 User Guide...
- Page 2 The software you are about to access is provided to you pursuant to the purchase of the Product by the legal entity which employs you, or which you represent (the “licensee” or “You”), from CAE. This purchase of the Product is subject to CAE’s Healthcare Education Products General Terms and Conditions (the “HEPGTC”) and this End-User License agreement (“Licensee”).
- Page 3 Product and components thereof shall remain with CAE and, if applicable, its suppliers. For clarification, Licensee agrees that the source code for the Software is a trade secret of CAE and only CAE shall have the right to alter, maintain, enhance or otherwise modify the Software.
- Page 4 Product contained herein, or b) if required to be disclosed by law, and only to the extent of such disclosure and limited to the purpose requested, with prior notice to CAE to permit it to seek an appropriate remedy to prevent the disclosure, or alternatively to agree to the terms of such disclosure.
- Page 5 6.1 Licensee acknowledges that the Software and Data constitute a special, irreplaceable asset of great value to CAE, and that a breach, in any way, of any of Licensee’s obligations under Sections 2 (License), and 5 (Non-Disclosure) hereof would cause serious and irreparable harm to CAE which may not be adequately compensated for in damages.
- Page 6 Government, or any of its units or agencies shall be governed solely by the terms of this License and the HEPGTC. Any technical data provided by CAE with the Product that is not covered by the above provisions is deemed to be "technical data-commercial items" pursuant to DFAR Section 252.227.7015(a).
- Page 7 Licensee hereby agrees that Licensee is solely responsible for reviewing its data that will be provided to CAE (or to which CAE will have access) to ensure that it does not contain Excluded Data. 10.5 No Waiver: No omission or delay by either party at any time to enforce a right or remedy...
- Page 8 Front Matter YSTEM PECIFICATIONS Device Dimensions 69.5” W x 9.8” D x 8.9” H 176.5cm W x 24.9cm D x 22.7cm H Weight 45 lbs (20.9 kg) Electrical 24 V DC, 3A (72W max) Environmental Operating temperature: 50° to 90° F (10° to 32° C) Conditions Relative Humidity: 20 to 80% Storage Conditions...
- Page 9 CAECathLabVR Front Matter AUTIONS AND ARNINGS Please read and understand these cautions and warnings before you begin using the simulator. • Keep all electronic equipment free from high humidity or liquids • Avoid weighing down the equipment with any tools or accessories not relevant to the immediately exercise •...
-
Page 10: Table Of Contents
Table of Contents End User License Agreement For CAE Products ........i System Specifications ................vii Cautions and Warnings ................. viii Introduction ....................1 Contained in this User Guide ...............2 Equipment Overview ................3 CathLabVR Simulator ..................4 Anatomy Plate....................4 CathLabVR Computer..................4 CathLabVR Cart ....................5... - Page 11 Table of Contents Using the Simulation Tips ..............27 Selecting a Tool ..................28 Inserting a Tool..................30 Removing a Tool..................32 Using the Pedals..................33 Calibrating the Measurement Feature ..........35 Using the Control Box................36 Using the Contrast Syringe ..............37 Using the Physio Feature ..............39 Using the Roadmapping Feature ............40 Customizing a Wire or Stylet..............41 Fixating an Active-Fixation Lead ............43...
- Page 12 Table of Contents Software Questions ..................65 Module Instruments and Required Equipment........72 Cardiac Rhythm Disease Management (CRDM) .........72 Cardiac Surgery ..................72 Percutaneous Coronary Interventions (PCI) ........73 Percutaneous Peripheral Interventions (PPI) ........74 Appendix B - Keyboard Shortcuts ............75 Introduction ..................... 76 Contained in this User Guide ..............77 Appendix C - ....................
- Page 13 Table of Contents...
-
Page 14: Introduction
3-D graphics, auditory and state-of-the-art haptic feedback enhance the virtual reality. IMPORTANT: The CathLabVR Simulator is a training tool. The simulator is not intended to diagnose the condition of a live human being or identify a life-threatening situation. The CathVR Simulator is one of a series of didactic tools that can be used to improve training for endovascular diagnostic and intervention procedures. -
Page 15: Contained In This User Guide
This User Guide has been designed for quick access to information on how to use and maintain the CathLabVR Simulator. Please be sure to read and follow the Cautions and Warnings on the pages preceding the Table of Contents. This is for the safety of users as well as for the protection of the simulator. -
Page 16: Equipment Overview
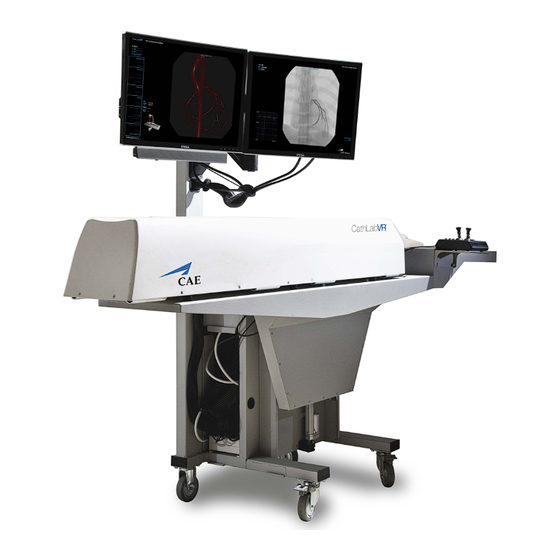
Equipment Overview QUIPMENT VERVIEW The CathLabVR Simulator comes standard with the necessary equipment and accessories for using the base unit. Standard Equipment CathLabVR Simulator Anatomy Plate CathLabVR Computer CathLabVR Cart Monitor Pole Extension Tray Shelf Control Box Keyboard and Mouse... -
Page 17: Cathlabvr Simulator
Equipment Overview CathLabVR Simulator The CathLabVR simulator is one of the main hardware components for the CathLabVR unit. All accessories for the endovascular modules are connected or inserted into the simulator to display the tool on-screen during a procedure. The carriages inside the simulator correspond with the specific tools for each individual procedure and require proper care to ensure the product remains in good working condition. -
Page 18: Cathlabvr Cart
Equipment Overview CathLabVR Cart The CathLabVR cart is the structure upon which the CathLabVR manikin, computer and shelves is secured. The monitor pole is attached to the back of the cart and the computer is stored inside the cart. The manikin, shelf and trays attach to the top of the cart. Monitor Pole The monitor pole attaches to the cart structure and contains a monitor arm for mounting the two flat screen monitors. -
Page 19: Monitors
CAECathLabVR Equipment Overview Monitors The CathLabVR comes standard with two flat screen monitors. This dual monitor setup allows users to view their progress and different functions during the simulation with efficiency and accuracy. Monitor Power Cable The CathLabVR contains one monitor power cable with two female receptors, each connecting to a separate monitor. -
Page 20: Embolic Protection Tool Kit
Equipment Overview Embolic Protection Tool Kit The Embolic Protection Tool Kit contains the following accessories: • Filter Basket EPD Handle • Occlusive Ballon EPD Handle • Self-expanding Stent Handle • 0.014” Guardwire wire • Embolectomy aspiration catheter • Syringe CRDM Tool Kit The CRDM Tool Kit contains the following accessories: •... -
Page 21: Vascular Tool Kit
CAECathLabVR Equipment Overview Vascular Tool Kit The vascular tool kit contains the following accessories: • Guidwire steering handle • 30 ATM inflation device • Diagnostic catheter • Guide catheter • Modified OTW therapeutic catheter • Modified RX therapeutic catheter • .035” diagnostic guidewire •... -
Page 22: Using The Simulator
Using the Simulator SING THE IMULATOR Note: For optimal use, no other software programs should be open while the simulator software is running. Note: To use the printing functions in the software, a network connection must be established. For further assistance, contact your system administrator. PN: 905K400652... -
Page 23: Starting The Software
CAECathLabVR Using the Simulator Starting the Software Once the CathLabVR simulator is powered on, the software launches automatically and the Login screen appears. The Username field The Password field The Login button The Login Screen To log in to the software: 1. - Page 24 Using the Simulator The CathLabVR Home screen appears. The Home Screen From the Home screen, users can select and start a simulation exercise, view personal data and print usage summaries and reports. Users are also able to modify language preferences and access the user guide from the Home screen.
-
Page 25: Interface Overview
CAECathLabVR Using the Simulator Interface Overview The CathLabVR user interface contains a dashboard of icons that represent the tools available to users. The Icon Dashboard When an icon is selected, the icon will appear blue and the associated content will appear in the main screen on the interface. - Page 26 Using the Simulator My Tasks From the My Tasks screen, users can choose a simulation, review didactic content, run a simulation and review results. The My Tasks icon The My Tasks Screen My Profile From the My Profile screen, users can review their personal data including username, registration and contact information and privileges.
- Page 27 CAECathLabVR Using the Simulator Usage From the Usage screen, review and print their usage summaries for completed simulations. The Usage icon The Usage Screen Reports From the Reports screen, users can review and print reports for completed simulations. The Reports icon The Reports Screen PN: 905K400652...
-
Page 28: Selecting A Simulation
Using the Simulator Selecting a Simulation Each module in the software contains a specially-developed curriculum to test learners on their ability to perform acute endovacular procedures. Based on the courses and tasks assigned to the learner by the administrator, the training experience is customized to help the learner meet the necessary educational objectives. - Page 29 CAECathLabVR Using the Simulator 2. From the Available Tasks panel on the left side of the screen, click the desired module The desired module The Home Screen 3. Click the desired course The desired course The Home Screen PN: 905K400652...
- Page 30 Using the Simulator 4. Click the desired task The desired task The Home Screen The didactic content appears in the main screen of the software. PN: 905K400652...
-
Page 31: Reviewing The Didactic Content
CAECathLabVR Using the Simulator Reviewing the Didactic Content Before beginning a simulation, users should review the didactic content for the selected procedure. The didactic content contains information users need to know before and after performing a specific procedure. The didactic content for tasks may include Training Objectives, Case History, Pre-Procedures, Post- Procedures, and Collaborators. -
Page 32: Training Objectives
Using the Simulator Training Objectives To access the Training Objectives screen, click the Training Objectives tab. When selected, the tab appears blue and the Training Objectives screen appears. Training Objectives The Training Objectives Screen The Training Objectives screen outlines the training goals and objectives users meet upon successful completion of the procedure. - Page 33 CAECathLabVR Using the Simulator Case History To access the Case History screen, click the Case History tab. When selected, the tab appears blue and the Case History screen appears. The Case History tab The Case History Screen The Case History screen provides users with background information about the patient including symptoms, medical history and documentation of previous conditions and procedures.
- Page 34 Using the Simulator Pre-Procedures To access the Pre-Procedures screen, click the Pre-Procedures tab. When selected, the tab appears blue and the Pre-Procedures screen appears. The Pre- Procedures The Pre-Procedures Screen The Pre-Procedures screen provides steps the user needs to complete prior to beginning the procedure.
- Page 35 CAECathLabVR Using the Simulator Post-Procedures To access the Post-Procedures screen, click the Post-Procedures tab. When selected, the tab appears blue and the Post-Procedures screen appears. The Post- Procedures The Post-Procedures Screen The Post-Procedures screen provides actions users should perform after the procedure is complete. PN: 905K400652...
- Page 36 Using the Simulator Collaborators To access the Collaborators screen, click the Collaborators tab. When selected, the tab appears blue and the Collaborators screen appears. The Collaborators Screen The Collaborators screen credits the individuals and institutions who contributed to the development of the module task.
-
Page 37: Running A Simulation
CAECathLabVR Using the Simulator Running a Simulation Prior to running a simulation, prepare for the simulation by completing the following steps: 1. Select the desired task 2. Review the associated didactic content After the preparation steps are complete, start the simulation. To start a simulation: 1. - Page 38 Using the Simulator The simulation launches and the initialization screen appears. The Initialization Screen Once the initialization is complete, the simulation start screen appears. The right monitor displays the Fluoro imaging, vital signs and ECG for the simulated patient. The Simulation Start Screen -Right Monitor PN: 905K400652...
- Page 39 CAECathLabVR Using the Simulator The left monitor displays the tool selection panel, C-Arm glyph and coordinates, and the feature options list: Physio, Cine, Still and Case History. The feature options list The tool selection panel The C-Arm coordinates The C-Arm glyph The Simulation Start Screen - Left Monitor Note: Be sure to observe the content on both monitors while performing procedures.
-
Page 40: Using The Simulation Tips
Using the Simulator Using the Simulation Tips The simulation tips feature guides the learner through a procedure with tips for completing the next required action during a running simulation. The simulation tips are present by default. The simulation tips appear in the bottom-left corner of the left monitor. Simulation Simulation Tips message... -
Page 41: Selecting A Tool
CAECathLabVR Using the Simulator Selecting a Tool The CathLabVR offers a selection of multiple tools for successfully completing a procedure. Users select the tools from the hardware (wires, catheters, etc.) that they deem appropriate for the task they chose and identify the selected tool in the software. To select a tool in the software: 1. - Page 42 Using the Simulator 2. Select different options from the options panel to narrow the tool options in the filter results panel The options panels The filter results panel The OK button The Tool Selection Window Users can also select a tool directly from the filter results panel without selecting different options.
-
Page 43: Inserting A Tool
CAECathLabVR Using the Simulator Inserting a Tool Guide wires and catheters are the selected tools that can be physically inserted inside the simulator. Note: Prior to inserting a tool into the simulator, select the tool in the software using the tool selection panel. - Page 44 Using the Simulator This indicates that the simulator has engaged the tool properly. The Smart Capture lights The Simulation Screen 4. Activate the Fluoro feature intermittently to view the path of the tool and navigate appropriately To manipulate the tool, twist the end of the tool slowly until the to ensure no damage or perforation occurs.
-
Page 45: Removing A Tool
CAECathLabVR Using the Simulator Removing a Tool To remove a tool form the simulator: 1. From the simulation screen left monitor, choose a tool pod in the tool selection panel The selected guidewire The tool selection panel The Simulation Screen - Guidewire Selected The options panels The filter... -
Page 46: Using The Pedals
Using the Simulator The feature options list The tool selection panel The C-Arm coordinates The C-Arm glyph The Simulation Screen - Left Monitor The physical tool can now be removed into the simulator. Using the Pedals The dual foot pedals are used to control the x-ray and video capture tools. The Foot Pedals PN: 905K400652... - Page 47 CAECathLabVR Using the Simulator Activating the Fluoro Feature To activate the Fluoro (x-ray) feature, depress the Fluoro pedal. Upon starting a simulation, the right monitor will prompt the learner to press the pedal and activate the Fluoro feature to view the x-ray. The Fluoro Activation Message Note: In all procedures of the CRDM module, press down on the RIGHT pedal (labeled Cine) to use the Fluoro feature.
-
Page 48: Calibrating The Measurement Feature
Using the Simulator Calibrating the Measurement Feature QCA (Quantitative Cine Angiometrics) allows the user to record a Cine Angiogram, pause the Cine and make detailed measurements from the still image. Prior to any measurements, the user should calibrate so that measurements are accurate in the chosen angle and zoom magnification. QCA calibration should be performed prior to obtaining any measurements from a Still cine image. -
Page 49: Using The Control Box
CAECathLabVR Using the Simulator Using the Control Box The control box allows users to adjust different C-Arm and Table settings. The table up button The table down button The home button The zoom button The table The c-arm joystick joystick The crop vertical toggle switch The crop... -
Page 50: Using The Contrast Syringe
Using the Simulator Using the Contrast Syringe The contrast syringe accessory tool allows learners to see a vascular structure more clearly on the x- ray by injecting contrast dye into the vessels. To use the contrast syringe: 1. Ensure the contrast syringe is connected to the back of the simulator The contrast syringe port The Accessory Ports... - Page 51 CAECathLabVR Using the Simulator The contrast dye pulses through the vessels on the x-ray. contrast dye The Fluoro Image with Contrast Dye - Right Monitor Note: The Cine feature can be activated in place of the Fluoro feature to use the x-ray during a contrast dye injection.
-
Page 52: Using The Physio Feature
Using the Simulator Using the Physio Feature The Physio feature displays a 3-D image of the anatomy for the module. The feature options list The Simulation Screen - Left Monitor To activate the physio view, from the features options list, click Physio. The Physio image appears on the left monitor. -
Page 53: Using The Roadmapping Feature
CAECathLabVR Using the Simulator Users may choose to activate the overlay mode and show the Physio view superimposed over the real-time fluoro image. To activate overlay mode: 1. Depress the Fluoro foot pedal 2. Press the O key on the computer keyboard A faint image of the Physio view appears over the real-time fluoro image. -
Page 54: Customizing A Wire Or Stylet
Using the Simulator Customizing a Wire or Stylet Once any wire is selected, the Customize button will become available. To customize a wire or stylet: 1. Select a tool from the Tool Selection panel Customize button The Simulation Screen - Tool Selected 2. - Page 55 CAECathLabVR Using the Simulator 4. Click and drag the balls along the wire to the location where would like to move them 5. Once the lower ball has been moved to the desired location, (bending point), use the left mouse button to shape the wire by dragging distal bending point in space, forming the desired curve 6.
-
Page 56: Fixating An Active-Fixation Lead
Using the Simulator Fixating an Active-Fixation Lead Users can select an active-fixation lead for CRDM procedures and fixate the lead. The Fixate button The Simulation Screen - Active Fixation Lead Selected To fixate an active-fixation lead tip: 1. Place the active-fixation lead tip in the desired anatomical location 2. -
Page 57: Using The Venogram Balloon
CAECathLabVR Using the Simulator Using the Venogram Balloon Note: This feature is only used during the CRDM module. The venogram balloon is inflated by an syringe during a venogram procedure to identify the anatomy of the veins and properly place a lead. This syringe is connected via tubing to the Venogram port located on the back of the simulator. -
Page 58: Using The Balloon Inflation Feature
Using the Simulator Using the Balloon Inflation Feature The balloon is inflated by a 20cc syringe, trigger, pressure gauge and piston knob that can be pushed in and out as well as rotated to achieve the desired pressure. during a procedure. This syringe is connected via tubing to the Balloon Inflation port located on the back of the simulator. - Page 59 CAECathLabVR Using the Simulator To use the balloon inflation syringe: 1. Ensure the balloon inflation syringe is connected to the back of the simulator The balloon inflation port The Accessory Ports 2. Select the virtual balloon or stent from the tools selection panel in the software 3.
-
Page 60: Using The Embolic Protection Devices
Using the Simulator Using the Embolic Protection Devices The embolic protection devices are used during coronary and carotid intervention procedures. The specific tools are the interceptor, guardwire and export catheter. Embolic Protectio n tool selection panel The Simulation Screen - Left Monitor To use an embolic protection tool: 1. -
Page 61: Using The Adjunct Therapy Feature
CAECathLabVR Using the Simulator Using the Adjunct Therapy Feature The Adjunct Therapy feature allows users to select various pharmacologic and non-pharmacologic therapies. These therapies may be given to prevent or treat complications occurring within the simulation. Adjunct Therapy selection panel The Simulation Screen - Left Monitor To select an adjunct therapy, click the Adjunct Therapy link inside the tools selection panel. -
Page 62: Using The Analyzer Function
Using the Simulator Using the Analyzer Function For procedures that require lead placement, the analyzer function tests the pacing and sending thresholds to determine if the location is acceptable. To use the analyzer function: 1. From the features options list, select Analyzer The feature options list The tool... -
Page 63: Accessing The Cine Gallery
CAECathLabVR Using the Simulator During pacing, the pacing threshold and impedance will be indicated. 3. Select Switch ECG Leads to view a different surface ECG, (Lead I and AVF are available) 4. Select Pause Display to freeze the current ECG and ECG tracing Note: Selecting Pause Display again will resume real-time ECG. -
Page 64: Accessing The Stills Gallery
3. Double-click on the Stills image in the gallery to access the Still frame Ending a Simulation The CathLabVR simulator has two ways in which a simulation can end. In some cases, the learner makes a procedural error and is unable to correct the error within the allotted time for the simulation.If a learner performs a fatal error, the simulation will end before the... -
Page 65: Viewing Results
CAECathLabVR Using the Simulator Viewing Results Once the simulation is complete, the Results screen appears. The Results Screen Users can review the different metrics recorded from the procedure, including but not limited to, total fluoroscopy time, times and amounts of contrast dye injections, and other procedure-specific objectives. -
Page 66: Viewing Personal Data
Using the Simulator Viewing Personal Data To view personal data, click the My Profile icon. The My Profile icon The Icon Dashboard The Personal Data Screen PN: 905K400652... -
Page 67: Viewing Usage Summaries
CAECathLabVR Using the Simulator Viewing Usage Summaries To view usage summaries, click the Usage icon. Usage icon The Icon Dashboard The Usage Summary Screen PN: 905K400652... -
Page 68: Viewing Reports
Using the Simulator Viewing Reports Learners can view customized reports from the Reports screen. To view reports: 1. Click the Reports icon Reports icon The Icon Dashboard The Reports Screen PN: 905K400652... - Page 69 CAECathLabVR Using the Simulator 2. From the Tasks options, select the desired tasks to include in the report or select All Tasks The Tasks options The Reports Screen 3. From the Reports options, select the desired reports to include in the report or select All Reports Reports options...
- Page 70 Using the Simulator The Print Preview panel The Reports Screen The report is now available for printing. PN: 905K400652...
-
Page 71: Printing Data From The Simulator
CAECathLabVR Using the Simulator Printing Data from the Simulator Learners can print the data from the Results screen after completing a task. The print feature is also available on the Personal Data, Usage Summaries and Reports screens. The Reports screen is the only screen that requires the learner to select the data to include in the report and generate a print preview prior to printing. - Page 72 Using the Simulator Note: The Print button on the Personal Data screen is located near the top right corner of the screen. The Print button The Results Screen The Print button The Print Window 2. Select the desired network printer 3.
-
Page 73: Printing Data To A Pdf File
CAECathLabVR Using the Simulator Printing Data to a PDF File If network connection is not available or no network printers are available, users can print data to a PDF file and save the file to an external device to print on a computer with a network printer connection. - Page 74 Using the Simulator 3. Click Print The PDF Complete Document Creation Options Window 4. Select the desired folder where the file will be saved Note: If the location is on an external device, use the USB port located on the back of the simulator to connect the external device to the simulator.
-
Page 75: Modifying Language Preferences
CAECathLabVR Using the Simulator The PDF Complete Special Edition window appears with the completed PDF. The PDF Complete Window Modifying Language Preferences Learners can change the language settings for their personal account using the language preferences menu in the top right corner of the screen. To modify the language preferences: 1. -
Page 76: Adjusting The Volume
Using the Simulator Adjusting the Volume Learners can adjust the volume of the simulator sounds by using the hotkeys on the simulator keyboard. To increase the volume, press the Ctrl key and the Up arrow on the simulator keyboard simultaneously until the desired volume is achieved. To decrease, press the Ctrl key and the Down arrow on the simulator keyboard simultaneously until the desired volume is achieved. -
Page 77: Exiting The Software
CAECathLabVR Using the Simulator Exiting the Software Learners should log out of the software once they are completed with their training session. To exit the software: 1. Click on the username in the top right corner of the screen The Logout drop-down menu The Home Screen with Logout Drop-Down Menu... -
Page 78: Frequently Asked Questions
Frequently Asked Questions REQUENTLY SKED UESTIONS The following tables describe some common user questions and solutions for the CathLabVR simulator. Software Questions Why do I receive the message, “Please Remove the Current Tool” when attempting to select a tool from the Tools menu? This message indicates that the If you are using the simulator for the 1st time, con- “carriage”... - Page 79 #4. If this tube is bent/damaged, the wire may not be able to enter carriage #4. If this occurs, please contact CAE for assistance. If the tool is inserted into the carriage properly and slowly, and the carriage does not attempt to capture the wire/tool, exit the simulation and reselect the module.
- Page 80 If none of the maneuvers described above allow the stuck tool to be removed, please contact CAE Customer Service. Why doesn’t the Fluoro or Cine features work when I step on the foot pedals?
- Page 81 If speaker is properly connected and software enabled, (volume high and not muted), speaker may be broken. In this case, contact CAE Customer Service to return speaker for instructions on returning the speaker for repair/replacement. Why won’t the tools enter the simulator when using gentle pressure? The tool is not entering carriage, is Make sure the tool has been selected in the software.
- Page 82 Modules are bundled in four separate categories: Cardiac Rhythm Disease Management, Cardiac Surgery, Percutaneous Coronary Intervention and Percutaneous Peripheral Interventions. The following table outlines the categories and modules offered for the CathLabVR simulator. Category Module...
-
Page 83: Cardiac Rhythm Disease Management (Crdm)
CAECathLabVR Module Descriptions Module Instruments and Required Equipment In each of the modules, different instruments and features are used to complete the selected task. Cardiac Rhythm Disease Management (CRDM) The Cardiac Rhythm Disease Management (CRDM) modules give learners an opportunity to practice and master techniques required to perform a CRDM corrective procedure. -
Page 84: Percutaneous Coronary Interventions (Pci)
Module Descriptions Percutaneous Coronary Interventions (PCI) The Percutaneous Coronary Interventions (PCI) modules give learners an opportunity to practice and master techniques required to perform basic and advanced PCI procedure. Module Available Instruments Available Features PCI: Coronary Interventions • Guidewire • Fluoro •... -
Page 85: Module Instruments And Required Equipment
CAECathLabVR Module Descriptions Percutaneous Peripheral Interventions (PPI) The Percutaneous Peripheral Interventions (PPI) modules give learners an opportunity to practice and master techniques required to perform a basic and advanced PPI procedure. Module Available Instruments Available Features PPI: Carotid Interventions • Guidewire •... - Page 86 Appendix B - Keyboard Shortcuts B - K PPENDIX EYBOARD HORTCUTS The following table contains the shortcut keys for use with CathLabVR software. Shortcut Key Action Analyzer Back Continue Enter key Continue Guide Wire Menu Catheter Menu Balloon Menu Stent Menu Embolic Protection Menu Adjunct Therapy Menu Simulation Tips...
-
Page 87: Introduction
3-D graphics, auditory and state-of-the-art haptic feedback enhance the virtual reality. IMPORTANT: The CathLabVR Simulator is a training tool. The simulator is not intended to diagnose the condition of a live human being or identify a life-threatening situation. The CathVR Simulator is one of a series of didactic tools that can be used to improve training for endovascular diagnostic and intervention procedures. -
Page 88: Appendix B - Keyboard Shortcuts
This User Guide has been designed for quick access to information on how to use and maintain the CathLabVR Simulator. Please be sure to read and follow the Cautions and Warnings on the pages preceding the Table of Contents. This is for the safety of users as well as for the protection of the simulator. - Page 89 CAECathLabVR Appendix B - Keyboard Shortcuts PN: 905K400652...
- Page 90 3. Connect the CathLab VR device to a power outlet 4. Turn the CathLab VR device ON 5. Start Calibration of CathLab VR HW: a.From the computer, select Start > All Programs > CAE Healthcare > Medtronic CRDM > Calibrate CathLab VR HW The calibrate file...
- Page 91 CAECathLabVR Upgrade Instructions & Embedtek Specs b.Click Start on the EV 3.0 calibration screen to start friction calibration The Start button The Calibration Window c.Click OK when the calibration is complete The OK button The Calibration Window 6. Register OCX: a.From the computer, open the C:\Medtronic CRDM folder PN: 905K400652...
-
Page 92: Upgrade Instructions And Embedtek Computer Specifications
Upgrade Instructions & Embedtek Specs b.Double-click the file Register CRDM.OCX.bat to run the register The register file The Register File c.Click OK when the register is complete and succeeded The Succeeded Window Repeat the same steps for PCI and EDGE products. For PCI: a.From the computer, open the C:\Medtronic PCI folder b.Double-click the file Register PCI.OCX.bat to run the register... - Page 93 CAECathLabVR Upgrade Instructions & Embedtek Specs Embedtek Tower Workstation Specifications: • Dimensions 17” H x 6.75” W x 18.36” D (43.2 cm H x 17.2 cm W x 46.6 cm D) º • Weight 19 lbs (8.6kg) º • C226 Embedded ATX Motherboard Super Micro X10SAE º...
- Page 95 For more information about CAE products, contact your regional sales manager or the CAE distributor in your country, or visit caehealthcare.com. Tel +1 941-377-5562 or 866-233-6384 For customer service, please contact CAE. Customer Service Headquarters - United States and Latin America Monday - Friday from 7:00 a.m.
Need help?
Do you have a question about the CathLabVR Simulator and is the answer not in the manual?
Questions and answers