Table of Contents
Advertisement
Vertical Cellular Automation Installation Instructions
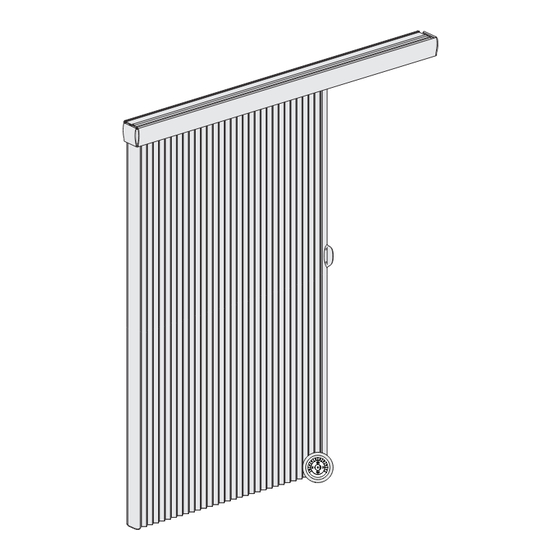
Product View ................................................................................................................................................................. 1
Tools and Fasteners Needed ........................................................................................................................................ 2
Installation Overview .................................................................................................................................................... 3
Outside Mount .............................................................................................................................................................. 3
Inside/Ceiling Mount ..................................................................................................................................................... 6
Install the Fabric Stack ................................................................................................................................................. 7
Mount the Automation Manual Control Button ..................................................................................................... 14
Connect Power Source ............................................................................................................................................... 15
Testing the Shade ....................................................................................................................................................... 17
Using Automation Remote ........................................................................................................................................ 17
Resetting the Shade (If Necessary) ........................................................................................................................... 18
VALANCE INSTALLATION
Valance Attachment ................................................................................................................................................... 19
Room Divider Kit ......................................................................................................................................................... 21
CARE
Troubleshooting .......................................................................................................................................................... 22
Removing the Shade, If Necessary ............................................................................................................................ 24
Cleaning Procedures ................................................................................................................................................... 24
.......................................................................................................................................................... 26
.................................................................................................................................................................. 27
Cellular Shade Collection
Rev. A
9/3/19
Advertisement
Table of Contents

Related Manuals for Kirsch Cellular Shade Collection


Summary of Contents for Kirsch Cellular Shade Collection
-
Page 1: Table Of Contents
Cellular Shade Collection Vertical Cellular Automation Installation Instructions GETTING STARTED Product View ................................. 1 Tools and Fasteners Needed ............................2 INSTALLATION Installation Overview ..............................3 Outside Mount ................................3 Inside/Ceiling Mount ..............................6 Install the Fabric Stack ..............................7 Mount the Automation Manual Control Button ..................... 14 Connect Power Source ............................... -
Page 2: Getting Started
GETTING STARTED Product View Headrail Installation Brackets Manual Control Button Moving Rail Bracket* Battery Wands Cord Tensioners* Tension Ribbon Cable Clip* Cord Motor Gear Box Fabric Carriers Stationary Rail Bracket Handle Stationary Rail Moving Rail Extension Cable Optional Outside Mount Hardware: Extension Inside Bracket... -
Page 3: Tools And Fasteners Needed
® Thank you for purchasing the Kirsch Cellular Shade Collection. With proper installation, operation, and care, your new shades will provide years of beauty and performance. To get started, unpack the shade and remove all foam/packaging materials. Check that all parts shown on the packing list are included with the order. -
Page 4: Installation
INSTALLATION INSTALLATION Installation End Mount Installation Brackets Required Bracket Brackets Shade Brackets The number of installation brackets required varies with headrail width, as shown ■ ■ Width Required in the table. 12" – 31" ⁄ " – 66" NOTE: Two installers are recommended for shades over 84" wide. ⁄... - Page 5 INSTALLATION INSTALLATION Determine where to place the top of the installation brackets. ■ ■ Top of Bracket Add the desired floor clearance to the ordered height of the shade. The ordered height can ➤ ■ be found on the packaging label. A minimum of ⁄...
- Page 6 INSTALLATION INSTALLATION Attach the spacer blocks and installation brackets with #6 hex head mounting screws long ■ ■ Maximum enough for a secure installation. (See chart below.) Longer screws are not provided. " Longer Screw The top of the spacer blocks should be at the desired shade height. ➤...
-
Page 7: Inside/Ceiling Mount
INSTALLATION INSTALLATION Inside/Ceiling Mount Mount the Installation Brackets Mark 8" in from each jamb. This marks the ■ ■ center points of the two end brackets. 8" Space Evenly Space Evenly 8" Mark the locations of any additional ➤ ■ Jamb Window/Door Opening Jamb... -
Page 8: Install The Fabric Stack
INSTALLATION INSTALLATION Install the Fabric Stack NOTE: The installation procedures that follow are the same for inside and outside mounts, except where indicated. Prepare the Fabric Stack Insert the stationary rail bracket into the vertical rail on the side where the fabric stacks. ■... - Page 9 INSTALLATION INSTALLATION Install the Fabric Stack into the Headrail Rear Grooves Insert the moving rail onto the moving rail bracket. ■ ■ The bracket fits into the grooves on the rear of the vertical rail. Be sure to fit the bracket ➤...
- Page 10 INSTALLATION INSTALLATION Install the stationary rail bracket. ■ ■ Hook the stationary rail bracket to the headrail as illustrated below. ➤ ■ After hooking it to the headrail, you may allow the stationary rail to hang freely. ➤ ■ Stationary Rail Bracket Stationary Rail...
- Page 11 INSTALLATION INSTALLATION Inside Mount: Attach the stationary rail bottom bracket. The bracket may be ■ ■ attached to the sill or floor. It may also be attached to the jamb using the inside Jamb mount adapter. Attachment Be sure the stationary rail is flush against the jamb. ➤...
- Page 12 INSTALLATION INSTALLATION Set Cord Tension Unwrap the cord from the orange cord organizer. ■ ■ Remove any twists by running a finger between the two cords. ➤ ■ Note that both ends of the cords are tied to washers to prevent the cords from slipping into the vertical rail. ➤...
- Page 13 INSTALLATION INSTALLATION Position the cords. ■ ■ From the outside of the end plate, place the washer on the end of one cord behind the slot in the middle of the end plate, so ➤ ■ that the cord fits into the slot. Pull the cord taut to seat the washer. Cut the knot from the end of the other cord and tie the cord to the cord tensioner using a square knot.
- Page 14 INSTALLATION INSTALLATION Adjust the moving rail to vertical, if necessary. Work from the front side of the shade. ■ ■ Locate the Phillips screws on the moving rail bracket. ➤ ■ To adjust the bottom end of the moving rail to the right, loosen the right screw one-half turn, then tighten the left screw ➤...
-
Page 15: Mount The Automation Manual Control Button
INSTALLATION INSTALLATION Mount the Automation Manual Control Button The manual control button is inside the headrail, near the motor, attached to a wire harness that is connected to the motor. Remove the manual control button from the headrail. ■ ■ Disconnect the 10-pin connector from the manual control button. -
Page 16: Connect Power Source
■ If You Have Battery Wands... ® Two battery wands come with Kirsch Cellular Shades Vertical Cellular Automation shades 54" wide or wider. Shades less than 54" wide will come with one battery wand only. Plug the Power Cable into the Battery Wands... -
Page 17: Operation
INSTALLATION INSTALLATION If Your Order Came with One Battery Wand Only... Plug the single power cable from the motor into the socket on the battery wand. ■ ■ Place the battery wand into the front channel of the headrail. The front lip on the channel holds the wand in position. ■... -
Page 18: Testing The Shade
INSTALLATION OPERATION Testing the Shade Testing the shade with the manual control button will allow you to ensure that the motor and power source are working correctly. Press the manual control button on the headrail to test operation. If the shade does not operate, see “Troubleshooting” on page 22. ■... -
Page 19: Resetting The Shade (If Necessary)
Dual Operation ® An innovative feature of Kirsch Cellular Shades Vertical Cellular Automation is dual operation: the shade can be operated either motorized or manually. The drive belt automatically disengages after each motorized use, allowing the shade to be traversed manually. -
Page 20: Valance Attachment
INSTALLATION VALANCE INSTALLATION Valance Attachment Attach Valance Clips Attach the valance clips to the headrail. ■ ■ Position the bottom of the valance clip under ➤ ■ the bottom lip of the headrail. Headrail Valance Clip Rotate the valance clip up to snap it into place ➤... - Page 21 INSTALLATION VALANCE INSTALLATION Attach the valance to the valance clips, as shown. ■ ■ Insert the top of the valance into the top of ➤ ■ the valance clip. Rotate the valance down to snap it into place ➤ ■ onto the headrail.
-
Page 22: Room Divider Kit
Valance INSTALLATION VALANCE INSTALLATION Attach dovetail brackets to the valance clips. ■ ■ Insert the top of the dovetail bracket into ➤ ■ the top of the valance clip. Headrail Rotate the dovetail bracket down to snap it ➤ ■ in place. -
Page 23: Troubleshooting
First review the guide that came with your control device. ■ ■ Refer to the following troubleshooting procedures for specific solutions for your shade. ■ ■ ® If questions remain, please contact Kirsch at 844-KIRSCH2 (844-547-7742). Problem The shade will not snap into the installation brackets. Solution Check that the installation brackets are level and aligned. - Page 24 Install the batteries according to the instructions on the battery Battery Wand wand label. Press the cap on until it latches. ® NOTE: Kirsch recommends AA alkaline batteries for use with our Squeeze Cap Latch battery-powered shades. These will provide more than one year of operation, depending on usage.
-
Page 25: Removing The Shade, If Necessary
■ ■ stated in “Install the Fabric Stack” on page 7. Cleaning Procedures ® Kirsch Vertical Cellular Shades are made of anti-static, dust-resistant fabric which repels dirt and dust. For most cellular fabrics, the following cleaning options are available. Dusting Regular light dusting with a feather duster is all the cleaning that is needed in most circumstances. - Page 26 INSTALLATION CARE Spot-Cleaning CAUTION: Do not spot-clean Harmony, Naturelle, Oceanside, and Sonora fabrics. Prepare a solution of warm water and a mild detergent. ■ ■ Dampen a clean cloth in the solution and wring it out. ■ ■ Dab the spot with the dampened cloth until it is removed. Do not rub the fabric. ■...
-
Page 27: Declarations
INSTALLATION DECLARATIONS U.S. Radio Frequency FCC Compliance FCC ID information is located on top of the blind’s headrail. This device complies with Part 15 of the FCC Rules. Operation is subject to the following two conditions: (1) This device may not cause harmful interference, and (2) This device must accept any interference received, including interference that may cause undesired operation. -
Page 28: Warranty
This warranty gives you specific legal rights, and you may also have other rights which vary from state to state. © 2019 Kirsch Custom Window Coverings. All rights reserved. All trademarks used herein are the property of Kirsch or their respective owners. 09/19...
Need help?
Do you have a question about the Cellular Shade Collection and is the answer not in the manual?
Questions and answers