Table of Contents
Advertisement
Quick Links
Dual Shade System Installation Instructions
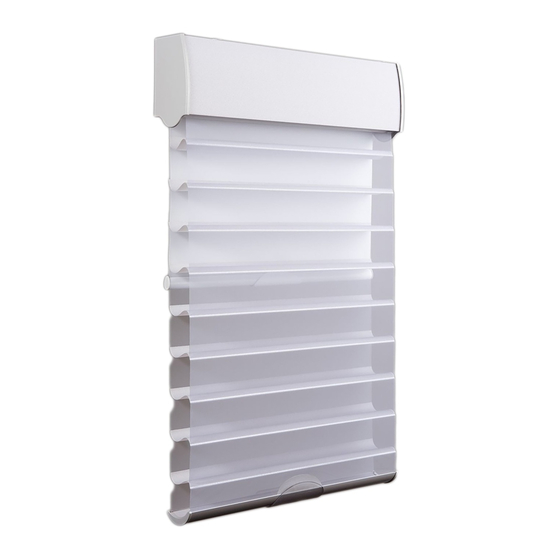
Product View ................................................................................................................................................................. 1
Tools and Fasteners Needed ........................................................................................................................................ 2
Installation Overview .................................................................................................................................................... 3
STEP 1: Mount the Installation Brackets ................................................................................................................... 3
Inside Mount .............................................................................................................................................................. 4
Outside Mount ........................................................................................................................................................... 5
STEP 2: Automation and Touch Control - Connect the Power Cable, If Applicable ........................................... 6
STEP 3: Install the Shading ......................................................................................................................................... 7
STEP 4: Connect the Power Source, If Applicable .................................................................................................... 8
Touch Control Only -Unpack the Wand and Attach to Activation Arm ............................................................... 9
OPERATION
Operate the Shading ................................................................................................................................................... 10
Retractable Cord...................................................................................................................................................... 10
Touch Control .......................................................................................................................................................... 11
Automation .............................................................................................................................................................. 12
Troubleshooting .......................................................................................................................................................... 14
CARE
Removing the Shading (If Necessary) ....................................................................................................................... 20
Cleaning Procedures ................................................................................................................................................... 20
Warning ........................................................................................................................................................................ 21
.................................................................................................................................................................. 23
Shadings Collection
............................................................................................................................ 22
Rev. A
9/3/19
Advertisement
Table of Contents

Related Manuals for Kirsch Shadings Series


Summary of Contents for Kirsch Shadings Series
-
Page 1: Table Of Contents
Shadings Collection Dual Shade System Installation Instructions GETTING STARTED Product View ................................. 1 Tools and Fasteners Needed ............................2 INSTALLATION Installation Overview ..............................3 STEP 1: Mount the Installation Brackets ........................3 Inside Mount ................................4 Outside Mount ................................5 STEP 2: Automation and Touch Control —... -
Page 2: Getting Started
GETTING STARTED Product View Optional Dust Cover (For Outside Mount) Optional Back Cover (For Inside Mount) Installation Brackets Limit Stops Retractable Cord Headrail Rear Retractable Roller Shade Cord Tassel Front Shading Shading Bottom Rail Roller Shade Bottom Rail Battery Wand Activation Arm Battery Wand Programming... -
Page 3: Tools And Fasteners Needed
GETTING STARTED ® Thank you for purchasing the Kirsch Shadings Collection. With proper installation, operation, and care, your new shades will provide years of beauty and performance. Please thoroughly review this instruction booklet and the enclosed packing list before beginning the installation. If your shading has a protective cover on the fabric-covered headrail, keep the plastic in place until the shading is installed. -
Page 4: Installation
INSTALLATION INSTALLATION Installation Overview To install your shading, you will need to perform the following four steps: STEP 1: Mount the Installation Brackets STEP 2: Automation and Touch Control Only: Connect the Power Cable STEP 3: Install the Shading STEP 4: Connect the Power Source, If Applicable STEP 1: Mount the Installation Brackets The number of installation brackets required varies with shading width, as shown in the table. -
Page 5: Inside Mount
INSTALLATION INSTALLATION Mount the Installation Brackets — Inside Mount Back Cover Bracket Prepare the Installation Brackets Top Tab If using the optional back cover: ■ ■ NOTE: If you have a battery wand, do not remove the top tab on the back cover Back Cover bracket. -
Page 6: Outside Mount
INSTALLATION INSTALLATION Drill the screw holes using a ⁄ " drill bit. ■ ■ CAUTION: Use drywall anchors when mounting into drywall. Attach the installation brackets using the screws provided. ■ ■ IMPORTANT: Do not overtighten the screws. Check to ensure the lever can be moved easily side to side. -
Page 7: Step 2: Automation And Touch Control - Connect The Power Cable, If Applicable
INSTALLATION INSTALLATION Additional Clearance with Spacer Blocks NOTE: A minimum ⁄ " additional clearance is required for Automation and Touch Control shadings with a battery wand. If using ⁄ " or ⁄ " spacer blocks, attach the spacer block(s) and installation bracket to a flat ■... -
Page 8: Step 3: Install The Shading
INSTALLATION INSTALLATION Plug the Power Cable into the Battery Wand NOTE: When power is connected to the motor, a green LED inside the programming button housing will flash to indicate the shading is ready for operation. From the back of the shading headrail, connect the power cable (from the ■... -
Page 9: Step 4: Connect The Power Source, If Applicable
INSTALLATION INSTALLATION Attach the Optional Dust Cover (If Applicable) The dust cover is used to protect the top of the headrail from exposure on outside mounted shadings. Cut the dust cover to desired width. ■ ■ Remove Remove the paper backing on one side of the hook and loop fastener dots. ■... -
Page 10: Touch Control Only -Unpack The Wand And Attach To Activation Arm
INSTALLATION INSTALLATION Plug the power cable from the shading into the extension cable. ■ ■ Plug the other end of the extension cable into the socket in the battery wand. ■ ■ Battery Wand Cover Extension Cable Power Cable from Shading 18V DC Power Supply Power Cable Connect the Power Supply. -
Page 11: Operate The Shading
INSTALLATION OPERATION Operate the Shading A single control is used to operate both the front window shading and the rear roller shade. Operation is sequential. The front shading must be lowered and the vanes open before the rear roller shade can be lowered. Conversely, the rear roller shade must be raised before the vanes on the front shading can be closed and the front shading raised. -
Page 12: Touch Control
INSTALLATION OPERATION Touch Control Each push up and release the wand, or pull down and release the wand, will initiate one of three shading movements, in sequential order. See Basic Operation below. Basic Operation To Open the Shading Push the wand up and release, to sequentially move the front shading/vanes/back panel in the ■... -
Page 13: Automation
INSTALLATION OPERATION Go to Vanes Fully Open Position With the shading stationary, push and hold the wand up. The shading will begin to move. ■ ■ The shading will pause momentarily and then continue to move. ■ ■ Release the wand. ■... - Page 14 INSTALLATION OPERATION Joining a Shading to a Group IMPORTANT: The shading will not operate using the remote unit it has been joined to a group. 1. Press and hold ■ STOP on the remote until the indicator lights blink (approximately 6 seconds). The remote is now in program mode.
-
Page 15: Troubleshooting
First review the guide that came with your control device. ■ ■ Refer to the following troubleshooting procedures for specific solutions for your shading. ■ ■ ® For questions, please contract Kirsch at 844-KIRSCH2 (844-547-7242). Problem The headrail will not fit into the installation brackets. Solution Check that the installation brackets are level and aligned. - Page 16 Press the cap on until it latches. Squeeze Latch ® NOTE: Kirsch recommends AA alkaline batteries for use with our battery-powered shadings. These will provide more than one year of operation, depending on the usage. Lithium and rechargeable batteries are not recommended.
- Page 17 INSTALLATION OPERATION Problem The shading raises or lowers evenly, the fabric rubs against one end of the headrail, or the bottom rail is uneven when fully raised. Solution Check that the window is square by measuring the diagonals. Check that the installation brackets are level. Shim (not provided) to level, if necessary. Check that the limit stops are adjusted the same and are too tight.
- Page 18 INSTALLATION OPERATION Problem The shading is hard to raise or lower, or the bottom rail does not stop at the top limit. Headrail Limit Stop Solution Check the adjustment position of both limit stops. The top illustration shows the correct adjustment. The limit stop catches the bottom rail, and the bottom of the limit stop is slightly above or barely touching the fabric roll.
- Page 19 INSTALLATION OPERATION Problem Automation Only: Adjacent shadings do not roll up evenly. Solution It is considered normal if the roll-up on both shadings is within ⁄ " of each other. If one shading rolls up tighter than another, lower and raise both shadings several times. Reset the shading.
- Page 20 INSTALLATION OPERATION Problem Touch Control Only: The shading limits need to be adjusted. Solution Adjust the Upper Limit — available for Front Shading only. NOTE: Programming mode timeout is 20 seconds. If there is no action within 20 seconds, programming mode exits. Move the shading to the fully open position(front shading and rear shade are completely inside the headrail.) See ■...
-
Page 21: Removing The Shading (If Necessary)
Underside of Bracket Cleaning Procedures ® Kirsch Shadings are made of 100% polyester, which means they are inherently durable and resilient. However, care must be taken to avoid wrinkling the fabric, particularly where the vanes meet the facings. Fabric-Covered Headrail Spot-clean the headrail using a sponge or delicate cloth, cool distilled water and a mild soap solution;... -
Page 22: Child Safety
INSTALLATION CARE Injection/Extraction Shadings can be professionally cleaned using the injection/extraction method. ■ ■ Use only the dry method of injection/extraction for all Nera Light Dimming fabrics. ■ ■ Never immerse the headrail in the solution. ■ ■ Electrostatic Cleaning Do not use electrostatic cleaning wipes on any Shadings Collection fabrics. -
Page 23: Automation Declarations
INSTALLATION DECLARATIONS U.S. Radio Frequency FCC Compliance FCC ID information is located behind the motor-side end cap. The end cap may be removed to view this information. This device complies with Part 15 of the FCC Rules. Operation is subject to the following two conditions: (1) This device may not cause harmful interference, and (2) This device must accept any interference received, including interference that may cause undesired operation. -
Page 24: Warranty
This warranty gives you specific legal rights, and you may also have other rights which vary from state to state. © 2019 Kirsch Custom Window Coverings. All rights reserved. All trademarks used herein are the property of Kirsch or their respective owners. 09/19...
Need help?
Do you have a question about the Shadings Series and is the answer not in the manual?
Questions and answers