Table of Contents
Advertisement
Quick Links
Wall & Deck Mounted
Sequential Control
Thermostatic Mixer
HTMWMCP, HTMDMCP
HTMWMRS & HTMDMRS
Installation and Maintenance Instructions
Intatec Ltd
Airfield Industrial Estate
Hixon
Staffordshire
ST18 0PF
In this procedure document we have endeavoured to make the
information as accurate as possible
Tel: 01889 272 180
We cannot accept any responsibility should it be found that in
Fax: 01889 272 181
any respect the information is inaccurate or incomplete or
email: sales@intatec.co.uk
becomes so as a result of further developments or otherwise
web: www.intatec.co.uk
© Intatec Ltd. 2016
Advertisement
Table of Contents

Subscribe to Our Youtube Channel
Related Manuals for Inta HTMWMCP


Summary of Contents for Inta HTMWMCP
- Page 1 Wall & Deck Mounted Sequential Control Thermostatic Mixer HTMWMCP, HTMDMCP HTMWMRS & HTMDMRS Installation and Maintenance Instructions Intatec Ltd Airfield Industrial Estate Hixon Staffordshire ST18 0PF In this procedure document we have endeavoured to make the information as accurate as possible...
-
Page 2: Table Of Contents
Contents Thank you for choosing the Inta lever operated thermostatic wall mixer. Subject Page Introduction Technical Data Components - Wall Mounted Components - Wall Mounted with Removable Spout Components - Deck Mounted Components - Deck Mounted with Removable Spout Dimensions... -
Page 3: Introduction
HTMDMRS - HTM safe touch thermostatic sequential deck mounted tap with removable spout. Technical Data This Inta thermostatic mixer is suitable for installations on all types of plumbing systems, including gravity supplies, fully pumped, modulating combination boiler, unvented water heater and unbalanced supplies i.e. -
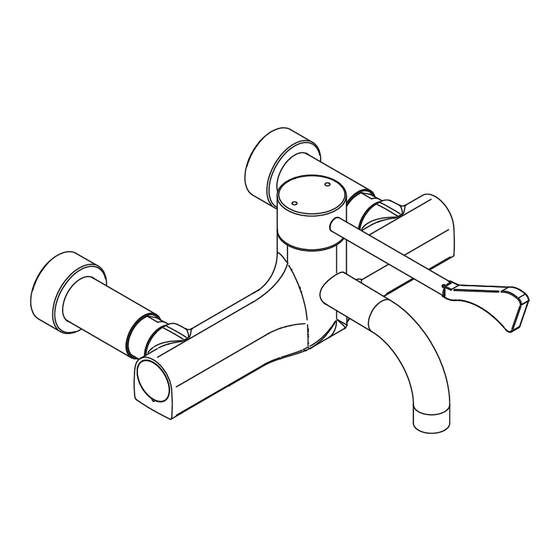
Page 4: Components - Wall Mounted
Components Wall Mounted with Fixed Spout Item Description Item Description Body inc. Outlet Diffuser Hot Water Insulator Thermostatic Cartridge Cold Water Inlet Assembly including 5 l/m flow regulator Lever Lever Retaining Screw Hot Water Inlet Assembly including 5 l/m flow regulator Concealing Plate Cold Water Inlet Tail Assembly Hot Water Port Blanking Assembly... -
Page 5: Components Wall Mounted With Removable Spout
Components Wall Mounted with Removable Spout Additional Components Removable Spout Item Description Item Description Body Spout Retaining Screw Spout ‘O’ Ring © Intatec Ltd 2016... -
Page 6: Components - Deck Mounted
Components Deck Mounted with Fixed Spout Item Description Item Description Body inc. Outlet Diffuser Hot Water Insulator Thermostatic Cartridge Cold Water Inlet Assembly including 5 l/m flow regulator Lever Lever Retaining Screw Hot Water Inlet Assembly including 5 l/m flow regulator Concealing Plate Cold Water Inlet Tail Assembly Hot Water Port Blanking Assembly... -
Page 7: Components Deck Mounted With Removable Spout
Components Deck Mounted with Removable Spout Additional Components Removable Spout Item Description Item Description Body Spout Retaining Screw Spout ‘O’ Ring © Intatec Ltd 2016... -
Page 8: Dimensions
Dimensions Wall Mounted Ø45 186.5 Ø50 Ø33 G½B Dimensions Deck Mounted Ø33 Ø50 G½B © Intatec Ltd 2016... -
Page 9: Installation
Installation Wall Mounting • The tap is supplied as shown in the Components section except that the thermostatic cartridge (2) and swivel nut connectors (9) are fitted into the body. • Fit the concealing plates (5) onto the tailpieces (6) (7). -
Page 10: Operation
Operation Hot Supply Cold Supply Max. blend temperature (preset) Cold Warm As the handle is rotated anti-clockwise from the off position the delivered water progresses from cold, through warm to the pre-set maximum temperature of approximately 43˚C. Trouble Shooting Fault Diagnosis Mixed water temperature is not hot enough. -
Page 11: Re-Calibration
Re Calibration The factory setting at 41˚C can be altered to suit site conditions. Warning: Care must be taken when altering the setting as incorrect calibration can cause injury. • Remove the grub screw. • Lift the handle cover off. •... -
Page 12: Aftercare
The HTMWMRS wall mounted and HTMDMRS deck mounted taps have a removable spout to assist with cleaning, disinfection by immersion or sterilisation in an autoclave. Inta recommend that a replacement spout is available as the tap should not be left without a spout (HTMSP16XX). -
Page 13: Removing Spout And Disinfection
Removing Spout Lever in closed position • Using a suitably sized Allen key unscrew the grub screw (18) located beneath the spout. The grub screw must be removed completely to ensure the ‘O’ rings are not damaged when the spout is pulled away. •... -
Page 14: System Flushing Procedure
System Flushing Procedure The water system must be thoroughly flushed before attempting to commission or operate this tap to ensure all pipework is clean and free from any debris. This system flushing procedure allows the process to be efficiently conducted with the tap installed. Failure to carry out effective system flushing before commissioning or operating this product could damage or limit the performance of the product and invalidate the product guarantee. -
Page 15: Sterilization Process
System Flushing Procedure OPEN 90° CLOSE 8 - Ensure the isolation valve 9 - Unscrew the connector plug using 10 - Repeat the procedure for the on the hot supply is suitably sized spanner and refit cold inlet side before opening closed before the check valve and end cover both isolation valves... - Page 16 Sterilization Process OPEN 90° CLOSE 5 - Fit the cold inlet plug into the hot 6 - Open the ball valve on the hot 6A - Turn to open position and the hot into the supply to start sterilization position cold position procedure OPEN...
-
Page 17: Tmv3 Installation Instructions
When this Mixer is used in a DO8 Application the following Instructions apply: Introduction This Inta Thermostatic Mixer has been specifically designed and manufactured to meet the requirements of BS 7942: 2000 and NHS D08. The product has been independently tested and approved as a TYPE 3 valve under the TMV3 scheme. - Page 18 1 bar differential pressure. 6. This Inta thermostatic mixer has been designed to be wall mounted. It is essential that access to the valve is not obstructed for future maintenance, that may be required to the valve or associated fittings.
- Page 19 Installation 10. It is essential that this product should not be installed in situations where there is a possibility of the valve being deprived of water or where demands for water are greater than the actual stored supplies. 11. To ensure that the performance levels of this Thermostatic Mixing Valve are maintained (in the event of cold water failure) the temperature of the hot water supply at the point of entry to the valve must be a minimum of 10°C above the commissioned mixed water discharge temperature.
- Page 20 Commissioning 5.3 Measure and record the temperature of the water discharging from the valve for the largest and smallest draw off point. 5.4 Isolate the cold water supply to the valve and monitor the mixed water temperature. 5.5 Measure and record the maximum mixed water temperature and the final temperature. The final temperature found during the test should not exceed the values quoted in table 2.
- Page 21 In Service Testing 3. If the mixed water temperature is acceptable, carry out the following: Record the temperature of the hot and cold water supplies. Record the temperature of the mixed water at the largest draw off flow rate. Record the temperature of the mixed water at the smallest draw off flow rate. Isolate the cold water supply to the mixing valve and monitor the mixed water temperature.
-
Page 22: Guarantee
Guarantee Intatec guarantees the product to be free from defects in materials and workmanship at the date of purchase. If the product is determined to be defective at the date of original purchase due to improper materials or workmanship and you inform us of this within the prescribed warranty period, (five years for showering products, one year for commercial products), of the date of purchase, Intatec will, without charge for labour or parts, repair or (at the discretion of Intatec) replace the product or its defective parts subject to the terms and limitations below. - Page 23 Notes: © Intatec Ltd 2016...
- Page 24 Please leave this Manual for the User To activate your product warranty please visit www.intatec.co.uk and click on Product Registration Intatec Ltd Airfield Industrial Estate Hixon Staffordshire ST18 0PF Tel: 01889 272 180 Fax: 01889 272 181 email: sales@intatec.co.uk web: www.intatec.co.uk ©...
Need help?
Do you have a question about the HTMWMCP and is the answer not in the manual?
Questions and answers