Table of Contents

Related Manuals for BluStream Multicast ACM200


Summary of Contents for BluStream Multicast ACM200
- Page 1 Reset Link Link Yellow Green Yellow Green 5V 12V Video LAN(PoE) Control LAN IR Ctrl DC 12V Blustream Multicast ACM200 - Advanced Control Module User Manual Revision 1.0 - January 2019 M U L T I C A S T...
-
Page 2: Table Of Contents
Web-GUI - Update Firmware 38 - 40 Web-GUI - Update Admin Password RS-232 (Serial) Routing Specifications, Package Contents & Maintenance Blustream IR, RS-232 & Telnet Commands 43 - 52 Troubleshooting Computer Settings - enabling TFTP & Telnet 54 - 57 Notes www.blustream.co.uk / www.blustream.com.au... -
Page 3: Introduction
• 3rd party drivers available for major home control brands Impotant Note: The Blustream Multicast system distributes HDMI video over Layer 3 Managed network hardware. It is advised that Blustream Multicast devices are connected on an independent network switch to prevent unnecessary interference, or reduction in signal performance due to other network devices bandwidth requirements. -
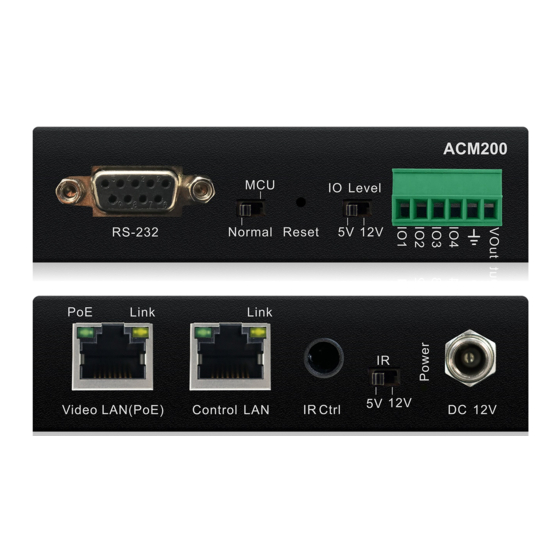
Page 4: Panel Descriptions - Acm200
Power LED Indicator - LED is on when the device is Video LAN (PoE) Port - connect to the network powered on. switch that the Blustream Multicast components Power Port – use 12V 1A DC adaptor (sold are connected to. -
Page 5: Acm200 Control Ports
1 2 3 4 Default Password: RS-232: The Blustream ACM200 can be controlled via serial using the serial DB9 connector. Default settings below: For the full list of command protocols please see ‘RS-232 & Telnet Commands’ located at towards rear of this manual. -
Page 6: Acm200 Control Ports - Ir Control
IR control - advanced features of the ACM200 such as video wall mode, audio embedding etc. can only be achieved using RS-232 or TCP/IP control. IO Level Blustream have created 16x input & 16x output IR commands allowing source selection of up to 16x IPxxxUHD-TX RS-232 Normal Reset Transmitters on up to 16x IPxxxUHD-RX Receivers. - Page 7 Link Yellow Green Yellow Green Optional 12V PSU where no PoE is available 5V 12V Video LAN(PoE) Control LAN IR Ctrl DC 12V 1G Managed Network Switch Multicast UHD IR Cable Network Switch RS-232 LAN Cable contact support@blustream.co.uk / support@blustream.com.au...
-
Page 8: Web-Gui Guide Overview
Users previously configured for future log ins. The default Admin password is: 1 2 3 4 Please note: the Admin password can be changed once logged in using the 'Update Password' option located in the main menu options. www.blustream.co.uk / www.blustream.com.au... -
Page 9: Web-Gui - New Project Set-Up Wizard
Click 'Next' to continue set-up: If at this point the Network Switch is not configured for use with the Blustream Multicast system, click on the hyperlink 'network switch setup guides' to navigate to a centralised webpage containing common Network Switch Guides. - Page 10 There are two methods for adding new Multicast Transmitter and Receiver devices to a system, please choose one before clicking 'Start Scan': Method 1: connect ALL Blustream Multicast Transmitter's and Receiver's to the network switch with their factory default IP addresses (169.254.100.254). This method will quickly configure all devices with their own individual IP...
- Page 11 Once the set-up method to configure the system has been chosen, hit the 'Start Scan' button. The ACM200 will search for new Blustream Multicast devices on the network and will continue to search for new devices until such time as:...
- Page 12 This pop-up shows an image preview of the media currently being streamed by the Transmitter unit. The ability to identify the unit by flashing the front panel LED's on the unit, and the ability to Reboot the unit. www.blustream.co.uk / www.blustream.com.au...
-
Page 13: Web-Gui - New Project Set-Up Wizard
Video Walls, Fixed Signal Routing (IR, RS-232, Audio etc), and the ability to back-up to a configuration file (recommended). Click 'Finish' once done to continue to the 'Drag & Drop Control' page, logged in as Administrator (see page 15). contact support@blustream.co.uk / support@blustream.com.au... -
Page 14: Web-Gui - Menu Overview
9. Users - used to set-up or manage users of the system. 10. Settings - access to various system settings including: network and resetting devices. 11. Update Devices - used for applying the latest firmware updates to the ACM200 and connected Blustream Multicast Transmiters and Receivers. -
Page 15: Web-Gui - Drag & Drop Control
ALL Receivers within the system to watch the source selected. Should the preview of this window show the Blustream logo, this signifies that there is a mixture of sources being watched across the range of Receivers within the system. The note underneath 'All Receivers' will display: 'TX: Different'. -
Page 16: Web-Gui - Video Wall Control
Should a screen within a Video Wall display on the GUI show 'RX Not Assigned', this means that the Video Wall does not have a Blustream Multicast Receiver unit assigned to the array. Please revert back to Video Wall set up to assign the Receiver accordingly. -
Page 17: Web-Gui - Preview
The Preview windows show a live grab of the media which automatically updates every few seconds. To select the Transmitter or Receiver to preview, use the drop down box to select the individual Transmitter or Receiver to preview. contact support@blustream.co.uk / support@blustream.com.au... -
Page 18: Web-Gui - Project Summary
6. Scan Once: scan the network once for any new Multicast device connected. Once discovered you will be presented with the option to: 1. manually assign a new device, or: 2. auto assign a new unit to the next available ID and IP address as connected. www.blustream.co.uk / www.blustream.com.au... -
Page 19: Web-Gui - Transmitters
HDMI audio when the 3.5mm audio jack is removed. 9. Actions - opens a pop-up window with advanced configuration settings. See following page for further information. 10. Refresh - refresh all current information on the devices within the system. contact support@blustream.co.uk / support@blustream.com.au... -
Page 20: Web-Gui - Transmitters
Receiver unit also for the CEC commands to be sent between. Default setting for this feature is Off. If more than one Blustream Receiver is viewing a Transmitter, the CEC is passed between all devices. Because of this it is advised to leave CEC disabled on all products unless required. - Page 21 It is recommended to ensure that the media from the Transmitter with the custom EDID displays correctly on other displays within the system. Please note: it is important that only one screen is viewing the Transmitter at the time the EDID Copy takes place. contact support@blustream.co.uk / support@blustream.com.au...
-
Page 22: Web-Gui - Receivers
12. Scaling Help - you can obtain some basic help with scaling selection by clicking the button at the top of the page marked 'Scaling Help'. See page 24 for more information. 13. Refresh - click here to refresh all current information on the devices within the system. www.blustream.co.uk / www.blustream.com.au... - Page 23 16. Remove from Project - removes the Receiver from the project. This does not factory reset the Receiver. 17. Factory Reset - restores the Receiver to it's original default settings and sets the default IP address. contact support@blustream.co.uk / support@blustream.com.au...
- Page 24 In some parts of the ACM200 Web-GUI, there is an option to display an OSD (On Screen Display) for assistance with the configuration of screens / Receivers, especially within a Video Wall array. See 'OSD Help' pop-up information below: www.blustream.co.uk / www.blustream.com.au...
-
Page 25: Web-Gui - Fixed Signal Routing
Fixed Routing can be found by clicking 'Fixed Routing Help'. It is possible to alter the fixed signal routing from a third party control system. For advanced routing commands please refer to the API section at the rear of this manual. contact support@blustream.co.uk / support@blustream.com.au... - Page 26 - Control4, ELAN, RTi etc. Connections: The third party control processor IR, or Blustream IR receiver, is connected to the IR RX socket on the Multicast Transmitter or Receiver. Please note: You must use Blustream 5V IRR Receiver or Blustream IRCAB (3.5mm stereo to mono 12V to 5V IR converter cable).
- Page 27 HDMI device to another for simple actions such as: Power, Volume etc. The Blustream Multicast system allows for the CEC channel within the HDMI link between two products (source and sink) to communicate with eachother using the CEC protocol.
-
Page 28: Web-Gui - New Video Wall Configuration
Web-GUI - New Video Wall Configuration Blustream Multicast Receivers can be configured to be part of a Video Wall array within the ACM200. Any Multicast system can contain up to 9x Video Wall arrays of differing shapes and sizes. Ranging from 1x2 up to 9x9. Each Video... - Page 29 Display / Receiver Assign (drop down boxes): The ACM200 will create a visual representation of the Video Wall on the page. Use the drop down arrows for each screen to select the relevant Multicast Receiver on the Video Wall array. contact support@blustream.co.uk / support@blustream.com.au...
- Page 30 'Copy Bezels to All' button can be used to copy the settings to each display. Click 'Update' to confirm settings, and 'Back' to return to the previous Update Video Wall screen. The 'Bezel Help' button opens a pop-up window with guidance to the correction and adjustment of these settings. www.blustream.co.uk / www.blustream.com.au...
- Page 31 Video Wall array. Use the dropdown selection for each screen to create a Group within the Video Wall: See next page for further explanation on how a larger Video Wall array can have multiple Groups configured within. contact support@blustream.co.uk / support@blustream.com.au...
- Page 32 Additional configurations can be created with screens assigned as groups. This allows multiple video sources to be viewed at the same time and will appear as a Video Wall within a Video Wall. The below example has two different sized Video Walls inside a 3x3 array. This configuration contains 2 groups: www.blustream.co.uk / www.blustream.com.au...
-
Page 33: Web-Gui - Existing Video Wall Configuration
This is particularly helpful when testing Video Wall configuration commands from a third party control system. Please see the advanced API commands for use with third party control systems for Video Wall control, Configuration switching and Group selection on page 46 of this guide. contact support@blustream.co.uk / support@blustream.com.au... -
Page 34: Web-Gui - Users
To set-up a new User, click 'New User' at the top of the screen: Enter the new User credentials into the window that appears and click 'Create' once completed: The new User will then appear in the Users menu page ready for access / permissions to be configured: www.blustream.co.uk / www.blustream.com.au... -
Page 35: Web-Gui - Users
/ screens applicable set-up. This way, any User of the system is required to enter a password to gain switching control of the system. contact support@blustream.co.uk / support@blustream.com.au... -
Page 36: Web-Gui - Settings
Please note: the New Project Setup Wizard will appear after using the 'Clear Project' function. Should a project save file not have been created prior to clearing the project, it is not possible to restore the system after this point. www.blustream.co.uk / www.blustream.com.au... -
Page 37: Web-Gui - Settings
2. Update the Telnet port number that the Control port of the ACM200 communicates through. The default port number used is port 23 which will be used for all official Blustream third party control drivers. 3. Update the RS-232 Baud Rate of the DB9 connection of the ACM200 to suit a third party control processor. The default Baud Rate used is: 57600. -
Page 38: Web-Gui - Update Firmware
Updating the ACM200: Download the ACM200 Firmware file (.bin) from the Blustream website to your computer. Click on the buttom marked 'Upload ACM200 Firmware' Select the [ACM200].bin file already downloaded to your computer for the ACM200. The file will automatically upload to the ACM200 which takes approximately 2 minutes to complete. - Page 39 USER MANUAL Web-GUI - Update Firmware - continued... The Update Firmware page is also used for firmware upgrading the firmware of Blustream Transmitters or Receivers. The most current firmware version for the Multicast Transmitters and Receivers can be downloaded from the Blustream website.
-
Page 40: Web-Gui - Update Admin Password
IMPORTANT: Once the Admin password has been changed, it cannot be recovered by the User. If the Admin password is forgotten or lost, please contact a member of the Blustream Technical Support team who will be able to assist in the recovery of the Admin rights of the unit. See email addresses below:... -
Page 41: Rs-232 (Serial) Routing
Once a connection is established, any characters that are sent from the ACM200 will be transmitted to the connected Transmitter or Receiver, and vice versa. To close the connection send the command: ACMCLOSEGUEST Please note: When the ACM200 is in GUEST MODE the web-GUI is disabled. contact support@blustream.co.uk / support@blustream.com.au... - Page 42 • 1 x IR control cable - 3.5mm to 3.5mm stereo to mono cable • 1 x 6-pin phoenix connector • 1 x Mounting kit Maintenance Clean this device with a soft, dry cloth. Never use alcohol, paint thinner or benzene to clean this device. www.blustream.co.uk / www.blustream.com.au...
- Page 43 USER MANUAL Blustream Infrared Commands Blustream have created 16x input & 16x output IR commands allowing source selection of up to 16x IPxxxUHD-TX Transmitters on up to 16x IPxxxUHD-RX Receivers. These are different to the source switching controls sent to a Multicast Receiver.
- Page 44 3:1080p@50 4:1080p@60 5:1080i@50 Set output xxx resolution to bypass (=0) 6:1080i@60 OUTxxxRESrr Set output xxx resolution to 2160p@30(=1) 7:720p@60 8:720p@50 9:1280x1024@60 10:1024x768@60 11:1360x768@60 12:1440x900@60 13:1680x1050@60 Single Receiver (output) status OUTxxxSTATUS (See status example at end of document) www.blustream.co.uk / www.blustream.com.au...
- Page 45 HDMI 4K@30Hz 4:4:4, Audio 7.1CH(Default) zz=16: HDMI 4K@60Hz 4:2:0, Audio 2CH PCM zz=17: HDMI 4K@60Hz 4:2:0, Audio 5.1CH DTS/DOLBY zz=18: HDMI 4K@60Hz 4:2:0, Audio 7.1CH DTS/DOLBY/HD Single Transmitter (input) status (See status example at end of docu- INyyySTATUS ment) contact support@blustream.co.uk / support@blustream.com.au...
- Page 46 Apply config: Configuration cidx Set Grouped Output from Single Source cidx gidx [SUCCESS] Done INPUT:yyy ALL video wall status VWSTATUS (See status example at end of document) Single Video Wall status VWidxSTATUS (See status example at end of document) www.blustream.co.uk / www.blustream.com.au...
- Page 47 Output xxx does not exist (RX has not been configured) Input yyy does not exist (TX has not been con- figured) Output xxx is offline Input yyy is offline Param range error (outside of given settings) contact support@blustream.co.uk / support@blustream.com.au...
- Page 48 Out Net HPD Ver Mode Res Rotate Name 001 On Off A7.3.0 VW Receiver 001 Fast Fr Vid/Aud/IR_/Ser/USB/CEC HDR MCas On 001 001/004/000/000/002/000 CEC DBG Stretch IR BTN LED SGEn/Br/Bit On On Off /9/8n1 IM MAC Static 00:19:FA:00:59:3F 169.254.006.001 169.254.006.001 255.255.000.000 ================================================================ www.blustream.co.uk / www.blustream.com.au...
- Page 49 VW Col Row CfgSel Name 02 02 Video Wall 2 OutID 001 002 003 004 CFG Name Configuration 1 Group FromIn Screen H01V01 H02V01 H01V02 H02V02 Configuration 2 Group FromIn Screen H02V01 H02V02 H01V01 H01V02 ================================================================ contact support@blustream.co.uk / support@blustream.com.au...
- Page 50 H01V01 H01V02 ================================================================ ACM200> gpio00status GPIO information ================================================================ IP Control Box ACM200 GPIO Info FW Version: 1.14 GPIO DIR Set Get 01 In - 1 02 In - 1 03 In - 1 04 In - 1 ================================================================ www.blustream.co.uk / www.blustream.com.au...
- Page 51 1:90 2:180 3:270] ee=[0:Always On 1...9:10~90Seconds] br=[0:300 1:600 2:1200 3:2400 4:4800 5:9600] [6:19200 7:38400 8:57600 9:115200] bit=Data Bits + Parity + Stop Bits, example: 8n1 Data Bits=[5...8], Parity=[n o e], Stop Bits=[1..2] name: Max 16 Characters contact support@blustream.co.uk / support@blustream.com.au...
- Page 52 VW idx HhhVvv OWaa VWww : Set Video Wall idx Position hh,vv Outer Width aa And View Width ww VW idx HhhVvv OHaa VHww : Set Video Wall idx Position hh,vv Outer Height aa And View Height ww aa=[100...1000]: Screen Outer Width/Height ww=[100...1000]: Screen View Width/Height www.blustream.co.uk / www.blustream.com.au...
-
Page 53: Troubleshooting
Able to ping the device but not login via Telnet connection If unable to communicate (ping) the ports of the ACM200, connect directly to the network switch and not via a DHCP modem router to test. contact support@blustream.co.uk / support@blustream.com.au... -
Page 54: Computer Settings - Enabling Tftp & Telnet
USER MANUAL Adjusting Your Computer Settings - Enabling TFTP & Telnet Prior to using the Blustream ACM200 Firmware update PC program you must activate both TFTP and Telnet fea- tures on the computer. This is achieved using the following steps below: In Windows, navigate to: Start ->... - Page 55 169.254.1.253 The following instructions allow a manual alteration of the IP address of the computer allowing a communication with Blustream Multicast devices. In Windows, type 'network and sharing' into the search box When the Network and Sharing screen opens, click on 'Change adapter settings'.
- Page 56 ACM200 USER MANUAL Right click on the Ethernet adaptor and click Properties In the Local Area Connection Properties window highlight Internet Protocol Version 4 (TCP/IPv4) then click the Properties button. www.blustream.co.uk / www.blustream.com.au...
- Page 57 Use the following IP address and enter in the correct IP, Subnet Mask, and Default gateway that corre sponds with the network setup. Press OK and close out of all network screens.The computers IP address has now been fixed. contact support@blustream.co.uk / support@blustream.com.au...
-
Page 58: Notes
ACM200 USER MANUAL Notes... www.blustream.co.uk / www.blustream.com.au... - Page 59 www.blustream.com.au...
Need help?
Do you have a question about the Multicast ACM200 and is the answer not in the manual?
Questions and answers