Bayer HealthCare Medrad MRXperion Operating Manual
Mr injection system
Hide thumbs
Also See for Medrad MRXperion:
- Operation manual (126 pages) ,
- Instructions for use manual (87 pages) ,
- Instructions for use manual (39 pages)

Related Manuals for Bayer HealthCare Medrad MRXperion


Summary of Contents for Bayer HealthCare Medrad MRXperion
- Page 1 Operation Manual 1 - 1 Operation Manual...
-
Page 3: Table Of Contents
Operation Manual 1 Introduction ......................1 1.1 Certifications....................................1 1.2 Intended Use....................................1 1.3 Training Information..................................1 1.4 Contraindications................................... 1 1.5 Restricted Sales ....................................1 1.6 Required Training ................................... 1 1.7 Disclaimers....................................... 1 2 Symbols........................3 2.1 Manufacturing Symbols ................................3 2.2 Shipper Symbols....................................3 2.3 Notified Body .................................... - Page 4 MEDRAD® MRXperion 7 System Lights and Indicators................23 7.1 Injector Head Lights and Indicators ............................23 7.2 Injector Status Lights...................................24 7.3 Pod Power Indicator..................................24 7.4 Hand Switch Light ..................................25 8 Powering Up and Shutting Down the System ..........27 8.1 Powering Up the System................................27 8.2 Powering Down the System ...............................28 8.2.1 Hard Shutdown..................................28 8.3 Restore from Injector Shutdown...............................28...
- Page 5 Operation Manual 13 Completing an Injection ..................55 13.1 Injection Complete ..................................55 13.2 Injection Aborted..................................56 13.3 Exiting Injection Complete ..............................57 13.3.1 Conducting Another Injection .............................57 14 Removing Disposable Syringes and Connector Tube ........59 14.1 Removing Disposable Syringes and Connector Tube......................59 15 Advanced Configurations ................61 15.1 System Setup ....................................61 15.1.1 System Setup Configurable Items ..........................62 15.2 Calculator Setup..................................62...
- Page 6 MEDRAD® MRXperion 18.1.3 Display Input Power Requirements..........................80 18.1.4 Pod Input Power Requirements ..........................80 18.2 Injector (Scan Room Unit) Specifications..........................80 18.2.1 Injector (Scan Room Unit) Dimensions ........................80 18.2.2 Scan Room Unit Power Supply Dimensions......................81 18.2.3 Input Power Requirements............................81 18.3 Environmental Specifications ..............................81 18.3.1 Non-Operating (Transportation and Storage)......................81 18.3.2 Operating ..................................81 18.3.3 Protection Against Electrical Shock ...........................82...
-
Page 7: Introduction
On-site initial installation and additional training as requested MEDRAD® MRXperion Quick Guides Syringe instructions for use (IFU) Please contact Bayer HealthCare Services or your local Bayer representative if any of these resources are needed. 1.4 Contraindications None known. 1.5 Restricted Sales Federal (USA) Law restricts this device to sale by or on the order of a physician. - Page 8 1 - 2 MEDRAD® MRXperion The system is not intended to deliver contrast agents and/or saline to more than one patient from the same saline container and Bayer disclaims any and all liability or consequences resulting from use of the same container on more than one patient.
-
Page 9: Symbols
Operation Manual 2 - 3 Symbols 2.1 Manufacturing Symbols Manufacturer Authorized representative in the European community 2.2 Shipper Symbols Temperature range Humidity range Atmospheric pressure range Serial number Catalog number This side up Keep dry Fragile... -
Page 10: Notified Body
2 - 4 MEDRAD® MRXperion 2.3 Notified Body Indicates that this device conforms to the requirements of the European Medical Device Directive 93/42/EEC 2.4 Regulatory Classifications Identifies a type BF applied part complying with EN 60601-1 standards Medical - General Medical Equipment As To Electrical Shock, Fire, and Mechanical Hazards Only In accordance with ANSI/AAMI ES60601-1 (2005, 3rd Ed.) CAN/CSA-C22.2 No. -
Page 11: Mr Icons And Classifications
Operation Manual 2 - 5 Indicates that a component contains an electrical fuse that can be replaced. 2.5 MR Icons and Classifications Has been demonstrated to pose no known hazards in a specified MR environment MR Conditional with specified conditions of use as defined by the ASTM International Standards for MRI Device Marking. - Page 12 2 - 6 MEDRAD® MRXperion Caution: Transportable Weight- 43.4kg Safe Working Load- 0.75kg Warning: Refer to warnings on Instructions for Use packaged in each carton. Caution: Refer to cautions on Instructions for Use packaged in each carton. Indicates hazardous voltage. Consult operating instructions Indicates that the information is a warning.
-
Page 13: Warnings, Cautions, And Notices
Do not immerse any system components in water or soap solutions. Disconnect the system from supply mains before cleaning. Do not use the system if any worn or damaged cabling is detected. Contact Bayer HealthCare Services for replacement. Fire Hazard - Serious patient and/or worker injury or death may result. -
Page 14: Cautions
Use only non-magnetic tools to install any scanner/magnet room components. Dispose of system components and accessories according to local regulations or contact Bayer HealthCare Services. When moving the system, hold the pedestal no higher than 45inches (114.3 cm) above the floor. -
Page 15: System Overview
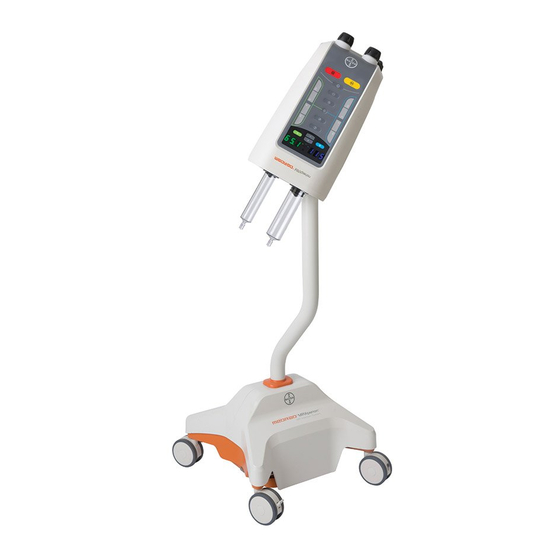
Operation Manual 4 - 9 System Overview 4.1 System Diagram The system is comprised of a scan room unit (injector) and a control room unit (touch screen display and Pod). These components are connected by a fiber optic communications link. NOTE: When using the system with an open-bore scanner, it is recommended that the injector be placed a minimum of 60 inches (152.4 cm) from the facade of the scanner. -
Page 16: Moving The System
4 - 10 MEDRAD® MRXperion Figure 4 - 2: System Diagram - Power Supply Outside Scanner Room Scan Room Control Room and MRI Equipment Room 1 - Scan Room Unit (Injector) 6 - Penetration Panel Filter 2 - Power Cable 7 - Scan Room Unit Power Supply 3 - Fiber Optic Communication Link 8 - Display and Pod Power Supplies... -
Page 17: Fluid Delivery Basics
Operation Manual 4 - 11 Once the injector head column is in place, move the system by holding the handle or by holding the pedestal below the point indicated by the label on the pedestal arm. To rotate the injector head column, turn the knob at the base of the injector head column counterclockwise to unlock it. -
Page 18: I Checked For Air
4 - 12 MEDRAD® MRXperion Pause Phase: Defines a set amount of time that fluid injection will be paused. The next phase will execute once the set time has elapsed. Hold Phase: Places the fluid delivery in Hold. The operator must press the “Start” button on the Pod, injector head or hand switch. -
Page 19: Fluid Pressure And Pressure Limiting
Operation Manual 4 - 13 4.3.7 Fluid Pressure and Pressure Limiting The fluid pressure is measured by the system during the execution of a phase and ensures the protocol Pressure Limit is not exceeded. Fluid pressure is dependent on the following: Flow rate Fluid viscosity Fluid temperatures... -
Page 20: Basic Informatics
4 - 14 MEDRAD® MRXperion Auto Docking: When Auto Advance is configured to be ON and a new empty syringe is installed, the injector piston automatically advances and docks with the syringe plunger. Auto Advance: When Auto Advance is configured to be ON and a new empty syringe is installed on the injector head, the piston automatically docks with the syringe plunger and advances it to the full forward position. -
Page 21: Understanding The Display And Pod
Operation Manual 5 - 15 Understanding the Display and Pod 5.1 Home Screen Figure 5 - 1: Home Screen Name Icon (if applicable) Description Shows the volume in the syringes. An outline of the syringe displays if no syringe is present. Syringe Volume Information If applicable, a dotted line displays on the syringe graphic to indicate... - Page 22 5 - 16 MEDRAD® MRXperion Name Icon (if applicable) Description Reset Resets the protocol to the default factory values. Displays the total programmed volume per syringe or the total Total Volume combined volume in both syringes. See "Section 15.4.1 - Fluid Delivery Setup Configurable Items"...
- Page 23 Operation Manual 5 - 17 Name Icon Description Injector Illuminates yellow when in active communication with injector head. Communicator I Checked for Air Illuminates yellow when the operator has confirmed that the Indicator syringes and tubing have been inspected for the presence of air. Figure 5 - 3: Protocol Manager Name Description...
-
Page 24: Pod Description
Accesses the eGFR and Weight-Based Dosing calculators. Calculator button will only Calculators appear in the Launch Menu if one or more calculators are enabled. Displays the contact information for Bayer HealthCare Services and launches Service Virtual Care Applications if installed. -
Page 25: Understanding The Injector Head
Operation Manual 6 - 19 Understanding the Injector Head 6.1 Injector Head Controls NOTE: For more detailed information about injector head button light functionality, see "Section - 7.1 - Injector Head Lights and Indicators". Name Icon (if applicable) Description Syringe A Contrast Syringe Syringe B Saline Syringe... - Page 26 6 - 20 MEDRAD® MRXperion Name Icon (if applicable) Description Double press with injector head pointed upward: Fills Syringe B (Saline) to the displayed volume (Auto Fill). Single press: Displays Auto Fill volume for 10 seconds. The total Auto Fill volume for Syringe B includes: the programmed injection volume Fill B volume to run KVO for one hour (if KVO is enabled)
-
Page 27: Injector Head Components
Operation Manual 6 - 21 Name Icon (if applicable) Description When pressed, initiates a test injection based on operator-defined parameters. When blinking, indicates that the operator can perform a test inject to determine patency of the patient connection. Test Inject The head must be oriented with the syringes pointed downward and the I Checked For Air must be confirmed to use this function. - Page 28 6 - 22 MEDRAD® MRXperion...
-
Page 29: System Lights And Indicators
Operation Manual 7 - 23 System Lights and Indicators 7.1 Injector Head Lights and Indicators The buttons on the injector head illuminate or blink depending on the conditions listed below: Name Button / Icon Behavior / Event Continuously illuminates white when Fill A button is pressed Continuously illuminates white when Fill B button is pressed. -
Page 30: Injector Status Lights
7 - 24 MEDRAD® MRXperion Name Button / Icon Behavior / Event Illuminates continuously when pressed Fill B Button Blinks to prompt the operator when KVO can be started KVO Button Illuminates continuously when KVO is enabled Blinks slow to prompt the operator when a test injection can be performed Test Inject Button Blinks fast during Test Injection Blinks slow after priming to alert the operator to I Checked for Air... -
Page 31: Hand Switch Light
Operation Manual 7 - 25 7.4 Hand Switch Light The optional hand switch enables an operator to start, hold, and stop an injection. The hand switch contains a light that identifies the state of the injector. This light illuminates or blinks depending on the conditions below: Table 7 - 2: Hand Switch Light Functionality Condition Hand Switch Light Description... - Page 32 7 - 26 MEDRAD® MRXperion...
-
Page 33: Powering Up And Shutting Down The System
The display will briefly show the system communication statuses and software versions. NOTE: If a communication error is displayed, contact Bayer HealthCare Services. Next, the Safety Screen will display. Read the warnings on the Safety Screen and select Continue. The system powers up and the Home Screen is displayed. -
Page 34: Powering Down The System
8 - 28 MEDRAD® MRXperion 8.2 Powering Down the System The system provides three options for powering down the system: Full System Shutdown, Injector Shutdown, and System Restart. From the Launch menu, select Shutdown, and then select a shutdown option or press the power button on the Pod. Figure 8 - 2: Power Down Options Select from the following shutdown options: System Shutdown: Both the display and the injector shutdown. -
Page 35: Calculators
Operation Manual 9 - 29 Calculators The system includes two calculators that can be used for determining weight-based dosing values and eGFR values. CAUTIONS Minor or moderate patient and/or worker injury may result. eGFR values are estimates. Decisions about the use of contrast media should be made by the on-site professionals. eGFR values derived from the operator of these algorithms are estimates and may be in error. -
Page 36: Setting Up The Egfr Calculator
9 - 30 MEDRAD® MRXperion The calculator setup can also be accessed from the Setup button on the Calculator screen. From the launch menu, select Calculator (1). Select the Setup button (2). Figure 9 - 2: Accessing Calculator Setup from the Calculator screen 9.2.1 Setting Up the eGFR Calculator Access the eGFR Calculator Setup by selecting the eGFR tab (1) on the Calculator Setup screen. - Page 37 Operation Manual 9 - 31 NOTE: eGFR formulas have known limitations. Adhere to site policy and guidelines for proper use of these formulas. To view the formula details, select the formula name button. Click OK to close the message window. Figure 9 - 4: Viewing eGFR calculator formula Table 9 - 1: eGFR Formulas Calculator...
- Page 38 9 - 32 MEDRAD® MRXperion eGFR Calculator References: MDRD: Levey AS, Coresh J, Greene T, Stevens LA, Zhang YL, Hendriksen S, Kusek JW, Van Lente F; Chronic Kidney Disease Epidemiology Collaboration. Using standardized serum creatinine values in the modification of diet in renal disease study equation for estimating glomerular filtration rate.Ann Intern Med. 2006 Aug 15;145(4):247-54.
- Page 39 Operation Manual 9 - 33 From the drop down menu, select the number of ranges (1). Enter the maximum value for each range by selecting the field (2) and entering the numbers using the keypad. Select Enter to confirm value. The starting value for the next range will be automatically calculated and populated. Repeat step 4 for additional ranges.
-
Page 40: Setting Up The Weight-Based Dosing Calculator
9 - 34 MEDRAD® MRXperion 9.2.2 Setting Up the Weight-Based Dosing Calculator Figure 9 - 7: Defining Dosing Unit - Weight-Based Dosing Calculator Access the Weight-Based Dosing Calculator setup by selecting the Weight-Based tab (1) on the Calculator Setup screen. Define a dosing unit from the pick list (2). -
Page 41: Using The Weight Based Dosing Calculator
Operation Manual 9 - 35 Enter the patient parameters (2) as indicated. Select a parameter, then use the keypad or pick list to input patient parameter. NOTE: Required parameters will vary based on the selected formula. Serum Creatinine: Enter Serum Creatinine using the keypad. Press Enter to save or Cancel to disregard. Height: Enter the patient’s height using the keypad. - Page 42 9 - 36 MEDRAD® MRXperion Figure 9 - 9: Using the Weight-Based Dosing (WBD) Calculator...
-
Page 43: Protocol Management
Operation Manual 10 - 37 Protocol Management 10.1 Create or Edit a Protocol Operators create and edit protocols from the Home Screen. Select an arrow (1) to create or edit a protocol. Choose a phase type from the pick list (2) on the right of the display or choose Delete to remove an existing phase. Figure 10 - 1: Select Phase Type Table 10 - 1: Phase Types Phase Type... - Page 44 10 - 38 MEDRAD® MRXperion Select two of the three parameters (3) (See"Section 15.4.1 - Fluid Delivery Setup Configurable Items" for more information) and enter the values using the keypad(4). The third parameter will be calculated automatically. Figure 10 - 2: Enter Parameters Select Enter to confirm the entered value or select Cancel to disregard.
- Page 45 Operation Manual 10 - 39 Optionally, set or modify a reminder. Reminders are alerts that display after an operator-defined amount of time. The system stores reminders as part of the protocol. Select Reminders (1) from the Home Screen. Figure 10 - 4: Enter Reminders b.
-
Page 46: Save A Protocol
10 - 40 MEDRAD® MRXperion To define or modify the Test Inject parameters: Select Test Inject (1). Figure 10 - 5: Edit Test Inject Parameters b. Check the Enable box (2) to enable the test injection function. Select the parameter (3) to be automatically calculated. d. -
Page 47: Recall A Saved Protocol
Operation Manual 10 - 41 10.3 Recall a Saved Protocol Select Protocol Manager from the Home Screen. Select the desired region or select View All (1). Select the protocol name (2). Select OK (3). The Home screen displays the selected protocol. Figure 10 - 7: Recall Protocol To edit the protocol, see "Section 10.1 - Create or Edit a... - Page 48 10 - 42 MEDRAD® MRXperion...
-
Page 49: Preparing For Injection
Operation Manual 11 - 43 Preparing for Injection WARNING Blood Vessel Hazard - Serious patient injury or death may result. Ensure that the programmed flow rate meets facility guidelines. Air Embolism Hazard - Serious patient injury or death may result. Expel all trapped air from the syringe(s), connectors, tubing, and catheter-over-needle before connecting the system to the patient. -
Page 50: Control Room Preparation
11 - 44 MEDRAD® MRXperion 11.1 Control Room Preparation 11.1.1 Prepare Injection Protocol A protocol must be set and locked prior to installing syringes in order to use any enabled automatic syringe installation features. Set the protocol. To recall a protocol, see "Section 10.3 - Recall a Saved Protocol". -
Page 51: Filling A Syringe: Automatically Or Manually
Operation Manual 11 - 45 With the Auto Advance feature, the piston automatically advances and engages the syringe plunger and then advances it to the full forward (0 mL) position. The Fill A and Fill B button will blink when Auto Advance is complete for the corresponding syringe. -
Page 52: Attach And Prime The Tubing
11 - 46 MEDRAD® MRXperion NOTE: The system draws in the configured Auto Load Purge Volume and then expels this volume. The Auto Load Purge volume can be set to 10mL, 5mL, or 2mL. (Instructions for setting the Auto Load Purge volume are in "Section 15.4 - Fluid Delivery Setup".) To manually fill the syringe:... -
Page 53: Connect The Tubing To Patient
Operation Manual 11 - 47 Ensure the fluid path is free from excess air. NOTE: If required, turn the manual knobs or repeat the priming steps above to advance fluid and remove any remaining air. Confirm that the fluid path has been examined and is free from excess air by pressing the I Checked for Air Confirmation button on the injector head. - Page 54 11 - 48 MEDRAD® MRXperion...
-
Page 55: Arming And Injecting
Operation Manual 12 - 49 Arming and Injecting NOTE: Verify that the protocol is correct prior to locking the protocol. 12.1 Add Volume Indicator Whenever the total volume programmed to be injected is greater than the volume remaining in the syringes, the Home Screen provides on-screen Add Volume indicators to communicate how much fluid should be added to perform the protocol. - Page 56 12 - 50 MEDRAD® MRXperion Figure 12 - 2: Arming Prevented Communication After examining the fluid path to determine it is free from excess air, perform the I Checked for Air Confirmation: Figure 12 - 3: I Checked for Air Confirmation Select Yes to acknowledge that the operator has examined the syringes and connector tubing and has determined that all air has been expelled.
-
Page 57: Arming From The Scan Room
Operation Manual 12 - 51 12.2.2 Arming from the Scan Room Press the I Checked for Air Confirmation button on the injector head to acknowledge that the operator has confirmed that all air has been expelled from the syringe and tubing. NOTE: If the last piston movement was a reverse movement or if a syringe required by the protocol is not present, the system does not permit arming and communicates this to the operator. -
Page 58: Initiating An Injection
12 - 52 MEDRAD® MRXperion Following the I Checked for Air Confirmation, select the KVO button to initiate KVO. KVO may be stopped at any time by selecting the KVO button after KVO is initiated (illuminated in blue) or by pressing any injector head control button. -
Page 59: Viewing Injection Progress
Operation Manual 12 - 53 12.7 Viewing Injection Progress During an injection, the system displays the following: Figure 12 - 5: Injection Views Pressure Graph The graph shows the pressure sensed by the system during an injection. Phase View The system highlights each phase as it starts. Reminders Indicates the number of set reminders. -
Page 60: Reminders
12 - 54 MEDRAD® MRXperion 12.8 Reminders A Reminder dialog will display after the programmed time for the Reminder has elapsed. NOTE: If a Test Inject phase is performed, the reminder elapsed time begins with the start of the first phase after the Test Inject. -
Page 61: Completing An Injection
Operation Manual 13 - 55 Completing an Injection 13.1 Injection Complete When an injection completes: The Injection Completed screen displays a summary of the injection and the total fluid delivered. The elapsed time of the injection continues to increment until an operator exits the Injection Completed screen. KVO, if activated (the KVO button will be illuminated blue), continues to dispense small boluses of saline until the operator stops KVO or until no fluid remains in Syringe B. -
Page 62: Injection Aborted
13 - 56 MEDRAD® MRXperion Select the Graph button to view a graphical representations of the injection. Figure 13 - 2: Injection Complete - Graph Select the left or right arrow (1) to scroll through the injection history. (If the entire injection history fits within the graph, no arrows will appear.) A graphical representation (2) of the phases and pressure limits of the completed injection is displayed until the Injection Complete screen is exited. -
Page 63: Exiting Injection Complete
Operation Manual 13 - 57 13.3 Exiting Injection Complete 13.3.1 Conducting Another Injection NOTE: Depending on how Fluid Delivery Setup is configured, the protocol may reset after the injection. The default setting is for the system to keep the previous protocol for the next injection. Select Same Patient. - Page 64 13 - 58 MEDRAD® MRXperion...
-
Page 65: Removing Disposable Syringes And Connector Tube
Operation Manual 14 - 59 Removing Disposable Syringes and Connector Tube 14.1 Removing Disposable Syringes and Connector Tube WARNING Biological Contamination Hazard - Serious patient and/or worker injury or death may result. Properly discard syringes and connector tube after single use or if contamination may have occurred during setup or use. Disconnect the disposable connector tube set from the catheter. - Page 66 14 - 60 MEDRAD® MRXperion...
-
Page 67: Advanced Configurations
Operation Manual 15 - 61 Advanced Configurations 15.1 System Setup System Setup enables the operator to configure settings that affect operation of the overall system. From the launch menu, select Setup, then select System Setup. Figure 15 - 1: Setup Categories (System Setup) Select a System Setup option or toggle to the next screen for additional options. -
Page 68: System Setup Configurable Items
15 - 62 MEDRAD® MRXperion Set the parameter for the selected option. Figure 15 - 3: Option Parameters for Display Audio Level - System Setup Select OK. Select Yes to confirm and save the changes. 15.1.1 System Setup Configurable Items Configurable Item Description Language... -
Page 69: Protocol Manager Setup
Operation Manual 15 - 63 15.3 Protocol Manager Setup Protocol Manager Setup enables the operator to manage the organization and display of protocols that are stored in the Protocol Manager. To create or edit a protocol, refer to "Section 10.1 - Create or Edit a Protocol". -
Page 70: Rearrange Protocol List
15 - 64 MEDRAD® MRXperion 15.3.2 Rearrange Protocol List From the Protocol Manager Setup screen, select the protocol name. Select Move Up or Move Down. Figure 15 - 6: Rearrange Protocol List 15.3.3 Hide/Show a Region From the Protocol Manager Setup screen, select the desired region. Select HIDE to hide a region and select SHOW to display a hidden region. -
Page 71: Rename A Region
Operation Manual 15 - 65 15.3.4 Rename a Region From the Protocol Manager Setup screen, select the desired region. Select RENAME. Figure 15 - 8: Rename a Region Enter the name using the keyboard that pops up, and select Enter. Select OK, then select Yes on the confirmation window to save changes. - Page 72 15 - 66 MEDRAD® MRXperion Select a Fluid Delivery Setup option (1) or toggle to the next screen for additional options (2). Figure 15 - 10: Setup Screen (Fluid Delivery Setup) Set the parameter for the selected option. Figure 15 - 11: Option Parameters (Fluid Delivery Setup) Select OK.
-
Page 73: Fluid Delivery Setup Configurable Items
Operation Manual 15 - 67 15.4.1 Fluid Delivery Setup Configurable Items Configurable Item Description Sets the syringe to be used for priming the tubing. Select A to configure Syringe A (contrast) to Priming Source be the priming source. Select B to configure Syringe B (saline) to be the priming source. Enable or disable test injection. - Page 74 15 - 68 MEDRAD® MRXperion Edit information for each of the following items by selecting a tab (2) on the left of the screen and entering the parameters: Figure 15 - 12: Adding a New Contrast Type Contrast Name: Select an existing contrast name from the list (3) or add a new contrast name by selecting Add New (4) and entering the name of the contrast using the keyboard window that will appear on the display.
- Page 75 Operation Manual 15 - 69 15.4.2.2 Editing an Existing Contrast Type Select Contrast Types on the Fluid Delivery Setup screen. Select a saved Contrast Type (1) on the Contrast Configuration screen and select Edit (2). Figure 15 - 13: Select an Existing Contrast Type to edit Edit information for each of the following items by selecting a tab on the left of the screen and entering the parameters (See Figure 15 - 14): Contrast Name: Select an existing contrast name from the list (3) or add a new contrast name by selecting Add...
-
Page 76: Help
From the Help screen, users can view applicable patent information, licensed features, and the software version their system is running. Information regarding the operation manual and Bayer HealthCare Services can also be found on Help screen. 15.5.1 Accessing the Help System Access the system settings by opening the Launch Menu (1). -
Page 77: Status
Operation Manual 15 - 71 Figure 15 - 16: Help System Navigation 15.6 Status If available, Status provides an indication of system status information. When selected, Status will display information that may be beneficial when placing service support requests. Figure 15 - 17: Status... - Page 78 15 - 72 MEDRAD® MRXperion...
-
Page 79: System Messages
Operation Manual 16 - 73 System Messages The system will display messages on the screen as conditions or events occur. There are three types of basic messages: Type 1 messages Type 2 messages Type 3 messages 16.1 Type 1 Messages Type 1 messages provide information regarding the current system status and will clear automatically. -
Page 80: Type 3 Messages
If the condition cannot be corrected, record the code and number from the lower left corner of the dialog box and call Bayer HealthCare Services for assistance. Figure 16 - 3: Type 3 Message Example... -
Page 81: Maintenance And Checkout
The following procedures are recommended for daily cleaning and inspection of all components in the system. If any defects are detected, repair the system or call Bayer HealthCare Services for service. Do not use the system until the problem is corrected. -
Page 82: Cleaning The Pedestal
Inspect the pedestal for loose or damaged components. Tighten or repair as necessary. NOTE: All relevant guidelines for facility, local, or national safety recommendations related to cable routing and installation should be followed. NOTE: Contact Bayer HealthCare Services or your local dealer for service or repairs 17.1.4 Cleaning the Display NOTICE Electro-Mechanical Hazard - Equipment Damage may result. -
Page 83: Monthly
Once a month, the entire system should be thoroughly inspected and cleaned and an operational checkout should be performed. Disconnect the system from line power before cleaning. If any defects are detected, either repair the system or call Bayer HealthCare Services for service. Do not use the system until the problem is corrected. 17.2.1 Operational Checkout A basic functional checkout of the system should be included as part of regular maintenance. -
Page 84: Annually
17 - 78 MEDRAD® MRXperion Resume the injection and verify the injection completes normally and that the Injection Complete screen displays the results. Advance plungers to the full forward position, remove syringes, and ensure that the pistons automatically retract. 10. Power down the injector. 17.3 Annually Once a year, a system calibration and leakage check should be performed by a qualified Services representative. -
Page 85: Specifications
18 - 79 Specifications 18.1 Display Specifications 18.1.1 Display Dimensions NOTE: Listed dimensions are approximate. 18.1.2 Display Connections Hand Switch connection Ethernet connection (Bayer HealthCare Services use only) Ethernet connection 2 (to the display) Fiber optic connections Power Supply connection... -
Page 86: Display Input Power Requirements
18 - 80 MEDRAD® MRXperion 18.1.3 Display Input Power Requirements 100-240 VAC 47-63 Hz 1.6A 18.1.4 Pod Input Power Requirements 100-240 VAC 50-60 Hz 0.35A 18.2 Injector (Scan Room Unit) Specifications 18.2.1 Injector (Scan Room Unit) Dimensions NOTE: Listed dimensions are approximate. -
Page 87: Scan Room Unit Power Supply Dimensions
Operation Manual 18 - 81 18.2.2 Scan Room Unit Power Supply Dimensions (1) AC Main Power Input and Main Power Switch (2) Scan Room Unit Power and Output 18.2.3 Input Power Requirements 100-240 VAC 50/60 Hz 120VA - 210VA 18.3 Environmental Specifications 18.3.1 Non-Operating (Transportation and Storage) Temperature: -20°C to 60°C (-4°F to +140°F) -
Page 88: Protection Against Electrical Shock
18 - 82 MEDRAD® MRXperion 18.3.3 Protection Against Electrical Shock Per IEC60601-1:2012 (Edition 3.1), the system is designed as a Class 1 Medical Device with a type BF applied part. Type BF corresponds to the degree of protection against electrical shock by the applied part of the Medical Device. Class 1 equipment requires a protective earth connection (electrical grounding) to ensure protection against electrical shock in the event of a failure of the basic insulation system. -
Page 89: System Capabilities
Operation Manual 18 - 83 18.4 System Capabilities SYRINGE A: Disposable 65 mL SYRINGE B: Disposable 115 mL 0.5 mL to max. syringe volume in: SYRINGE A: VOLUME 0.1 mL increments up to 31 mL (Programmable): 1 mL increments above 31 mL SYRINGE B: 1 mL to max. -
Page 90: System Fluid Performance
18 - 84 MEDRAD® MRXperion 18.7 System Fluid Performance The injector’s ability to generate pressure is only one factor affecting maximum flow rates. Other factors include: Catheter diameter Viscosity of the fluid Tube length Number of tubing sections Tube diameter Temperature of the fluid, tube, and syringes during the injection Maximum pressure setting on the injector To illustrate the wide range of maximum flow rates, a number of laboratory tests were performed using the MEDRAD®... -
Page 91: Options And Accessories
Operation Manual 19 - 85 Options and Accessories 19.1 MEDRAD® MRXperion MR Injection System Catalog Number MEDRAD® MRXperion MR Injection System MRXP 200 19.2 MEDRAD® MRXperion Injection System Syringe Kit Catalog Number 65/115 mL Syringes with 96” Low Pressure T- Connector Tube with Check Valve and Two XP 65/115 VS Spikes... - Page 92 19 - 86 MEDRAD® MRXperion...
-
Page 93: Compliance To En/Iec 60601-1-2: 2007
Operation Manual 20 - 87 Compliance to EN/IEC 60601-1-2: 2007 Special precautions regarding Electromagnetic Compatibility (EMC), are required for installation and use of this system. The system complies with the requirements of: EN 60601-1-2:2007 Medical Electrical Equipment-Part 1: General Requirements for Safety, Amendment No. 2. Collateral Standard: Electromagnetic Compatibility Requirements and Tests. - Page 94 20 - 88 MEDRAD® MRXperion Recommended Separation Distances Between Portable and Mobile RF Communications Equipment and the System The system is intended for use in an electromagnetic environment in which radiated RF disturbances are controlled. The customer or the operator of the system can help prevent electromagnetic interference by maintaining a minimum distance between portable and mobile RF communications equipment (transmitters) and the system as recommended below, according to the maximum output power of the communications equipment.
- Page 95 Operation Manual 20 - 89 Guidance and Manufacturer’s Declaration - Electromagnetic Immunity The system is intended for use in the electromagnetic environment specified below. The customer or operator of the system should assure that it is used in such an environment. Immunity Test IEC 60601 Test Level Compliance Level...
- Page 96 20 - 90 MEDRAD® MRXperion Guidance and Manufacturer’s Declaration - Electromagnetic Immunity The system is intended for use in the electromagnetic environment specified below. The customer or operator of the system should assure that it is used in such an environment. Immunity Test IEC 60601 Test Level Compliance Level...
- Page 98 United States and other countries, all patient data that appear in this document are fictitious. No actual patient information is shown. Bayer HealthCare and Bayer HealthCare Services. For a full list of Bayer offices and authorized dealers, go to: http://www.radiology.bayer.com Radiology www.radiology.bayer.com...
Need help?
Do you have a question about the Medrad MRXperion and is the answer not in the manual?
Questions and answers