enphase ENV-S-WM230 Installation And Operation Manual
Hide thumbs
Also See for ENV-S-WM230:
- Installation and operation manual (37 pages) ,
- Quick install manual (3 pages) ,
- Quick start manual (4 pages)

Subscribe to Our Youtube Channel
Related Manuals for enphase ENV-S-WM230


Summary of Contents for enphase ENV-S-WM230
- Page 1 INSTALLATION AND OPERATION MANUAL Enphase Envoy-S Metered Multiphase 141-00035 Rev 01...
-
Page 2: Environmental Protection
Product information is subject to change without notice. All trademarks are recognised as the property of their respective owners. For warranty text, refer to enphase.com/warranty. User documentation is updated frequently; Check the Enphase website (enphase.com/support) for the latest information. Copyright © 2016 Enphase Energy Inc. All rights reserved. -
Page 3: Table Of Contents
Required Items ..........................9 Optional Items ........................... 9 System Metering ..........................9 Create the Map and Install the PV Modules and Enphase Microinverters ........10 Installation Sequence ......................... 11 Installing the Envoy-S ........................12 1. Choose a Location for the Envoy-S ....................13 2. - Page 4 View or Change Monitoring Settings ..................... 29 View Microinverter Information ..................... 33 View Envoy Information ......................... 33 Open a Connection for Enphase Troubleshooting ................ 33 Troubleshooting ..........................34 Device Detection Issues ........................34 Issue: Installer Toolkit Shows “Cross Domain Traffic Reported” ..........34 Issue: Device Communications LED is Solid Amber..............
-
Page 5: Safety
Do not wire unused terminals or terminal blocks on the Envoy-S. DANGER: Risk Do not use Enphase equipment in a manner not specified by the manufacturer. of electric Doing so may cause death or injury to persons, or damage to equipment. -
Page 6: The Enphase Envoy-S
This integrated system maximises energy harvest, increases system reliability, and simplifies design, installation and management. The Enphase Microinverter converts the DC output of the PV module into grid-compliant AC power. In addition to performing the DC to AC conversion, it maximises energy production by using a sophisticated Maximum Power Point Tracking (MPPT) algorithm. -
Page 7: Installation Planning And Preparation
At regular intervals, the Envoy-S polls each Enphase device for its energy data. Using its Internet connection, the Envoy-S then forwards that information to Enlighten. The Envoy-S also reports any error conditions affecting itself or other Enphase devices. You can view both energy data and error conditions in Enlighten. -
Page 8: Pre-Installation Checks
If you are installing in a multiphase application, the power line communication signal must be “coupled” between the phases to allow the Envoy to communicate with all of the Enphase devices in the system. Install a phase coupler on the load side of the over-current protection device. See the Enphase Technical Brief on Phase Coupling for your region at enphase.com/support... -
Page 9: Metering Ct Considerations
Ethernet cable (use 802.3, unshielded Cat5E or Cat6). Do not use shielded twisted pair (STP) cable. System Metering The Envoy-S monitors up to 600 Enphase Microinverters and up to 39 Enphase AC Batteries. Envoy-S name and model Case Metering / reporting... -
Page 10: Create The Map And Install The Pv Modules And Enphase Microinverters
Create the Map and Install the PV Modules and Enphase Microinverters If you installed an Enphase PV system at this site, create the Enphase installation map and install the PV modules and Enphase Microinverters. You will scan this map later using Installer Toolkit and your mobile device. -
Page 11: Installation Sequence
4. Optional: Install DRM & a central disconnect 5. Energise the Envoy-S 6. Launch Installer Toolkit and start AP mode 7. Detect devices 8. Verify system configuration 9. Connect to Enlighten 10. Send summary report © 2016 Enphase Energy Inc. 141-00035 Rev 01... -
Page 12: Installing The Envoy-S
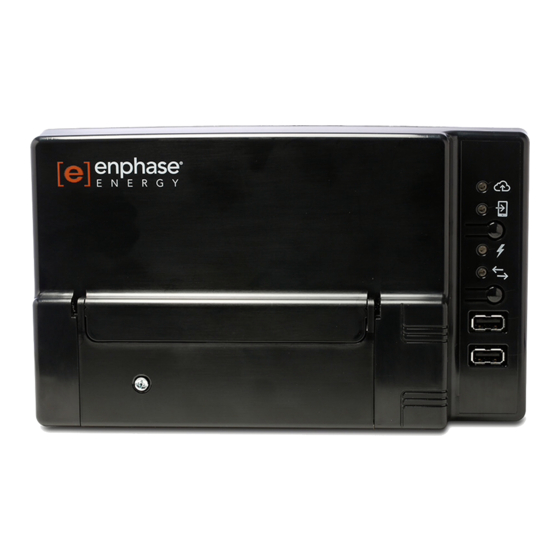
Envoy-S Metered Multiphase Installation and Operation Installing the Envoy-S To install the Envoy-S, perform the following steps and refer to this diagram: Envoy-S Metered (model number ENV-S-WM-230) LEDs and buttons ports Terminal blocks ports Ethernet port © 2016 Enphase Energy Inc. 141-00035 Rev 01... -
Page 13: Choose A Location For The Envoy-S
White – L2 (Active) Grey – L3 (Active) Grey – L3 (Active) Blue – L3 (Active) Blue – Neutral Blue – Neutral Black – Neutral Green/Yellow – Ground/PE Green – Ground/PE Green – Ground/PE © 2016 Enphase Energy Inc. 141-00035 Rev 01... -
Page 14: Install Cts For Metering
AC lines at three points: the main switchboard feed, the Envoy, and the solar production circuit breaker. Wire colours may not always consistently identify Lines 1, 2 and 3. If in doubt, use a multimeter to check. © 2016 Enphase Energy Inc. 141-00035 Rev 01... - Page 15 If it cannot be de-energised, a qualified electrician may safely install the CT as directed, making sure to connect the leads and then place the CT around the wire and latch. © 2016 Enphase Energy Inc. 141-00035 Rev 01...
-
Page 16: Extend Ct Leads, If Needed
Buried wires must be certified for direct burial and follow the code for installation. Do not bury splices unless in a certified junction box rated for the application, and use a certified moisture resistant connection method. © 2016 Enphase Energy Inc. 141-00035 Rev 01... -
Page 17: If Required, Install Drm Support And A Central
On the Envoy-S, if the AP Mode LED is not lit, press the AP Mode button. On your mobile device, go to Settings and join the Wi-Fi network “Envoy_nnnnnn” (where “nnnnnn” represents the final six digits of the Envoy-S serial number). © 2016 Enphase Energy Inc. 141-00035 Rev 01... -
Page 18: Detect The Devices
Method B: Discover Devices with Installer Toolkit Use the Installer Toolkit mobile app to set the number of Enphase devices that the Envoy-S should search for on the power line. -
Page 19: Verify System Configuration
It flashes green when devices are upgrading. Check Installer Toolkit for production status details. If the Power Production LED remains solid amber, see “Power Production Issues” on page 36. © 2016 Enphase Energy Inc. 141-00035 Rev 01... -
Page 20: Connect To Enlighten
9. Connect to Enlighten The Envoy-S requires a connection to the Internet for reporting to Enlighten. You can provide this connection through an existing broadband router, other Wi-Fi access point, or by using the Enphase Mobile Connect cellular modem. WARNING! Risk of Equipment Damage. Do not remove power from the Envoy-S if the LEDs are flashing green. -
Page 21: Method C: Ethernet Cable
Tighten an additional tie wrap around the ferrite bead. h. Trim any tie wrap excess. Plug the other end of the Ethernet cable into the bridge. Plug the other bridge into an AC socket near the broadband router. © 2016 Enphase Energy Inc. 141-00035 Rev 01... -
Page 22: If The Internet Connection Fails
Envoy serial number). NOTE: If you connect to an Envoy after associating it to a system, the report includes a system name and address. For more information, refer to the Enphase Installer Toolkit Operation Manual at: enphase.com/support. © 2016 Enphase Energy Inc. -
Page 23: Activate Monitoring
Envoy-S, Enlighten sets up an account for the site owner. When you complete the registration and installation, Enphase sends account information to the site owner so that they can log in to the Enlighten website and view system performance. -
Page 24: Envoy-S Operation
Envoy-S Operation Envoy-S Displays and Controls You can track system installation progress with the Enphase Installer Toolkit mobile app. The LEDs on the Envoy-S are solid green when a function is enabled or performing as expected, flashing when an operation is in progress, or solid amber when troubleshooting with Installer Toolkit is required. -
Page 25: Led Behaviour At Initial Start Up
The Envoy-S identifies each device by its unique serial number. If you add more devices to an existing system or replace an Enphase Microinverter or Enphase AC Battery, you can run a scan to detect the new devices. To initiate a scan after you add new devices to an existing Enphase system, perform the following steps. -
Page 26: Connecting To Envoy-S
Connect using a computer or mobile device with the Envoy-S local interface Connect Using the Installer Toolkit App The Enphase Installer Toolkit is a mobile app that provides installers with onsite system configuration capabilities. Options for establishing a connection between the Installer Toolkit app and the Envoy-S are: Connect the mobile device to the same LAN as the Envoy-S using the site’s wireless router. -
Page 27: Complete The Connection To Envoy-S With Installer Toolkit
Envoy when you tap Connect to Envoy. This action also stops the device scan on the Envoy, if one is in progress. Refer to enphase.com/installer-toolkit/ for more information on the Enphase Installer Toolkit. © 2016 Enphase Energy Inc. 141-00035 Rev 01... -
Page 28: Connect Remotely Using Enlighten
The default reporting mode for the Envoy-S is Standard (high-bandwidth). If the site uses the Enphase Mobile Connect modem, this setting is locked to Low-Bandwidth. Low bandwidth mode reports 15-minute interval readings and event data to Enlighten four times a day. -
Page 29: Connect Using The Envoy-S Local Interface
You will be prompted to enter the following login credentials: Username: envoy Password: nnnnnn (where nnnnnn are the last six digits of the Envoy-S serial number) © 2016 Enphase Energy Inc. 141-00035 Rev 01... - Page 30 To use a static IP address, select Use Static IP and enter information as needed. Select Update. The application asks you to confirm: This may interrupt communications with the Envoy-S and require you to reconnect. Select OK to continue, or select Cancel. © 2016 Enphase Energy Inc. 141-00035 Rev 01...
- Page 31 Select Connect Other Network. Enter the new Wireless Network Name (ESSID) and Security code. If you need to disconnect the Envoy from a Wi-Fi network: Select More Info. Click Forget this Network. © 2016 Enphase Energy Inc. 141-00035 Rev 01...
- Page 32 Select Check Network Route. The application displays a loading message until results are returned. When the results return, the application displays a collection of routing details for the Envoy’s path to the Internet. © 2016 Enphase Energy Inc. 141-00035 Rev 01...
-
Page 33: View Microinverter Information
Under Connection to Enphase Support, there is an option to open a connection to allow Enphase to perform remote troubleshooting If you contact Enphase Customer Support, Enphase personnel may ask you to open a secure connection for diagnostic purposes. To open secure connection so ... -
Page 34: Troubleshooting
WARNING: Risk of electric shock. Risk of fire. Do not attempt to repair the Envoy-S; it contains no user-serviceable parts. Tampering with or opening the Envoy-S will void the warranty. If the Envoy-S fails, contact Enphase Customer Support for assistance (enphase.com/global/support-request). Warranty void if cover removed. Refer servicing to qualified personnel. -
Page 35: Issue: No Devices Are Reporting
Issue: Installer Toolkit Indicates that Scanning is Inhibited It is best to leave the Envoy in this condition for normal operation. However, if you need to re-enable scanning (for example, if you replace a device) contact Enphase Customer Support (enphase.com/global/support-request). -
Page 36: Power Production Issues
Envoy-S has a local network connection only and failed to connect to Enlighten after its scheduled reporting time (five minutes). When the LED is off, there is no network connection. If you are using the Enphase Mobile Connect modem and the Network Communications LED remains off or lights solid amber, see Troubleshooting in the Enphase Mobile Connect Installation Guide. -
Page 37: Issue: Wi-Fi Problems
Envoy-S. To do this: Connect to the Envoy-S local interface as described on page 29. Select Wi-Fi. Select Connect Other Network. Enter the new Wireless Network Name (ESSID) and Security code. © 2016 Enphase Energy Inc. 141-00035 Rev 01... -
Page 38: Local Networking Considerations
The Envoy connects to these servers using their DNS names. If you add firewall rules for Envoy reporting, Enphase recommends using the DNS names rather than the underlying IP addresses. This is because the IP addresses are subject to change without notice. -
Page 39: Replacing An Envoy-S
10. Verify that the new Envoy-S powers up. BEST PRACTICE: When powered up and connected for the first time, the Envoy-S may retrieve an automatic upgrade from Enphase. This upgrade may take up to 15 minutes. During upgrade the Envoy-S LEDs flash green sequentially. - Page 40 16. Contact Enphase Support at enphase.com/global/support-request to have the new Envoy-S added to your system and to retire the replaced Envoy-S. 17. Ship the old Envoy-S to Enphase using the supplied RMA shipping label. © 2016 Enphase Energy Inc. 141-00035 Rev 01...
-
Page 41: Technical Data
Envoy-S Metered Multiphase Installation and Operation Technical Data Model Numbers Enphase Envoy-S Metered™ Enphase communications gateway with integrated single phase PV and ENV-S-WM-230 consumption metering. PV production metering and optional consumption monitoring. Accessories (order separately) Current transformers (CTs) WxHxD: 61 mm x 51 mm x 35 mm. - Page 42 Current Up to 200 A via CT inputs Measurement circuit Per IEC/EN/CSA/UL 61010, CAT III Metering accuracy Production and consumption metering; Accuracy +/- 1.0%. Compliance IEC/EN 61010-1:2010, Compliance EN50065-1, EN61000-4-5, EN61000-6-1, EN61000-6-2 © 2016 Enphase Energy Inc. 141-00035 Rev 01...
Need help?
Do you have a question about the ENV-S-WM230 and is the answer not in the manual?
Questions and answers