Table of Contents
Advertisement
Advertisement
Table of Contents

Related Manuals for Technogym Wellness Expert


Summary of Contents for Technogym Wellness Expert
- Page 1 & ERVICE MAINTENANCE MANUAL . 1.1...
- Page 3 The information in this manual is intended for a QUALIFIED TECHNICIAN, specifically trained by TECHNOGYM and authorized to set and start the machine, as well as to carry out special maintenance or repairs that require complete familiarity with the machine, its operation, safety devices, and intervention procedures.
-
Page 5: Table Of Contents
New Wellness Expert: Service & Maintenance manual - rev. 1.1 Contents 1. GENERAL NOTICES............................1.1 1.1. I ..............................1.1 NTRODUCTION 1.2. R ............................1.1 ECOMMENDATIONS 1.3. G ...................... 1.2 ENERAL RULES FOR REPAIR PROCEDURES 1.4. G PREVENTION OF DAMAGE ... 1.2... - Page 6 New Wellness Expert: Service & Maintenance manual - rev. 1.1 7.2. D ......................7.3 ISASSEMBLING THE DISPLAY BOARD 7.2.1. DISPLAY before the changes to fix the malfunctioning with appearance of a blue screen” ....7.3 7.2.2. DISPLAY after the changes to fix the malfunctioning with appearance of a blue screen” ....7.6 7.3.
-
Page 7: General Notices
1. GENERAL NOTICES 1.1. INTRODUCTION This document is reserved for Technogym Service technicians, and is intended to provide authorized personnel with the necessary information to correctly carry out repairs and maintenance. A thorough knowledge of the technical information contained in this manual is essential for completing the professional training of the operator. -
Page 8: General Rules For Repair Procedures
1. Always mark any parts or positions which may be confused with each other at the time of reassembly. 2. Use original Technogym spare parts and lubricants of the recommended brands. 3. Use special tools where specified. 4. Consult the technical circulars, which may contain more up-to-date information on adjustments and maintenance than those contained in this manual. -
Page 9: Esd Isolation Gloves
New Wellness Expert: Service & Maintenance manual - rev. 1.1 NEVER place electronic units on bubble wrap or polystyrene (white or light blue), as these materials are highly charged with electrostatic particles. Packing materials of this type must be categorically kept away from work benches, as they must never come into contact with the electronic circuit boards. - Page 10 New Wellness Expert: Service & Maintenance manual - rev. 1.1 Page intentionally left blank Page 1.4...
-
Page 11: Technical Characteristics
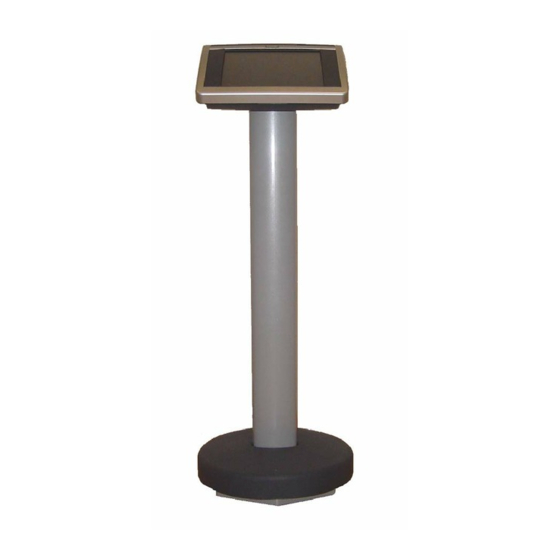
New Wellness Expert: Service & Maintenance manual - rev. 1.1 2. TECHNICAL CHARACTERISTICS 2.1. MECHANICAL CHARACTERISTICS Footboard diameter 43 cm 17 inch Height 115 cm 46 inch Weight 25 Kg 55 lb 2.2. ELECTRICAL CHARACTERISTICS US version European version Line voltage... -
Page 12: Wiring Diagram
New Wellness Expert: Service & Maintenance manual - rev. 1.1 2.5. WIRING DIAGRAM DISPLAY READER LVDS BOARD CBQ-32 WE-5 WE-7 HARD DISK BASE BOARD ETX BOARD INVERTER RAM MEMORY WE-6 TOUCH SCREEN WE-3 INTERFACE BOARD WE-4 TOUCH SCREEN USB 0-3... -
Page 13: Wiring
New Wellness Expert: Service & Maintenance manual - rev. 1.1 2.6. WIRING WE-1: High voltage cable Power entry module – Power supply Power entry Signal Color Power supply module Line Blue Neutral Brown faston Earth Yellow/Green WE-2: Cable connecting upper and lower assemblies Power supply –... - Page 14 New Wellness Expert: Service & Maintenance manual - rev. 1.1 WE-5: LCD cable LVDS board – Base board LVDS board Signal Color Base board TXCLKOUT+ TXCLKOUT- TXOUT2+ TXOUT2- TXOUT1+ TXOUT1- TXOUT0+ TXOUT0- VCC LCD VCC LCD (not used) (not used) WE-6: Touch screen interface cable Touch screen interface board –...
- Page 15 New Wellness Expert: Service & Maintenance manual - rev. 1.1 TRM-32: TGS Cable Main Board – TGS reader Main Board Signal Color +12 Vdc power supply Yellow White Green Brown Page 2.5...
- Page 16 New Wellness Expert: Service & Maintenance manual - rev. 1.1 Page intentionally left blank Page 2.6...
-
Page 17: Principles Of Operation
New Wellness Expert: Service & Maintenance manual - rev. 1.1 3. PRINCIPLES OF OPERATION 3.1. BLOCK DIAGRAM The figure below shows the block diagram for the machine: DISPLAY TOUCH SCREEN LCD DISPLAY LCD INVERTER TGS READER DISPLAY BOARD POWER Keyboard... -
Page 18: Display Board
• ETX board This is the circuit board that houses the microprocessor, which runs a dedicated version of the Windows XP Embedded operating system and the "Wellness Expert" application, and the system RAM (512 MB), placed on a bank. • Base board This board acts as the interconnection hub for all the components of the display, and serves as the point of connection with the power supply. -
Page 19: Lcd Display
New Wellness Expert: Service & Maintenance manual - rev. 1.1 3.1.3. LCD DISPLAY The component used is a colour TFT-LCD unit with 800x3x600 resolution and 262144 colors. It is provided with a touch screen to facilitate interaction with the user. - Page 20 New Wellness Expert: Service & Maintenance manual - rev. 1.1 Page intentionally left blank Page 3.4...
-
Page 21: Accessories
New Wellness Expert: Service & Maintenance manual - rev. 1.1 4. ACCESSORIES It’s available an USB key containing an image of the operating system, to use it in case of SW damaging. Follow the instructions detailed in paragraph 6.4. “Updating SW” to use it. The code of... - Page 22 New Wellness Expert: Service & Maintenance manual - rev. 1.1 Page intentionally left blank Page 4.2...
-
Page 23: Installation Instructions
New Wellness Expert: Service & Maintenance manual - rev. 1.1 5. INSTALLATION INSTRUCTIONS 5.1. SPECIFICATIONS AND REQUIREMENTS For proper installation of the equipment, make sure that: 1. The machine is installed on a level, vibration-free surface with a sufficient capacity to support its weight. -
Page 24: First Power-On
• Launch the “Wellness Expert” program found on the PC desktop. • Make sure the program starts, and especially that no error messages appear from the data client. • Insert a TGS programmed by the Technogym System Trainer in the network, and make sure that the associated user is recognized. -
Page 25: Troubleshooting
New Wellness Expert: Service & Maintenance manual - rev. 1.1 6. TROUBLESHOOTING The troubleshooting procedures are shown in the form of flow charts. In order to facilitate consultation, the following standard box shapes are used. This type of box is the START point of the troubleshooting procedure. It typically contains a description of the problem or malfunction. -
Page 26: The Machine Does Not Illuminate
New Wellness Expert: Service & Maintenance manual - rev. 1.1 6.1. THE MACHINE DOES NOT ILLUMINATE THE DISPLAY DOES NOT ILLUMINATE Does the wall outlet supply the Plug the machine into a correct v oltage? working electrical outlet Replace the mains lead... - Page 27 New Wellness Expert: Service & Maintenance manual - rev. 1.1 Does the mains v oltage reach the input to the Replace cable WE-1 power supply ? Are the DC v oltages at the Replace power supply output of the power supply...
- Page 28 New Wellness Expert: Service & Maintenance manual - rev. 1.1 Are the AC v oltages at the output to the LCD inv erter Replace LCD inv erter correct? Is the LCD neon lamp on? Replace LCD Try to replace the cable WE-5.
- Page 29 New Wellness Expert: Service & Maintenance manual - rev. 1.1 Using a tester, check that all the output voltages on connector CN2 of the power supply are correct, referring to paragraph 2.6. “Wiring”. As for step (3) but on connector J5 on the base board.
-
Page 30: The Machine Does Not Read The Tgs
New Wellness Expert: Service & Maintenance manual - rev. 1.1 6.2. THE MACHINE DOES NOT READ THE TGS The machine displays this error if the TGS reader is not working properly, or if it is not supplied by the display board. - Page 31 New Wellness Expert: Service & Maintenance manual - rev. 1.1 Follow the procedure step by step to correctly diagnose the problem. Take particular care with the checks highlighted by circled numbers, which are described in detail below: Place the tester probes across pins 1 and 3 of connector CN1 of the TGS reader. The measured value should be +12 Vdc.
-
Page 32: Sw Errors
New Wellness Expert: Service & Maintenance manual - rev. 1.1 6.3. SW ERRORS 6.3.1. T ’ HE OPERATING SYSTEM DOESN T WORK Carry out the procedure 6.4. “Updating SW” using the USB key delivered with the machine. Page 6.8... -
Page 33: Updating Sw
New Wellness Expert: Service & Maintenance manual - rev. 1.1 6.4. UPDATING SW To carry out this procedure, it is necessary to order a DOS-formatted bootable USB 2.0 key, using the code indicated in chapter 4. “Accessories”. In event of a system lockout, this USB key can be used to restore the system by following the procedure below. -
Page 34: Formatting Procedure
New Wellness Expert: Service & Maintenance manual - rev. 1.1 1. Turn off the machine. 2. Insert the USB key into port 0 (at the bottom, on the right) of the four available on the base of the machine, as indicated in the figure below. -
Page 35: System Restore From Hard Disk
New Wellness Expert: Service & Maintenance manual - rev. 1.1 At the end of the above procedure, perform the touch screen calibration as detailed in paragraph 8.1. “Touch screen calibration”. 6.4.2. S YSTEM RESTORE FROM This is a quicker procedure, suitable for cases where the corrupted files affect only the primary partition which contains the operating system, while the secondary partition remained undamaged. - Page 36 New Wellness Expert: Service & Maintenance manual - rev. 1.1 • Automatic restore of the Ghost image of Windows XP Embedded. • The system is restarted, after which the procedure is complete. If there are problems restoring the Ghost image of Windows XP Embedded, due to damaged clusters on the hard disk, it is necessary to restart the system and then use the formatting procedure described in paragraph 6.4.1.
-
Page 37: Updating Wellness Expert And Wellness Expert Video Sw
1. Using another PC equipped with CD-ROM drive, copy the contents of the entire “Wellness Expert” CD onto the USB key. 2. Go to the Wellness Expert and insert the USB key into one of the four ports provided on the base of the machine. -
Page 38: Installation From External Cd-Rom Drive
7. Go back to the external PC, delete the contents of the key and copy the “Wellness Expert Video” CD to it. 8. Go back to the Wellness Expert and insert the USB key into one of the four ports provided on the base of the machine. -
Page 39: Disassembly Of Components
New Wellness Expert: Service & Maintenance manual - rev. 1.1 7. DISASSEMBLY OF COMPONENTS 7.1. DISASSEMBLING THE LOWER ELECTRONIC 1. Shut off the equipment and unplug the power cord from the wall socket. 2. Back off the 4 screws a using a medium Phillips screwdriver and remove the covering plate. - Page 40 New Wellness Expert: Service & Maintenance manual - rev. 1.1 2. Unplug the 2 connector indicated in the picture at side. To disassemble the power entry module: 1. Unplug the fastons directly connected to it. 2. Press the two tabs f and extract the module by pushing it outward Figure 7.1-4...
-
Page 41: Disassembling The Display Board
New Wellness Expert: Service & Maintenance manual - rev. 1.1 7.2. DISASSEMBLING THE DISPLAY BOARD 7.2.1. DISPLAY BEFORE THE CHANGES TO FIX THE MALFUNCTIONING WITH ” APPEARANCE OF A BLUE SCREEN 1. Shut off the equipment and unplug the power cord from the wall socket. - Page 42 New Wellness Expert: Service & Maintenance manual - rev. 1.1 LCD inverter: 1. Back off the 2 screws g, using a small Philips screwdriver. 2. Unplug the 3 connectors indicated in the right side of the picture at side. 3. Back off the 2 screws h, using a small Philips screwdriver.
- Page 43 New Wellness Expert: Service & Maintenance manual - rev. 1.1 TGS key reader: 1. Unplug the connector indicated in the picture at side. 2. Back off the 3 screws o, using a small Philips screwdriver. 3. Remove the TGS key reader plastic support.
- Page 44 New Wellness Expert: Service & Maintenance manual - rev. 1.1 7.2.2. DISPLAY AFTER THE CHANGES TO FIX THE MALFUNCTIONING WITH ” APPEARANCE OF A BLUE SCREEN 1. Shut off the equipment and unplug the power cord from the wall socket.
- Page 45 New Wellness Expert: Service & Maintenance manual - rev. 1.1 LCD inverter: 1. Back off the 2 screws 7, using a small Philips screwdriver. 2. Unplug the 3 connectors indicated in the right side of the picture at side. 3. Back off the 2 screws 8, using a small Philips screwdriver.
- Page 46 New Wellness Expert: Service & Maintenance manual - rev. 1.1 To disassemble the fan: 1. Back off the screw 12 using a small Phillips screwdriver, locking down the nut on the back of the board. 2. Back off the 4 screws 13 using a small Phillips screwdriver.
- Page 47 New Wellness Expert: Service & Maintenance manual - rev. 1.1 TGS key reader: 1. Unplug the connector indicated in the picture at side. 2. Back off the 3 screws 17, using a small Philips screwdriver. 3. Remove the TGS key reader plastic support.
-
Page 48: Disassembling The Footboard
New Wellness Expert: Service & Maintenance manual - rev. 1.1 7.3. DISASSEMBLING THE FOOTBOARD Follow the steps described in paragraph 7.2. “Disassembling the display board”. 1. Back of the screw a using a medium Phillips screwdriver. Figure 7.3-1 2. Back of the 2 screws b using an 8-mm hex wrench. -
Page 49: Adjustments
New Wellness Expert: Service & Maintenance manual - rev. 1.1 8. ADJUSTMENTS 8.1. TOUCH SCREEN CALIBRATION Two different Touch Screen models are mounted on the products we have on the market, the first model used was a SEMTECH and the actual one an HAMPSHIRE. -
Page 50: Touch Screen First Model "Semtech
New Wellness Expert: Service & Maintenance manual - rev. 1.1 8.1.1. T “SEMTECH” OUCH SCREEN FIRST MODEL To access the touch screen calibration function, proceed as follows: 1. Click START, select SETTINGS and then CONTROL PANEL. 2. In the window which appears, double click the Touch Screen calibrator icon to launch the test program. -
Page 51: Touch Screen Second Model "Hampshire
New Wellness Expert: Service & Maintenance manual - rev. 1.1 7. The operation will be repeated five times, with the target in each of the four corners and finally in the middle of the screen. 8. At the end of the procedure, the following message will appear for a few seconds:... - Page 52 New Wellness Expert: Service & Maintenance manual - rev. 1.1 Figure 8.1-4 3. Follow the on-screen instructions. Touch and keep pressed the centre of each target with an object that is pointed but not sharp, as long as the “Release” message appearson the screen.
- Page 53 New Wellness Expert: Service & Maintenance manual - rev. 1.1 Figure 8.1-6 6. Touch the screen and check that the target appears right where you are touching. 7. Accept or refuse the calibration of the touch screen according to the feedback of the test, by pressing the “Accept”...
-
Page 54: Display Colors Calibration
New Wellness Expert: Service & Maintenance manual - rev. 1.1 8.2. DISPLAY COLORS CALIBRATION To access the function for adjusting colour contrast, brightness and gamma level, proceed as follows: 1. Click START, select SETTINGS and then CONTROL PANEL. 2. In the window which appears, double click the Display icon. - Page 55 New Wellness Expert: Service & Maintenance manual - rev. 1.1 5. The following dialog appears on the display: Figure 8.2-3 6. Select the S3Gamma Plus tab. Here it is possible to adjust the colour contrast, brightness and gamma level using 3 virtual knobs.
- Page 56 New Wellness Expert: Service & Maintenance manual - rev. 1.1 Page intentionally left blank Page 8.8...
-
Page 57: Machine Configuration
New Wellness Expert: Service & Maintenance manual - rev. 1.1 9. MACHINE CONFIGURATION 9.1. CONFIGURING THE “CONSOLE.INI” FILE The “CONSOLE.INI” file is located in the program directory, and contains the program initialization parameters. They may be changed by using any text editor to edit the file, such as NOTEPAD. -
Page 58: Idcen And Idcat
New Wellness Expert: Service & Maintenance manual - rev. 1.1 9.1.2. I EN AND These parameters are used up to version 3.0. The center and chain identification numbers can be set by changing the values of the parameters “IdCen” and “IdCat”, respectively, in the section “[Center]” as shown in the box below: [Centro] ;... -
Page 59: Unit Of Measure
New Wellness Expert: Service & Maintenance manual - rev. 1.1 9.1.5. U NIT OF MEASURE The unit of measure to be used by the program may be chosen by toggling the value of the parameter “UnitaMisura” in the “[Internazionale]” section, as shown in the box below: [Internazionale] ;... - Page 60 New Wellness Expert: Service & Maintenance manual - rev. 1.1 Page intentionally left blank Page 9.4...
-
Page 61: Scheduled Maintenance
New Wellness Expert: Service & Maintenance manual - rev. 1.1 10. SCHEDULED MAINTENANCE To keep the machine in perfect working order and forestall possible problems it is necessary to carry out the scheduled maintenance operations described below. The maintenance operations can essentially be classified according to the frequency with which they need to be performed: •... -
Page 62: Twice-Yearly Maintenance Operations
10.2. TWICE-YEARLY MAINTENANCE OPERATIONS These operations can only be carried out by a qualified technician specifically trained by Technogym and authorized to carry out machine installation and adjustments, as well as special maintenance operations or repairs which require special knowledge of the machine, its operation, safety systems and working procedures. - Page 64 TECHNOGYM S.p.A. Via G. Perticari, 20 47035 Gambettola (FC) ITALIA Tel.: +39-0547-650638 Fax: +39-0547-650150 e-mail: service@technogym.com 0SM00339AA-UK...
Need help?
Do you have a question about the Wellness Expert and is the answer not in the manual?
Questions and answers