
Related Manuals for Technogym Selection Cable Jungle


Summary of Contents for Technogym Selection Cable Jungle
- Page 1 S E L E C T I O N T H E S T R E N G T H E V O L U T I O N Cable Jungle User manual All equipment...
-
Page 2: Table Of Contents
Contents Identification of the manufacturer and equipment ......3 Description of the equipment ............4 Technical data ................... 5 Safety devices and warnings ............6 Place of installation ................8 Lifting and moving the equipment ............. 9 Assembly ..................11 Anchoring to the floor .............. -
Page 3: Identification Of The Manufacturer And Equipment
Identification of the manufacturer and equipment The equipment and manufacturer identification plate, fixed to the upper inside part of the frame, gives the following details: A Manufacturer's name and address B CE Mark C Serial number D Maximum user weight E Equipment classification F Consultation of user manual required Cable Jungle... -
Page 4: Description Of The Equipment
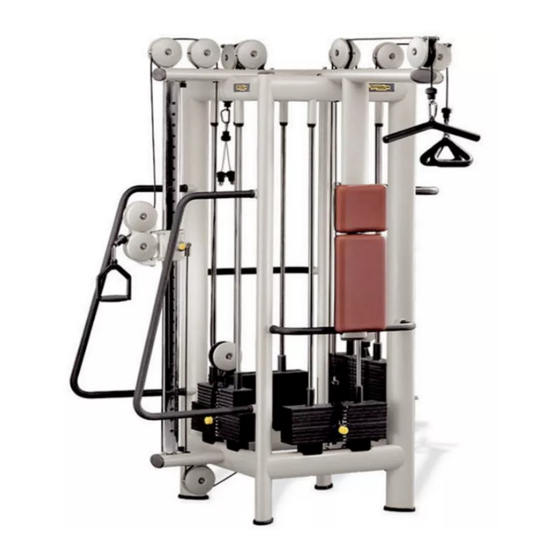
Description of the equipment A Frame: load-bearing structure of the equipment. The user stands in front of any of the four sides of the frame to perform the exercises. On sides 2 and 4 there are high pulleys; on side 1 there is an adjustable output pulley; on side 3 there is a low pulley and a high pulley. -
Page 5: Technical Data
Technical data 1679 mm 1918 mm (66") (76") 518 kg (1142 lb) 50 kg (100 lb) 55 kg (110 lb). Effective handgrip workload: 27.5 kg (55 lb) 70 kg (140 lb) 100 kg (200 lb). Effective handgrip workload: 50 kg (100 lb) Cable Jungle... -
Page 6: Safety Devices And Warnings
Safety devices and warnings The maximum user weight is 180 kg. The equipment has no sharp corners. All parts which come into contact with the user's body are suitably protected with rubber coverings or padding. Pay particular attention to the parts of the equipment with labels indicating “BEWARE OF CRUSHING”. - Page 7 Safety devices and warnings WARNINGS WARNING Attention must be paid to the labels attached to the equipment, as they provide SERIOUS INJURIES CAN OCCUR information about possible risks and hazards. ON THIS EQUIPMENT. YOU MUST ALWAYS TAKE THE FOLLOWING PRECAUTIONS TO AVOID INJURY! We recommend immediately replacing the labels when they become damaged or difficult Before using the equipment, read all the warnings and all the instructions.
-
Page 8: Place Of Installation
Place of installation To ensure safe, comfortable and effective use of the equipment, the place of installation must comply with certain specific requirements; in particular, before choosing where to install the equipment we recommend that you check that the following conditions are available: a temperature between +10°C and +25°C;... -
Page 9: Lifting And Moving The Equipment
Lifting and moving the equipment Use the four castor wheels (optional) to move the equipment. If the equipment has already been anchored to the floor, it needs to be released from the anchorage and its original feet refitted: follow the instructions in the paragraph describing anchoring to the floor in reverse order. - Page 10 Lifting and moving the equipment Proceeding in the same way, lift the equipment from the other side and insert the other two wheels. Lastly, lift the equipment again, remove the safety wedges and place the wheels on the floor. WARNINGS Do not use the equipment with the castors fitted.
-
Page 11: Assembly
Assembly WARNING When installing the equipment, use suitable personal protective equipment. Assembling the weight stacks on sides 2 and 4 Loosen the two screws (A) inside each of the guards (B) on sides 2 and 4, then lower the guide rails (C) until they are resting on the floor. WARNING Screws (A) secure the guide rails (C);... - Page 12 Assembly Assemble one weight stack at a time. For every weight stack take the crosspiece (E) from the crate and then take the weights out one by one, starting from the last one (the one with the highest number), and insert them in guide rails (C) from above. WARNINGS The weights must be assembled with the selection holes facing the outside of the equipment and the numbers upright.
- Page 13 Assembly Once the weight stacks have been assembled insert their respective crosspiece (E) above the weights; carefully insert guide rails (C) into their upper housings (F); then tighten screws (A) to lock them in position. Proceed in the same way for the other weight stack. After completing the weight stacks on sides 2 and 4, assemble the cables (see the Assembling the pulleys and cables section).
- Page 14 Assembly Assembling the supports Side 2 Insert upper cross-bar (A) into the frame and secure it with the three screws (B), two at the sides and one underneath. Fit handgrip (C) into the two frame pins and secure it with the four screws (D), two on each side.
- Page 15 Assembly Side 4 Insert pulley mount (E) into the frame and secure it with the three screws (G), two at the sides and one underneath. Fit handgrip (F) into the two frame pins and secure it with the four screws (H), two on each side.
- Page 16 Assembly Assembling the pulleys and cables Re-route the cables on sides 2 and 4 as shown in the illustrations, threading them through the holes (A) provided in the equipment tubing. Check that the cables are correctly positioned in the pulley grooves. Cable Jungle...
- Page 17 Assembly After re-routing, the cables must be secured: fit rubber gaiter (B) on to the end of the cable, insert the cable into connector (C) and then thoroughly tighten screws (D). Cable Jungle...
-
Page 18: Anchoring To The Floor
Anchoring to the floor The following anchoring parts are supplied: 4 feet, feet protections, anchor screws. WARNING To anchor the equipment, use anchor screws suited to the kind of floor, and which strictly comply with the following minimum requirement: minimum guaranteed load of 50 kg. When anchoring the equipment to the floor, the feet need to be replaced: loosen screw (A) to remove all the supporting feet. - Page 19 Drill the holes in the floor. Insert anchor screws (D) and screw then tightly to the floor. WARNING The equipment must be anchored to the floor. Technogym accepts no responsibility for injury caused by failure to anchor it to the floor. Cable Jungle...
-
Page 20: Fitting The Number Holder
Fitting the number holder The number holder must be fixed immediately underneath the cross-bars: standing facing the equipment, attach the number holder to the left tube supporting the guide rail, so that it is flush with the rubber stop on the guide rail. The number holder is made up of two sections: the larger section (A) must be placed at the front;... -
Page 21: Routine Maintenance
Call the Technogym Technical Support Service for instructions on any maintenance operations not described in this manual. Cable Jungle... -
Page 22: Replacing The Padded Parts
Replacing the padded parts If any of the padding shows signs of wear, especially in the interests of hygiene, we recommend replacing them completely. In order to replace the backrest and headrest unscrew the screws on the opposite side to the padding. Cable Jungle... -
Page 23: Replacing The Cables
WARNINGS Carefully check the state of the cables once a month. ALWAYS use cables supplied directly by Technogym. When replacing cables, note that the equipment comes with various cable anchor systems. Side 1, adjustable outlet cable The cable is secured with screws (B) and (D), both to the connector and the anchor points. - Page 24 Replacing the cables Side 2, high pulley The cable is fixed to attachment (C) with three screws (B), which must be loosened, and with adjuster (E), from which it must be withdrawn. Remove any accessories; raise rubber gaiter (A); unscrew the screws (B) and pull the cable from connector (C); loosen lock nut (D) and unscrew adjuster (E);...
- Page 25 Replacing the cables Side 3, high pulley and low pulley The cable is secured with two identical connectors with screws (B), three for each connector. Remove any accessories; raise rubber gaiter (A); unscrew the screws (B) and pull the cable out of connector (C); repeat for the other end of the cable;...
- Page 26 Replacing the cables Side 4, high pulley The cable is fixed to connector (C) with three screws (B), which must be loosened, and with adjuster (E), from which it has to be withdrawn. Remove any accessories; raise rubber gaiter (A); unscrew the screws (B) and pull the cable out of connector (C);...
-
Page 27: Replacing The Spring Hook
When replacing, always use a spring hook supplied directly by Technogym. If it is impossible to obtain an original part, use a spring hook that strictly meets the following minimum requirements: materials used: AISI 316 stainless steel;... -
Page 28: Technical Service
When contacting the Technogym Technical Support Service, please specify the following details: equipment model, date of purchase, serial number, precise description of the problem. WARNING Any operations carried out by persons not authorized by Technogym on the equipment will invalidate the warranty. Cable Jungle... -
Page 29: Storage
Storage If the equipment is not expected to be used for a prolonged period, we recommend storing it: in a clean and dry place, covered with a cloth to protect it from dust; in an environment with a temperature between +10°C and +25°C and humidity between 20% and 90%. Use the original packing materials, to better preserve the equipment. -
Page 30: Disposal
Disposal It is always good practise to ensure that the equipment can never constitute a hazard; therefore do not leave the equipment where children may play with it. Do not dump the equipment in the environment, or in public areas or private areas accessible to the public. The equipment is made from recyclable materials such as steel, aluminium and plastic, which must be disposed of in the manner prescribed by the urban refuse collection regulations in force, by firms specialised in urban and environmental hygiene. -
Page 31: Using The Equipment
Using the equipment Some examples of installing accessories and a small selection of the exercises that may be carried out using the Cable Jungle are described below. Triceps bar Jointed bar Cable Jungle... - Page 32 Using the equipment Handle Ankle strap Cable Jungle...
- Page 33 Using the equipment Lateral arm raise (medial and posterior deltoids) Handle in low position. Select the workload with the pin. Stand with the arm to be raised away from the equipment and your legs slightly apart for greater stability. Abduct your outstretched arm until it is parallel to the ground without making counter-lateral movements with your torso.
- Page 34 Using the equipment Front arm raise (anterior deltoids) Jointed bar in low position. Select the workload with the pin. Stand facing the equipment with your legs slightly apart for greater stability. Lift your arms simultaneously to shoulder height without moving your torso. Maintain a smooth controlled speed;...
- Page 35 Using the equipment Lateral arm raises, with trunk bent at a right-angle (medial and posterior deltoid) Handle in low position. Select the workload with the pin. Stand with the side to be exercised away from the equipment with your legs slightly parted and grasp the side handgrip for greater stability;...
- Page 36 Using the equipment Chin pulls (trapezoid) Jointed bar in low position. Select the workload with the pin. Stand facing the equipment with your legs slightly apart for greater stability; arms outstretched. Pull the bar toward your chin by bending your elbows: shoulders, elbows and hands must all be aligned.
- Page 37 Using the equipment Internal rotation (subscapular, teres major, greater pectoral) Handle at elbow height. Select the workload with the pin. Stand with the side to be exercised toward the weight stack, arm bent at 90° and turned outward with legs slightly apart for greater stability. Rotate your arm inwards towards your trunk while keeping your elbow at the right angle.
- Page 38 Using the equipment External rotation (supraspinatous, subspinatous, teres minor) Handle at elbow height. Select the workload with the pin. Stand with the side to be exercised away from the equipment, arm bent at 90° and rotated close to your trunk, legs slightly apart. Grasp the side handgrip with your free hand for greater stability.
- Page 39 Using the equipment Pulls (latissimus muscle of back) Jointed bar in high position. Select the workload with the pin. Kneel in front of the equipment and grasp the bar with a reverse grip and arms outstretched. Curl your arms close to your chest. Maintain a smooth controlled speed;...
- Page 40 Using the equipment Cross with handle (greater pectoral) Handle at shoulder height. Select the workload with the pin. Stand with the arm to be exercised toward the equipment and legs slightly apart for greater stability. Adduct your outstretched arm inwards. Maintain a smooth controlled speed;...
- Page 41 Using the equipment Biceps with handle (biceps) Handle in high position. Select the workload with the pin. Stand facing the equipment with your legs slightly apart for greater stability and grasp the handle with your arm outstretched, reverse grip. Curl your forearm up without moving your upper arm. Maintain a smooth controlled speed;...
- Page 42 Using the equipment Forearm curls (biceps) Jointed bar in low position. Select the workload with the pin. Stand facing the equipment with your legs slightly apart for greater stability and grasp the bar with your arm outstretched, reverse grip. Curl your forearm up without moving your upper arm. Maintain a smooth controlled speed;...
- Page 43 Using the equipment Triceps extensions (triceps) Jointed bar in high position. Select the workload with the pin. Stand with your back against the backrest and grasp the bar at chest height. Extend your forearm downward without moving your upper arm. Maintain a smooth controlled speed;...
- Page 44 Using the equipment Triceps extensions with handle (triceps) Handle in high position. Select the workload with the pin. Stand with your back towards the equipment and move the leg on the same side as the working arm in front of the other for greater stability. Grasp the handle with your arm bent.
- Page 45 Using the equipment Lateral leg swings (abductors) Ankle strap in low position. Select the workload with the pin and put the ankle strap on. Stand with the side to be exercised away from the equipment. Grasp the handgrip with one hand to steady your torso. Swing your leg outwards without making counter-lateral movements with your torso.
- Page 46 Using the equipment Leg adductions (adductors) Ankle strap in low position. Select the workload with the pin and put the ankle strap on. Stand with the side to be exercised toward the weight stack. Hold your leg outstretched and slightly raised. Grasp the handgrip with one hand to steady your torso.
- Page 47 Using the equipment Back leg swings (gluteus) Ankle strap in low position. Select the workload with the pin and put the ankle strap on. Stand facing the equipment and grasp the handgrips to steady your torso. Raise the leg to be exercised slightly above the ground in front of the other. Swing your leg back keeping your torso immobile and tilted slightly forward.
- Page 48 Using the equipment Forward leg bend (hip flexors) Ankle strap in low position. Select the workload with the pin and put the ankle strap on. Stand with your back to the equipment and grasp the two side handgrips to steady your torso.
- Page 49 Using the equipment Crunch (abdominals) Kneel facing the equipment; triceps bar in high position. Select the workload with the pin. Crunch forward seeking to bring your breast bone as close as possible to your pelvis. Maintain a smooth controlled speed; we recommend a slower speed during the return phase than during the approach phase.
Need help?
Do you have a question about the Selection Cable Jungle and is the answer not in the manual?
Questions and answers