
Related Manuals for Technogym Element+ Leg Press


Summary of Contents for Technogym Element+ Leg Press
-
Page 1: Leg Press
E L E M E N T E S S E N T I A L S T R E N G T H Leg Press User manual All equipment... -
Page 2: Table Of Contents
Contents Identification of the manufacturer and the equipment ....3 Description of the equipment ............ 4 Technical data ................5 Safety devices and warnings ............ 6 Place of installation ..............7 Lifting and handling the equipment ........... 8 Adjusting the equipment ............10 Routine maintenance .............. -
Page 3: Identification Of The Manufacturer And The Equipment
Identification of the manufacturer and the equipment The identification plate of the equipment and manufacturer, affixed on the frame, gives the following details: A Name and address of the manufacturer B CE Mark C Serial number D Cautions and maximum user weight E Equipment classification ELEMENT+ SILVER-BLU AVI CB350C0 - ALK0GGGK... -
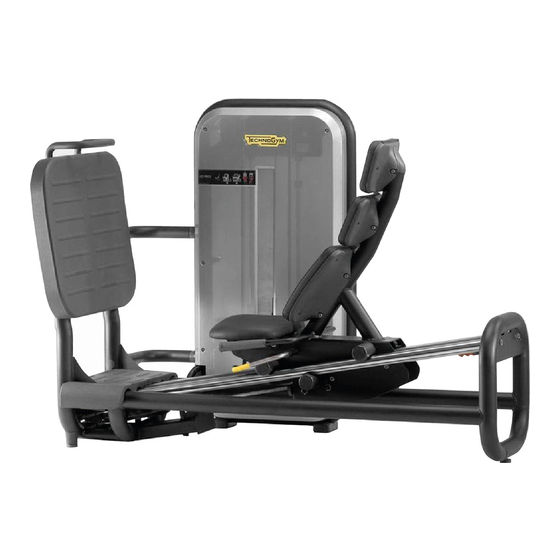
Page 4: Description Of The Equipment
Description of the equipment Seat (A): where the user sits to perform the exercise. Its position can be adjusted using the seat lever (B). Upper handgrip (C): the user can enhance the comfort by holding it to get on and off the equipment. Side handgrips (D): the user can enhance the comfort by holding them during the exercise. -
Page 5: Technical Data
Technical data 2118 mm 1173 mm (83") (48") 1523 mm (60") 08093012 155 kg (342 lb) 200 kg (400 lb) Leg Press... -
Page 6: Safety Devices And Warnings
Safety devices and warnings The maximum user weight is 180 kg (397 lb). The equipment does not have any sharp corners. All the parts which come into contact with the body are adequately protected with rubber coverings or padding. The weight stack is enclosed in protective panels. WArnIngS During all operations involving transport, maintenance and cleaning, pay attention to any part of the equipment where body parts may become trapped. -
Page 7: Place Of Installation
Place of installation To guarantee safe, comfortable and effective use of the equipment, the place of installation must comply with certain specific requirements; in particular, before choosing where to install the equipment it is recommended to check the following: temperature between +10°C and +25°C; sufficient ventilation to maintain a humidity level between 20% and 90%, when the equipment is in use;... -
Page 8: Lifting And Handling The Equipment
Lifting and handling the equipment To move the equipment, use normal lifting and handling machine. It is recommended to place some padded material between the frame and the lifting machine. WArnIng The equipment must be moved with great care, due to the risk of it tipping over. Before lifting the equipment, insert between the two panels of the weight stack the spacer provided at the time of delivery. - Page 9 Lifting and handling the equipment WArnIng When lifting the equipment, do not exert pressure against the weight stack guards. Leg Press...
-
Page 10: Adjusting The Equipment
Adjusting the equipment After the equipment has been positioned on the floor, check that it is level. The foot (A) is adjustable for this purpose: loosen the lock nut (B) and tighten or loosen the foot until the equipment is stable. When this is done, close the lock nut (B). -
Page 11: Routine Maintenance
WArnIng Be careful not to rub with excessive force on the drawings and instructions shown on the labels. For maintenance actions not described in this manual, call in the Technogym Technical Service. To lubricate the weight stack guides: remove the back panel of the weight stack (following the instructions found in the section Removing the weight stack panel);... - Page 12 routine maintenance If the seat squeaks, lubricate the guide rails as follows: slide the seat all the way along the guide rails to one of the ends; use a soft cloth to remove any dust and oil residues from the guide rails; slightly moisten the cloth with the oil supplied in the optional Basic Box kit;...
-
Page 13: Replacing The Padded Components
replacing the padded components If any of the padded components show signs of wear, it is advisable, especially in the interests of hygiene, to replace them completely. In order to replace seats and backrests loosen the screws on the opposite side to the padding. Leg Press... -
Page 14: Replacing The Seat Cable
replacing the seat cable To replace the cable, proceed as follows: unscrew the screws (A) in the lower part of the frame, two per side, and raise the footrest (B); unscrew the screws (C) and extract the cover (D); Leg Press cont. - Page 15 replacing the seat cable back off the grub screws (E) of the block (F) in the cam (g) and extract first the cable, then the block; back off the grub screws (H) of the block (I) and extract the cable under the seat; insert the new cable following the original path of the cable;...
- Page 16 replacing the seat cable replace the block (F) and tighten the grub screws (E); pull the cable taut under the seat, holding the block (I), and tighten the grub screws (H); cut the excess cable; Leg Press cont.
- Page 17 replacing the seat cable replace the cover (D) and tighten the screws (C); replace the footrest (B) and tighten the screws (A). When replacing the cable the cam must remain in its initial position, indicated in the figure. Leg Press cont.
- Page 18 WArnIng ALWAYS use cables supplied directly by Technogym. The cables must always be replaced at the first sign of wear, even if it only affects the outer rubber protection. WArnIng Every month, carefully inspect the condition of the cables.
-
Page 19: Adjusting The Seat Cable Tension
Adjusting the seat cable tension It is possible to take up some of the slack in the seat cable as follows: insert a thickness of approx. 10 mm (1/2”) under the first weight of the weight stack; back off the grub screws (H) of the block (I) under the seat; pull the cable taut, holding the block (I), and tighten the grub screws (H);... -
Page 20: Replacing The Weight Stack Cable
replacing the weight stack cable To replace the cable, proceed as follows: unscrew the screws (A) in the lower part of the frame, two per side, and raise the footrest (B); unscrew the screws (C) and extract the cover (D); Leg Press cont. - Page 21 replacing the weight stack cable remove the back panel of the weight stack (following the instructions found in the section Removing the weight stack panel); back off the lock nut (F) and unscrew the adjuster (g); back off the grub screws (H) of the block (I) which secures the weight stack cable and extract first the cable, then the block;...
- Page 22 replacing the weight stack cable insert the new cable beginning on the adjuster side (follow the original path of the cable as shown in the figure); WArnIng Pay close attention when passing the cable through the hole in the front panel of the weight stack.
- Page 23 replacing the weight stack cable put in the adjuster (g), and tighten the lock nut (F); insert a thickness of approx. 10 mm (1/2”) under the first weight of the weight stack and remove the pin; reassemble the block (I); insert the cable and tighten the grub screws (H);...
- Page 24 replacing the weight stack cable replace the cover (D) and tighten the screws (C); replace the footrest (B) and tighten the screws (A). Leg Press cont.
- Page 25 WArnIng ALWAYS use cables supplied directly by Technogym. The cables must always be replaced at the first sign of wear, even if it only affects the outer rubber protection. WArnIng Every month, carefully inspect the condition of the cables.
-
Page 26: Adjusting The Weight Stack Cable Tension
Adjusting the weight stack cable tension It is possible to take up some of the slack in the weight stack cable using the adjuster (C), after loosening the lock nut (B). For this purpose, you will need to remove the back panel of the weight stack (following the instructions found in the section Removing the weight stack panel). -
Page 27: Removing The Weight Stack Panel
removing the weight stack panel The weight stack panel is attached to the frame with 6 screws. To disassemble the panel (A): unscrew the 6 screws (B) while holding the panel with one hand; remove the panel. To reassemble the panel, carry out the above steps in reverse order. Leg Press... -
Page 28: Technical Service
When contacting the Technogym Technical Support Service, please specify the following details: equipment model, date of purchase, serial number, precise description of the problem. WArnIng Any operations on the equipment carried out by persons not authorized by Technogym will invalidate the warranty. Leg Press... -
Page 29: Storage
Storage If the equipment will not be used for a prolonged period, it is recommended to store it: in a clean and dry place, covered with a cloth to protect it from dust; in an environment with a temperature between +10°C and +25°C and a humidity between 20% and 90%. For correct storage, use the original packing materials. -
Page 30: Using The Equipment
Using the equipment To adjust the seat (A), lift the lever (B) under the handgrip (C) on your left side. Select the workload with the pin (D). Rest your back flat against the backrest. Position your feet about 7 inches apart on the foot platform with your toes slightly wider apart than your heels. - Page 31 Using the equipment Move through your range of motion with a slow, controlled movement. Avoid locking your knees at the end of your movement. Maintain a smooth controlled speed through the movement while staying in control of the weight. At the end of the exercise, lift the lever on your left and move the seat back so you can stand up comfortably.
Need help?
Do you have a question about the Element+ Leg Press and is the answer not in the manual?
Questions and answers
How do I get the weight stack off