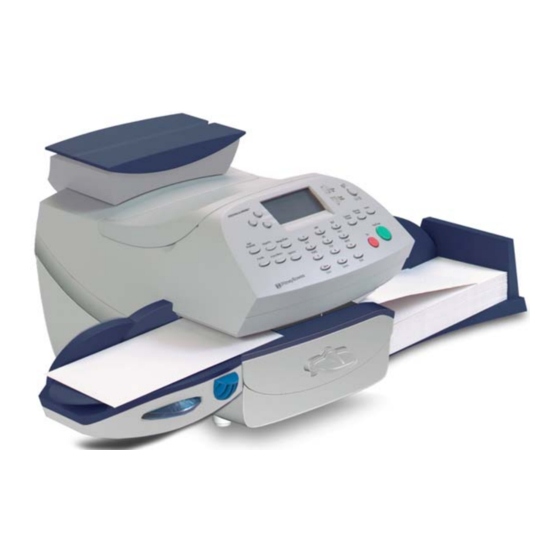
Pitney Bowes DM125 Operator's Manual
Digital postage meter
Hide thumbs
Also See for DM125:
- Operator's manual (221 pages) ,
- Installing manual (25 pages) ,
- Instructions (2 pages)

Related Manuals for Pitney Bowes DM125


Summary of Contents for Pitney Bowes DM125
- Page 1 Postage Meters ™ DM125 Digital Postage Meter Operator Guide Canada English Edition SV62667 Revision F February 2017...
- Page 2 Except as provided in writing, duly signed by an officer of Pitney Bowes, no license either express or implied, under any Pitney Bowes or third party’s patent, copyright or other intellectual property rights is...
-
Page 3: Pitney Bowes Contact List
NOTE: This equipment is not intended to be serviceable. Please refer to the warranty information if problems occur. The responsible party is Pitney Bowes Canada. All service and supply inquiries can be done by calling 1-800-672-6937 and following the telephone prompts. Customer Service Representatives are available Monday through Friday, 8:00 AM - 8:00 PM ET. -
Page 5: Table Of Contents
Table of Contents Pitney Bowes Contact List Adding and Removing Inscriptions Seal the Envelope Only - Bypass All Printing 1 - Safety 4 - Running Mail Introduction Industry Canada Power up the Machine Ear Protection/Noise Exposure Guidelines Checking the Amount of Postage Available... - Page 6 Account List Report (Standard Accounting) Defining New Values for the Normal Preset Error Report Viewing A Custom Preset Selecting a Custom Preset Defining a New Custom Preset Editing a Custom Preset Name Pitney Bowes Operator Guide February, 2017 Page vi of 226...
- Page 7 15 - Meter Updates and Setting the System Time Using PC Meter Inspections Connect Resetting the Scale to Zero Using PC Meter About Meter Updates and Inspections Connect About Postal Rate Changes Pitney Bowes Operator Guide February, 2017 Page vii of 226...
- Page 8 18 - Specifications Specifications (Equipment and Materials) 19 - Troubleshooting Getting Help What Information You Need to Provide Customer Support Display Problems Feeding Problems Printing Problems Accidentally Printing the Wrong Postage Pitney Bowes Operator Guide February, 2017 Page viii of 226...
- Page 9 1 - Safety Introduction Industry Canada Ear Protection/Noise Exposure Guidelines System Power Operation Maintenance...
-
Page 10: Safety
Safety Introduction Familiarize yourself with proper procedures and methods before you install, operate or repair the system to avoid personal injury or damage to the equipment. Pitney Bowes Operator Guide February, 2017 Page 10 of 226... -
Page 11: Industry Canada
The abbreviation, IC, before the registration number signifies that registration was performed based on a Declaration of Conformity indicating that Industry Canada technical specifications were met. It does not imply that Industry Canada approved the equipment. Pitney Bowes Operator Guide February, 2017... -
Page 12: Ear Protection/Noise Exposure Guidelines
90dBA time weighted average over an 8-hour shift mandates hearing protection is used. (European Union standard is 85dBA) NOTE: Local jurisdictions may have more stringent requirements. Refer to local regulations for standards and requirements in your area. Pitney Bowes Operator Guide February, 2017 Page 12 of 226... -
Page 13: System Power
For Input modules and Output modules - power is distributed from the chassis. Use the AC connectors supplied with the modules to connect to system power. Do not connect external devices to the inserter. Pitney Bowes Operator Guide February, 2017... -
Page 14: Operation
WARNING & CAUTION statements are used in the text of this manual to identify specific hazards, which have potential to cause injury. Pitney Bowes declines all liability in the event of material damage or bodily injury resulting from negligence in the... -
Page 15: Maintenance
Use the right tool for the job. A set-up tool is supplied to accommodate running different size paper on the inserter. Use only Pitney Bowes approved printer ink and cleaners. To prevent overheating, do not cover the vent openings. Do not store flammable fluids inside this machine. - Page 16 This page intentionally left blank.
-
Page 17: Getting Started
2 - Getting Started Parts of the Machine The Control Panel Connections on the Back of the Machine... -
Page 18: Parts Of The Machine
Getting Started Parts of the Machine DM125 Item Description Control Panel: Allows you to enter and set up information on your mailing system. Top Cover: Open this to replace the ink cartridge. Weighing Platform (optional): Allows you to weigh a mail piece for postage calculation. -
Page 19: The Control Panel
Getting Started The Control Panel Control Panel Pitney Bowes Operator Guide February, 2017 Page 19 of 226... - Page 20 Yes key also functions as the Enter key for data entry) Alpha/Numeric Keypad: Allows you to type in numbers and letters for account names, postage values, and other information, see How to Enter Text for more information. Pitney Bowes Operator Guide February, 2017 Page 20 of 226...
- Page 21 Feature key, the account name will not be recorded by the system. Clear Key: Allows you to delete entrys or backup to a previous screen. Pitney Bowes Operator Guide February, 2017 Page 21 of 226...
-
Page 22: Connections On The Back Of The Machine
Getting Started Connections on the Back of the Machine Pitney Bowes Operator Guide February, 2017 Page 22 of 226... - Page 23 Power Switch: Powers the machine on and off. USB Port (type B peripheral port): Used to connect to: • the Pitney Bowes Data Centre via a USB cable connected to a Windows PC that has Internet access (known as PC Meter Connect™ desktop application).
- Page 24 This page intentionally left blank.
-
Page 25: Pieces
3 - What You Can Print on Mail Pieces Printing Options What's in the Meter Stamp Check the Meter Stamp Imprint Printing a Meter Stamp with an Advanced Date Printing only the Date and Time (no meter stamp) Adding and Removing Advertisements at the Machine 31 Printing Advertisement, Date and Time Only (no meter stamp) Adding and Removing Inscriptions... -
Page 26: What You Can Print On Mail Pieces
For information on printing a normal meter stamp, refer to Determining the Amount of Postage Needed. For information on the locations of the meter stamp and optional components, refer to What's in the Meter Stamp. Pitney Bowes Operator Guide February, 2017 Page 26 of 226... -
Page 27: What's In The Meter Stamp
Description Encrypted Canpost indicia Meter serial number Postage amount Date Postal code of postage meter Envelope Ad Optional printing area Required printing Meter Stamp, Optional Advertisement and Postal Inscription Components Pitney Bowes Operator Guide February, 2017 Page 27 of 226... -
Page 28: Check The Meter Stamp Imprint
You can check the meter stamp imprint by printing a meter stamp with $0.00 postage. To print with $0.00 postage, press Zero at the Home screen and press Enter/yes, and slide an envelope or a tape sheet through the machine. Pitney Bowes Operator Guide February, 2017... -
Page 29: Printing A Meter Stamp With An Advanced Date29
4. Select Continue. The new date now shows in the Home screen. 5. To set the date on your mail back to the current date, press Options and select Set to todays date. Pitney Bowes Operator Guide February, 2017 Page 29 of 226... -
Page 30: Printing Only The Date And Time (No Meter Stamp)
NOTE: Make sure you orient the mail piece so the date and time prints on a blank section of the mail piece. 4. Select Exit Date and Time when finished to return to the Home screen. Pitney Bowes Operator Guide February, 2017... -
Page 31: Adding And Removing Advertisements At The Machine
1. From Home screen, press Page Down to second screen and select AD. 2. Select Install an Ad. 3. Select Connect now. The system connects to the Pitney Bowes Data Centre (this may take a few moments). Various screens display, letting you know the status of the process. -
Page 32: Printing Advertisement, Date And Time Only (No Meter Stamp)
Make sure you orient the mail piece so the date and time prints on a blank section of the mail piece. 5. Select Exit Ad Date & Time when finished to return to the Home screen. Pitney Bowes Operator Guide... -
Page 33: Adding And Removing Inscriptions
Adding or Removing Postal Inscriptions Using PC Meter Connect. Purchasing other Postal Inscriptions for your Machine Additional inscriptions can be ordered through the Pitney Bowes Supply Line, contact Pitney Bowes (see Pitney Bowes Contact List). Inscriptions can be purchased and downloaded directly into your machine. -
Page 34: Seal The Envelope Only - Bypass All Printing
4. Slide the envelope to the right until the system takes hold of it. The system seals and ejects the piece. 5. Select Exit Seal Only when finished to return to the Home screen. Pitney Bowes Operator Guide February, 2017... - Page 35 4 - Running Mail Power up the Machine Checking the Amount of Postage Available Determine the Amount of Postage Needed Applying Postage Entering Postage In Manually Applying Postage Entering Weight In Manually Applying Postage Using The Weighing Platform...
-
Page 36: Running Mail
When you power up your system, the Home screen appears on the operating display. If your system has been set up to require a Lock Code or password, you are prompted to enter it. A typical Home screen is show below (with optional scale connected and optional internal rating feature). Pitney Bowes Operator Guide February, 2017... -
Page 37: Checking The Amount Of Postage Available
Used – the total of all postage ever used in the meter Total Pieces – the total number of mail pieces run through the meter that had postage applied 3. Press Clear (back arrow key) or Home to return to Home screen. Pitney Bowes Operator Guide February, 2017... -
Page 38: Determine The Amount Of Postage Needed
Zone or Postal Code - If the class or weight requires a Zone or Postal Code the system prompts you to enter the destination Zone or Postal Code. Pitney Bowes Operator Guide February, 2017... -
Page 39: Applying Postage Entering Postage In Manually
7. Select Done when finished entering all the class options and fees. 8. If using the moistener, place flap along moistener and move towards the right. Pitney Bowes Operator Guide February, 2017... - Page 40 9. Place the envelope up against the registration wall of the system and slide it to the right until the system grasps it. The system prints the meter stamp and ejects the envelope/tape sheet. Pitney Bowes Operator Guide February, 2017...
-
Page 41: Applying Postage Entering Weight In Manually
7. Select Done when finished entering all the class options and fees. 8. If using the moistener, place flap along moistener and move towards the right. Pitney Bowes Operator Guide February, 2017... - Page 42 Running Mail 9. Place the envelope/tape sheet up against the registration wall of the system and slide it to the right until the system grasps it. Pitney Bowes Operator Guide February, 2017 Page 42 of 226...
-
Page 43: Applying Postage Using The Weighing Platform
COD and Insurance. 5. Select Done when finished entering all the class options and fees. 6. If using the moistener, place flap along moistener and move towards the right. Pitney Bowes Operator Guide February, 2017... - Page 44 7. Place the envelope up against the registration wall of the system and slide it to the right until the system grasps it. The system prints the meter stamp and ejects the envelope/tape sheet. Pitney Bowes Operator Guide February, 2017...
-
Page 45: Using Batch Count Feature
5 - Using Batch Count Feature Viewing the Batch Mail Count Printing the Batch Count Clearing the Batch Count... -
Page 46: Viewing The Batch Mail Count
Batch Value: The amount of postage applied since the last time the batch value was cleared. 4. To clear the batch count, refer to Clearing the Batch Count. or press Home to return to the Home screen. Pitney Bowes Operator Guide February, 2017 Page 46 of 226... -
Page 47: Printing The Batch Count
Batch Count: The number of mail pieces that had postage applied since the last time the batch count was cleared. Batch Value: The amount of postage applied since the last time the batch value was cleared. PBP Serial No: The serial number of this meter (normally meter number). Pitney Bowes Operator Guide February, 2017 Page 47 of 226... -
Page 48: Clearing The Batch Count
2. Press Page Down and select Clear batch values. 3. At the "Confirm Clear" prompt, press Yes/Enter to confirm. The batch value and batch piece registers return to zero 4. Press Home to return to the Home screen. Pitney Bowes Operator Guide February, 2017 Page 48 of 226... - Page 49 6 - Maintenance Ink Cartridge Replacement Messages Printing a Test Pattern Purging the Print Heads Replacing the Print Head Replacing the Ink Cartridge Filling The Moistener Tank Cleaning the Moistener Brush Cleaning the Moistener Wick and Holder...
-
Page 50: Maintenance
Refer to the Contact List for information on ordering supplies. "Ink Out” Replace the ink cartridge immediately. The ink supply is gone you will not be able to print any postage. Pitney Bowes Operator Guide February, 2017 Page 50 of 226... -
Page 51: Printing A Test Pattern
If the test pattern looks like the sample below Poor Test Print(missing lines), press NoThe machine will execute a print head cleaning. When complete you will be returned to the PM maintenance menu. Pitney Bowes Operator Guide February, 2017 Page 51 of 226... -
Page 52: Purging The Print Heads
7. You have a choice of 4 purges to use. Normally selecting Purge A is sufficient to purge the system, unless directed by a Pitney Bowes agent to do otherwise. 8. The system executes a purge. This may take a few moments. When finished, you return to the Purge screen. -
Page 53: Replacing The Print Head
Replacing the Print Head IMPORTANT: This procedure should only be done under the direction or with the permission of a Pitney Bowes representative. This procedure can also be used to reseat the print head in response to a possible error condition. - Page 54 7. While squeezing, lift and tilt the print head to the right toward the space for the ink tank cartridge. The print head should come up out of the machine. 8. Remove the new print head from packaging. Pitney Bowes Operator Guide February, 2017...
- Page 55 10. Squeeze the two gray tabs on either side of the new print head and slightly angle the print head while pushing the print head flush against the wall. 11. Replace the ink cartridge, see Replacing the Ink Tank Cartridge if you need assistence. Pitney Bowes Operator Guide February, 2017 Page 55 of 226...
- Page 56 Maintenance 12. Close the top cover and reposition the weighing platform, if you are using one. The machine resets and you return to the Home screen. Pitney Bowes Operator Guide February, 2017 Page 56 of 226...
-
Page 57: Replacing The Ink Cartridge
Replacing the Ink Cartridge IMPORTANT: This procedure should only be done under the direction or with the permission of a Pitney Bowes representative. This procedure can also be used to reseat the print head in response to a possible error condition. - Page 58 7. Lower the ink cartridge into the cavity (the label on the top of the cartridge should face the front of your system). The ridges on either side of the cartridge will slide into the grooves. 8. Close the ink cartridge guard and "click" to secure. Pitney Bowes Operator Guide February, 2017...
- Page 59 Maintenance 9. Close the cover.The system automatically starts an ink initialization process and in a few moments returns you to the Home screen. Replace the weighing platform if you use one. Pitney Bowes Operator Guide February, 2017 Page 59 of 226...
-
Page 60: Filling The Moistener Tank
2. Add enough E-Z Seal® to bring the sealant level up to the bottom of the fill hole. We recommend E-Z Seal because it helps keep your moistener clean and improves sealing efficiency. Refer to the Pitney Bowes Contact List to order E-Z Seal. -
Page 61: Cleaning The Moistener Brush
1. Push down on the blue release lever on the moistener. 2. Pull the moistener straight out to the left away from the machine. 3. Open the hinged brush holder. Pitney Bowes Operator Guide February, 2017 Page 61 of 226... - Page 62 7. Reinstall the moistener. Push down on the blue release lever on the moistener and guide the moistener back onto the machine. You should hear a click as it engages. Pitney Bowes Operator Guide February, 2017...
-
Page 63: Cleaning The Moistener Wick And Holder
Cleaning the Moistener Wick and Holder 1. Push down on the blue release lever on the moistener. 2. Pull the moistener straight out to the left away from the machine. Pitney Bowes Operator Guide February, 2017 Page 63 of 226... - Page 64 6. Reinstall the moistener. Push down on the blue release lever on the moistener and guide the moistener back onto the machine. You should hear a click as it engages. Pitney Bowes Operator Guide February, 2017 Page 64 of 226...
-
Page 65: How To Enter Text
7 - How to Enter Text About Entering Text... -
Page 66: About Entering Text
In postal codes, all alpha characters are uppercase. For non-US postal codes that follow a fixed format of alpha and numeric characters, only the appropriate alpha or numeric in each specific position is allowed. Pitney Bowes Operator Guide February, 2017... - Page 67 This key toggles between “all uppercase letters” and “all lowercase letters.” The current mode is presented on line 4 of the display. ABC to indicate the uppercase mode, or abc to indicate the lowercase mode. Pitney Bowes Operator Guide February, 2017...
- Page 68 This page intentionally left blank.
- Page 69 8 - Accounting About Accounts Turning Accounts On and Off Creating an Account Editing Account Name and Password Selecting an Account Viewing Account Totals Printing a Single Account Report Printing a Multi-Account Summary Report Clearing All or Some of the Accounts Deleting an Account Turning On Account Passwords Globally Turning Off Account Passwords Globally...
-
Page 70: Accounting
InView™ Meter Reporting This optional web based software from Pitney Bowes allows you to view, consolidate and analyze postage meter usage information from one mailing machine or multiple machines throughout your organization. -
Page 71: Turning Accounts On And Off
Key in the 4-digit password and select Continue. —If you want to enable InView Accounting you must have purchased that option. Refer to document SV62371 InView Accounting Guide for the DM125, DM225 Digital Mailing System on our website for information on setting up InView Accounting. See Pitney Bowes Contact List. - Page 72 3. Select Turning accounting OFF. If the supervisor password has been enabled, you are prompted to enter it. Key in the 4-digit password and select Continue. 4. You return to the Home screen with no account displayed. Pitney Bowes Operator Guide February, 2017...
-
Page 73: Creating An Account
A. Press Yes/Enter and go back to Step 3 to enter another account, OR B. Press No to continue. You return to the Accounts menu. 6. Press Clear (back arrow key) or Home to return to the Home screen. Pitney Bowes Operator Guide February, 2017... -
Page 74: Editing Account Name And Password
B. Use the appropriate selection key next to the display. 5. If a password has been assigned to this account, you will be prompted to enter one. Key in the 4- digit password and select Continue. Pitney Bowes Operator Guide February, 2017... -
Page 75: Selecting An Account
4. If a password has been assigned to this account, you will be prompted to enter one. Key in the 4- digit password if necessary. 5. You return to the Home screen with the name of the account listed. Pitney Bowes Operator Guide February, 2017... -
Page 76: Viewing Account Totals
C. Follow the prompts to exit this screen if you are finished. 6. Press Home to return to the Home screen. To perform this with PC Meter Connect, refer to Viewing Account Totals Using PC Meter Connect. Pitney Bowes Operator Guide February, 2017 Page 76 of 226... -
Page 77: Printing A Single Account Report
6. Press Clear (back arrow key) to return to Report type menu or press Home to return to the Home screen. To perform this with PC Meter Connect, refer to Printing an Account Report Using PC Meter Connect. Pitney Bowes Operator Guide February, 2017 Page 77 of 226... -
Page 78: Printing A Multi-Account Summary Report
5. Press Clear (back arrow key) to return to Reports menu or press Home to return to the Home screen. To perform this with PC Meter Connect, refer to Printing an Account Report Using PC Meter Connect. Pitney Bowes Operator Guide February, 2017 Page 78 of 226... -
Page 79: Clearing All Or Some Of The Accounts
B. Use the appropriate selection key next to the display. 4. At the confirm clear prompt, press Yes/Enter (or No if you change your mind). The account is cleared and you return back to the Accounts menu. Pitney Bowes Operator Guide February, 2017... -
Page 80: Deleting An Account
B. Use the appropriate selection key next to the display. 4. At the confirmation prompt to delete the account selected, press Yes/Enter to delete (or No if you change your mind). Pitney Bowes Operator Guide February, 2017 Page 80 of 226... -
Page 81: Turning On Account Passwords Globally
B. Use the appropriate selection key next to the display. 6. You return to the Home screen with the name of the account listed. 7. Continue with Creating an Account later in this chapter to set up accounts with passwords. Pitney Bowes Operator Guide February, 2017... -
Page 82: Turning Off Account Passwords Globally
4. You are prompted to enter the Supervisor password. Key in the 4-digit password. You return back to the Accounts menu. 5. Press Clear (back arrow key) or Home to return to the Home screen. Pitney Bowes Operator Guide February, 2017... - Page 83 9 - Reports About Reports Funds Report Add Postage Report Rates Summary Report Printing a Single Account Report Printing a Multi-Account Summary Report Configuration Report System Setup Report Account List Report (Standard Accounting) Error Report...
-
Page 84: Reports
3. Select the report you wish to print from the list. You may need to press the down arrow key to view additional reports. 4. If you have an attached printer, you will need to select Mailing Machine. Pitney Bowes Operator Guide February, 2017... - Page 85 4. When prompted, select Attached Printer. 5. A message appears indicating that the report will be printed to the attached printer. Select Returen to Reports Menu to continue. Pitney Bowes Operator Guide February, 2017 Page 85 of 226...
-
Page 86: Funds Report
Batch Value: the amount of postage applied since the last time the batch value was cleared. PBI Serial No: serial number of this meter (normally meter number). Account No: your Postage By Phone® system account number. Pitney Bowes Operator Guide February, 2017 Page 86 of 226... -
Page 87: Add Postage Report
Meter No: serial number of this meter (normally meter number). Printed: the date the report was printed. If you have PC Meter Connect, refer to Printing a Refill Summary Report Using PC Meter Connect. Pitney Bowes Operator Guide February, 2017 Page 87 of 226... -
Page 88: Rates Summary Report
Version: the alpha-numeric identifier used for this rate. Effective Date: the date the rate takes effect. Active: indicates if the rate is active (Yes or No). Meter Number: the serial number of this meter. Pitney Bowes Operator Guide February, 2017 Page 88 of 226... -
Page 89: Printing A Single Account Report
6. Press Clear (back arrow key) to return to Report type menu or press Home to return to the Home screen. To perform this with PC Meter Connect, refer to Printing an Account Report Using PC Meter Connect. Pitney Bowes Operator Guide February, 2017 Page 89 of 226... -
Page 90: Printing A Multi-Account Summary Report
5. Press Clear (back arrow key) to return to Reports menu or press Home to return to the Home screen. To perform this with PC Meter Connect, refer to Printing an Account Report Using PC Meter Connect. Pitney Bowes Operator Guide February, 2017 Page 90 of 226... -
Page 91: Configuration Report
Reports Configuration Report This report lists configuration information about your machine and Postage By Phone® account. It is generally a report you will not need unless your Pitney Bowes Customer Service Representative requests it. 1. Press Reports. 2. Select Printable reports. -
Page 92: System Setup Report
4. When prompted, ensure that a laser printer is connected to your system, then select Continue. 5. The report is printed. 6. Press Clear (back arrow key) to return to the Reports menu, or press Home to return to the Home screen. Pitney Bowes Operator Guide February, 2017 Page 92 of 226... -
Page 93: Account List Report (Standard Accounting)
4. When prompted, ensure that a laser printer is connected to your system, then select Continue. 5. The report is printed. 6. Press Clear (back arrow key) to return to the Reports menu, or press Home to return to the Home screen. Pitney Bowes Operator Guide February, 2017 Page 93 of 226... -
Page 94: Error Report
4. When prompted, insert tape sheet or envelope into the machine. The report is printed. 5. Press Clear (back arrow key) to return to the Reports menu, or press Home to return to the Home screen. Pitney Bowes Operator Guide February, 2017... - Page 95 10 - Configuring Your Mailing Machine About System Settings Setting System Time Setting the Contrast of the LCD Display Turning Features On and Off Setting the Date, Time and Timeouts Setting Normal Preset Time Sleep Mode Activation Time Setting Autodate Advance Correct Drift Setting Daylight Savings Time Setting Up or Disabling the Lock Code...
-
Page 96: Configuring Your Mailing Machine
Checking and Clearing the Batch Count (also refer to Checking Clearing Batch Mail Count) Connecting to Data Centre settings (also refer to Advanced Settings Maintenance Mode Change Language Meter Withdrawal (for withdrawing postage funds) Run Install Mode (for special purposes only) Pitney Bowes Operator Guide February, 2017 Page 96 of 226... -
Page 97: Setting System Time
2. Select Set to today's date. You will be returned to the Home screen with today's date set. If you have PC Meter Connect, refer to Setting System Time Using PC Meter Connect. Pitney Bowes Operator Guide February, 2017 Page 97 of 226... -
Page 98: Setting The Contrast Of The Lcd Display
To adjust the LCD display contrast: 1. Press Options. 2. Select Adjust the Contrast. 3. Select Increase Contrast or Decrease Contrast. 4. Press Clear (back arrow key) or Yes/Enter to return to the Options menu. Pitney Bowes Operator Guide February, 2017 Page 98 of 226... -
Page 99: Turning Features On And Off
Accounting – this turns on or off an accounting option (if purchased). Also, refer to Accounting. For INVIEW™ accounting, see the INVIEW™ Accounting Guide for DM125, DM225 Digital Mailing Systems (SV62371) on the Pitney Bowes website. -
Page 100: Setting The Date, Time And Timeouts
Setting the Normal Preset Time. Sleep Mode, refer to Sleep Mode Activation Time. Autodate Advance, refer to Setting Autodate Advance. Correct drift, refer to Correcting Drift. Daylight Savings, refer to Setting Daylight Savings Time. Pitney Bowes Operator Guide February, 2017 Page 100 of 226... -
Page 101: Setting Normal Preset Time
5. Key in the amount of minutes (from 1-240) before the system returns to the normal preset. 6. Select OK. The display returns to Time and Timeouts menu. 7. Press Clear (back arrow key) to return to Options Menu. Pitney Bowes Operator Guide February, 2017... -
Page 102: Sleep Mode Activation Time
5. Key in the amount of minutes (from 1-240) before the system goes into sleep mode. 6. Select OK. The display returns to Time and Timeouts menu. 7. Press Clear (back arrow key) to return to Options menu. Pitney Bowes Operator Guide February, 2017... -
Page 103: Setting Autodate Advance
AM as the time when the machine advances the date of the meter stamp. 6. The display returns to Time and Timeouts menu. 7. Press Clear (back arrow key) to return to Options menu. Pitney Bowes Operator Guide February, 2017... -
Page 104: Correct Drift
Key in the number of minutes you need to add and select Continue. 7. The display returns to Time and Timeouts menu. 8. Press Clear (back arrow key) to return to Options menu. Pitney Bowes Operator Guide February, 2017 Page 104 of 226... -
Page 105: Setting Daylight Savings Time
6. Select Enable to use Daylight Saving Time, or select Disable if you don't use Daylight Saving Time. Your selected setting is saved and the display returns to the Time and Timeouts menu. 7. Press Clear (back arrow key) to return to Options menu. Pitney Bowes Operator Guide February, 2017... -
Page 106: Setting Up Or Disabling The Lock Code
Postage Refill Change Accounts, Accounting Functions and Change Setup Refer to Passwords and Meter Functions for a comparison of access rights provided by the lock code and the account password. Pitney Bowes Operator Guide February, 2017 Page 106 of 226... -
Page 107: Setting Up Or Disabling The Supervisor Password
(4 digits) and select Continue. Re-enter the new password again to confirm and select Continue. At the "Supervisor Password has been enabled" message, select Continue. 6. Press Clear (back arrow key) to return to Options menu. Pitney Bowes Operator Guide February, 2017... -
Page 108: Turning Scale On Or Off
1. At the Home screen, press the selection key next to SCALE: line. 2. Select Turn Scale OFF (or ON). 3. You return to the Home screen with either the scale on or off. Pitney Bowes Operator Guide February, 2017... -
Page 109: Setting Scale Options (If Using Scale Option)
Turn the scale on/off View Imperial Wgt. Change/Retain Class Change/Retain Code Most of the scale options are accessed by pressing the selection key next to SCALE: line at the Home screen. Pitney Bowes Operator Guide February, 2017 Page 109 of 226... -
Page 110: Zeroing The Scale
1. At the Home screen, press the selection key next to SCALE: line. 2. Select View metric weight. 3. The current weight displays in grams. 4. Select Continue to return to the Home screen. Pitney Bowes Operator Guide February, 2017 Page 110 of 226... -
Page 111: Setting Weight Change Options
Code or retain Postal Code when weight changes. The current condition is listed at the bottom of the screen. 4. Press Clear (back arrow key) to return to the Home screen. Pitney Bowes Operator Guide February, 2017 Page 111 of 226... -
Page 112: Setting Class Change Options
4. Select either change class or retain class when Postal Code changes. The current condition is listed at the bottom of the screen. 5. Press Clear (back arrow key) to return to the Home screen. Pitney Bowes Operator Guide February, 2017... -
Page 113: Setting The High Funds Warning
.75 or $1.50. Select OK. 6. Press Clear (back arrow key) to return to Options menu. If you have PC Meter Connect, refer to Setting the High Value Warning Using PC Meter Connect. Pitney Bowes Operator Guide February, 2017 Page 113 of 226... -
Page 114: Setting The Low Funds Warning
5. Key in the amount you want (in whole dollars only). Select OK. 6. Press Clear (back arrow key) to return to Options menu. If you have PC Meter Connect, refer to Setting the Low Funds Warning Using PC Meter Connect. Pitney Bowes Operator Guide February, 2017 Page 114 of 226... -
Page 115: Enabling Scale Stabilizing
5. Select Scale Stabilizer. 6. The current setting (YES or NO) is listed on the screen. Follow the prompt to change the setting. 7. Press Clear (back arrow key) to return to the Home screen. Pitney Bowes Operator Guide February, 2017... -
Page 116: Setting Language Preference
5. Select Change Language. 6. Select the desired language, English or French. Press Home to return to the Main screen. The language you selected will remain in effect until it is changed again. Pitney Bowes Operator Guide February, 2017 Page 116 of 226... -
Page 117: Install Mode Options
Quick Install Guide that came with your machine, you can download one from our website, refer to Pitney Bowes Contact List for more information. NOTE: Do not run this option unless directed to do so by your Pitney Bowes representative. To run the install mode: 1. Press Options. 2. Press Page Down twice 3. - Page 118 This page intentionally left blank.
- Page 119 11 - Using the Preset Feature About Presets Defining New Values for the Normal Preset Viewing A Custom Preset Selecting a Custom Preset Defining a New Custom Preset Editing a Custom Preset Name Deleting a Custom Preset...
-
Page 120: Using The Preset Feature
You cannot assign an account to the Normal Preset (if you have enabled the accounting feature). When a rate change becomes effective, always check the postage values assigned to all presets to make sure that they comply with the new rates. Pitney Bowes Operator Guide February, 2017... - Page 121 Normal Preset chosen (using the values just shown). B. Select Continue to return to the View a Preset screen. If you have PC Meter Connect, refer to Viewing the Preset Using PC Meter Connect. Pitney Bowes Operator Guide February, 2017 Page 121 of 226...
-
Page 122: Defining New Values For The Normal Preset
5. Select Continue at the last screen to return to the first screen in step 4, and save the current values as the Normal preset, or press Home to return to the Home screen to establish the proper settings (see step 1). Pitney Bowes Operator Guide February, 2017... -
Page 123: Viewing A Custom Preset
A. Choose this Custom Preset as is, select Select this preset. You return to the Home screen with this Custom Preset chosen (using the values just shown). B. Select Continue to return to the View a Preset screen to select another preset. Pitney Bowes Operator Guide February, 2017... -
Page 124: Selecting A Custom Preset
4. Select the preset you want to use. You return to the Home screen with the preset values chosen. If you have PC Meter Connect, refer to Viewing the Preset Using PC Meter Connect. Pitney Bowes Operator Guide February, 2017 Page 124 of 226... -
Page 125: Defining A New Custom Preset
5. Select Continue at the last screen to return to the correct values prompt in Step 4, or press Home to return to the Home screen. If you have PC Meter Connect, refer to Storing or Changing the Preset Using PC Meter Connect. Pitney Bowes Operator Guide February, 2017 Page 125 of 226... -
Page 126: Editing A Custom Preset Name
To access alpha characters, repeatedly press the appropriate number key until the desired character displays. 5. When finished, select OK. You return to the Custom Preset menu. 6. Press Home to return to the Home screen. Pitney Bowes Operator Guide February, 2017 Page 126 of 226... -
Page 127: Deleting A Custom Preset
4. At the prompt to clear the Preset, press Yes/Enter. The preset is deleted. 5. The system confirms that the preset has been deleted. Select Continue. You return to the Custom Preset menu. 6. Press Home to return to the Home screen. Pitney Bowes Operator Guide February, 2017 Page 127 of 226... - Page 128 This page intentionally left blank.
-
Page 129: 12 - Passwords
12 - Passwords About Passwords and Meter Functions... -
Page 130: About Passwords And Meter Functions
For information on settinp up a supervisor password, refer to Setting or Disabling the Supervisor Password. For information on setting up a password for an account, refer to Creating an Account. Pitney Bowes Operator Guide February, 2017 Page 130 of 226... -
Page 131: Connecting To The Data Centre
13 - Connecting to the Data Centre How You Connect to the PB Data Centre Connect to the PB Data Centre Directly to a LAN Port with DM Series USB Ethernet Adapter Connect to the PB Data Centre Using PC Meter Connect Application on Your Computer... -
Page 132: How You Connect To The Pb Data Centre
In order to download postage to your meter and perform updates (postal rate updates, inspections and system updates) on your machine, you must connect to the Pitney Bowes Data Centre. Your meter can connect to the Pitney Bowes Data Centre using one of the following methods: DM Series USB Ethernet Adapter, PC Meter Connect. -
Page 133: Connect To The Pb Data Centre Directly To A Lan Port With Dm Series Usb Ethernet Adapter
Plug the other end of the adapter into an available USB "A" port on the back of the machine. For more information on setting up this type of connection, refer to How to setup a LAN connection on the DM125 available on our website. Pitney Bowes... -
Page 134: Connect To The Pb Data Centre Using Pc Meter Connect Application On Your Computer
Set machine settings, such as date and time, printing options, presets, etc. Run accounting reports Access the Pitney Bowes online store which provides an easy and convenient way to order ink cartridges, E-Z Seal®, envelopes, and other supplies for your machine. - Page 135 14 - Adding Postage Checking Postage Funds in the Meter Checking Postage By Phone® Account Balance Adding Postage to Your Machine Withdrawing Postage Funds from the Meter...
-
Page 136: Adding Postage
Postage is stored internally in your meter. When you need to add more, you establish communications between your meter and the Pitney Bowes Data Centre, and specify the amount of postage you wish to download. The postage is electronically transferred to your meter from your Pitney Bowes Postage By Phone®... -
Page 137: Checking Postage By Phone® Account Balance
1. Make sure that your machine can make the connection to the Data Centre. 2. Press Add Postage. 3. Select Check PBP balance. 4. The machine connects to the Pitney Bowes Data Centre. Various status screens display. 5. The Prepaid and Other balances display. Pitney Bowes... -
Page 138: Adding Postage To Your Machine
$1. 4. At the refill amount confirmation prompt, press Enter/yes. 5. The machine connects to the Pitney Bowes Data Center. Depending on your connection type (LAN or internet) various screens may display showing the status of the process. When complete, the refill successful message displays. - Page 139 (by sending in a check, direct withdrawal, etc.). Credit Line Available: Amount you have left in your Postage By Phone® system account of those funds you established as credit with Pitney Bowes (such as Purchase Power®, etc.). Refill Amount: Amount of your refill.
-
Page 140: Withdrawing Postage Funds From The Meter
5. Select Meter Withdrawal. 6. Select Transfer all funds from meter to PBP account. 7. The system connects into the Pitney Bowes Data Centre (this may take a few moments). Various screens displays, letting you know the status of the process. -
Page 141: Meter Updates And Inspections
15 - Meter Updates and Inspections About Meter Updates and Inspections About Postal Rate Changes Performing Meter Inspections... -
Page 142: About Meter Updates And Inspections
If it is not necessary to reboot, simply select Continue to return to the Home screen. IMPORTANT: Do not remove power or the Internet connection to the Pitney Bowes Data Centre during a system upgrade or rates download. Wait until the meter has finished processing before disconnecting the meter. You will know this has occurred... - Page 143 Postal Code Update If the Postal Code on record at the Pitney Bowes Data Centre does not match the Postal Code of your system, the code will be downloaded into your system. (When a system is moved to a new Postal Code, the Data Centre enters the new code into the record.
-
Page 144: About Postal Rate Changes
Postal rates change periodically by the . If new rates are available, you can download them quickly and easily, directly from the Pitney Bowes Data Centre. The new rates are normally available for download at least seven days before the effective date. -
Page 145: Performing Meter Inspections
2. Press Add Postage. 3. Select Check PBP balance. 4. The system connects to the Pitney Bowes Data Centre (this may take a few moments). Various screens displays, letting you know the status of the process. 5. The Prepaid and Other balances displays. Press No. - Page 146 This page intentionally left blank.
-
Page 147: Using Pc Meter Connect
16 - Using PC Meter Connect About PC Meter Connect Installation Requirements Network Specifications and Requirements for PC Meter Connect PC Meter Connect Installation Launching the Application Displaying PC Meter Connect on the System Tray Accessing Features from the System Tray Starting PC Meter Connect™... -
Page 148: Pitney Bowes Operator Guide February
Storing or Changing the Preset Using PC Meter Connect Viewing the Preset Using PC Meter Connect Viewing Meter Software Version Using PC Meter Connect Viewing PC Meter Connect Software Version Pitney Bowes Operator Guide February, 2017 Page 148 of 226... -
Page 149: About Pc Meter Connect
About PC Meter Connect PC Meter Connect desktop application is a high-speed software application. It enables your mailing machine to connect to the Pitney Bowes Data Centre through a Windows PC with an internet connection. You simply download the PC Meter Connect™ software from the Pitney Bowes support website, see PC Meter Connect Installation. -
Page 150: Installation Requirements
(32-bit or 64-bit) operating systems with the latest service packs. Mac OS is not supported. 1.2 GHz processor and 512 MB of RAM administrative rights to install software an Internet connection Pitney Bowes Operator Guide February, 2017 Page 150 of 226... -
Page 151: Network Specifications And Requirements For Pc Meter Connect
Centre, as well as provide convenient access to mailing machine settings from your PC if running the Enhanced version (model DM125). A USB cable is provided to connect your machine to any free USB port on the back of the PC that is running PC Meter Connect. -
Page 152: Frequently Asked Questions
It is recommended that you connect your meter to the internet through a firewall. If your network does not allow unrestricted outbound access you can provide access to Pitney Bowes’ servers adding the Pitney Bowes servers to your exception list. Refer to Exception List. - Page 153 2. Firewall on “Passive” FTP - what ports should be opened on server and client side? On server port 21 for commands and ports > 1023 must be opened. On the client, ports > 1023 must be opened for successful FTP connection and transfer of files. Pitney Bowes Operator Guide February, 2017...
- Page 154 Internet Settings menu from PC Meter Connect and select HTTPS mode. If the feature is not supported, the option is greyed out. What type of communication does the meter use while connecting to the Pitney Bowes Data Centre servers? The meter uses HTTP on Port 80, HTTPS on Port 443, and FTP on Port 21 for communications to Pitney Bowes Data Centre Servers.
- Page 155 Select the Use Internet Explorer proxy settings option button to choose the same setting as Internet Explorer, or: b. Select the Manual proxy settings option button. Then enter the Name and Password in the "Proxy Authentication" section. Pitney Bowes Operator Guide February, 2017 Page 155 of 226...
-
Page 156: Pc Meter Connect Installation
Using PC Meter Connect PC Meter Connect Installation Download the PC Meter Connect™ software from the Pitney Bowes support website to your PC with internet access. See Pitney Bowes Contact List. 1. Do not connect the USB cable to your PC or your machine yet. -
Page 157: Launching The Application
PC Meter Connect™ icon in the system tray), double clicking on the desktop icon will restart the software. Alternately, you may click on the Start button > All Programs > Pitney Bowes > PC Meter Connect. A PC Meter Connect™ icon will then appear in system tray. -
Page 158: Displaying Pc Meter Connect On The System Tray
2. Click on Properties from the list of choices that displays. 3. At the Taskbar and Start Menu Properties window, on the Taskbar tab, verify that the Hide inactive icons field is unchecked (blank). If necessary, click to uncheck it. Click OK to finish. Pitney Bowes Operator Guide February, 2017... -
Page 159: Accessing Features From The System Tray
Right Click on PC Meter Connect™ Icon in System Tray Item Description Update PC Meter Connects you to a Pitney Bowes website for the latest version of the Connect™ PC Meter Connect™ software Internet Settings Allows you to change your Internet settings for best operation with PC Meter Connect™... -
Page 160: Starting Pc Meter Connect
PC Meter Connect connects to the PB Data Centre and displays the postage amount in your system, your Postage-By-Phone account balance, your Purchase Power balance, and any updates required. PC Meter Connect™ Main Window Pitney Bowes Operator Guide February, 2017... - Page 161 Meter Not Connected Message When you reconnect your machine to the PC after disconnecting it, the following message displays in the system tray. The red "X" disappears from the tray. Meter Detected Message Pitney Bowes Operator Guide February, 2017 Page 161 of 226...
-
Page 162: Pc Meter Connect Application Main Window
. Good Communication PC Not Communicating with Machine PC Not communicating with PC Not Communicating with Internet or Internet Machine Pitney Bowes Operator Guide February, 2017 Page 162 of 226... - Page 163 Demonstrations about your machine. PDF of this operator guide. Frequently Asked Questions (FAQs) on this machine on the Pitney Bowes website. e. My Meter - This tab allows you to edit machine settings such as the date and time, printing options, and presets etc.
-
Page 164: Checking The Postage Amount Using Pc Meter Connect
You can check the funds (postage) in your machine from the Postage tab on the PC Meter Connect main window. The Postage tab is the default tab that displays when you launch the program. Pitney Bowes Operator Guide February, 2017... -
Page 165: Adding Postage Using Pc Meter Connect
Postage tab is the default tab that displays when you launch the program. 1. At the Postage tab, click on Add Postage to Meter. 2. Enter in the amount or choose one of the preset amounts. Click Confirm to continue. Pitney Bowes Operator Guide February, 2017... - Page 166 (by sending in a check, direct withdrawal, etc.). Credit Line Available: Amount you have left in your Postage By Phone® system account of those funds you established as credit with Pitney Bowes (such as Purchase Power®, etc.). Refill Amount: Amount of your refill.
-
Page 167: Downloading New Postal Rates Using Pc Meter Connect
3. When completed the system will prompt you to click Continue, then Done. 4. If updates are required click on the Update Software link in the Task panel on the right side of the screen. Pitney Bowes Operator Guide February, 2017... -
Page 168: Performing Meter Inspections Using Pc Meter Connect
3. Click on the Perform Meter Inspection link in the Task panel on the right side of the screen. 4. After several minutes, a Meter Inspection Completed screen displays. 5. Click Ok. Pitney Bowes Operator Guide February, 2017 Page 168 of 226... -
Page 169: Printing A Meter Stamp With An Advanced Date Using Pc Meter Connect
Printing a Meter Stamp with an Advanced Date Using PC Meter Connect 1. Click on the My Meter tab from the PC Meter Connect main window. 2. Select Meter Settings 3. Select Date and Time. Pitney Bowes Operator Guide February, 2017 Page 169 of 226... - Page 170 5. Click Apply. A confirmation screen displays the new date. Click OK. 6. To reset the date on your mail back to the current date, repeat steps 1 - 5 and select today's date. Pitney Bowes Operator Guide February, 2017...
-
Page 171: Adding Or Removing Ads Using Pc Meter Connect
Adding or Removing Ads Using PC Meter Connect 1. Click on the My Meter tab from the PC Meter Connect main window. 2. Select Meter Settings. 3. Select Ads & Inscriptions. Pitney Bowes Operator Guide February, 2017 Page 171 of 226... - Page 172 Using PC Meter Connect 4. Select the ad you want by clicking in the Envelope Ads field and selecting it from the dropdown list. 5. Click Apply. Pitney Bowes Operator Guide February, 2017 Page 172 of 226...
-
Page 173: Adding Or Removing Postal Inscriptions Using Pc Meter Connect
Adding or Removing Postal Inscriptions Using PC Meter Connect 1. Click on the My Meter tab from the PC Meter Connect main window. 2. Select Meter Settings. 3. Select Ads & Inscriptions. Pitney Bowes Operator Guide February, 2017 Page 173 of 226... - Page 174 4. Select the inscription you want by clicking in the Inscriptions field and selecting it from the dropdown list. You can also remove an inscription by selecting the blank option. The inscription you select displays on the screen. 5. Click Apply. Pitney Bowes Operator Guide February, 2017 Page 174 of 226...
-
Page 175: Setting The System Time Using Pc Meter Connect
Setting the System Time Using PC Meter Connect 1. Click on the My Meter tab from the PC Meter Connect main window. 2. Select Meter Settings. 3. Select Date and Time. Pitney Bowes Operator Guide February, 2017 Page 175 of 226... - Page 176 4. In the System field on the left side of the screen, place your cursor over the day, hour or minute and use the ^ or v keys to select the time/date of your machine. 5. Click Apply and a confirmation screen displays the new time. Click OK. Pitney Bowes Operator Guide February, 2017...
-
Page 177: Resetting The Scale To Zero Using Pc Meter Connect
Resetting the Scale to Zero Using PC Meter Connect 1. Select the My Meter tab from the PC Meter Connect main window. 2. Click Reset Scale to Zero. A "Scale has been recalibrated" message displays. Pitney Bowes Operator Guide February, 2017 Page 177 of 226... -
Page 178: Setting The High Value Warning Using Pc Meter Connect
4. Enter a value up to $99.000 in the High Value Warnings field for which you want the system to prompt you with the high warning message. 5. Click Apply. Pitney Bowes Operator Guide February, 2017 Page 178 of 226... -
Page 179: Setting The Low Funds Warning Using Pc Meter Connect
4. Enter a value up to $99.000 in the Low Funds Warnings field for which you want the system to prompt you with the low funds warning message. 5. Click Apply. Pitney Bowes Operator Guide February, 2017 Page 179 of 226... -
Page 180: Viewing Account Totals Using Pc Meter Connect
2. Click Account Reports on the right side of the screen in the task panel. A report displays listing the postage amount and the number of pieces for each account. Pitney Bowes Operator Guide February, 2017 Page 180 of 226... -
Page 181: Printing An Account Report Using Pc Meter Connect
PC Meter Connect main window. 2. Click Account Reports on the right side of the screen in the task panel. 3. Click Print at the lower left side of the screen. Pitney Bowes Operator Guide February, 2017 Page 181 of 226... - Page 182 Using PC Meter Connect 4. Click Print at the lower left side of the screen again. Pitney Bowes Operator Guide February, 2017 Page 182 of 226...
- Page 183 Using PC Meter Connect 5. Select your printer at the Windows Print screen and then click OK. Pitney Bowes Operator Guide February, 2017 Page 183 of 226...
-
Page 184: Printing A Refill Summary Report Using Pc Meter Connect
PC Meter Connect main window. 2. Click Refill History on the right side of the screen in the task panel. 3. Click Print at the lower left side of the screen. Pitney Bowes Operator Guide February, 2017 Page 184 of 226... - Page 185 Using PC Meter Connect 4. Click Print at the lower left side of the screen again. Pitney Bowes Operator Guide February, 2017 Page 185 of 226...
- Page 186 Using PC Meter Connect 5. Select your printer at the Windows Print screen and then click OK Pitney Bowes Operator Guide February, 2017 Page 186 of 226...
-
Page 187: Storing Or Changing The Preset Using Pc Meter Connect
NOTE: If no class is selected, you may save a postage amount as a preset. Once a class is selected, you cannot save a postage amount. 5. When finished, click Save Preset. 6. At the preset stored confirmation screen, click OK. Pitney Bowes Operator Guide February, 2017 Page 187 of 226... -
Page 188: Viewing The Preset Using Pc Meter Connect
Viewing the Preset Using PC Meter Connect 1. Click on the My Meter tab from the PC Meter Connect main window. 2. Click Meter Settings. 3. Click on View Preset. Pitney Bowes Operator Guide February, 2017 Page 188 of 226... -
Page 189: Viewing Meter Software Version Using Pc Meter Connect
1. Select the Updates tab from the PC Meter Connect main window. 2. Select Details >> to display the mainling machine software version information. 3. Select Update Software to download the latest software version to your meter. Pitney Bowes Operator Guide February, 2017... -
Page 190: Viewing Pc Meter Connect Software Version
2. Select About PC Meter Connect to find out what PC Meter Connect version you are currently running. 3. If you need to update the version of your PC Meter Connect software, visit www.pb.com/support/PCMC. Pitney Bowes Operator Guide February, 2017 Page 190 of 226... -
Page 191: Supplies And Options
17 - Supplies and Options Supplies and Options... -
Page 192: Supplies And Options
Options Pitney Bowes offers a number of flexible options so you can tailor your mailing system to meet your exact needs today, and expand it as your business grows tomorrow. Contact your Pitney Bowes Sales... - Page 193 Accounts for more information on this feature. InView™ Meter Reporting This optional web based software from Pitney Bowes allows you to view, consolidate and alalyze postage meter usage information from one mailing machine or multiple machines throughout your organization. See About Accounts for more information on this feature.
- Page 194 This page intentionally left blank.
-
Page 195: 18 - Specifications
18 - Specifications Specifications (Equipment and Materials) -
Page 196: Specifications (Equipment And Materials)
Machine noise is less than 70dba in accordance with EN ISO 7779, and ANSI 12.10. LCD Display 4 lines, 20 characters long Throughput DM125 Up to 45 letters per minute Actual throughput will vary, depending on the material used, machine condition, use of moistener, etc. Print Resolution... - Page 197 Minimum Thickness 0.007" (0.18 mm) Maximum Thickness 3/8" (9.5 mm) Maximum Stack Height for Mail 2.5" (60 mm) NOTE: For best results, always make sure your material conforms to these specifications. Pitney Bowes Operator Guide February, 2017 Page 197 of 226...
- Page 198 This page intentionally left blank.
-
Page 199: 19 - Troubleshooting
19 - Troubleshooting Getting Help What Information You Need to Provide Customer Support Display Problems Feeding Problems Printing Problems Accidentally Printing the Wrong Postage Moistening Problems (envelopes don't seal) Viewing System Configuration Levels Troubleshooting Communications Problems Problems Connecting to the Data Centre Via PC Meter Connect Troubleshooting Your Internet Connection Text Error Messages... -
Page 200: Getting Help
If you are experiencing problems connecting to the PB Data Centre using the Communication Device information can be found on the Pitney Bowes support site. If you are unable to finds answers to your questions using these resources contact PB Customer... -
Page 201: What Information You Need To Provide Customer Support
What Information You Need to Provide Customer Support Be sure to have the following information available before contacting Pitney Bowes Technical Support: Product Name: DM125 Digital Postage Meter PCN: See the label under the lid at the top of the meter. -
Page 202: Display Problems
1. Press Options. 2. Select Adjust the Contrast. 3. Select Increase Contrast or Decrease Contrast to change the contrast level as necessary. 4. Press Home to return to the Home screen. Pitney Bowes Operator Guide February, 2017 Page 202 of 226... -
Page 203: Feeding Problems
• Make sure your envelopes meet our published specifications. See Material Specifications. • Feed envelopes correctly. See Running Mail. Don't try to feed oversize envelopes through the machine. Use tape strips instead. Pitney Bowes Operator Guide February, 2017 Page 203 of 226... -
Page 204: Printing Problems
Replacing the Ink Cartridge for step by step instructions. Possible Cause Print nozzles clogged Solution Perform a print purge needed, see Purging the Print Heads for step by step instructions. Pitney Bowes Operator Guide February, 2017 Page 204 of 226... -
Page 205: Accidentally Printing The Wrong Postage
Return spoiled meter impressions to a corporate Canada Post office. Corporate post offices are managed by Canada Post. Post office franchises, which are hosted by retailers, do not issue postage meter refunds. What is the minimum refund for spoiled meter impressions? Pitney Bowes Operator Guide February, 2017 Page 205 of 226... -
Page 206: Pitney Bowes Operator Guide February
The post office will send a copy to Canada Post's head office. The amount, less the applicable fee, will be credited to your meter manufacturer's account. These credits are issued at the end of each month. Pitney Bowes Operator Guide February, 2017... -
Page 207: Moistening Problems (Envelopes Don't Seal)
Try wetting the moistener brush. If the brush drys out quickly, replace the moistener wick, see Cleaning the Moistener Wich and Holder. Possible Cause Dirty moistener brush Solution Remove the moistener brush. Clean it in plain water and rinse thoroughly, see Cleaning the Moistener Brush. Pitney Bowes Operator Guide February, 2017 Page 207 of 226... - Page 208 Troubleshooting Possible Cause Worn moistener brush Solution Replace the moistener brush, see Cleaning the Moistener Brush. Refer to Getting Help. Pitney Bowes Operator Guide February, 2017 Page 208 of 226...
-
Page 209: Viewing System Configuration Levels
Troubleshooting Viewing System Configuration Levels Sometimes in an effort to fix your problem over the phone, a Pitney Bowes agent may request you to look up the system level that is on your machine. Follow these steps to do this: 1. -
Page 210: Troubleshooting Communications Problems
To make sure you do not have problems with your internet connection refer to Internet Connection Troubleshooting. For possible issues with PC Meter Connect, refer to Troubleshooting PC Meter Connect. Pitney Bowes Operator Guide February, 2017 Page 210 of 226... -
Page 211: Problems Connecting To The Data Centre Via Pc Meter Connect
Select HTTPS as the Protocol. If the option is greyed out, select FTP Mode (Passive) as the Protocol. d. Select Use Internet Explorer proxy settings for the For Proxy Address Assignment. e. Click OK. Solution B Pitney Bowes Operator Guide February, 2017 Page 211 of 226... - Page 212 IMPORTANT: If you install PC Meter Connect™ on a PC with other Pitney Bowes applications, you will need to exit PC Meter Connect™ before you can use the other Pitney Bowes applications. Simply right click on the PC Meter Connect™ icon in the system tray and select Exit to exit PC Meter Connect™. To restart PC Meter Connect™, just double-click on the PC Meter Connect™...
- Page 213 Full desktop application version of PC Meter Connect: Socket connection error caused by a firewall/content filter program running on the PC or on the network. Contact your local IT representative to make sure Pitney Bowes is permitted to make connections with your network. For more information, refer to...
- Page 214 PC Meter Connect is not installed, or PC Meter Connect is installed but the driver must be installed manually. 1803 This indicates you may need to update your version of PC Meter Connect. Pitney Bowes Operator Guide February, 2017 Page 214 of 226...
- Page 215 000000000000} 0 then web filtering is most likely not the issue. If you have a web filtering or firewall issue, a specific message will display instead of a line of zeros. If this is the case, consider adding the Pitney Bowes servers to your Exception List.
- Page 216 Internet Settings from the menu. b. Select Non-Chunked as the HTTP Transfer Encoding Method. c. Select HTTPS as the Protocol. If the option is greyed out, select FTP Mode (Passive) as the Protocol. Pitney Bowes Operator Guide February, 2017 Page 216 of 226...
-
Page 217: Troubleshooting Your Internet Connection
If you have a web filtering or firewall issue, a specific message will display instead of a line of zeros. If this is the case, consider adding the Pitney Bowes servers to your exception list. Refer Exception List. -
Page 218: Text Error Messages
If you can not fix the issue with the website resources you may have to call for service or assistance. Refer to Getting Help. Pitney Bowes Operator Guide February, 2017 Page 218 of 226... -
Page 219: Numeric Error Codes
The following table lists the possible codes, a description of each, and what action you can take. Please be sure to record any error codes that appear on your display before calling your customer support agent. You can also visit our support site for additional information, see Pitney Bowes Contact List. Error Code Description... - Page 220 You must reboot your system after every DE00 occur when you are trying to connect with error. Do this by: the Pitney Bowes Data Centre. It could be caused by any of these conditions: 1. Unplug your power cord, and wait one to three minutes.
- Page 221 These are system error codes and my 1. Press Clear/Back (C). If nothing E22XX, P2BXX require help from a Pitney Bowes happens in 5 seconds, turn off the engineer to diagnose and correct. machine, wait 15 seconds, and turn the machine back on.
-
Page 222: Exception List
If you are using PC Meter Connect: Distributor: http://distservp1.pb.com, https://distservp1.pb.com Comet Server: http://cometservp1.pb.com (US), https://cometservp1.pb.com (US), http://cometservd1.pb.com (Canada), https://cometservd1.pb.com (Canada) DLA: http://pbdlsp1.pb.com, https://pbdlsp1.pb.com FTP: ftp://dlsdlp1a.pb.com, ftp://dlsdlp1b.pb.com, ftp://dlsdlp1z.pb.com, ftp://dlsdlp1.pb.com Acct Upld: https://acctservp1.pb.com Pitney Bowes Operator Guide February, 2017 Page 222 of 226... -
Page 223: 20 - Glossary
20 - Glossary... - Page 224 PC Meter Connect™– a small desktop software application you install on your PC to allow your machine to connect to the Pitney Bowes Data Centre through your PC’s Internet connection rather than over a standard telephone line. Postage refills and system updates can be completed efficiently and much quicker via the Internet.
- Page 225 Pressing any key wakes up the display. Standby Mode (DM125/DM225 only) – The lowest power consumption mode that may persist for an indefinite time when the product is connected to an outlet and switched "off" at the back of the machine.
- Page 226 This page intentionally left blank.
Need help?
Do you have a question about the DM125 and is the answer not in the manual?
Questions and answers