Atlas Copco GA 15 Instruction Book
Hide thumbs
Also See for GA 15:
- Instruction book (164 pages) ,
- User manual (45 pages) ,
- User manual (45 pages)
Table of Contents
Advertisement
Quick Links
Advertisement
Table of Contents

Related Manuals for Atlas Copco GA 15


Summary of Contents for Atlas Copco GA 15
- Page 1 Atlas Copco GA 15 API459842 Instruction book...
- Page 3 Atlas Copco GA 15 API459842 Instruction book Original instructions Manufacturing Date: 16/11/2009 Copyright notice Any unauthorized use or copying of the contents or any part thereof is prohibited. This applies in particular to trademarks, model denominations, part numbers and drawings.
-
Page 4: Table Of Contents
Instruction book Table of contents Safety precautions......................6 ........................... 6 AFETY ICONS ......................6 ENERAL SAFETY PRECAUTIONS ................... 7 AFETY PRECAUTIONS DURING INSTALLATION ....................8 AFETY PRECAUTIONS DURING OPERATION ................9 AFETY PRECAUTIONS DURING MAINTENANCE OR REPAIR General description...................... 11 ..........................11 NTRODUCTION ............................ - Page 5 Instruction book 3.10 ......................39 ALLING UP RUNNING HOURS 3.11 ....................... 40 ALLING UP MOTOR STARTS 3.12 .......................40 ALLING UP MODULE HOURS 3.13 ......................41 ALLING UP LOADING HOURS 3.14 ........................41 ALLING UP LOAD RELAY 3.15 ..................42 ALLING UP RESETTING THE SERVICE TIMER 3.16 ................
- Page 6 Instruction book Operating instructions....................73 ..........................73 NITIAL START ..........................76 EFORE STARTING ............................76 TARTING .......................... 77 URING OPERATION ........................78 HECKING THE DISPLAY ............................79 TOPPING ........................80 AKING OUT OF OPERATION Maintenance........................81 ....................81 REVENTIVE MAINTENANCE SCHEDULE ..........................83 IL SPECIFICATIONS ......................84 TORAGE AFTER INSTALLATION ..........................
- Page 7 Instruction book ....................96 OTOR OVERLOAD RELAY SETTINGS ..........................96 RYER SWITCHES .................... 96 EFERENCE CONDITIONS AND LIMITATIONS GA 15 GA 22..................96 OMPRESSOR DATA FOR UP TO ......................97 ECHNICAL DATA CONTROLLER Instructions for use...................... 99 Guidelines for inspection...................100 Pressure equipment directives................. 101 Declaration of conformity..................
-
Page 8: Safety Precautions
Instruction book Safety precautions Safety icons Explanation Danger to life Warning Important note General safety precautions 1. The operator must employ safe working practices and observe all related work safety requirements and regulations. 2. If any of the following statements does not comply with the applicable legislation, the stricter of the two shall apply. -
Page 9: Safety Precautions During Installation
9. If compressed air is used in the food industry and more specifically for direct food contact, Atlas Copco recommends, for optimal safety, the use of certified Class 0 compressors in combination with appropriate filtration depending on the application. Please contact your Atlas Copco Customer Center for advice on specific filtration. -
Page 10: Safety Precautions During Operation
Instruction book 14. In multiple compressor systems, manual valves must be installed to isolate each compressor. Non- return valves (check valves) must not be relied upon for isolating pressure systems. 15. Never remove or tamper with the safety devices, guards or insulation fitted on the machine. Every pressure vessel or auxiliary installed outside the machine to contain air above atmospheric pressure must be protected by a pressure relieving device or devices as required. -
Page 11: Safety Precautions During Maintenance Or Repair
Instruction book • All fasteners are tight • All electrical leads are secure and in good order • Safety valves and other pressure relief devices are not obstructed by dirt or paint • Air outlet valve and air net, i.e. pipes, couplings, manifolds, valves, hoses, etc. are in good repair, free of wear or abuse •... - Page 12 Instruction book 10. Scrupulously observe cleanliness during maintenance and repair. Keep dirt away by covering the parts and exposed openings with a clean cloth, paper or tape. 11. Never weld or perform any operation involving heat near the oil system. Oil tanks must be completely purged, e.g.
-
Page 13: General Description
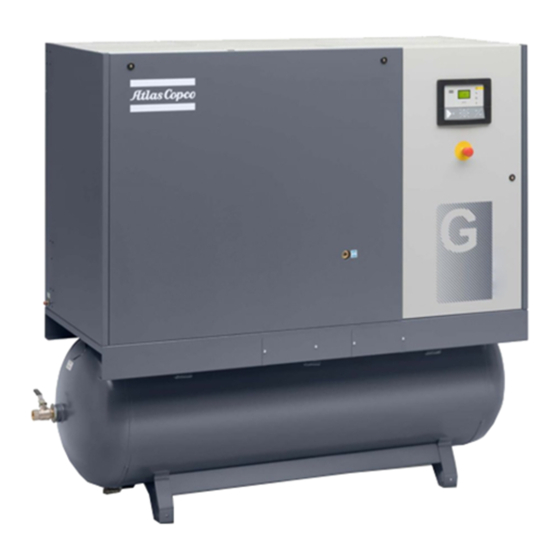
Instruction book General description Introduction GA 15, GA 18 and GA 22 are single-stage, oil-injected screw compressors driven by an electric motor. The compressors are air-cooled. ® The compressors are controlled by an Elektronikon controller. GA Pack GA Pack are enclosed in a sound-insulated bodywork. The compressors are controlled by an Elektronikon®... - Page 14 Instruction book Front view, GA 15 up to GA 22 Tank-mounted Full-Feature Reference Name Air filter Air receiver Air outlet valve Air cooler Oil cooler Manual drain, air receiver Dryer Elektronikon® controller (standard) or Elektronikon® Graphic controller (optional) Motor Condensate trap (GA Pack)
-
Page 15: Air Flow
Instruction book Air flow Flow diagrams Flow diagram, GA Pack API459842... - Page 16 Instruction book Flow diagram, GA Full-Feature Reference Description Intake air Air/oil mixture Wet compressed air Condensate Dried compressed air API459842...
-
Page 17: Oil System
Instruction book Description Air drawn through filter (AF) and open inlet valve (IV) into compressor element (E) is compressed. Compressed air and oil flow into the oil tank (OT). The air is discharged through outlet valve (AV) via minimum pressure valve (Vp) and air cooler (Ca). During loaded operation, minimum pressure valve (Vp) keeps the pressure in the separator tank (OT) above a minimum value, required for lubrication. - Page 18 Instruction book References Description Compressed air flow towards the condensate trap (Pack units). Compressed air flow to the air dryer (compressors with integrated dryer) Intake air Air/oil mixture Wet compressed air Description In oil tank (OT) most of the oil is removed from the air/oil mixture by centrifugal action. The rest is removed by oil separator (OS).
-
Page 19: Cooling System
Instruction book Cooling system Flow diagram Cooling system References Description Intake air Air/oil mixture Wet compressed air Description The cooling system comprises air cooler (Ca) and oil cooler (Co). On air-cooled compressors, the cooling air flow is generated by fan (FN). API459842... -
Page 20: Condensate System
Instruction book Condensate system Condensate drains Condensate drains, Pack units Condensate drain, Full-Feature units Pack units have a condensate trap (MT) downstream the air cooler. The condensate trap is provided with a manual drain outlet (Dm) and an automatic drain outlet (Da). On Full-Feature units, the dryer is equipped with an electronic drain (1). -
Page 21: Regulating System
Instruction book Regulating system Flow diagram Regulating system (loaded condition) Loading When the net pressure is below the loading pressure, solenoid valve (Y1) is energised. Results: • The space above unloading valve/blow-off valve (UV) is connected with the oil separator tank pressure (1) via the solenoid valve. -
Page 22: Electrical System
Instruction book Electrical system General Also consult sections Electrical diagrams Electrical connections. The electrical system comprises following components: Electric cubicle on GA 15 up to GA 22, typical example Reference Designation F1/2/3 Fuses F4/5/6 Fuses F7/8 Fuses for dryer (only on Full-Feature compressors) -
Page 23: Electrical Diagrams
Instruction book Reference Designation Earth terminal Electrical diagrams The complete electrical diagram can be found in the electric cubicle. Text on drawing Reference Designation Customer’s installation Option All other voltages except 440-460 V - 60 Hz Remote start/stop Motor protection API459842... - Page 24 Instruction book Reference Designation Emergency stop Remote emergency stop Supply of dryer All other voltages Designations used Typical references used in the electric diagram of the compressor: Reference Compressor Dryer Compressor motor PT20 Pressure sensor, air delivery TT11 Temperature sensor, element outlet TT90 Temperature sensor, LAT dryer (GA Full-Feature only) Solenoid valve...
-
Page 25: Air Dryer
Instruction book Reference Compressor control module Start Stop Reference Optional equipment Electronic water drain Timer drain Phase sequence relay Main switch Anti-condensation heaters Air dryer Description Air dryer Air circuit Compressed air enters heat exchanger (10) and is cooled by the outgoing, cold, dried air. Water vapor in the incoming air starts to condense. - Page 26 Instruction book The refrigerant enters evaporator (4) where it withdraws heat from the compressed air by further evaporation at constant pressure. The heated refrigerant leaves the evaporator and is sucked in by the compressor (1). API459842...
-
Page 27: Elektronikon® Controller
Instruction book Elektronikon® controller ® Elektronikon regulator Control panel Introduction ® In general, the Elektronikon regulator has following functions: • Controlling the compressor • Protecting the compressor • Monitoring components subject to service • Automatic restart after voltage failure (made inactive) Automatic control of the compressor The regulator maintains the net pressure between programmable limits by automatically loading and unloading the compressor. -
Page 28: Control Panel
Instruction book If one of the measurements exceeds the programmed shutdown warning level, this will also be indicated to warn the operator before the shutdown level is reached. Service warning If the service timer exceeds a programmed value, this will be indicated on the display to warn the operator to carry out some service actions. -
Page 29: Icons Used On The Display
Instruction book Reference Designation Function LED, Automatic operation Indicates that the regulator is automatically controlling the compressor: the compressor is loaded, unloaded, stopped and restarted depending on the air consumption and the limitations programmed in the regulator. Warning symbol LED, Warning Is lit if a warning condition exists. - Page 30 Instruction book Function Icon Description Automatic restart after Automatic restart after voltage failure is active voltage failure Timer Active protection functions Emergency stop Service Service required Units Pressure unit (Mega Pascal) Pressure unit (pounds per square inch) Pressure unit (bar) Temperature unit Temperature unit Hours (always shown together with seconds)
-
Page 31: Main Screen
When the voltage is switched on, the first screen is a test screen. The next screen is the Main screen, shown automatically. The Main screen shows: • The compressor status by means of pictographs • The air outlet pressure Always consult Atlas Copco if the pressure on the display is preceded by a "t". API459842... -
Page 32: Shut-Down Warning
Instruction book Shut-down warning Description A shut-down warning will appear in the event of: • Too high a temperature at the outlet of the compressor element • Too fast increase of temperature at the outlet of the compressor element • Too high a dewpoint temperature (Full-Feature compressors) Compressor element outlet temperature •... -
Page 33: Shut-Down
Instruction book Main screen with the dewpoint temperature warning The related pictograph will appear flashing Press the Scroll button (12) until the actual dewpoint temperature appears. Warning screen, dewpoint temperature The screen shows that the dewpoint temperature is 9˚C. • It remains possible to scroll through other screens (using Scroll buttons 12) to check the actual status of other parameters. - Page 34 Instruction book Compressor element outlet temperature • If the outlet temperature of the compressor element exceeds the shut-down level (factory setting 120 ˚C / 248 ˚F, programmable) the compressor will be shut-down, alarm LED (5) will flash, automatic operation LED (3) will go out and the following screen will appear: Main screen with shut-down indication, element outlet temperature The related pictograph will appear flashing.
-
Page 35: Service Warning
Instruction book Main screen with shut-down indication, motor overload • Switch off the voltage and remedy the trouble. • After remedying and when the shut-down condition has disappeared, switch on the voltage and restart the compressor. Service warning Description A service warning will appear when the service timer has reached the programmed time interval. If the service timer exceeds the programmed time interval, service LED (9) will light up. -
Page 36: Scrolling Through All Screens
Instruction book Stop the compressor, switch off the voltage and carry out the required service actions. See section Preventive Maintenance. • The longer interval service actions must also include the shorter interval actions. In the example above, carry out all service operations belonging to the 8000 running hours interval as well as those belonging to the 4000 running hours interval. - Page 37 <P. 9> Selection for function: Automatic restart See section Activating automatic restart after voltage failure (active or not, only for Atlas Copco) <P. 10> Selection between Y-D or DOL starting See section Selection between Y-D or DOL starting <P. 11>...
- Page 38 Instruction book Protections Designation Related topic screens <Pr. 1> Protections screens See section Calling up/modifying protection <Pr. 2> settings <Pr. 3> Test screens Designation Related topic <t. 1> Display test See sections Test screens <t. 2> Safety valve test See sections Test screens <t.
- Page 39 Instruction book Menu flow Simplified menu flow Ref. Description Ref. Description Compressor outlet pressure (16) Pressure band setting Compressor outlet temperature (17) Service timer settings Dewpoint temperature (18) Temperature unit Digital input status (19) Unit pressure API459842...
-
Page 40: Calling Up Temperatures
Instruction book Ref. Description Ref. Description Running hours (20) Auto restart Motor starts (21) Selection Y-D/DOL Module hours (22) Load delay time Loading hours (23) Minimum stop time Load relay (24) Password settings (10) Service timer reading (25) Remote pressure sensing (11) Actual program version (26) -
Page 41: Calling Up Running Hours
Instruction book The screen shows that the outlet temperature is 82 ˚C. • For Full-Feature compressors: Press Scroll button (12). The dew point temperature will be shown: The screen shows that the dew point temperature is 3 ˚C. 3.10 Calling up running hours Control panel Starting from the Main screen: •... -
Page 42: Calling Up Motor Starts
Instruction book 3.11 Calling up motor starts Control panel Starting from the Main screen, press Scroll button (12) until <d. 2> is shown and then press Enter button (13). A screen similar to the following appears: This screen shows the number of motor starts (x 1 or - if <x1000> lights up - x 1000). In the above example, the number of motor starts is 10100. -
Page 43: Calling Up Loading Hours
Instruction book In the example shown, the screen shows the unit used (hrs) and the value (5000): the regulator module has been in service during 5000 hours. 3.13 Calling up loading hours Starting from the Main screen: • Press Scroll button (12) until <d.4> is shown and then press Enter button (13): The screen shows the unit used <hrs>... -
Page 44: Calling Up/Resetting The Service Timer
Instruction book 3.15 Calling up/resetting the service timer Calling up the service timer Starting from the Main screen: • Press Scroll button (12) until <d.6> is shown and then press Enter button (13): This screen shows the unit used <hrs> (or <x1000 hrs>) and the value <1191>. In the example shown, the compressor has run 1191 hours since the previous service. -
Page 45: Selection Between Local, Remote Or Lan Control
Instruction book 3.16 Selection between local, remote or LAN control Starting from the Main screen, press Scroll button (12) until <P. 1> is shown and then press Enter button (13). The actually selected control mode is shown: <LOC> for local control, <rE> for remote control or <LAn>... - Page 46 Instruction book Modifying the node ID The node ID can be changed; use a value between 1 and 31. When the function is ON, the parameters cannot be modified. Change the function to OFF to change the node ID. It is also possible to change the channels. The controller has 4 channels. When changing the channels, the controller can act as a Mk IV controller (a previous version of the controller).
-
Page 47: Calling Up/Modifying Ip, Gateway And Subnetmask
Instruction book 3.18 Calling up/modifying IP, Gateway and Subnetmask Calling up Starting from the Main screen, press the Scroll button (12) until <P. 3> is shown and then press Enter button (13). The next screen shows either <OFF> or <On>. If <On>, press the Enter button (13) to modify it to <OFF>. Use the Scroll buttons Up or Down (12) to scroll between the items in this list (<IP>... -
Page 48: Calling Up/Modifying Pressure Band Settings
Instruction book 3.19 Calling up/modifying pressure band settings Calling up the settings API459842... - Page 49 Instruction book Starting from the Main screen: • Press Scroll button (12) until <P.04> is shown and then press Enter button (13). Pressure band 1 (<Pb. 1>) is shown on the display. Button (12) can be used to scroll to pressure band 2 (<Pb.2>). •...
-
Page 50: Modifying The Pressure Band Selection
Instruction book 3.20 Modifying the pressure band selection Control panel Starting from the Main screen: • Press Scroll button (12) until <P.05> is shown and then press Enter button (13). The active pressure band 1 (<Pb.1>) is shown on the display. •... -
Page 51: Calling Up/Modifying The Unit Of Temperature
Instruction book 3.22 Calling up/modifying the unit of temperature Control panel Starting from the Main screen: • Press Scroll button (12) until <P.07> is shown and then press Enter button (13). The actually used unit is shown. Possible settings are <˚C> and <˚F>. •... -
Page 52: Selection Between Y-Dor Dol Starting
(13). The actually used starting mode is shown: <Y-D> (star-delta) or <doL> (Direct-On-Line). • For obvious reasons, this parameter must normally not be altered. Therefore it can only be modified after entering a secure code. Consult Atlas Copco if the parameter is to be changed. Example of Y-D setting 3.26 Calling up modifying load delay time... -
Page 53: Calling Up Modifying Minimum Stop Time
Instruction book • This screen shows the load delay time (10) and the unit (s= seconds). To modify this value press the Enter button (13) (a password may be required). • The value starts blinking and Scroll buttons (12) can be used to modify the value. •... -
Page 54: Activate Load/Unload Remote Pressure Sensing
Instruction book • The screen shows the password status (ON (<On>) or OFF (<OFF>). Press Enter button (13) to modify. • Change the value with Scroll buttons (12). • Select <On> and press Enter button (13). • Enter the new password and press Enter button (13) to confirm. •... - Page 55 Instruction book A number of protection settings are provided. The protection screens are labelled <Pr.>. The pictograph shown with the protection screen indicates the purpose of the protection. Possible combinations are <Pr.>, followed by a number and one of the next pictographs: Pictograph Designation <Pr.>...
-
Page 56: Test Screens
Safety valve test In the test screen <t. 2>, a safety valve test is provided. The safety valves can only be tested after entering a code. Consult Atlas Copco if the safety valves are to be tested. Production test Test screen <t. 3> is only intended for production test. If the Main screen shows following screen, the... -
Page 57: Web Server
Instruction book How to solve? Use the Scroll buttons (12) and scroll to menu <t. 3>. The screen shows: Press the Enter button (13): the text starts blinking. Press enter again and the menu disappears. 3.32 Web server All controllers have a built-in web server that allows direct connection to the company network or to a dedicated PC via a local area network (LAN). - Page 58 Instruction book Configuration of the network card • Go to Network and Sharing Center (1). • Click on Change adapter settings (1). • Select the Local Area Connection, which is connected to the controller. • Click with the right button and select Properties (1). •...
- Page 59 Instruction book • Use the following settings: • IP Address 192.168.100.200 (1) • Subnetmask 255.255.255.0 (2) Click OK (3) and close network connections. Configure a company network (LAN) connection • Ask your IT department to generate a fixed IP address in your company’s network. •...
- Page 60 Instruction book • Adapt the network settings in the Elektronikon Mk5: • Go to Main Menu • Go to Settings (1) • Go to Network (1) API459842...
- Page 61 Instruction book • Go to Ethernet (1) • Switch Off (1) the Ethernet communication to allow editing the settings • Adapt IP Address (1) • Adapt Gateway IP (2) • Adapt Subnet Mask (3) • Switch On (4) the Ethernet communication API459842...
- Page 62 Instruction book • Wait a few minutes so the LAN network can connect to the Elektronikon Mk5 Configuration of the web server ® The internal web server is designed and tested for Microsoft Internet Explorer. Also "Opera", "Mozilla Firefox", "Safari"and "Chrome" should work. Viewing the controller data All screen shots are indicative.
- Page 63 Instruction book Screen shot (example!) Navigation and options • The banner shows the unit type and the language selector. In this example, three languages are available on the controller. • On the left side of the interface, you can find the navigation menu. If a license for ESi is foreseen, the menu contains 3 buttons.
- Page 64 Instruction book Unit settings All unit settings can be displayed or hidden. Put a check mark in front of each point of interest and it will be displayed. Only the machine status is fixed and can not be removed from the main screen. Analog inputs Lists all current analog input values.
-
Page 65: Programmable Settings
Instruction book Special protections Lists all special protections of the unit. Service plan Displays all levels of the service plan and their status. This screen shot underneath only shows the running hours. It is also possible to show the current status of the service interval. 3.33 Programmable settings Parameters: unloading/loading pressures for compressors without built-in refrigeration dryer Minimum... - Page 66 The built-in service timer will give a Service warning message after a preprogrammed time interval has elapsed. Also see section Preventive maintenance schedule. Consult Atlas Copco if a timer setting has to be changed. See section Calling up/modifying service timer settings. The intervals must not exceed the nominal intervals and must coincide logically. Terminology Term...
- Page 67 Minimum stop Once the compressor has automatically stopped, it will remain stopped for the minimum time stop time, whatever happens with the net air pressure. Consult Atlas Copco if a setting lower than 20 seconds is required. Unloading/ The regulator does not accept illogical settings, e.g. if the unloading pressure is Loading pressure programmed at 7.0 bar(e) (101 psi(g)), the maximum limit for the loading pressure...
-
Page 68: Installation
Instruction book Installation Dimension drawings GA 15 up to GA 22 Tank-mounted Pack API459842... - Page 69 Instruction book GA 15 up to GA 22 Tank-mounted Full-Feature Type GA 15 GA 15 Full- Pack Feature Weight of Tank- mounted version (kg) API459842...
-
Page 70: Installation Proposal
Instruction book Ref. Name Compressor air inlet Motor and cooling air inlet Compressed air outlet Motor and compressor cooling air outlet Electrical cable entry Dryer cooling air inlet Dryer cooling air outlet Automatic drain Manual drain Installation proposal Compressor room example API459842... - Page 71 If frost might occur, the appropriate measures should be taken to avoid damage to the machine and its ancillary equipment. In this case, and also if operating above 1000 m (3300 ft), consult Atlas Copco. Moving/lifting Tank-mounted unit: Move the compressor by a lift truck by positioning the forks below the lifting supports that are mounted between the feet of the air receiver.
-
Page 72: Electrical Connections
Stop the compressor and switch off the voltage before connecting external equipment. Only potential free contacts are allowed. • LAN control: The compressor is controlled via a local network. Consult Atlas Copco. Compressor status indication on compressors equipped with an Elektronikon® controller The Elektronikon controller is provided with an auxiliary relay (K05) for remote indication of a shutdown. -
Page 73: Pictographs
Instruction book Stop the compressor and switch off the voltage before connecting external equipment. Consult Atlas Copco. Pictographs Pictographs GA 15 up to GA 22 Reference Designation Warning: before connecting compressor electrically, consult Instruction book for motor rotation direction Torques for steel (Fe) or brass (CuZn) bolts Warning: suction Lightly oil gasket of oil filter, screw filter on and tighten by hand (approx. - Page 74 Instruction book 1. Read the instruction book. Drain the condensate to reduce the risk of corrosion. 2. Drain the vessel daily by opening the manual drain valve. 3. Inspect the vessel wall-thickness yearly and note down the inspection date. API459842...
-
Page 75: Operating Instructions
Instruction book Operating instructions Initial start-up Safety The operator must apply all relevant Safety precautions. Procedure For the location of the air outlet valve and the drain connections, see sections Introduction Condensate system. Motor and gear casing transport fixtures API459842... - Page 76 Instruction book Position of oil level sight-glass Electric cubicle API459842...
- Page 77 Instruction book Location of the sheet Consult the sections Electric cable size,Installation proposal Dimension drawings The following transport fixtures, painted red, must be removed: • Bolts (1) • Bushes (2) Check that the electrical connections correspond to the applicable codes and that all wires are clamped tight to their terminals.
-
Page 78: Before Starting
Instruction book Before starting Procedure Check the oil level, top up if necessary. See section Initial start-up. Starting Procedure For the position of the air outlet valve and the drain connections, see sections Introduction Condensate system Control panel Elektronikon® Step Action Open the air outlet valve. -
Page 79: During Operation
Instruction book During operation Warnings The operator must apply all relevant Safety precautions. Also consult section Problem solving. Removing the front panel (service panel) during operation will lead to an automatic shutdown of the unit after a certain time depending of the compressor version. When the motors are stopped and LED (8) (automatic operation) is alight, the motors may start automatically. -
Page 80: Checking The Display
Instruction book Position of oil level sight-glass on GA 15 up to GA 22 On compressors with an Elektronikon® controller, unlock the emergency stop button (10) and press the 'Rset' key (5) before restarting. Air filter Especially if the compressor is installed in a dusty environment, inspect the air filter element regularly. -
Page 81: Stopping
Instruction book Compressors with Elektronikon® controller: Check the display (2) regularly for readings and messages. The display normally shows the compressor outlet pressure, while the status of the compressor is indicated by pictographs. Remedy the trouble if alarm LED (7) is lit or flashes, see section Shutdown warning Shutdown Problem... -
Page 82: Taking Out Of Operation
Instruction book Taking out of operation Warning The operator must apply all relevant Safety precautions. Procedure Step Action Stop the compressor and close the air outlet valve. Open the manual condensate drain (if provided). Consult section Condensate system to locate the drain valve. -
Page 83: Maintenance
Service kits For overhauling or carrying out preventive maintenance, service kits are available (see section Service kits). Service contracts Atlas Copco offers several types of service contracts, relieving you of all preventive maintenance work. Consult your Atlas Copco Customer Centre. API459842... - Page 84 When servicing, replace all removed gaskets, O-rings and washers. Intervals The local Atlas Copco Customer Centre may overrule the maintenance schedule, especially the service intervals, depending on the environmental and working conditions of the compressor. The longer interval checks must also include the shorter interval checks.
-
Page 85: Oil Specifications
Oil specifications It is strongly recommended to use genuine Atlas Copco Lubricants. They are the result of years of field experience and research. See section Preventive maintenance schedule for the advised replacement intervals and consult the Spare Parts list for part number information. -
Page 86: Storage After Installation
Service kits For overhauling and for preventive maintenance, a wide range of service kits is available. Service kits comprise all parts required for servicing the component and offer the benefits of genuine Atlas Copco parts while keeping the maintenance budget low. -
Page 87: Adjustments And Servicing Procedures
Keep the outside of the electric motor clean for efficient cooling. If necessary, remove dust with a brush and/or compressed air jet. Bearing maintenance The motor bearings do not need to be regreased during their normal service life. Air filter Location of air filter Air filter, GA 15 up to GA 22 API459842... -
Page 88: Oil And Oil Filter Change
Instruction book Recommendations 1. Never remove the filtration element while the compressor is running. 2. For minimum downtime, replace the dirty element by a new one. 3. Discard the element when damaged. Procedure 1. Stop the compressor. Switch off the voltage. 2. - Page 89 Instruction book Procedure Oil system components of GA 15 up to GA 22 1. Run the compressor until warm. Stop the compressor. Close the air outlet valve and switch off the voltage. Depressurise the compressor by opening manual drain valve(s) (Dm, Dm1). Wait a few minutes and depressurise the air receiver/oil tank (OT) by unscrewing oil filler plug (FC) just one turn to permit any pressure in the system to escape.
-
Page 90: Oil Separator Change
Procedure Oil system components of GA 15 up to GA 22 1. Run the compressor until warm. Stop the compressor, close the air outlet valve and switch off the voltage. Wait a few minutes and depressurise by unscrewing oil filler plug (FC) just one turn to permit any pressure in the system to escape. -
Page 91: Safety Valves
• Next, clean with an air jet in the reverse direction to normal flow. Use low pressure air. If necessary, the pressure may be increased up to 6 bar(e) (87 psig). • If it is necessary to wash the coolers with a cleaning agent, consult Atlas Copco. Safety valves... -
Page 92: Dryer Maintenance Instructions
Instruction book The safety valve (SV) can be tested on a separate air line. If the valve does not open at the set pressure stamped on the valve, it needs to be replaced. An additional safety valve is fitted on tank mounted versions. The valve can be tested on a separate air line. If the valve does not open at the set pressure stamped on the valve, it needs to be replaced. -
Page 93: Problem Solving
Instruction book Problem solving Warning Before carrying out any maintenance, repair work or adjustment, press the stop button, wait until the compressor has stopped, press the emergency stop button and switch off the voltage. Close the air outlet valve, open the manual drain valve. Depressurise the compressor by opening the oil filler plug (FC) one turn. - Page 94 Oil cooler clogged Clean cooler Bypass valve malfunctioning Have valve tested Air cooler clogged Clean cooler Compressor element out of order Consult Atlas Copco Customer Centre Faults and remedies, dryer For all references hereafter, consult section dryer. Condition Fault Remedy...
- Page 95 Instruction book Condition Fault Remedy Evaporator pressure too high See below Condenser pressure too high See below Condenser pressure too high Fan control switch out of Replace or too low order Fan blades or fan motor out of Check fan/fan motor order Ambient temperature too high Check and correct;...
-
Page 96: Technical Data
Fluctuates between programmed unloading and loading pressures. Compressor element 55-65 ˚C (99-117 ˚F) above cooling air temperature. outlet temperature Dew point temperature For GA 15 up to GA 22 with built-in dryer: see section Compressor data. Electric cable size and main fuses Important •... - Page 97 Recommended wire Main section (2) section (3) fuses (A) (4) GA 15 4 x 10 mm 4 x 16 mm Remarks : (1): current in the supply lines at maximum load (2): suggested wire section under standard conditions (Pack) (3): suggested wire section under worst case conditions (Full-Feature)
-
Page 98: Motor Overload Relay Settings
See section compressor data Minimum working pressure Maximum air inlet temperature ˚C Minimum ambient temperature ˚C Compressor data for GA 15 up to GA 22 Reference conditions All data specified below apply under reference conditions, see section Reference conditions and limitations. -
Page 99: Technical Data Controller
Instruction book GA 15 8.5 bar Frequency Maximum (unloading) pressure bar(e) Maximum (unloading) pressure, Full-Feature units bar(e) 8.25 Nominal working pressure bar(e) Pressure drop over dryer, Full-Feature units bar(e) 0.25 Motor shaft speed r/min 2940 Set point, thermostatic valve ˚C Temperature of air leaving outlet valve (approx.) -
Page 100: Analog Inputs
Instruction book Digital outputs Number of outputs 6 (Elektronikon® controller - p.n. 1900 5200 00 …. 1900 5200 09) Type Relay (voltage free contacts) Rated voltage AC 250 V AC / 10 A max. Rated voltage DC 30 V DC / 10 A max. Digital inputs Number of inputs 4 (Elektronikon®... -
Page 101: Instructions For Use
Instruction book Instructions for use Oil separator vessel This vessel can contain pressurized air. This can be potentially dangerous if the equipment is misused. This vessel must only be used as a compressed air/oil separator tank and must be operated within the limits specified on the data plate. -
Page 102: Guidelines For Inspection
Instruction book Guidelines for inspection Guidelines On the Declaration of Conformity / Declaration by the Manufacturer, the harmonised and/or other standards that have been used for the design are shown and/or referred to. The Declaration of Conformity / Declaration by the Manufacturer is part of the documentation that is supplied with this compressor. -
Page 103: Pressure Equipment Directives
Instruction book Pressure equipment directives Components subject to 97/23/EC Pressure Equipment Directive Compressor type Part number Description PED class GA 15 up to GA 22 0832 1000 77 Safety valve 0830 1009 87 0832 1000 78 Safety valve 0832 1002 23... -
Page 104: Declaration Of Conformity
Instruction book Declaration of conformity Typical example of a Declaration of Conformity document (1): Contact address: Atlas Copco Airpower n.v. P.O. Box 100 B-2610 Wilrijk (Antwerp) Belgium (2): Applicable directives (3): Standards used API459842... - Page 105 Instruction book On the Declaration of Conformity / Declaration by the Manufacturer, the harmonized and/or other standards that have been used for the design are shown and/or referred to. The Declaration of Conformity / Declaration by the Manufacturer is part of the documentation that is supplied with this device.
- Page 108 Atlas Copco delivers the products and services that help to increase your business’ efficiency and profitability. Atlas Copco's pursuit of innovation never ceases, driven by our need for reliability and efficiency. Always working with you, we are committed to providing you the customized quality air solution that is the driving force behind your business.
Need help?
Do you have a question about the GA 15 and is the answer not in the manual?
Questions and answers