Advertisement
Quick Links
360º Vision System for Aftermarket Radio/Display
PROFESSIONAL INSTALLATION IS REQUIRED
CALIBRATION KIT IS REQUIRED FOR FINAL PROGRAMMING
Please read thoroughly before starting installation and check that kit contents are complete.
Items Included in the Kit:
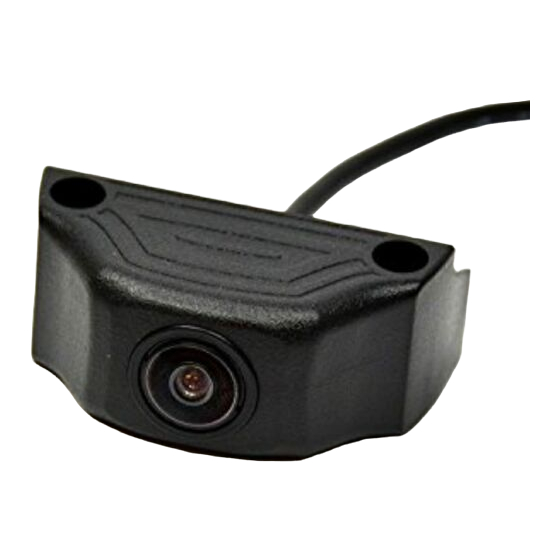
360º camera module
Key box power/image buttons
Front camera w/grill mount and harness
2 side mount cameras w/pods and harnesses
2 video output RCA cables
Power/camera input harness
2 side camera templates
Mounting screws and gaskets
Rear license plate mounting bracket
These instructions
Safety Precautions:
• Work in well ventilated area that is clear of obstructions.
• Secure vehicle with tire chucks in both front and rear of tires.
• Turn vehicle accessories OFF and ensure ignition key is in OFF position.
• Wear safety goggles and snug fitting clothes.
• Use tools only for their intended purpose and which are in good repair.
• Only perform this task if confidence, skill, and physical ability permit.
NOTE: We strive to provide accurate and up-to-date installation instructions. For the latest full color
instructions, as well as an installation video, please visit
1. Front camera is mounted in the grill aiming straight or at a 20º angle to the ground.
2. Mount camera in housing using the bracket and screws provided. (The white sticker is up on the
camera.)
AVMS-3690 Instructions 9-2-16
(Kit # AVMS-3690)
DUE TO THE COMPLEXITY OF THIS KIT
Front camera installation
INSTALLATION INSTRUCTIONS
Tools & Supplies Needed:
Wire strippers
Wire cutters
Electrical tape
Zip ties
Plastic panel removal tools
Screwdriver
7 mm socket
Drill
Large Uni-bit/drill bits
Hole saws
T-15 Torx
Section 1:
Page 1 of 9
www.brandmotion.com
Advertisement

Related Manuals for BrandMotion AVMS-3690


Summary of Contents for BrandMotion AVMS-3690
-
Page 1: Section 1: Front Camera Installation
INSTALLATION INSTRUCTIONS 360º Vision System for Aftermarket Radio/Display (Kit # AVMS-3690) DUE TO THE COMPLEXITY OF THIS KIT PROFESSIONAL INSTALLATION IS REQUIRED CALIBRATION KIT IS REQUIRED FOR FINAL PROGRAMMING Please read thoroughly before starting installation and check that kit contents are complete. -
Page 2: Section 2: Side Mirror Camera Installation
2. Working on the driver side door. With the door closed, place the template sticker ( marked LHD ) on the bottom side of the mirror with arrow aiming away from the vehicle. Perpendicular to the side of the body. ( Do not go by mirror lines or angles .) AVMS-3690 Instructions 9-2-16 Page 2 of 9... - Page 3 INSTALLATION INSTRUCTIONS AVMS-3690 Instructions 9-2-16 Page 3 of 9...
- Page 4 INSTALLATION INSTRUCTIONS AVMS-3690 Instructions 9-2-16 Page 4 of 9...
- Page 5 .) 7. Drill a hole in the bottom of the mirror using a hole saw or Uni-bit to the size on the template. Which is 1 1/8” AVMS-3690 Instructions 9-2-16 Page 5 of 9...
- Page 6 14. Remove the tape from the foam gasket and mount the camera pod to the mirror. Use the self-tapping screws provided to mount the pods to the underside of the mirror. ( Do not over tighten the screws; it may strip out the plastic.) AVMS-3690 Instructions 9-2-16 Page 6 of 9...
-
Page 7: Rear Camera Installation
2. Mount camera to be able to see the ground and both outer edges of the vehicle. 3. Run harness to the front of the vehicle to where the 360º Main control module will be. 4. Zip tie the harness in place to make sure it does not rattle. AVMS-3690 Instructions 9-2-16 Page 7 of 9... - Page 8 8. Place the vehicle into reverse to see the rear camera image on the screen. Or turn on screen to see image. (Warning will be displayed on the screen until the unit is calibrated.) AVMS-3690 Instructions 9-2-16 Page 8 of 9...
- Page 9 INSTALLATION INSTRUCTIONS Diagram 1a. AVMS-3690 Instructions 9-2-16 Page 9 of 9...
Need help?
Do you have a question about the AVMS-3690 and is the answer not in the manual?
Questions and answers