Table of Contents
Advertisement
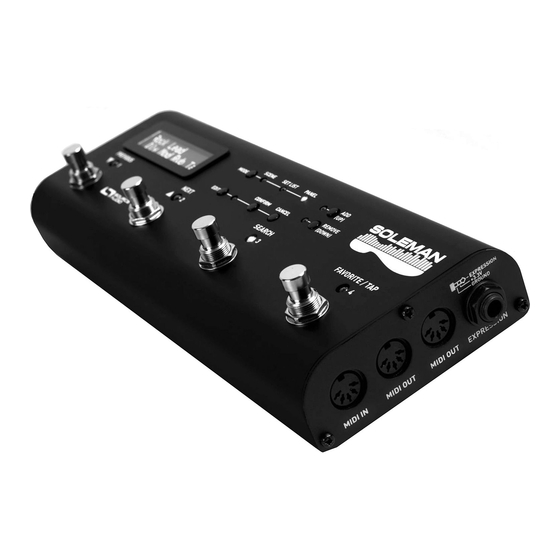
Soleman MIDI Foot Controller
User's Guide
Welcome
Thank you for purchasing the Soleman MIDI Foot Controller. The Soleman is a versatile, highly
configurable hardware and software MIDI controller housed in a durable, compact package.
It has two hardware MIDI outputs, which allow it to interface with any hardware that adheres to the
MIDI standard. It also has a USB-MIDI interface for direct control of MIDI-compatible software such
as DAWs (Digital Audio Workstations), virtual instruments, synths, or VST plugins.
The four footswitches scroll through scenes, launch individual MIDI messages, step through set lists,
or trigger highly customizable MIDI macros. An external switch port allows for two additional
footswitches to make navigation more convenient.
The expression input allows the user to use a passive expression pedal to generate MIDI continuous
controller messages in a very flexible manner, providing direct expressive control over MIDI-
compatible devices and software.
SA165
Soleman User's Guide
1
Advertisement
Table of Contents

Subscribe to Our Youtube Channel
Related Manuals for Source Audio Soleman


Summary of Contents for Source Audio Soleman
-
Page 1: Welcome
User’s Guide Welcome Thank you for purchasing the Soleman MIDI Foot Controller. The Soleman is a versatile, highly configurable hardware and software MIDI controller housed in a durable, compact package. It has two hardware MIDI outputs, which allow it to interface with any hardware that adheres to the MIDI standard. -
Page 2: Overview
Two MIDI Outputs – Connect to up to two external hardware MIDI devices directly to the Soleman using the standard 5-pin DIN connectors. Scene Mode – In the most basic mode, the Soleman sends Program Change or Note On messages on its MIDI outputs, allowing for plug-and-play compatibility with many MIDI devices such as the Source Audio Neuro Hub. -
Page 3: Table Of Contents
Version History ............................39 Quick Start This section will guide you through the process of powering the Soleman and using it in a simple MIDI setup with program change (PC) messages. For this example, the Neuro Hub will be used as the target device. - Page 4 Setting the Mode The Soleman has three basic modes of operation: Scene, List, and Panel. For this example, the Scene mode will be used. Scene mode, the most basic mode of operation, sends program change messages (by default) on the MIDI outputs.
-
Page 5: User Interface Overview
User Interface Overview Mode Button: Toggles between the three main modes of the Soleman: Scene, List, and Panel. There are three corresponding LEDs that indicate which mode is currently active. Edit Button: Activates the Edit Menu. When the Edit Menu is active, the corresponding Edit LED will blink. -
Page 6: Connections
The power supply must be able to source at least 70 mA. The Soleman can be powered either by an external DC power supply or directly by the USB port. Warning: Using a non-Source Audio supply, especially an unregulated supply, could damage the unit. - Page 7 The MIDI Out ports are the main connections to the external MIDI hardware you wish to control using the Soleman. There are two MIDI outputs and they are both identical – each of them outputs an exact copy of the same MIDI messages, allowing the Soleman to connect to multiple external devices in parallel.
-
Page 8: Scene Mode
Scene number will increase by 1. By pressing the Previous footswitch, the Scene number will decrease by 1. Each time a new Scene is activated, the corresponding MIDI message will be output from the Soleman. The Scenes range from 0 to 127. If the Next footswitch is pressed when Scene 127 SA165... - Page 9 Soleman will jump to Scene 0. If the Previous footswitch is pressed when Scene 0 is active, then the Soleman will jump to Scene 127. External expansion footswitches, if connected, can also be used to change Scenes in the same manner as the Previous and Next footswitches.
- Page 10 By default, the MIDI program change message associated with a scene will be sent on the Global Default MIDI Out Channel, which can be modified in the Edit Menu. It is possible, however, to define custom MIDI messages that use different channels on a scene-by- scene basis using the USB Editor Software. SA165 Soleman User’s Guide...
-
Page 11: List Mode
When a list is loaded intially, no scene is active and the word “Start” is displayed in the center of the LCD. Press the Next footswitch to enter the list. When the first scene in a list is active, the word “Start” will be displayed in the lower left of the LCD: SA165 Soleman User’s Guide... - Page 12 Next and Previous footswitches without sending out the corresponding MIDI messages. When you have reached the desired position in the List, press the Search footswitch again. This will exit List Search mode and send the MIDI message corresponding to the current Scene. SA165 Soleman User’s Guide...
- Page 13 Previous or Next footswitches to select the previous or next Scene in the List. Selecting the Next or Previous List There are a total of 64 Lists stored in the Soleman. To change lists, follow these steps: ...
-
Page 14: Panel Mode
MIDI hardware that vary on a scene-to-scene basis. Panel Mode Panel Mode is the most powerful and flexible operating mode of the Soleman. In Panel mode, each footswitch is capable of sending a completely customizable MIDI message (or group of multiple MIDI messages) when it is activated as well as a different MIDI message (or group of multiple MIDI messages) when it is deactivated. - Page 15 [Data Byte 0] [Data Byte 1] Program Change Program number (0-127) None Note On/Off Note On number (0-127) Velocity (0-127) Continuous Control Continuous control number (0-127) Continuous control value (0-127) Macro None None System Real-time None None SA165 Soleman User’s Guide...
- Page 16 In this way, only one of the grouped switches is active at a given time. Example with footswitches 1 and 2 set to Radio mode: User Presses footswitch 1. The ON message for footswitch 1 is sent out. Footswitch 1 LED turns on. SA165 Soleman User’s Guide...
- Page 17 LCD will scroll the name back and forth if it exceeds the size of the display. Changing Panels There are a total of 64 Panels stored in the Soleman. To change Panels, use the Add/Up and Remove/Down buttons. To change Panels using only your feet, press the Search and Favorite footswitches at the same time to select the next panel, or press the Previous and Next footswitches at the same time to select the previous panel.
-
Page 18: Macros
Exclusive (SysEx) messages and other non-standard MIDI message types. Macros allow users to output custom MIDI data from the Soleman that greatly expands the flexibility of the Soleman for use in different MIDI applications. The Soleman can store 127 macros, each of which can be up to 50 data bytes in length. -
Page 19: Usb Midi Interface
MIDI, such as Ableton Live, Logic Pro, Pro Tools, Guitar Rig and more. All MIDI messages sent on the Soleman’s hardware MIDI outputs will also be sent to the computer over USB. MIDI messages can also be sent to the Soleman for recalling scenes via Note On messages and recalling Panels via Program Changes. - Page 20 0 to 127. However, this range can be modified on a per-Scene or per-Panel basis. Make sure that you have properly calibrated the expression pedal using the Expression Calibration function before attempting to remap the expression CC range. SA165 Soleman User’s Guide...
- Page 21 Heel = 127 Heel = 127 Toe = 0 Toe = 30 Heel = 30 Heel = 90 Toe = 90 Toe = 0 Heel Heel Heel Heel Treadle Position Treadle Position Treadle Position Treadle Position SA165 Soleman User’s Guide...
-
Page 22: Global Edit Menu
The Global Edit Menu provides access to a number of global settings that change the way the Soleman works. To access the Global Edit Menu, press and hold the Edit button. The Edit LED will begin to blink, indicating that Global Edit mode is active. Once in Global Edit Mode, press the Edit button to navigate through the various options in the menu. - Page 23 Lower dead zone Global Input MIDI Channel The Global MIDI Channel determines the MIDI channel for the MIDI input on the Soleman. The same channel applies using the 5-pin DIN hardware jack and the USB-MIDI interface. The Soleman will respond to Program Changes and Note ON messages that are sent to it to recall individual Panels and Scenes, respectively.
- Page 24 Hub a program change message. The Hub can store a name for each of the scenes in its memory. When a scene is activated, the Hub can send out the name data back to the Soleman to be displayed on the Soleman’s LCD screen.
- Page 25 N a m e s Y e s Now, when the Soleman launches scenes on the Hub in Scene Mode, the corresponding name will be sent from the Hub and displayed on the Soleman’s LCD screen. IMPORTANT! When using the Use Hub Names mode, the Neuro Hub must be set to use its MIDI Out jack as a MIDI output and NOT as a MIDI Through.
- Page 26 Factory Reset If you wish to return the Soleman to its factory settings, eliminating all user data and restoring all options to their defaults, navigate to the Factory Reset screen in the Edit Menu and then press and hold the Remove button.
-
Page 27: External Footswitches
Be very cautious not to perform a factory reset unless you are willing to lose all of your user data! External Footswitch Connections The Soleman supports up to two external footswitches that can be used to improve navigation in List mode and Panel mode, or to use as an external tap tempo input. -
Page 28: Usb Editor Software
5-pin DIN MIDI Input Jack or the USB-MIDI connection will have the same result. This allows users to recall Scenes, Set Lists, or Panels via MIDI so that the Soleman can be remotely controlled from external hardware or software. The following table describes the MIDI... - Page 29 Soleman’s user data. To download the software, visit http://www.sourceaudio.net/support/downloads. Device Status The device status box shows the status of the USB connection to the Soleman. When the Soleman is connected, the firmware version is shown and the device box turns green. Global Settings The global settings section provides access to the same parameters and settings available in the Global Edit menu.
- Page 30 It is usually best to set these values automatically using the Expression Pedal Calibration in the Global Edit menu on the hardware while plugging in an expression pedal to the Soleman. SA165...
- Page 31 MIDI Channel follows the global setting by default. If another channel is selected in the scene, it will override the global setting only for this scene. Lists The Lists section allows the user to edit lists. Select a list to edit from the drop-down menu. SA165 Soleman User’s Guide...
- Page 32 Enable Use Setup Macro to launch a macro when the panel is loaded. If Use Footswitch 4 for Tap Tempo is enabled, footswitch 4 will be disabled in the footswitch section. Footswitches The footswitches section allows the footswitches for the selected panel to be configured. SA165 Soleman User’s Guide...
- Page 33 Macro On and Macro Off are only used if the Message type is Macro. Macros The Macros section allows users to build custom sets of MIDI messages for sending multiple messages in a single package. Macros can be called from within Scenes or Panels. SA165 Soleman User’s Guide...
- Page 34 Continuous Controller message needs a controller number (data value 1) and a value (data value 2). As another example, a Note On message needs a note number (data value 1) and a velocity (data value 2). SA165 Soleman User’s Guide...
- Page 35 System Exclusive messages require the user to type in the data directly into the Systex Data text box. Data must be formatted as hexadecimal values, and each byte must be separated from the next byte using a comma. For example a valid Sysex message is F0, 00, 01, 6C, F7. SA165 Soleman User’s Guide...
-
Page 36: Appendix
Here is a table of some common MIDI Message types and their corresponding data formats. In Scene and List modes, the Soleman uses Program Change or Note On messages by default. In Panel mode, Control Change messages can also be used. -
Page 37: Specifications
5V DC bus power (USB) Firmware Updates USB Editor Firmware Update: Over time, new features may be added to the Soleman via firmware updates. Firmware updates will be made available on the Source Audio website. To update the firmware, connect the Soleman to the computer using a USB cable and use the Firmware Update function in the USB Editor Software. -
Page 38: Warranty
Source Audio. Warranty Information Source Audio may, at its option, require proof of the original purchase date in the form of a dated copy of the original authorized dealer’s invoice or sales receipt. Service and repairs of Source Audio products are to be performed only at the Source Audio factory or a Source Audio authorized service center. -
Page 39: Version History
This Limited Warranty only applies to products sold and used in the USA. Source Audio shall not be liable for damages or loss resulting from the negligent or intentional acts of the shipper or its contracted affiliates. You should contact the shipper for proper claims procedures in the event of damage or loss resulting from shipment.
Need help?
Do you have a question about the Soleman and is the answer not in the manual?
Questions and answers