Table of Contents
Advertisement
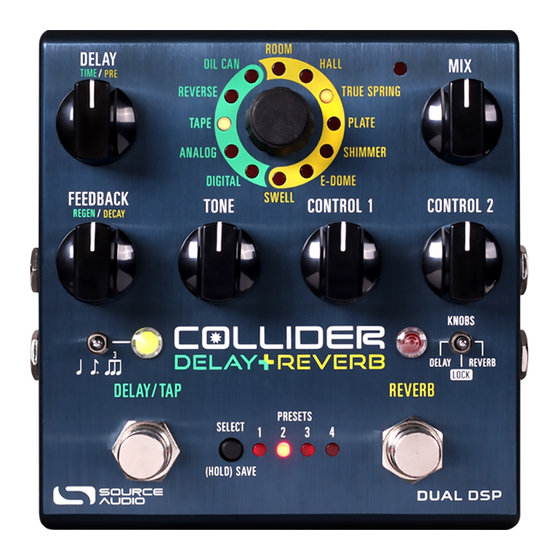
Collider Delay+Reverb User Guide
Welcome
Thank you for purchasing the Collider Delay+Reverb. This powerful, yet easy-to-use stereo effects
pedal features 12 meticulously crafted delay and reverb engines. Each effect was handpicked from
our award winning and highly regarded Nemesis Delay and Ventris Dual Reverb pedals. The Collider's
intuitive control surface makes it easy to mix-and-match any two-engine combination of delay and
reverb. Plus, dual footswitches provide individual Engage/Bypass control over each effect in a two-
engine combination.
The Collider offers an exceptional collection of rich, spacious tones, including realistic reproductions
of vintage Analog, Tape, and Oil Can Delays, classic models of Spring and Plate Reverb, natural
replications of large and small acoustic spaces, and an intriguing and highly musical selection of
"unnatural" tones including Reverse Delay and Shimmer Reverb.
The pedal also features dual DSP architecture, 8 user presets (or 128 user presets with MIDI), stereo
inputs and outputs, analog dry through, delay tap tempo, reverb hold, full MIDI functionality,
external expression capabilities, and extra editing and signal routing options via the Neuro Desktop
and Mobile App Editors.
We built the Collider Delay+Reverb for supreme sonic exploration. We cannot wait to hear where it
takes you.
- The Source Audio Team
Collider Delay+Reverb Owner's Manual
SA263
1
Advertisement
Table of Contents

Related Manuals for Source Audio Collider Delay+Reverb


Summary of Contents for Source Audio Collider Delay+Reverb
-
Page 1: Welcome
Neuro Desktop and Mobile App Editors. We built the Collider Delay+Reverb for supreme sonic exploration. We cannot wait to hear where it takes you. - The Source Audio Team Collider Delay+Reverb Owner’s Manual... -
Page 2: Table Of Contents
Neuro Hub .............................. 44 MIDI ................................ 45 USB................................46 Specifications ............................46 Troubleshooting ............................. 47 Frequently Asked Questions........................48 Rubber Feet ............................49 Waste Disposal Notes ..........................49 Warranty ..............................49 Version History ............................51 Collider Delay+Reverb Owner’s Manual SA263... -
Page 3: Overview
Neuro Community. The Neuro Desktop Editor - Connect your Collider Delay+Reverb to the USB port on your Mac or Windows PC to create and save advanced presets with the Neuro Desktop’s sleek editing interface. - Page 4 Discover Knobs Position – Allows you to “discover” where the pedal’s knobs are set for a given preset, via the Control LED flashing when you’ve reached the correct knob position on the dial. Collider Delay+Reverb Owner’s Manual SA263...
-
Page 5: Connecting The Pedal
To power the unit, connect the included 9V DC power supply to the jack labeled DC 9V on the back panel. Warning: Using a non-Source Audio supply, especially an unregulated supply, could damage the unit. A power supply with insufficient current levels may also cause noise or other unpredictable behavior. - Page 6 This is a standard 5-pin DIN connector that accepts MIDI control messages from external devices, including program change (PC) and continuous controller (CC) messages. Please email contact@sourceaudio.net regarding any questions about the Collider Reverb+Delay’s MIDI Collider Delay+Reverb Owner’s Manual SA263...
- Page 7 Output 2 as a Neuro App Data Daisy-Chain Output: UTPUT connection for the Neuro App, passing data from the Collider to the next Source Audio effect in your signal chain. You can daisy-chain the Neuro App data regardless of whether O...
- Page 8 The 3.5 mm C port connects to external control devices such as the Source Audio Tap ONTROL NPUT Tempo Switch, Source Audio Dual Expression Pedal, Neuro Hub, and Hot Hand Motion Controller. For more information, refer to the Expression Pedal Input,...
-
Page 9: Reverb Engines
The Collider includes seven onboard reverb effect engines, carefully selected from the Ventris Dual Reverb. Because of the wide tonal possibilities of each reverb engine in the Collider Delay+Reverb, it was necessary to arm the pedal with two variable knobs labeled CONTROL 1 and CONTROL 2. When a new reverb engine is selected, two engine specific parameters are automatically assigned to the CONTROL knobs. - Page 10 The cavernous E-DOME (a.k.a. “Enormo-Dome”) produces long, lush reverb trails that linger for days. Invoke the sound of massive, arena settings with the Ventris Reverb’s largest room simulation. This one is huuuuge. CONTROL 1: Bass – See the description in the ROOM engine section. Collider Delay+Reverb Owner’s Manual SA263...
-
Page 11: Delay Engines
The Collider includes five onboard delay effect engines, hand-picked from the Nemesis Delay. Because of the wide tonal possibilities of each delay engine in the Collider Delay+Reverb, it was necessary to arm the pedal with two variable knobs labeled CONTROL 1 and CONTROL 2. When a new delay engine is selected, two engine specific parameters are automatically assigned to the CONTROL knobs. - Page 12 Time Knob Range: 20 milliseconds to 800 milliseconds CONTROL 1: Modulation Depth – Controls the depth of the modulation. CONTROL 2: Modulation Rate – Controls the speed of the modulation. Turn all the way to the left for no modulation. Collider Delay+Reverb Owner’s Manual SA263...
-
Page 13: Controls
Kill Dry Mode is also available as a global option (see Kill Dry Mode in the Neuro Hardware Options section of this manual). Cascade Mode Sets the relative levels of the wet and dry signals. Fully counterclockwise is 100% dry, fully Collider Delay+Reverb Owner’s Manual SA263... - Page 14 REVERB (Decay) Sets the sustain time of the reverb trail. Turning the FEEDBACK knob counter- clockwise for a quicker decay and clock-wise for a slower decay and longer reverb trail. DELAY (Regeneration) Controls the amount of delay repeats. Turn the knob counterclockwise for Collider Delay+Reverb Owner’s Manual SA263...
- Page 15 CONTROL 1 and CONTROL 2 Because of the wide tonal possibilities of each engine in the Collider Delay+Reverb, it was necessary to arm the pedal with two “wildcard” knobs labeled CONTROL 1 and CONTROL 2. In DELAY mode, the mapping is simple: CONTROL 1 is Modulation Depth, and CONTROL 2 is Modulation Rate.
- Page 16 The ON/OFF LED above the D indicates if the delay effect is active (lit green) or ELAY OOTSWITCH bypassed (not lit). This LED also monitors the rate of Tap Tempo with alternating red and green blinks. Collider Delay+Reverb Owner’s Manual SA263...
- Page 17 (not lit). This LED also blinks while using the Reverb Hold function. Reverb Hold Function with Dual Processor Architecture One of the great advantages of the Collider Delay+Reverb’s dual processor architecture is the opportunity it offers to the Hold function. The Hold function sustains any Reverb engine’s wet signal indefinitely while pressing down on the REVERB footswitch.
-
Page 18: Hardware Shortcuts
Disable Internal Tap: To disable the integrated Tap Tempo feature located on the DELAY/TAP Footswitch, unplug the power cable. Then, press + hold the DELAY/TAP Footswitch while plugging the power supply back in. The DELAY/TAP LED Indicator will flash once for disabled, twice for enabled. Collider Delay+Reverb Owner’s Manual SA263... -
Page 19: Preset Storage And Recall
“jump” to the knob position as the knob is moved. Recalling Presets The first 4 User Presets (or 8 in Preset Extension Mode) are accessible via the onboard hardware or with and external footswitch in the following ways: Collider Delay+Reverb Owner’s Manual SA263... - Page 20 3. Send a desired MIDI Program Change number to indicate the desired copy destination for the preset. 4. P LED will blink fast and then turn solid. This indicates that the preset has been saved to RESET the new location. Collider Delay+Reverb Owner’s Manual SA263...
-
Page 21: Universal Bypass
Out of the box, the Collider operates in true bypass mode. In order to switch to buffered bypass mode, edit the Collider Delay+Reverb’s global settings using the Neuro Desktop or Mobile App. We recommend you choose between the active analog bypass (a.k.a. buffered bypass) and relay- based true bypass based on what is needed in your signal chain. -
Page 22: Stereo Operation & Signal Routing
Signal Path Options Cascade Mode The Collider Delay+Reverb’s standard signal path is Cascade Mode, or A -> B. This means that when your guitar signal hits the pedal, it is processed first by Delay, then Reverb, then goes outbound. This is the same as running a delay pedal before a reverb pedal in your pedal chain. In Stereo Out, Cascade Mode always routes A ->... - Page 23 There are four routing modes available when the Collider is in its default Auto Detect mode. See detailed descriptions of each Auto Detect mode in the sections below. • Mono In, Mono Out • Mono In, Stereo Out • Stereo In, Stereo Out • Stereo In, Mono Out Collider Delay+Reverb Owner’s Manual SA263...
- Page 24 This is the most common use case. Plugging the incoming signal into Input 1 with Output 1 connected to an amp (or the next device in the signal chain) produces a standard mono signal. Dual processing effects are also mixed down a single output. Collider Delay+Reverb Owner’s Manual SA263...
- Page 25 Mono In, Stereo Out This is a very common use case that allows you to create some nice stereo imaging from a single mono instrument input. Collider Delay+Reverb Owner’s Manual SA263...
- Page 26 If you want channel independence, set the Routing Option to “Parallel Delay/Reverb” and choose the “Split Stereo (Left=A, Right=B)” option Collider Delay+Reverb Owner’s Manual SA263...
- Page 27 Stereo In, Mono Out This mode allows you to plug in to both inputs, but only Output 1. This combines your wet/dry mix of Input 1 with your wet signal from Input 2. Collider Delay+Reverb Owner’s Manual SA263...
- Page 28 • Mono In, Stereo Out (Split Stereo) • Stereo In, Stereo Out (Split Stereo) Mono In, Stereo Out (Split Stereo) This mode is used when routing a single mono signal to Split Stereo (Left=A, Right=B). Collider Delay+Reverb Owner’s Manual SA263...
- Page 29 Stereo In, Stereo Out (Split Stereo) This mode is used when routing stereo input signals to Split Stereo (Left=A, Right=B). Collider Delay+Reverb Owner’s Manual SA263...
-
Page 30: External Control
External Control Plug an expression pedal, an external footswitch, the Source Audio Tap Tempo Switch, or the Source Audio Hot Hand 3 Universal Wireless Controller into the Collider Delay+Reverb’s CONTROL INPUT or PEDAL IN jack and access an array of external functionality and expression control. - Page 31 External Switches (1/8” TRRS Connection) The Source Audio Tap Tempo footswitch can also be connected to the CONTROL INPUT jack using a 3.5mm (1/8 inch) cable. By default the CONTROL INPUT jack is assigned to Neuro Hub or External Expression Control. If you wish change the function of this connection, it can be done with “Control Input Function”...
- Page 32 NPUT Collider. For proper operation, the configuration steps in the next section must be followed when using any expression pedal, whether from a third party or from Source Audio. Configuring the Expression Pedal When the expression pedal is connected to the Collider, follow these simple steps to calibrate it and map it to control different effect parameters.
- Page 33 3. Tap the external switch once. 4. Click the DELAY/TAP footswitch once. The C will blink faster (about 2 blinks per ONTROL second). Now, it is time to map the external switch to the effect parameters. Collider Delay+Reverb Owner’s Manual SA263...
- Page 34 ONTROL NPUT wireless motion control of the Collider Delay+Reverb’s effect parameters. The Hot Hand has two axes of expression: X and Y. These signals are carried on the two rings of the TRRS cable that comes from the Hot Hand receiver. The Collider uses the X expression signal.
- Page 35 External Control Options Guide For a quick reference guide to all of the Collider’s external control options, download the Collider Delay+Reverb Control Options Guide found at the bottom of the Collider Delay+Reverb page on the Source Audio website. Collider Delay+Reverb Owner’s Manual SA263...
-
Page 36: Neuro Desktop And Mobile Editors
Neuro Desktop and Mobile Editors Like all pedals in the Source Audio One Series line, the Collider Delay+Reverb features access to more precise editing parameters, preset sharing, and added functionality via the Neuro Desktop Editor and Mobile App. The Neuro Desktop Editor is currently available as a free download for Apple and... - Page 37 • Hardware Option: The gear icon opens the Hardware Options window. Each Source Audio pedal has its own set of global hardware settings. The attached pedal will retain all hardware option edits until either the option is de-selected or a Factory Reset is performed.
- Page 38 Hardware Options Clicking the gear icon in the Collider Delay+Reverb’s Connections window opens the Hardware Options menu (see the graphic below). Use the Hardware Options window to choose your pedal’s universal hardware settings. The Collider Delay+Reverb’s Hardware Options include the following: •...
- Page 39 On/Off states of both the Delay and Reverb effects when scrolling through presets. • Pedal Input & Control Input Calibration (Accessible via the Show Expression Pedal Calibration dropdown controls): In the vast majority of cases, it is not necessary to change Collider Delay+Reverb Owner’s Manual SA263...
- Page 40 Sound Editor Upon clicking the wrench icon in the Connections section, the Collider Delay+Reverb’s Sound Editor interface appears in a tab in the center field. This is where all of the sound editing work takes place. The Sound Editor is broken into several sub-sections, each containing a unique variation of virtual knobs and dropdown menus.
- Page 41 Primary Engine Controls: There are 7 primary control knobs for customizing each delay preset. Among this set of virtual knobs are controls like DELAY TIME and FEEDBACK, which are also found on the face of the Collider Delay+Reverb. • Tap Tempo Division: Select between 6 different beat divisions for the TAP footswitch including Quarter note, Dotted Eighth, and the Golden Ratio.
- Page 42 Import Button: Use the Import button to upload saved .pre files to your Collider and Neuro Desktop Editor. Upon clicking the Import button you will be asked to find the .pre file. Simply go to your Neuro presets folder, select file, and upload. Collider Delay+Reverb Owner’s Manual SA263...
- Page 43 128 preset positions or the 12 Effect Selector knob positions on the Collider Delay+Reverb. Cloud Tab The Cloud is the portal to your personal preset library, Source Audio created presets, as well as the entire catalog of user created Community Presets. The Cloud tab is broken into four different sub- tabs: Community, Factory, My Library, My Published.
-
Page 44: The Neuro Mobile App
The Neuro Desktop Editor is also available in a mobile version for iPhone or Android. Visit Google Play or the App Store and search for “Source Audio Neuro.” The Neuro Mobile App is a free download and contains all the editing and preset capabilities of the desktop version. -
Page 45: Midi
Options menu of the Neuro Editors. Note that the MIDI Input Channel is a global setting that is NOT saved per preset. Note that some manufacturers begin counting MIDI channels at zero (from 0 to 15), while the Source Audio Neuro Editors use the convention of counting from 1 to 16. Selecting Presets via Program Change (PC) Messages The 128 user presets on the Collider can be recalled via program change messages. -
Page 46: Usb
USB cable. The computer will automatically recognize the Collider, which will be identified as “One Series Collider Delay+Reverb” in the operating system. USB connectivity brings many benefits, such as the ability to connect with the Neuro Desktop Editor for downloading Collider firmware updates, accessing an advanced set of effect editing parameters, and downloading alternate reverb engines. -
Page 47: Troubleshooting
Hot Hand Input section for more details. Not connected properly: Check Hot Hand connections. Unit Appears Dead / No LEDs Lit Wrong power supply: Use correct power supply. See the DC 9V (Power) section for more details. Collider Delay+Reverb Owner’s Manual SA263... -
Page 48: Frequently Asked Questions
The Collider’s audio inputs can handle up to 8.76 dBu or 6.0 Volts peak-to-peak, which allows it to work in most amp effects loops. Be sure to check your amp’s documentation to verify that the maximum send level is less than the Collider’s maximum input level. Collider Delay+Reverb Owner’s Manual SA263... -
Page 49: Rubber Feet
Source Audio, LLC (hereinafter “Source Audio”) warrants that your new Source Audio One Series Collider Delay+Reverb, when purchased at an authorized Source Audio dealer in the United States of America (“USA”), shall be free from defects in materials and workmanship under normal use for a period of two (2) years from the date of purchase by the original purchaser. - Page 50 Source Audio. Warranty Information Source Audio may, at its option, require proof of the original purchase date in the form of a dated copy of the original authorized dealer’s invoice or sales receipt. Service and repairs of Source Audio products are to be performed only at the Source Audio factory or a Source Audio authorized service center.
-
Page 51: Version History
Version History October 8, 2019: Initial Release November 14, 2019: Includes additional Hardware Options December 27, 2019: Includes an additional Hardware Shortcut ©Source Audio LLC | 120 Cummings Park, Woburn, MA 01801 | www.sourceaudio.net Collider Delay+Reverb Owner’s Manual SA263...
Need help?
Do you have a question about the Collider Delay+Reverb and is the answer not in the manual?
Questions and answers