
Related Manuals for Smiths Medical cadd-solis VIP 2120


Summary of Contents for Smiths Medical cadd-solis VIP 2120
- Page 1 Intermittent Delivery Mode CADD -Solis VIP ® Ambulatory Infusion Pump Model 2120 Patient Information Guide...
- Page 2 Your Clinician’s: Name: Phone Number: Instructions: Pump placement during bathing/showering: Pump placement during sleep: Storage of medication/fluid: Notes:...
-
Page 3: Table Of Contents
Table of Contents Introduction ......................4 Warnings ....................... 5 Cautions ........................ 8 CADD®-Solis VIP Pump Diagrams ..............10 Installing New Batteries .................13 Using the Rechargeable Battery Pack or AC Adapter ......15 Turning the Pump On and Off ..............16 Pump Screens ....................17 Removing a Cassette ..................20 Attaching a New Cassette ................21 Priming the Tubing and Connecting to Your Catheter ......25... -
Page 4: Introduction
Introduction ® Your doctor recommends the CADD -Solis VIP ambulatory infusion pump as part of your treatment. ® The CADD -Solis VIP pump can be carried with you and is designed to deliver medication into your body. Your physician has prescribed a therapy specifically for you. Your prescription is programmed into your pump by your health care provider according to your physician’s specific orders. -
Page 5: Warnings
Failure to properly follow warnings, cautions, and instructions could result in death, serious injury, or damage to the pump. Warnings • To avoid explosion hazard, do not use the pump in the presence of flammable anesthetics or explosive gases. • If the pump is used to deliver life-sustaining medication, an additional pump must be available. - Page 6 • There are potential health hazards associated with improper disposal of batteries, electronics, and contaminated (used) reservoirs and extension sets. Dispose of used batteries, reservoirs, extension sets, and other used accessories, or a pump that has reached the end of its useful life, in an environmentally safe manner, and according to any regulations that may apply.
- Page 7 compartment may damage the battery contacts and could result in loss of power and nondelivery of drug. • If the pump is dropped or hit, the battery door may become broken or damaged. Do not use the pump if the battery door is damaged because the batteries will not be properly secured.
-
Page 8: Cautions
Cautions • Do not operate the pump at temperatures below 2°C (36°F) or above 40°C (104°F) to avoid damaging the electronic circuitry. • Do not store the pump at temperatures below –20°C (–4°F) or above 60°C (140°F) to avoid damaging the electronic circuitry. ™... - Page 9 • Do not use the pump in hyperbaric chambers as they affect how the pump works and may also cause damage to the pump. • Use only Smiths Medical accessories that are specified for use ® with the CADD -Solis VIP ambulatory infusion pump, as other brands may adversely affect pump operations.
-
Page 10: Cadd®-Solis Vip Pump Diagrams
CADD®-Solis VIP Pump Diagrams Battery compartment Display Indicator lights Amber Green USB port (used by clinician only) Blue AC power light AC power jack Remote dose cord jack (not used for Intermittent therapy) Keypad Green Light: Flashes when the pump is running and delivering medication. - Page 11 Display: Shows any information and messages. After a short time, the display turns itself off to save power. Press any key to turn the display back on. Power switch Cassette/Keypad lock (unlock/lock) Cassette latch Cassette (The part of the CADD™ medication cassette reservoir or CADD®...
- Page 12 Keypad Starts and stops pump delivery. “Soft keys” let you answer a question on the pump display. For example, the screen above this key may display “Yes,” in which case, pressing this key gives the question a “Yes” answer.
-
Page 13: Installing New Batteries
Installing New Batteries Four new AA, 1.5 volt primary (non-rechargeable) alkaline batteries ® or the CADD -Solis rechargeable battery pack must be used to power the pump. If the rechargeable battery pack is used, it can be recharged with the AC adapter. When Battery Low , Battery Depleted , or Rechargeable battery reached end of use appears in the pump display, change the batteries as soon as possible. - Page 14 type of drug being administered, could result in death or serious injury. • If the pump is dropped or hit, the battery door may become broken or damaged. Do not use the pump if the battery door is damaged because the batteries will not be properly secured. This may result in loss of power and nondelivery of drug, and depending on the type of drug being administered, could result in death or serious injury.
-
Page 15: Using The Rechargeable Battery Pack Or Ac Adapter
Using the Rechargeable Battery Pack or AC Adapter You may have a rechargeable battery pack and an AC adapter to power your pump. The AC adapter can be used to power the pump and/or to recharge the rechargeable battery pack. When using the AC adapter, the pump must also have 4 AA batteries or the rechargeable battery pack installed as a backup. -
Page 16: Turning The Pump On And Off
Turning the Pump On and Off press and hold the To turn on the pump, power switch Power When the pump powers on, it performs Switch various self-tests. Watch and listen for the following: • The green and amber lights flash. • The display shows a blue and amber rotating arc, followed by a ®... -
Page 17: Pump Screens
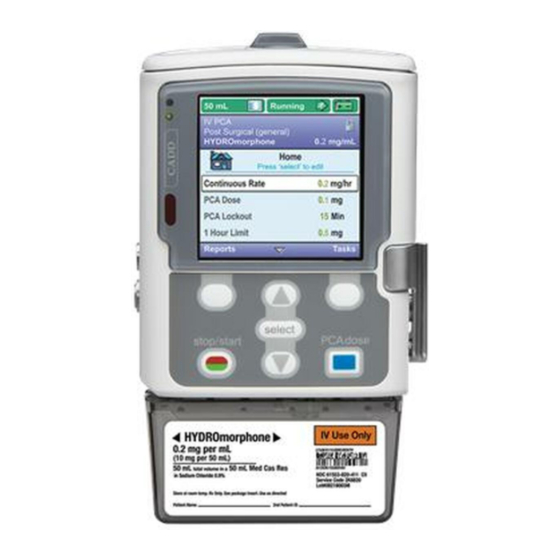
Pump Screens Menu screen Your therapy information Pump status bar. This area may show messages and alerts. Current reservoir volume Delivery status of the pump: Stopped or Running ... - Page 18 Note: The screens shown are examples. Your pump screens may vary based on your specific therapy. Home screen Current pump time Current status of your infusion A graphic of the infusion profile for your therapy, and the status of your infusion.
- Page 19 Pump Status Colors The colors green, amber, red, and blue in the pump status bar help you quickly recognize pump status. Similar to a traffic light, green means go, amber indicates caution, and red means stop: • Green: Pump conditions are satisfactory. • Amber: There is a condition to watch, but the current pump conditions are satisfactory.
-
Page 20: Removing A Cassette
Removing a Cassette The medication reservoir should be changed before new infusions, and when you receive reservoir volume empty or low alarms. Note: You should always have the supplies necessary to change ™ ® your CADD medication cassette reservoir or CADD administration set, as instructed by your health care provider. -
Page 21: Attaching A New Cassette
Attaching a New Cassette ™ Obtain a new, filled CADD medication cassette reservoir, or ® CADD administration set attached to a flexible IV bag. Refer to the Instructions for Use supplied with the product for information on preparing the product for use. WARNING: • Attach the cassette properly. - Page 22 3. Make sure the cassette latch is unlocked, and open the cassette latch. 4. Insert the cassette hooks into the hinge pins on the bottom of the pump. 5. Push down on the cassette latch, and push up firmly on the cassette until it clicks into place.
- Page 23 6. Lift the cassette latch into the closed position. You should be able to move the latch into the closed position with minimal to no resistance. If you experience resistance when lifting the cassette latch, DO NOT FORCE the latch. If you are unable to attach the cassette to the pump with minimal to no resistance, the cassette is not in the proper latching position.
- Page 24 8. A message briefly appears on the pump screen so you can verify the type of cassette you have attached. 9. If required, lock the cassette by inserting the pump key into the cassette/keypad lock and turning it clockwise to the locked position.
-
Page 25: Priming The Tubing And Connecting To Your Catheter
Priming the Tubing and Connecting to Your Catheter When priming the fluid path, the tubing downstream of the pump is filled with fluid, removing any air bubbles. Prime the tubing before connecting it to your catheter. Note: If you are not changing the cassette but wish to prime the fluid path, see “Priming the Tubing without Changing the Cassette”... - Page 26 2. Confirm that the tubing is disconnected from your catheter, open the clamps, and select Prime. WARNING: Do not prime the fluid path with the tubing connected to your catheter as this could result in overdelivery of medication or air embolism, which could result in serious injury or death.
-
Page 27: Priming The Tubing Without Changing The Cassette
Priming the Tubing without Changing the Cassette If necessary, or upon the advice of your health care provider, you can prime the tubing without changing the cassette. WARNING: Do not prime the fluid path with the tubing connected to your catheter as this could result in overdelivery of medication or air embolism, which could result in serious injury or death. - Page 28 4. Stop priming at any time by selecting Stop Priming. Priming automatically stops after 10 mL are primed (or after 20 mL, if using a high volume administration set). WARNING: To prevent air embolism, ensure that the entire fluid path is free of all air bubbles before connecting to your catheter.
-
Page 29: Resetting The Reservoir Volume
Resetting the Reservoir Volume The reservoir volume setting indicates the amount of fluid in the reservoir. Once the reservoir volume is set, the pump keeps track of how much fluid has been delivered, and displays the remaining reservoir volume. When a new cassette or administration set is attached to the pump, and if the pump is powered on, you may be prompted to reset the reservoir volume. - Page 30 If your health care provider instructed you to change your IV bag without changing the CADD® administration set, follow the steps below. To reset the reservoir when changing an IV bag only: 1. Stop the pump. 2. Remove the used IV bag from the administration set and attach the new IV bag to the administration set, as instructed by your health care provider.
-
Page 31: Starting The Pump
Starting the Pump Infusion begins when the pump starts. When the pump is running, “Running” appears with green highlighting on the status bar and the green light on the pump flashes. Note: Before starting the pump, be sure the tubing is primed and the pump is connected to your catheter as instructed by your health care provider. - Page 32 4. The pump begins running. The red “Stopped” message in the status bar changes to a green “Running” message, and “Infusion is starting now…” appears briefly. If a next dose start time was set, the display turns green and a message that the infusion is delayed appears briefly on the screen, and then the “Delayed Start”...
-
Page 33: Stopping The Pump During An Infusion
Stopping the Pump During an Infusion Stopping the pump between doses does not affect the start time of later doses. Stopping the pump while a dose is in progress shifts all subsequent doses by the amount of time the pump is stopped (see the image below). -
Page 34: Next Dose Start Time
Next Dose Start Time The Next Dose Start Time may be programmed to delay the start of the next dose of your infusion. However, if a dose is in progress, this cancels the remainder of the current dose. To avoid interrupting a dose in progress, wait until the pump is between doses to adjust the Next Dose Start Time. -
Page 35: Setting The Time And Date
Setting the Time and Date The time and date on the pump display should be current. The pump uses the date and time to determine when next dose start times begin. When necessary, set the time or date for the pump. The pump time does not automatically change for daylight saving time. - Page 36 4. Press U or D to scroll to the correct minutes and press S to navigate to the AM or PM field to change it, if necessary. If your pump was set up to use a 24-hour clock, the AM and PM fields do not appear.
- Page 37 To set the date: 1. In the Change Time and Date menu, press U or D to highlight Current Date, and press S. 2. Press U or D to scroll to the correct month and press S to navigate to the day field. Note: This example shows the Month/Day/Year date format.
-
Page 38: What If I Drop Or Hit The Pump
What if I Drop or Hit the Pump? What should I do if I drop the pump in water? If you accidentally drop the pump in water, retrieve it quickly, dry the pump off with a towel, and contact your health care provider. What if I drop the pump or hit it against a hard surface? Immediately do the following: • Gently twist and pull on the cassette to make sure it is still... -
Page 39: Alarms And Messages
Alarms and Messages The pump can sound multiple alarms. For many of the alarms, you have the option to “acknowledge” or “silence.” • Acknowledge: Clears the alarm from the screen. • Silence: The alarm stays on the screen, but is silenced for 2 minutes. The alarm continues until it is acknowledged or resolved. - Page 40 • Low Priority Alarm: This alarm does not stop the pump (delivery continues). The alarm is accompanied by a blue screen and persists for 5 seconds (or more with some alarms) unless it is acknowledged by a key Low priority alarm (blue) press or until the condition that triggered the alarm goes away.
-
Page 41: Alarm Help Screens
Alarm Help Screens Additional information may be available on the pump display when certain alarms occur. With these alarms, help screens describe what you can do to try to solve the problem that is causing the alarm. 1. When an alarm occurs, select Silence to quiet the alarm. -
Page 42: Notes
Notes ______________________________________________________ ______________________________________________________ ______________________________________________________ ______________________________________________________ ______________________________________________________ ______________________________________________________ ______________________________________________________ ______________________________________________________ ______________________________________________________ ______________________________________________________ ______________________________________________________ ______________________________________________________ ______________________________________________________ ______________________________________________________ ______________________________________________________ ______________________________________________________ ______________________________________________________ ______________________________________________________ ______________________________________________________ ______________________________________________________... - Page 44 1 800.258.5361 (USA) 1 214.618.0218 www.smiths-medical.com CADD-Solis, CADD, and the CADD and Smiths Medical design marks are trademarks of ® Smiths Medical. The symbol indicates the trademark is registered in the U.S. Patent and Trademark Office and certain other countries. All other names and marks men- tioned are trade names, trademarks, or service marks of their respective owners.
Need help?
Do you have a question about the cadd-solis VIP 2120 and is the answer not in the manual?
Questions and answers