Smiths Medical CADD-Prizm VIP 6100 Operator's Manual
Hide thumbs
Also See for CADD-Prizm VIP 6100:
- Quick reference card (2 pages) ,
- Manual (64 pages) ,
- Quick reference card (6 pages)

Related Manuals for Smiths Medical CADD-Prizm VIP 6100


Summary of Contents for Smiths Medical CADD-Prizm VIP 6100
- Page 1 OPERATOR’S MANUAL Model 6100 and 6101 Ambulatory Infusion Pump This online version differs from the printed version. Certain information that is not intended for patients has been removed.
- Page 2 The issue date of this Operator’s Manual is included for the clinician’s informa- tion. In the event one year has elapsed between the issue date and product use, the clinician should contact Smiths Medical MD, Inc. to see if a later revision of this manual is available.
- Page 3 ® Read this entire Operator’s Manual before operating the CADD-Prizm ambulatory infusion pump. Failure to properly follow warnings, cautions, and instructions could result in death or serious injury to the patient. WARNINGS • This Operator’s Manual should be used by clinicians only. Do not permit patients to have access to this manual, as the information contained would allow the patient complete access to all programming and operating functions.
- Page 4 • Do not administer drugs to the epidural space or subarachnoid space unless the drug is indicated for those spaces. • To prevent the infusion of drugs that are not indicated for epidural space or subarachnoid space infusion, DO NOT use administration sets that incorporate injection sites.
- Page 5 • There is no pump alarm to alert users that a battery has not been properly installed or has become dislodged. An improperly installed or dislodged battery could result in loss of power and non-delivery of drug. • If the pump is dropped or hit, the battery door may become broken or damaged.
- Page 6 • If Demand Doses are currently locked out, changing the Date and/or Time will cancel the lockout period. This will allow a Demand Dose to be requested and delivered as soon as you restart the pump, resulting in over- delivery. CAUTIONS •...
- Page 7 • Do not use the pump in the presence of flammable anesthetics or explosive gases. • Use only Smiths Medical MD accessories as using other brands may adversely affect the operation of the pump. • Check appropriate medication stability for time and temperature to assure...
-
Page 8: Table Of Contents
Table of Contents WARNINGS CAUTIONS Section 1: General Description and Basic Operations Introduction ....................Indications ....................Epidural/Subarachnoid ................Pump Diagram ................... Description of Keys, Display and Features ..........The Main Screen ..................Getting Help Using the Å Key ..............Lock Levels ....................10 AutoLock .................. - Page 9 Continuous Delivery Mode Continuous Programming Screens ............ 34 Continuous Programming Example ..........37 CONTIN: Programming with Upper Limits, Adjusting Rate in Lock Level 1 ................39 TPN Delivery Mode TPN Programming Screens .............. 40 TPN Programming Example ............44 TPN: Starting Daily Infusion ............47 Intermittent Delivery Mode Intermittent Programming Screens ...........
- Page 10 Section 5: Biomed Toolbox Overview: Accessing the Biomed Toolbox ..........79 Micrograms On/Off (PCA Only) ............... 80 Concentration Customization (PCA Only) ..........80 Extended History On/Off (PCA Only) ............82 Max Doses Per Hour On/Off (PCA Only) ..........82 PM (Preventive Maintenance) Reminder ............ 83 Custom Lock Level Code ................
-
Page 11: Section 1: General Description And Basic Operations
Section 1: General Description Section 1: General Description and Basic Operations Introduction The CADD-Prizm ® ambulatory infusion pump provides measured drug therapy to patients in hospital or outpatient settings. Therapy should always be over- seen by a physician or a certified, licensed healthcare professional. As appropri- ate, the patient should be instructed in using the pump. - Page 12 Section 1: General Description Administration of analgesics to the subarachnoid space is limited to use with indwelling catheters specifically indicated for short-term drug delivery. Anesthetics Administration of anesthetics to the epidural space is limited to use with indwelling catheters specifically indicated for short-term drug delivery. WARNING: •...
-
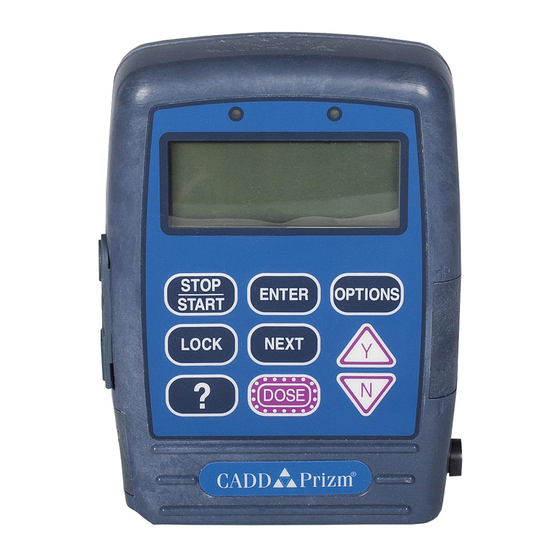
Page 13: Pump Diagram
Section 1: General Description Pump Diagram Indicator Lights Green Amber Display Keypad Front View Power jack Data In/Out jack Air Detector Port Cover ® Air Detector (optional) Polemount 2000-03-07 D. Zurn Rear View Bracket «Prizm Rear 3/4 (dark BW)» Recess Battery compartment Cassette... -
Page 14: Description Of Keys, Display And Features
Section 1: General Description Description of Keys, Display and Features Indicator Lights Green: The green light blinks approximately every 3 seconds when the pump is running and delivering fluid as programmed. Amber: The amber light flashes when the pump is stopped or an alarm condi- tion exists. - Page 15 Section 1: General Description „ is used to move from one programming screen to the next without changing the setting or value displayed. It is also used to return from the Biomed Toolbox Menu to the Options Menu, or from the Options Menu to the main screen.
- Page 16 Section 1: General Description WARNING: When the Air Detector is not installed, or is installed but turned off, the pump will not detect air in the fluid path. It is recommended that you periodically inspect the fluid path and remove any air to prevent air embolism. Air embolism could result in death or serious injury to the patient.
- Page 17 Section 1: General Description This allows you to secure the cassette to the pump using the key provided. The cassette must be latched before it can be locked. In the PCA delivery mode, the cassette must be locked onto the pump or the pump will not run. Downstream Occlusion Sensor (Not Shown) The pump contains a downstream occlusion sensor.
-
Page 18: The Main Screen
Section 1: General Description The Main Screen The main screen is the starting point for programming or viewing the pump’s settings. If no keys are pressed, the display will eventually revert to the main screen. The main screen within each delivery mode displays information about the delivery status, as shown below. -
Page 19: Getting Help Using The Å Key
Section 1: General Description Å Getting Help Using the For more information about a screen or message on the pump’s display, press Å key to view help screens. Help screens describe what you see on the display. They may also explain why a screen or message appeared and what to do next. -
Page 20: Lock Levels
Section 1: General Description Lock Levels Lock levels are used to limit patient access to certain programming and operat- ing functions. The table on the next page lists the functions that are accessible in Lock Level 0 (LL0), Lock Level 1 (LL1), and Lock Level 2 (LL2). When a function is accessible, the key associated with the function beeps when pressed. -
Page 21: Lock Level Table
Section 1: General Description Lock Level Table This table shows the features that can be accessed in each lock level. LL0 permits complete access to all programming and operating features. LL1 permits limited programming and access, and LL2 permits only minimal access. Stopped Pump Operations and Programming... - Page 22 Section 1: General Description...
-
Page 23: Section 2: Pump Setup And Programming Installing A Battery
Section 2: Pump Setup and Programming Section 2: Pump Setup and Programming Installing a Battery Use a new, 9 volt alkaline or lithium battery such as the DURACELL ® Alkaline MN 1604, the EVEREADY ® ENERGIZER ® Alkaline #522 or the ULTRALIFE ®... - Page 24 Section 2: Pump Setup and Programming To install a battery w/Button» 1. Make sure the pump is stopped. Press the button on the battery door and slide the battery door forward. Remove the used battery. 2. Match the + and - markings on the Match new battery with the markings on the tery»...
-
Page 25: Watching Power-Up
Section 2: Pump Setup and Programming Watching Power Up When you install a battery, the pump will start its power up sequence during which it performs self-tests and displays programmed values. Watch for the following: • Pump model number, last error code (“lec”), if any, and serial number (“sn”) will appear. -
Page 26: Changing The Lock Level
Section 2: Pump Setup and Programming Changing the Lock Level Before programming the pump, make sure the lock level is LL0. LL0 allows the clinician to access all programming and operating functions. To change the lock level 1. Make sure the pump is stopped. Lock Level Œ... -
Page 27: Pca Delivery Method
Section 2: Pump Setup and Programming PCA Delivery Method The PCA delivery method provides the following methods of delivery: • Continuous Rate • Demand Dose, activated by the patient • Clinician Bolus, a dose activated by the clinician. You may program each of the methods individually or in combination with each other. -
Page 28: Pca Programming Screens
Section 2: Pump Setup and Programming PCA Programming Screens These are the programming screens for the PCA delivery method. Descriptions of the screens follow. PCA 6210X STOPPED PCA Main Screen Press NEXT to advance Reservoir Volume | 100.0 ml Reservoir Volume <Range: 1 - 9999>... - Page 29 Section 2: Pump Setup and Programming Max Doses Per Hour Max. Doses per Hour <Range: 1 - 4> Dose Counters Given/Attempt: Dose Counters since 06/08/05 10:35 Press ENTER to clear Milligrams Given 0.00 mg (Units) Given since 06/08/05 10:35 Press ENTER to clear Air Detector Required Air Detector (review)
- Page 30 Section 2: Pump Setup and Programming to enter or verify the Continuous Rate and Demand Dose. If the units are mg or mcg, you must also enter the Concentration. Changing the Units clears the amount Given and the Extended History. Concentration If Units are mg or mcg, enter the concentration of drug in mg/ml or mcg/ml.
- Page 31 Section 2: Pump Setup and Programming Max Doses Per Hour This screen appears only if Max Doses Per Hour is “On” in the Biomed Toolbox. If you programmed a Demand Dose, enter the maximum number of Demand Doses allowed in any one-hour period. The possible values may be limited by the Demand Dose Lockout time you entered.
- Page 32 Section 2: Pump Setup and Programming Air Detector Status This screen appears only if an Air Detector is attached to the pump. It indicates whether the Air Detector is required, turned on, or turned off. New Patient Marker This screen appears only if the Extended History is “On” in the Biomed Toolbox. When you add a New Patient Marker, an event is added to the Event Log to indicate the pump was programmed for a new patient, and any previous infor- mation contained in the Extended History is cleared.
-
Page 33: Pca Programming Example
Section 2: Pump Setup and Programming PCA Programming Example WARNING: Ensure that the ±6% System Delivery Accuracy specification is taken into account when programming the pump and/or filling the Medication Cassette Reservoir. Failure to do so may result in medication in the reservoir becoming depleted sooner than expected. - Page 34 Section 2: Pump Setup and Programming 3. Enter the Units „ To accept the current programming Units, press Or, to change the units: Units ´ Î | Milligrams • Press to select the desired programming units. <Range: mg or ml> ¤...
- Page 35 Section 2: Pump Setup and Programming than or equal to 100 mg/hr or mcg/ ´ hr. Press to confirm, or press Î and re-enter the rate. 6. Enter the Demand Dose amount ´ Î • Press to select the Demand Dose desired amount.
- Page 36 Section 2: Pump Setup and Programming 8. Enter the Max Doses Per Hour This screen will appear only if the Max Doses Per Hour function is on. If Demand Dose is zero or the Lockout is one hour or greater, this screen will not appear;...
- Page 37 Section 2: Pump Setup and Programming 10. Clear the units Given ¤ • Press if you wish to clear Milligrams Given 0.00 mg the amount given; even if the since 06/08/05 10:35 amount is zero, this updates the Press ENTER to clear time and date markers.
- Page 38 Section 2: Pump Setup and Programming 14. Prepare the Pump for the Patient Follow the instructions for attaching a cassette, priming, changing the lock level, and attaching the pump to the patient (Section 3).
-
Page 39: Pca: Programming With Upper Limits, Adjusting Doses In Lock Level 1
Section 2: Pump Setup and Programming PCA: Programming with Upper Limits, Adjusting Doses in Lock Level 1 If a prescription allows for the Continuous Rate or Demand Dose to be ad- justed during the course of therapy, you may wish to operate the pump in LL1. Then, when necessary, you can adjust the Continuous Rate or the Demand Dose values up to the maximum value that was programmed in LL0. -
Page 40: Pca: Starting A Clinician Bolus
Section 2: Pump Setup and Programming PCA: Starting a Clinician Bolus A Clinician Bolus may be delivered in any lock level while the pump is running. It allows you to deliver a specified amount of drug, as a loading dose for example. - Page 41 Section 2: Pump Setup and Programming ´ confirm the value. Press to con- Clinician Bolus Î firm, or to re-enter the value. 10.00 mg 7. The screen will show the amount <Delivering...> decreasing as the bolus is delivered.
-
Page 42: Pca: Starting A Demand Dose
Section 2: Pump Setup and Programming PCA: Starting a Demand Dose If a Demand Dose has been programmed, the patient may start a Demand Dose while the pump is running. The amount delivered is added to the amount provided by the Continuous Rate. Each time the patient requests a Demand Dose, the pump will automatically add it to the Dose Counters screen. -
Page 43: Pca: Stopping A Demand Dose Or Clinician Bolus
Section 2: Pump Setup and Programming PCA: Stopping a Demand Dose or Clinician Bolus A Demand Dose or Clinician Bolus can be stopped in progress. The pump may be in any lock level. A Demand Dose that has been stopped will remain recorded on the Dose Counter screen under “Given/Attempt.”... -
Page 44: Continuous Programming Screens
Section 2: Pump Setup and Programming Continuous Delivery Method The Continuous delivery method provides a continuous rate of delivery in milliliters per hour. The following graph illustrates the Continuous delivery method: Programming Screens for Continuous Delivery The following are the programming screens for the Continuous Delivery method. - Page 45 Section 2: Pump Setup and Programming Milliliters Given 0.0 ml Milliliters Given since 01/08/05 10:35 Press ENTER to clear Air Detector Required Air Detector (review) <Review Only> Reservoir Volume Enter the volume of fluid contained in a filled fluid container. The Reservoir Volume value decreases as the pump delivers fluid or you use the priming feature.
- Page 46 Section 2: Pump Setup and Programming Air Detector Status This screen appears only if an Air Detector is attached to the pump. It indicates whether the Air Detector is required, turned on, or turned off.
-
Page 47: Continuous Programming Example
Section 2: Pump Setup and Programming Continuous Programming Example WARNING: Ensure that the ±6% System Delivery Accuracy specification is taken into account when programming the pump and/or filling the Medication Cassette Reservoir. Failure to do so may result in medication in the reservoir becoming depleted sooner than expected. - Page 48 Section 2: Pump Setup and Programming 3. Enter the hourly Continuous Rate ´ Î • Press to select the Continuous Rate desired rate. 0.5 ml/hr ¤ • Press <Range: 0.1 - 350.0> 4. Clear the Milliliters Given ¤ • Press if you wish to clear Milliliters Given the milliliters given;...
-
Page 49: Contin: Programming With Upper Limits, Adjusting Rate In
Section 2: Pump Setup and Programming CONTIN: Programming with Upper Limits, Adjusting Rate in Lock Level 1 If a prescription allows for the Continuous Rate to be adjusted during the course of therapy, you may wish to operate the pump in LL1. Then, when necessary, you can adjust the Continuous Rate up to the maximum value that was programmed in LL0. -
Page 50: Tpn Delivery Mode
Section 2: Pump Setup and Programming TPN Delivery Method The TPN delivery method allows high volume delivery of solutions, with optional tapering. Delivery can be gradually increased or “tapered up” at the beginning of the infusion profile, or it can be gradually decreased, or “tapered down”... - Page 51 Section 2: Pump Setup and Programming Infusion Volume 1000.0 ml total Infusion Volume <Range: 10 - 9990> Infusion Period Infusion Period 10 hrs 00 min <Range: 3:00-99:50> Taper-Up Period Taper-Up Period 1 hrs 30 min <Range: 0:00- 9:50> Taper-Down Period Taper-Down Period 1 hrs 30 min <Range: 00:00- 8:20>...
- Page 52 Section 2: Pump Setup and Programming volume, because of the fluid pumped during priming (see Priming the Tubing, Section 3), and so that automatic KVO delivery occurs at the completion of the infusion profile. NOTE: If the programmed Reservoir Volume is greater than the Infusion Volume, KVO delivery will automatically begin when the infusion profile is complete.
- Page 53 Section 2: Pump Setup and Programming than the maximum rate or less than the minimum rate, the pump will auto- matically lengthen or shorten the Infusion Period to accommodate the new Taper-Up Period. A message will appear to show that the pump is adjusting the value.
-
Page 54: Tpn Programming Example
Section 2: Pump Setup and Programming TPN Programming Example WARNING: Ensure that the ±6% System Delivery Accuracy specification is taken into account when programming the pump and/or filling the Medication Cassette Reservoir. Failure to do so may result in medication in the reservoir becoming depleted sooner than expected. - Page 55 Section 2: Pump Setup and Programming 3. Enter the Infusion Volume When this screen is first displayed, the third line may show the volume left from the last infusion period. As soon as you begin scrolling to a new Infusion Volume, it will disappear. ´...
- Page 56 Section 2: Pump Setup and Programming 8. Clear the Milliliters Given ¤ • Press if you wish to clear Milliliters Given 0.0 ml the amount given; even if the since 01/08/05 10:35 amount is zero, this updates the Press ENTER to clear time and date markers.
-
Page 57: Tpn: Starting Daily Infusion
Section 2: Pump Setup and Programming TPN: Starting Daily Infusion When a new cassette is attached to the pump at the beginning of infusion, the Reservoir Volume should be reset. This will also reset the infusion profile. To do this, follow the instructions in Section 3 for attaching a cassette and answer- ing yes to “Reset Reservoir Volume to —... -
Page 58: Intermittent Programming Screens
Section 2: Pump Setup and Programming Intermittent Delivery Method The Intermittent delivery method delivers a specified dose volume over a specified duration. You may repeat the dose in a cycle of up to 96 hours. The KVO feature allows you to deliver a minimal amount of drug between doses to maintain catheter patency. - Page 59 Section 2: Pump Setup and Programming Dose Volume 23.5 ml Dose Volume <Range: 0.1 - 1000> Dose Duration 1 hrs 00 min Dose Duration <Range: 00:09-24:00> Dose Cycle Dose Cycle 6 hrs 00 min <Range: 01:05-96:00> KVO Rate KVO Rate 0.2 ml/hr <Range: 0.0 - 10>...
- Page 60 Section 2: Pump Setup and Programming Reservoir Volume Enter the volume of fluid contained in a filled fluid container. The Reservoir Volume value decreases as the pump delivers fluid or you use the priming feature. When you change the fluid container and reset the Reservoir Volume, the value resets to the value entered on this screen.
- Page 61 Section 2: Pump Setup and Programming Next Dose Start Time is programmed, the KVO rate is active during the initial delay. The KVO rate is also active between doses. Next Dose Start Time The Next Dose Start Time is optional. It allows you to delay the start of deliv- ery up to four days by allowing you to select the date and time at which the first dose should begin.
-
Page 62: Intermittent Programming Example
Section 2: Pump Setup and Programming Intermittent Programming Example WARNING: Ensure that the ±6% System Delivery Accuracy specification is taken into account when programming the pump and/or filling the Medication Cassette Reservoir. Failure to do so may result in medication in the reservoir becoming depleted sooner than expected. - Page 63 Section 2: Pump Setup and Programming 3. Enter the Dose Volume ´ Î Dose Volume • Press to select the 23.5 ml desired volume. ¤ • Press <Range: 0.1 - 1000> 4. Enter the Dose Duration ´ Î Dose Duration •...
- Page 64 Section 2: Pump Setup and Programming 8. Verify the Dose Rate • The pump automatically Dose Rate calculates the rate of dose deliv- 50.0 ml/hr ery based on the volume and duration you entered. This screen <Review Only> „ is for review only; press continue.
-
Page 65: Intermt: Stopping The Pump During The Cycle
Section 2: Pump Setup and Programming INTERMT: Stopping the Pump During the Cycle Stopping the pump during the KVO will not affect the start time of subsequent doses. Stopping the pump while a dose is in progress will shift all subsequent doses by the amount of time the pump is stopped (illustrated below).
Need help?
Do you have a question about the CADD-Prizm VIP 6100 and is the answer not in the manual?
Questions and answers