Smiths Medical CADD-Prizm VIP 6100 Manual
Ambulatory infusion pump
Hide thumbs
Also See for CADD-Prizm VIP 6100:
- Quick reference card (2 pages) ,
- Operator's manual (126 pages) ,
- Quick reference card (6 pages)

Subscribe to Our Youtube Channel
Related Manuals for Smiths Medical CADD-Prizm VIP 6100


Summary of Contents for Smiths Medical CADD-Prizm VIP 6100
- Page 1 Clinician Information CADD-Prizm ® Ambulatory Infusion Pump Model 6100 and 6101...
- Page 2 ® provided with this product contains warnings and cautions that the user should be aware of for the safe use of the product. If you have any questions regarding these systems, please contact Smiths Medical’s Clinical Services Department at 1-800-258-5361.
- Page 3 This guide pertains only to the CADD-Prizm VIP (Variable Infusion ® Profile) Model 6100 and 6101 ambulatory infusion pump and the following delivery modes: Continuous Intermittent PCA 6210 CONTIN 6220 TPN 6230 INTERMT 6240 (all revision letters) (all revision letters) (all revision letters) (all revision letters) WARNING:...
-
Page 5: Table Of Contents
Table of Contents Section 1 General Description and Basic Operations Description of the CADD-Prizm VIP Pump ..........1 ® Pump Diagram ................... 2 Callout Descriptions ................... 3 Keypad ......................3 Installing a Battery ..................5 The Main Screen ..................6 Getting Help Using the Å... - Page 6 Section 3 Medication Reservoir or Administration Set Removing a Used Reservoir or Administration Set ......... 35 Attaching a New Reservoir or Administration Set ........36 Priming the Tubing and Connecting to the Patient ......... 39 Resetting the Reservoir Volume .............. 41 Section 4 Options Overview: Accessing Options ..............
-
Page 7: General Description And Basic Operations
General Description and Basic Operations Section 1 Description of the CADD-Prizm VIP Pump ® The CADD-Prizm VIP ambulatory drug delivery pump provides measured ® drug therapy to patients in hospital or outpatient settings. PCA (Patient-Controlled Analgesia) delivery mode is used for thera- pies that require a continuous rate of infusion, patient-controlled demand doses, or both, such as patient-controlled analgesia. -
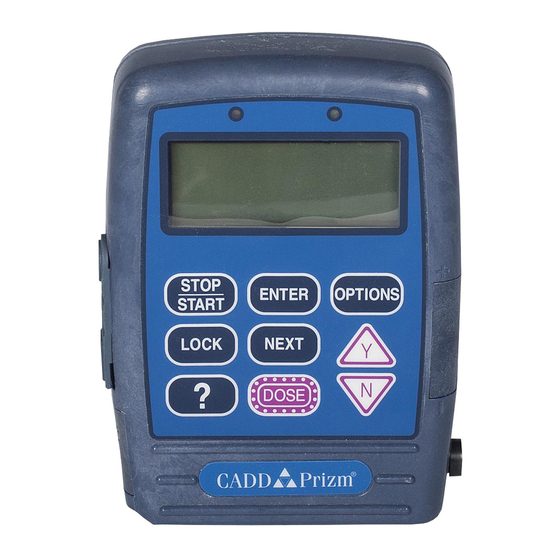
Page 8: Pump Diagram
Section 1 General Description and Basic Operations Pump Diagram Indicator Lights Front View Amber Green Display Keypad Power Jack Data In/Out O P T I O Jack E N T E R S T O P S T A R T Air Detector N E X T L O C K... -
Page 9: Callout Descriptions
General Description and Basic Operations Section 1 Callout Descriptions Indicator lights Green: flashes when the pump is running Amber: flashes when the pump is stopped or alerting to an alarm; lit continuously when the pump is inoperable Display Shows programming information and messages Power jack Connects to a CADD External Power Source (EPS) System Power... - Page 10 Section 1 General Description and Basic Operations Keypad (continued) scrolls through programming screens without changing the „ settings; returns you from the Biomed Toolbox menu to the Options menu, or from the Options Menu to the main screen in the PCA delivery mode, delivers a programmed amount Í...
-
Page 11: Installing A Battery
General Description and Basic Operations Section 1 Installing a Battery Use a fresh, 9 volt alkaline or lithium battery such as the DURACELL ® Alkaline MN 1604 or the ULTRALIFE Lithium U9VL battery. The pump ® retains all programmed values while the battery is removed. If the pump is running, you may connect an external power source to keep the pump running for 3 minutes while you change the battery. -
Page 12: The Main Screen
Section 1 General Description and Basic Operations The Main Screen The main screen is the starting point for programming or viewing the pump’s settings. If no keys are pressed, the display will eventually revert to the main screen. The main screen within each delivery mode displays information about the delivery status, as shown below. -
Page 13: Getting Help Using The Lock Level Table
General Description and Basic Operations Section 1 Getting Help Using the Å For more information about a screen or message on the pump’s display, Å press the key to view help screens. This symbol in the lower right This is the corner means there are additional calculated amount of Å... - Page 14 Section 1 General Description and Basic Operations Lock Level Table Lock levels are used to limit patient access to certain programming and operating functions. This table shows the features that can be accessed in each lock level. LL0 permits complete access to all programming and operating features. LL1 permits limited programming and access, and LL2 permits only minimal access.
-
Page 15: Changing The Lock Level
General Description and Basic Operations Section 1 Changing the Lock Level Before programming the pump, make sure the lock level is LL0 so you can access all programming screens. After programming, the lock level must be changed to LL1 or LL2 to prevent the patient from having complete access to all programming and operating functions. -
Page 16: Changing Delivery Modes
Section 1 General Description and Basic Operations Changing Delivery Modes The CADD-Prizm VIP pump contains four delivery modes: PCA, CONTIN, ® TPN, INTERMT. To change the mode, you must know the access code (Lock Level code plus 10). When you change the mode, the program will revert to the default settings, and the event log will clear. -
Page 17: Starting And Stopping The Pump
General Description and Basic Operations Section 1 Starting the Pump When you start the pump, programmed values will be automatically reviewed. Then fluid delivery will begin as programmed and the green indicator light will blink. If the pump will not start, a message will appear on the display. -
Page 18: Pump Programming
Section 2 Pump Programming - PCA Delivery Mode PCA Cycle Graph and Programming Screens The PCA delivery mode provides the following methods of delivery: > Continuous Rate > Demand Dose, activated by the patient > Clinician Bolus, a loading dose activated by the clinician. You may program a continuous rate, a demand dose, or both. -
Page 19: Pca Programming
Pump Programming - PCA Delivery Mode Section 2 PCA Programming Before programming: > Stop the pump and change the Lock Level to LL0 as described on page 9. > Select the PCA delivery mode as described in Changing Delivery Modes on page 10. If the pump is already in the PCA delivery mode, you may select it again to clear all programming screens to their default settings. - Page 20 Section 2 Pump Programming - PCA Delivery Mode 4. Enter the concentration of the drug This screen will not appear if the units are milliliters; go to step 5. ´ Î > Press to select the desired concentration. (If you Concentration cannot select the desired 1.0 mg/ml...
- Page 21 Pump Programming - PCA Delivery Mode Section 2 7. Enter the demand dose lockout time If demand dose is zero, this screen will not appear; go to step 10. ´ Î > Press to select the desired Demand Dose Lockout lockout time that must elapse 15 Min between demand doses.
- Page 22 Section 2 Pump Programming - PCA Delivery Mode 10. Clear the units given € > Press if you wish to clear the Milligrams Given total amount delivered since the 0.00 mg time and date shown; even if the since 06/08/96 10:35 amount is zero, this updates the Press ENTER to clear time and date markers.
-
Page 23: Pca: Programming With Upper Limits, Adjusting Doses In Lock Level 1
Pump Programming - PCA Delivery Mode Section 2 PCA: Programming with Upper Limits, Adjusting Doses in Lock Level 1 If a prescription allows for the continuous rate or demand dose to be adjusted during the course of therapy, you may wish to operate the pump in LL1. -
Page 24: Pca: Starting A Clinician Bolus
Section 2 Pump Programming - PCA Delivery Mode PCA: Starting a Clinician Bolus 1. Make sure the pump is running (in any lock level). Start the pump if necessary. Clinician Bolus Code 2. Press Œ Î 3. Press until the clinician bolus code appears on the display (See Operator’s Manual). -
Page 25: Pca: Stopping A Demand Dose Or Clinician Bolus
Pump Programming - PCA Delivery Mode Section 2 PCA: Stopping a Demand Dose or Clinician Bolus A demand dose or clinician bolus may be stopped in progress. 1. Press ⁄ Stop Demand Dose? One beep will sound and the message “Stop Demand Dose?” or Press Y or N “Stop Clinician Bolus?”... -
Page 26: Continuous Delivery Mode
Section 2 Pump Programming - Continuous Delivery Mode Continuous Cycle Graph and Programming Screens The Continuous delivery mode provides a continuous rate of delivery in milliliters per hour. Delivery Rate (ML/HR) Time (Continuous Delivery) The following fi gure shows the programming screens in the Continuous delivery mode: Air Detector (Review) -
Page 27: Continuous Programming
Pump Programming - Continuous Delivery Mode Section 2 Continuous Programming Before programming: > Stop the pump and change the Lock Level to LL0 as described on page 8. > Select the Continuous (CONTIN) delivery mode as described in Changing Delivery Modes on page 10. If the pump is already in the CONTIN delivery mode, you may select it again to clear all programming screens to their default settings. - Page 28 Section 2 Pump Programming - Continuous Delivery Mode 5. Verify the air detector status This screen will appear only if an air detector is installed. > Make sure the setting is correct. Air Detector NOTE: If the air detector is not required, Required this screen will show whether it is turned on or off.
-
Page 29: Contin: Programming With Upper Limits, Adjusting Rate In Lock Level 1
Pump Programming - Continuous Delivery Mode Section 2 CONTIN: Programming with Upper Limits, Adjusting Rate in Lock Level 1 If a prescription allows for the continuous rate to be adjusted during the course of therapy, you may wish to operate the pump in LL1. Then, when necessary, you can adjust the continuous rate up to the maximum value that was programmed in LL0. -
Page 30: Tpn Delivery Mode
Section 2 Pump Programming - TPN Delivery Mode TPN Cycle Graph and Programming Screens The TPN delivery mode allows the high volume delivery of solutions, with optional tapering. Delivery can be gradually increased or “tapered up” at the beginning of the infusion profi le, or it can be gradually decreased, or “tapered down”... -
Page 31: Tpn Programming
Pump Programming - TPN Delivery Mode Section 2 TPN Programming Before programming: > Stop the pump and change the Lock Level to LL0 as described on page 9. > Select the TPN delivery mode as described in Changing Delivery Modes on page 10. If the pump is already in the TPN delivery mode, you may select it again to clear all programming screens to their default settings. - Page 32 Section 2 Pump Programming - TPN Delivery Mode 4. Enter the infusion period When this screen is fi rst displayed, the third line may show the amount of time left from the last infusion period. As soon as you begin scrolling to a new infusion period, it will disappear. ´...
- Page 33 Pump Programming - TPN Delivery Mode Section 2 9. Verify the air detector status This screen will appear only if an air detector is installed. > Make sure the setting is correct. Air Detector NOTE: If the air detector is not required, Required this screen will show whether it is turned on or off.
-
Page 34: Tpn: Starting Daily Infusion
Section 2 Pump Programming - TPN Delivery Mode TPN: Starting Daily Infusion When a new administration set is attached to the pump at the beginning of infusion, the reservoir volume should be reset. This will also reset the infusion profi le. To do this, follow the instructions on page 36 for attaching an administration set and answering yes to “Reset reservoir volume to ... -
Page 35: Intermittent Delivery Mode
Pump Programming - Intermittent Delivery Mode Section 2 Intermittent Cycle Graph and Programming Screens The Intermittent delivery mode delivers a specifi ed dose volume over a specifi ed duration. You may repeat the dose in a cycle of up to 96 hours. The KVO feature allows you to deliver a minimal amount of drug between doses to maintain catheter patency. -
Page 36: Intermittent Programming
Section 2 Pump Programming - Intermittent Delivery Mode Intermittent Programming Before programming: > Stop the pump and change the Lock Level to LL0 as described on page 9. > Select the Intermittent (INTERMT) delivery mode as described in Changing Delivery Modes on page 10. If the pump is already in the INTERMT delivery mode, you may select it again to clear all programming screens to their default settings. - Page 37 Pump Programming - Intermittent Delivery Mode Section 2 5. Enter the dose cycle ´ Î > Press to select the time Dose Cycle from the start of one dose to the start 6 hrs 00 min time of the next dose. <Range: 01:05-96:00>...
- Page 38 Section 2 Pump Programming - Intermittent Delivery Mode 10. Verify the air detector status This screen will appear only if an air detector is installed. > Make sure the setting is correct. Air Detector NOTE: If the air detector is not required, this Required screen will show whether it is turned on or off.
-
Page 39: Intermt: Stopping The Pump During The Cycle
Pump Programming - Intermittent Delivery Mode Section 2 INTERMT: Stopping the Pump During the Cycle Stopping the pump during the KVO will not affect the start time of subsequent doses. Stopping the pump while a dose is in progress will shift all subsequent doses by the amount of time the pump is stopped (illustrated below). -
Page 40: Time Remaining
Section 2 Pump Programming - Intermittent Delivery Mode Time Remaining This option allows you to view the time remaining in the current dose cycle if one is being delivered and the time remaining in the cycle. The pump may be running or stopped and in any lock level. 1. -
Page 41: Medication Reservoir Or Administration Set
Section 3 Medication Reservoir or Administration Set Section 3 Removing a Used Reservoir or Administration Set WARNING: Always close the fluid path tubing with the clamp before removing the cassette from the pump to prevent unregulated gravity infusion. 1. Close the tubing clamp. 2. -
Page 42: Attaching A New Reservoir Or Administration Set
Section 3 Medication Reservoir or Administration Set Attaching a New Reservoir or Administration Set Refer to the instructions for use supplied with the reservoir or administration set for information on filling the reservoir, attaching a CADD extension set with anti-siphon valve or an add on anti-siphon valve, ®... - Page 43 Section 3 Medication Reservoir or Administration Set Section 3 To attach the new reservoir or administration set Refer to the Instructions for Use with the reservoir or set you will be attaching. 1. Clamp the tubing. Insert the cassette hooks into the hinge pins on the pump.
- Page 44 Section 3 Medication Reservoir or Administration Set 5. Gently twist and pull on the cassette to make sure it is firmly attached. 6. If “Reset Reservoir Volume to...?” Reset Reservoir appears, Volume to 100.0 ml? ´ > Press to reset Reservoir Volume to the value shown, or Press Y or N Î...
-
Page 45: Priming The Tubing And Connecting To The Patient
Section 3 Medication Reservoir or Administration Set Section 3 Priming the Tubing and Connecting to the Patient If the lock level is LL0 or LL1 when you Prime Tubing? attach a cassette, “Prime Tubing?” will appear in the sequence of screens. Prime the tubing before connecting it to the Press Y or N patient’s infusion set or indwelling catheter. - Page 46 Section 3 Medication Reservoir or Administration Set 5. If an air detector is in use, open the air detector door and thread the tubing through the groove. WARNING: When the air detector is not installed, or is installed but turned off, the pump will not detect air in the fluid path.
-
Page 47: Resetting The Reservoir Volume
Section 3 Medication Reservoir or Administration Set Section 3 Resetting the Reservoir Volume Normally, when you attach a cassette onto the pump as described on page 36, a series of messages lead you through resetting the reservoir volume, priming the tubing, (except in LL2), and starting the pump. You can, however, reset the reservoir volume without changing the cassette using the reservoir volume programming screen. -
Page 48: Options
Section 4 Options | Biomed Toolbox | Communications If Air Detector | Event Log is installed | Air Detector | Date | Time ´ | AutoLock INTERMT only | Delivery Modes PCA only: | Time Remaining If Extended Î History is on | Extended History | Prime TPN only... -
Page 49: Immediate Taper-Down: Tpn
Options Section 4 Immediate Taper-Down: TPN This option is available in the TPN delivery mode only. It allows you to stop infusion early by immediately tapering down. If the pump is in LL0 or LL1, the taper-down period can be changed from its originally programmed value, even if it is 0. -
Page 50: Extended History, Viewing: Pca
Section 4 Options Extended History, Viewing: PCA The extended history is available in the PCA delivery mode only. It allows you to view dose information for the past 48 hours, including doses given and attempted, and the amount delivered. The pump may be running or stopped and in any lock level. -
Page 51: Changing Delivery Modes
Options Section 4 4. When finished, press „ to return to the Extended History screen. NOTE: An asterisk (*) next to a value indicates that it applies only to the selected time period; it may not match the corresponding value in the programming screen. -
Page 52: Time
Section 4 Options Time The Time option shows the time of day in 24-hour (military) time according to the pump’s internal clock. The clock is powered by a separate, internal battery which retains the time even when the 9-volt battery is removed. The time is used to record the time of events in the event log. -
Page 53: Communications
Options Section 4 Communications The Communications option was intended to allow remote connection with a CADD-Prizm VIP pump using the CADD-Ambassador system. The ® ® CADD-Ambassador system is no longer available so the Communications ® option can no longer be used. Biomed Toolbox The biomed toolbox is used to customize certain pump configurations that are not frequently changed, for example, customized concentrations. -
Page 54: Accessories
Section 5 Accessories Printing Reports Reports may be printed from the CADD-Prizm VIP pump by using ® CADD-Sentry safety software. ® Through the CADD-Sentry safety software ® The CADD-Sentry safety software may be purchased separately for ® use with the CADD-Prizm VIP pump. -
Page 55: Remote Dose Cord
Accessories Section 5 To attach the power pack or AC adapter Power 1. Open the cover for the power jack. Jack 2. Line up the red mark on the power pack or AC adapter connector with the red mark on the pump. Push the connector in until it clicks. -
Page 56: Cadd ® Pump Pouches
Section 5 Accessories To attach the remote dose cord: Data In/Out Jack 1. Open the cover for the data in/out jack. 2. Line up the red mark on the remote dose cord connector with the red mark on the pump. Push the connector in until it clicks. - Page 57 Accessories Section 5 IV bag: Hang from the post Syringe: Slide end of plunger into the syringe holder Syringe holder IV bag post Installing the fluid bag or syringe and pump 1. If you are using an IV bag, first insert the end of the bag spike into the bottom of the security shell, then hang the bag from the post inside the security shell;...
-
Page 58: Using The Lockable Polemount Bracket
Section 5 Accessories 3. Hold the pump firmly against the security shell. Insert the key into the lock on the back of the security shell and turn it counterclockwise until the black mark lines up with “Locked.” Make sure the pump is firmly locked into place. - Page 59 Accessories Section 5 2. Insert the key into the lock and turn it counterclockwise until the mark on the lock lines up with the solid (“locked”) dot on the polemount bracket. 3. Turn the knob either direction until it clicks; this engages the lock. When the polemount bracket is locked, neither the knob nor the release button is operable.
-
Page 60: Troubleshooting And Reference
Section 6 Reference & Troubleshooting Alarms and Messages, Alphabetical List A more detailed list of alarms and messages is included in the Operator’s Manual. Message Corrective Action- 9-volt Battery Depleted / Install a fresh 9-volt battery. The pump will Install Good Battery not start with a depleted 9-volt battery. - Page 61 Reference & Troubleshooting Section 6 Message Corrective Action AutoLock is Changing No action is necessary; the AutoLock Lock Level to (LL1 or feature is automatically changing the LL2) pump’s lock level to the level shown. Cassette Not Attached/ The pump will not start without a cassette Pump Will Not Run attached.
- Page 62 Section 6 Reference & Troubleshooting Message Corrective Action Power Pack Depleted / The power pack is depleted and unable to Change Power Source support pump operation. The 9-volt battery is supplying power. Recharge the power pack with the AC adapter. Prev.
- Page 64 Toll-Free: 1-800-387-4346 Phone: +44 (0) 1233 722100 www.smiths-medical.com Smiths Medical is part of the global technology business Smiths Group plc. Product(s) described may not be licensed or available for sale in Canada or other countries outside of the United States.
Need help?
Do you have a question about the CADD-Prizm VIP 6100 and is the answer not in the manual?
Questions and answers
If a volume on a pump has been cleared can you still go back and see what has been deliveries?
Yes, you can check delivery history after clearing a volume on the Smiths Medical VIP 6100 pump. The extended history is available in PCA delivery mode and shows dose information for the past 48 hours, including doses given, attempted, and the amount delivered, regardless of whether the volume has been cleared.
This answer is automatically generated