Table of Contents
Advertisement
Advertisement
Chapters
Table of Contents
Troubleshooting

Subscribe to Our Youtube Channel
Related Manuals for Symbol MK2000 MicroKiosk


Summary of Contents for Symbol MK2000 MicroKiosk
- Page 1 MK2000 MicroKiosk Product Reference Guide...
- Page 3 MK2000 MicroKiosk Product Reference Guide 72-57772-01 Revision A June 2003...
- Page 4 The software is provided strictly on an “as is” basis. All software, including firmware, furnished to the user is on a licensed basis. Symbol grants to the user a non-transferable and non-exclusive license to use each software or firmware program delivered hereunder (licensed program).
-
Page 5: Table Of Contents
Symbol Support Center ........ - Page 6 MK2000 MicroKiosk Product Reference Guide Software Development Kit (SDK)..........1-8 Bar Code Scanning .
- Page 7 Contents Chapter 3. Setup and Configuration Overview ..............3-1 Control Panel Configuration Parameters .
- Page 8 MK2000 MicroKiosk Product Reference Guide Chapter 5. Updating Data Updating Data on the MK2000 ........... . 5-1 Partition Update vs.
- Page 9 Contents Appendix B. Laptop Driven Demo Application Overview ..............B-1 Laptop Driven Demo Functionality .
- Page 10 MK2000 MicroKiosk Product Reference Guide Appendix E. Upgrade Procedures Overview ..............E-1 Partition Update vs.
-
Page 11: About This Guide
About This Guide Introduction The MK2000 MicroKiosk Product Reference Guide provides information on installing, operating and programming the MK2000. Note: Unless otherwise noted, the term MK2000 refers to all configurations of the device. Chapter Descriptions Following are brief descriptions of each chapter in this guide. -
Page 12: Notational Conventions
MK2000 MicroKiosk Product Reference Guide • Chapter 7, User Applications, describes the capabilities to support user application development. • Appendix A, Technical Specifications, provides technical information about MK2000. • Appendix B, Laptop Driven Demo Application, provides technical information about Laptop Driven Demo Application. The Laptop Driven Demo Application is a browser based thin client application hosted by a laptop/desktop computer via a network connection that can be modified / customized. -
Page 13: Related Publications
Call the Support Center from a phone near the equipment so that the service person can try to talk you through the problem. If the equipment is found to be working properly and the problem is symbol readability, the Support Center will request samples of your bar codes for analysis at our plant. -
Page 14: Symbol Support Center
MK2000 MicroKiosk Product Reference Guide Symbol Support Center For service information, warranty information or technical assistance contact or call the Symbol Support Center in: United States Canada Symbol Technologies, Inc. Symbol Technologies Canada, Inc. One Symbol Plaza 2540 Matheson Boulevard East... - Page 15 Symbol Technologies Norway Postbus 24 7050 AA Hoybratenveien 35 C Varsseveld, Netherlands N-1055 OSLO, Norway 315-271700 (Inside Netherlands) +31-315-271700 (Outside Netherlands) Symbol’s repair depot and shipping address: Symbol Technologies Norway Enebakkveien 123 N-0680 OSLO, Norway +47 2232 4375 South Africa Spain/España Symbol Technologies Africa Inc.
- Page 16 Sweden.Support@se.symbol.com Customer support is available 24 hours a day, 7 days a week. If the Symbol product was purchased from a Symbol Business Partner, contact that Business Partner for service. For the latest version of this guide go to: http://www.symbol.com/manuals.
-
Page 17: Chapter 1. Mk2000 Introduction
Chapter 1 MK2000 Introduction Overview The MK2000 MicroKiosk allows shoppers to become more self sufficient in the retail environment. It provides consumers access to data critical to making an informed purchasing decision, including verifying prices on bar coded merchandise and obtaining up-to-the-minute information on in-store promotions. -
Page 18: Mk2000 Parts
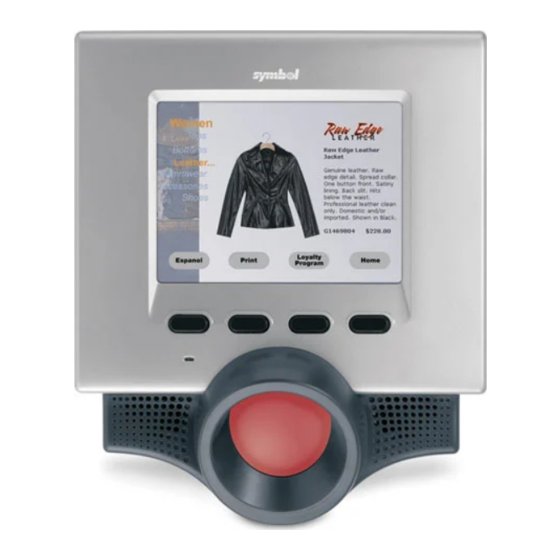
MK2000 MicroKiosk Product Reference Guide MK2000 Parts The MK2000 parts are shown in front, rear and bottom views Figure 1-1 on page 1-3, Figure 1-2 on page 1-4 and Figure 1-3 on page 1-5. The parts include: • Touch screen •... - Page 19 MK2000 Introduction Touch Screen Function Button (A) Function Button (D) Function Button (B) Function Button (C) Speakers (2) Scanner Window Microphone Figure 1-1. MK2000 Front View...
- Page 20 MK2000 MicroKiosk Product Reference Guide PCMCIA Access Cover* Vertical Cable Run Keyhole Mounts (4) Compact Flash Access VESA Cover* Mounts (4) Accessory Connections Access Cover* Figure 1-2. MK2000 Rear View Caution *While any of the access covers are removed, the user must follow proper ESD (Electro-Static Discharge) precautions to avoid damaging sensitive components.
-
Page 21: External Ports
MK2000 Introduction Printer/ Ethernet/ Scanner Bias-T Power Headphones Jack (RS-232) 12-24 12-24 ETHERNET/ ETHERNET/ SCANNER/ SCANNER/ AUDIO AUDIO RS 485 RS 485 BIAS-T BIAS-T PRINTER PRINTER RS 485 Line-Out Left and Right External Speakers Figure 1-3. MK2000 Bottom (Connectors) View External Ports The MK2000 has the following external ports located at the rear/bottom of the unit (see Figure 1-3):... -
Page 22: Power Port
MK2000 MicroKiosk Product Reference Guide Power Port The MK2000 can be powered by a Symbol approved power supply plugged into the power port (2.0 mm barrel jack connector) on the rear of the MK2000, for additional information see Power on page 2-9 and/or Technical Specifications on page A-1. -
Page 23: Mk2000 Features
MK2000 Introduction MK2000 Features Programmable Function Buttons The four function buttons are programmable, see Figure 1-1 on page 1-3 and Inactivity Manager on page 3-7. Bar Code Scanner Provides superior scanning capabilities. Omni-directional scan pattern decodes all traditional 1D bar codes. In addition 2D symbologies such as PDF and composite codes can also be scanned in Smart Raster mode, see Bar Code Scanning on page 1-9. -
Page 24: Power Options
Flash memory card. Power Options As an alternative to the standard Symbol approved power supply, power can be supplied by Power Over Ethernet (POE). The POE option may be utilized even if an Ethernet cable is not used for data transmission. -
Page 25: Bar Code Scanning
MK2000 Introduction Bar Code Scanning The MK2000 automatically decodes a bar code presented in its field of view. It decodes all traditional retail bar codes plus PDF, RSS and composite bar codes. Scanning Modes The MK2000 operates in a number of selectable scanning modes, Table 1-1 lists the MK2000 scan modes: Table 1-1. -
Page 26: Scanning Guidelines
MK2000 MicroKiosk Product Reference Guide Scanning Guidelines When scanning a bar code: • Hold the bar code at an angle which does not cause specular reflection (see Specular Reflection on page 1-14). • Hold the bar coded item close for small bar codes and farther away for large bar codes. -
Page 27: Smart Raster
In Smart Raster mode, a single scan line pattern appears. If the bar code is a standard bar code, the scanner decodes the symbol. If the bar code is a 2-D bar code, the scanning patterns open up to a full, optimized Raster pattern as soon as the scanner is properly aligned over the bar code. - Page 28 Figure 1-7. Moving Scan Pattern Upward and Downward on “Tall” PDF417 Bar Code The scan beam does not have to be perfectly parallel with the top and bottom of the symbol (up to a 4 tilt is permitted).
-
Page 29: Scanning Composite (2D) Bar Codes
EAN-128) and a 2-D bar code (CC-A, CC-B or CC-C). When scanning a composite bar code: • Keep the scan pattern parallel to the 2D symbol’s rows. • Hold the bar coded item at an angle which does not cause specular reflection (see Specular Reflection on page 1-14). -
Page 30: Specular Reflection
MK2000 MicroKiosk Product Reference Guide Specular Reflection When laser beams reflect directly back into the scanner from the bar code, they can “blind” the scanner and make decoding difficult. This phenomenon is called specular reflection. To avoid this, scan the bar code so that the beam does not bounce directly back. But don’t scan at too oblique an angle;... -
Page 31: Chapter 2. Installation
Chapter 2 Installation Overview This chapter describes the MK2000 installation. Topics covered include: • Installation steps • Mounting • Providing Power • Communications Interfaces • Installing Accessories • Peripherals • Signage • Connector Pin-Outs. MK2000 Unpacking Remove the MK2000 from its packing and inspect it for damage. Keep the packing, it is the approved shipping container and should be used if the MK2000 ever needs to be returned for servicing. -
Page 32: Installation Overview
MK2000 MicroKiosk Product Reference Guide Installation Overview To install the MK2000 perform the following seven steps: 1. Select the mounting method: • Wall Mount • Pole Mount • Desk Mount. Refer to MK2000 Mounting on page 2-3 for mounting instructions. -
Page 33: Mk2000 Mounting
ALL DIMENSIONS PROVIDED IN INCHES THE MK2000 IS DESIGNED TO BE USED WITH VESA FLAT PANEL MONITOR PHYSICAL MOUNTING INTERFACE STANDARD MOUNTING BRACKETS OR SYMBOL’S KEYHOLE SLIDE-ON MOUNTING BRACKETS. IT ALSO HAS THE ABILITY TO BE PLACED INTO A FLUSH PANEL KIOSK ENVIRONMENT BY SETTING IT INTO A 8.0 X 8.63 OPENING. -
Page 34: Mk2000 Wall Mounting Options
MK2000 MicroKiosk Product Reference Guide MK2000 Wall Mounting Options The MK2000 mounting options include: • Wall Mount Kit, see page 2-4 • Recessing the MK2000 into a kiosk or wall, see page 2-6. Using the Wall Mount Kit 1. Determine the MK2000 mounting location. - Page 35 Installation Lock Screw Mounting Plate Tab Shoulder Head Bolts (4) Connector/Port Cover Figure 2-2. Wall Mounting Kit Move to the left first Move down second Figure 2-3. Mounting Directions...
- Page 36 Wall Mounting Kit on page 2- 5 and Mounting Directions on page 2-5). Symbol does not provide hardware to support this installation. Recessed mounting may degrade the wireless network performance.
-
Page 37: Pole Mounting
Installation Pole Mounting 1. To install the Pole Mounting Kit, wrap the pole mount straps around the pole and tighten. 2. Secure the connector port cover to the pole mount bracket using the four shoulder screws. 3. Connect the cables to the MK2000 (see Figure 1-3 on page 1-5) and ensure the cables have been routed and secured correctly. -
Page 38: Vesa Mounting
MK2000. To find commercially available Off-the-Shelf stands, search the internet for “VESA Mount”. Symbol also offers an optional VESA Mounting Kit. The kit includes a Connector/Port Cover which provides enhanced security by covering the MK2000’s cables and ports (see Figure 2-6 on page 2-8). -
Page 39: Power
Installation Power The MK2000 power can be supplied by using the Symbol approved universal AC power supply or by using Symbol’s BiasT, the Power-over-Ethernet option. AC Power Supply Connection The MK2000 can be powered by the Symbol approved universal AC power supply plugged into the power port on the rear of the MK2000 via a 2.0mm barrel jack. -
Page 40: Communication Interfaces
Wired Ethernet: Power via AC Outlet With this option, the MK2000 communicates to the host via a 10Base-T Ethernet cable and receives power via a Symbol approved AC power supply plugged into an AC outlet, see AC Power Supply Connection on page 2-9. - Page 41 Installation Wired Ethernet: Power via POE The POE installation option allows the MK2000 to communicate and receive power on the same 10Base-T Ethernet cable, see Figure 2-7 on page 2-12. Caution POE should NOT be used in conjunction with an external power supply connected to the power port on the MK2000.
- Page 42 MK2000 MicroKiosk Product Reference Guide Customer Switch / Hub DC Power Supply DC Power AP-PSBIAS-T AP-PSBIAS-T Supply Category 5 Patch Cable Category 5 Patch Cable Customer Patch Panel Category 5 Category 5 MK2000 MicroKiosk Figure 2-7. MK2000 Power-Over-Ethernet, Network Connectivity...
-
Page 43: Wired Rs-485 Setup
Wired RS-485 Setup The MK2000 can communicate with a host via a wired RS-485 serial connection. Typically the MK2000 Symbol approved AC power supply is used with this communications interface. For MK2000 devices installed where pre-existing PCK 9100, PCK 9140 or MK1000 wiring exists, the pre-existing wiring can be plugged directly into the MK2000. -
Page 44: Wired Rs-232 Setup
MK2000 MicroKiosk Product Reference Guide If the host does not support RS-485 and RS-485 is the desired communication interface, an RS-232 to RS-485 conversion box is required. The conversion box must be sourced locally and configured per manufacture’s instructions. The conversion box is not available from Symbol Technologies. - Page 45 4000 Ft. Maximum RS-232/RS-485 Termination Resistors at Both Ends Conversion Box RS-232 100Ω 100Ω 1/2 W 1/2 W 100Ω 100Ω 1/2 W 1/2 W 100Ω 100Ω 100Ω 100Ω Green wire ground or power system ground Circuit ground or circuit common 120 Ω...
-
Page 46: Peripherals
MK2000 MicroKiosk Product Reference Guide Peripherals Peripheral devices such as a printer, decoded external scanner or RS-232 communicating devices can attach to the MK2000. This port can be used for serial communication with a host, connection of an external device like a printer or for the connection of an decoded external scanner, for port locations, see Figure 1-3 on page 1-5. - Page 47 Installation Placard Mounting Brackets Figure 2-10. Placard Mounting Brackets, Installation 2-17...
- Page 48 MK2000 MicroKiosk Product Reference Guide MK2000 Display Signage Figure 2-11. Sign Installation 2-18...
-
Page 49: Com Port
Installation COM Port Table 2-1. COM Port Port COM1 RS-485 COM4 RS-232 (no power) COM6 RS-232 (with 5 VDC) Connector Pin-Outs Table 2-2 through Table 2-4 describe the MK2000 connector pin outs, see Figure 1-3 on page 1-5 for port locations. 10-Pin Pin 10 Pin 1... -
Page 50: Ethernet / Bias-T Port Connections
The Ethernet connector provides the interface for both the ethernet signals and power supply voltage to the MK2000 through a single Ethernet cable. If power to the MK2000 is being provided via POE, do NOT use the Symbol approved AC power supply. Table 2-2. Power-over-Ethernet Connections... -
Page 51: Rs-485 Port Connections
Installation RS-485 Port Connections Table 2-3. RS-485 Connector: 10-Pin Description Pin 1 RS-485 (+) Pin 2 RS-485 (+) Pin 3 Reserved Pin 4 Reserved Pin 5 USB PWR Pin 6 USB - Pin 7 USB + Pin 8 RS-485 (-) Pin 9 Pin 10 RS-485 (-) - Page 52 MK2000 MicroKiosk Product Reference Guide 2-22...
-
Page 53: Chapter 3. Setup And Configuration
Chapter 3 Setup and Configuration Overview This chapter describes the MK2000 setup and configuration steps. All of the configuration parameters can be set using the Configuration Utility, see Configuration Utility on page 3- 9. In addition, Table 3-1 on page 3-2 provides cross reference for which configuration parameters can also be set using the Control Panel. -
Page 54: Control Panel Configuration Parameters
MK2000 MicroKiosk Product Reference Guide Control Panel Configuration Parameters ® The configuration parameters that can be set using the Windows desktop Control Panel ® as well as the Windows desktop Control Panel Icon used to access the configuration parameters are provided in Table 3-1. - Page 55 Setup and Configuration Table 3-1. Control Panel Configuration Parameter (Continued) Configuration Parameter Description Scan Wedge Not configurable with Control Panel (configurable by selecting Programs, Tools, Scanner Wedge) Append Enter to bar code? Append Tab to bar code? No Shell Present Prefix Scanning Mode Suffix...
-
Page 56: File System Structure Description
MK2000 MicroKiosk Product Reference Guide File System Structure Description ® The Windows CE file system uses folders to represent physical devices (such as PC Cards), as well as flash file systems (such as the FlashFx file system used on the MK2000). -
Page 57: Managing The Startup Process
When the MK2000 boots it runs the regmerge/copyfiles and the startup program. Regmerge/copyfiles is responsible for configuring the unit and merging new functionality (such as optional drivers and the User Application) into the operating system. The Symbol MK2000 SDK provides additional details on regmerge/copyfiles. -
Page 58: Reliable Sequencing Of Application Programs
MK2000 MicroKiosk Product Reference Guide Table 3-3. Startup Program, Parameter Descriptions (Continued) Parameter Description Waiting For Whether the startup sequence should wait for this program to complete before Completion launching the next one, typically set to FALSE. See Reliable Sequencing of Application Programs on page 3-6 for a more detailed description. -
Page 59: Reset Function
Setup and Configuration Reset Function ® If an application is running, perform the Reset function and enter the Windows protected mode to access the Control Panel settings. 1. To perform a cold boot press and hold buttons B and C until the display goes blank (typically 15 seconds) then release buttons (see Figure 1-1 on page 1-3). -
Page 60: Stylus Settings
Registry Persistence on page 6-2. Specifying an ESSID For a Wireless Network Connection The ESSID for the Spectrum24 radio card is set using the Symbol Mobile Companion application. It is saved with the other values of the current configuration. As always, if the value is changed, save the new configuration. -
Page 61: Configuration Utility
Setup and Configuration Configuration Utility ® The MK2000 Configuration Utility is a Windows program that allows many of the MK2000 parameters to be configured on a PC and then saved to a registry/configuration file for transfer to the MK2000’s non-volatile Flash Memory. Parameters set in the registry/ configuration file are retained between power down and power up cycles. - Page 62 MK2000 MicroKiosk Product Reference Guide Download and Install The Configuration Utility The Configuration Utility is available for download from Symbol’s Developer’s Zone web site (http://devzone.symbol.com/). Download the Configuration Utility install file and save it ® on the PC’s hard drive. Select Start/Run from the Windows task bar and use the Browse button, locate the Configuration Utility install file and select OK.
- Page 63 Setup and Configuration 2. The Configuration Utility Select Folder Screen provides the installer with the directory information for the installation. Enter a new install path or accept the default path, and select the Configuration Utility users. Select Next to continue. Figure 3-2.
- Page 64 MK2000 MicroKiosk Product Reference Guide 4. The Configuration Utility Install Complete Screen confirms the installation was completed successfully, select Close to exit. Figure 3-4. Configuration Utility Install Complete Screen 3-12...
-
Page 65: Configuration Utility Main Screen
Setup and Configuration Configuration Utility Main Screen The Configuration Utility main screen provides an overview of the configuration categories provided by the Configuration Utility, see Figure 3-5 on page 3-13. The main configuration category listings are provided: • Communication • System Configuration •... - Page 66 MK2000 MicroKiosk Product Reference Guide Edit Data Entry Formats The Configuration Utility uses standard data entry formats, that depend on the data type. • Check Box The fields are used for true or false values. If the check box has an "X" in it, the value is selected, otherwise it is not.
- Page 67 Setup and Configuration Load Configuration / .reg File Choose File - Open Configuration from the menu, select a file name and press OK. DHCPConfig Editing DHCP Options Topics covered in this section include how to edit options and save them to the Configuration File.
-
Page 68: Removing The Configuration Utility
MK2000 MicroKiosk Product Reference Guide DHCPConfig To edit the DHCPConfig options open the DHCPConfig window first select the Edit button to enter the Send/Receive window. From the Receive tab, select new values from the available options (use Ctrl key to enter more than one value) and tap on the Add button. -
Page 69: Chapter 4. Resident Demo Application
The Resident Demo Application (MK2000RDEMOAPP-x.xx) is a browser-based application available for download, either individually or as part of the SDK at: http://devzone.symbol.com. The purpose of the Resident Demo Application is to provide a visual and audible demonstration of the MK2000’s capabilities. The Resident Demo Application can be set to launch automatically on MK2000 boot up. -
Page 70: Resident Demo Application Functionality
MK2000 MicroKiosk Product Reference Guide Resident Demo Application Functionality The Resident Demo Application provides a visual and audible demonstration of the MK2000’s capabilities. It provides an overview of a basic MK2000 retail application and it is useful in demonstrating the basic functionality of the MK2000 in a retail environment. The Resident Demo Application is functionally divided into Customer Applications and Store Operations. -
Page 71: Demo Application Versions
There are two versions of the Demo Application, the Resident Demo Application (MK2000RDEMOAPP-x.xx) and the Laptop Driven Demo Application (MK2000SDEMOAPP-x.xx). Both versions (along with the source code) are available at: http://devzone.symbol.com. The Laptop Driven Demo Application is also supplied with the MK2000 SDK p/n MK2000CESDK-x.xx. Resident Demo Application The Resident Demo Application is a self-contained program that is run on the MK2000. -
Page 72: Installing The Resident Demo Application
Install A New Resident Demo Application Version 1. Download the Resident Demo Application: MK2000RDEMOAPP-x.xx (individually or as part of the SDK) at: http://devzone.symbol.com. 2. To load Resident Demo Application onto a CF card, use a PC to copy the following two items onto the CF card: •... -
Page 73: Disable/Restore Demo Application
Resident Demo Application 3. Insert the compact flash card into the CF card slot, see Figure 1-2 on page 1-4. To access the CF card contents use the Storage Card folder located in My Computer. 4. Double tap the My Computer icon. 5. -
Page 74: Starting The Resident Demo Application
MK2000 MicroKiosk Product Reference Guide Starting The Resident Demo Application Prior to launching the Resident Demo Application print out the Demo Application Bar Codes on page C-1. The printed bar codes are required to access the MK2000 features. The Resident Demo Application can be set to launch automatically on MK2000 boot up. -
Page 75: Resident Demo Application Structure
Resident Demo Application Resident Demo Application Structure The Resident Demo Application uses two categories of screens to demonstrate the MK2000 capabilities. The Customer Application Screens are designed to be used and accessed by customers. The Store Operations Screens are designed to be used and accessed only by store employees. -
Page 76: Customer Application Screens
MK2000 MicroKiosk Product Reference Guide Customer Application Screens Main Menu Bar The MK2000 displays the Main Menu Bar titles above the programmable buttons while in Attract Mode (Idle Mode). Figure 4-2. Main Menu Bar Scanning Bar Codes A bar code (item’s SKU, employee badge or loyalty card) can be scanned from any point within the application. -
Page 77: Attract Mode
Resident Demo Application Attract Mode The MK2000 Resident Demo Application automatically enters Attract Mode and displays a slide show. Attract Mode is automatically entered after a period of inactivity on any screen, the slides are displayed in preset intervals. Slide Show (screen saver) While the slide show displays, the Main Menu Bar (see page 4-8), is visible. -
Page 78: Price Verification
MK2000 MicroKiosk Product Reference Guide Price Verification The Resident Demo Application has three price verification screen formats: • Price Verification screen (Loyalty Program enabled) Requires the Loyalty Program bar code to access special Loyalty Program product information • Price Verification screen (Non-Loyalty Program) Displays standard non-Loyalty Program product information •... - Page 79 Resident Demo Application Audio Enabled Price Verification screen provides an audio listening station to the price verification screen: • Two Volume Control Buttons (Louder/Quieter) • Pause • Home, returns to Attract Mode (see page 4-9). Figure 4-6. Audio Enabled Price Verification Screen 4-11...
-
Page 80: Price Verification Menu Bar
MK2000 MicroKiosk Product Reference Guide Price Verification Menu Bar The MK2000’s Price Verification Screen uses the Price Verification Menu Bar to identify the button functions. The Price Verification Menu Bar appears directly over the function buttons and it identifies the button functions (while in the Price Verification Screen). -
Page 81: Loyalty Program
Resident Demo Application Loyalty Program Selecting the Loyalty Program button from the Main Menu Bar (see page 4-8), or from the Price Verification screen (see page 4-10), displays the Loyalty Program screen. Figure 4-8. Loyalty Program Screen Scanning the Loyalty Program (see Demo Application Bar Codes on page C-1), provides details about the customer’s Loyalty Program account status. -
Page 82: Store Operations Screen
MK2000 MicroKiosk Product Reference Guide Store Operations Screen Scan an employee badge (5 digit code 128) to enter the "Store Operations" mode. A detailed description of each of the button functions available from the Store Operations screen is provided below. While on this screen the internal scan engine is disabled. -
Page 83: In-Store Messaging Screen
Resident Demo Application In-Store Messaging Screen Selecting In-Store Messaging from the Store Operations Screen (see page 4-14)displays the In-Store Messaging Screen. When the screen is initially displayed, the first (most recently received) item is highlighted. The In-Store Messaging View Menu Bar indicates the current button functions. -
Page 84: Voicemail Options Screen
MK2000 MicroKiosk Product Reference Guide Voicemail Options Screen Selecting a voice mail item from the In-Store Messaging screen displays the Voicemail Options screen. The Voicemail Options Screen is used to listen or respond to a voice message. Select Options: •... -
Page 85: Voicemail Playback Screen
Resident Demo Application Voicemail Playback Screen Selecting an item from the Voicemail Options Screen displays the Voicemail Playback screen. The Voicemail Playback Screen is used to listen to and/or reply to a message. Select Options: • First Speaker button increases volume •... -
Page 86: Voicemail Response Screen
MK2000 MicroKiosk Product Reference Guide Voicemail Response Screen Selecting Reply from the Voicemail Options Screen displays the Voicemail Response screen. The Voicemail Response Screen is used to record a voice mail reply using the MK2000’s built in microphone, see Figure 1-1 on page 1-3. This screen can be used to record a message and play the message back. -
Page 87: Text Messaging Screen
Resident Demo Application Text Messaging Screen Selecting a text based message item from the In-Store Messaging screen displays the Text Messaging screen. The Text Messaging Screen is used to view a text based message. Select Options: • Delete to delete the message and return to the In-Store Messaging Screen (see page 4-15). -
Page 88: Scan A 2D Bar Code Screen
MK2000 MicroKiosk Product Reference Guide Scan a 2D Bar Code Screen Selecting Scan a 2D bar code from the Store Operations Screen (see page 4-14) displays the Scan a 2D bar code Screen. The Scan a 2D bar code screen allows store associates to read a 2-D bar code such as a PDF or composite code (see sample 2D bar code (PDF417) on page C-7). -
Page 89: Chapter 5. Updating Data
Chapter 5 Updating Data Updating Data on the MK2000 This chapter outlines the partition downloading and file downloading procedures for the MK2000. Partition Update vs. File Update There are two types of update supported by the MK2000: partitions and files. The file system used by the MK2000 is the same as the file system used on a desktop computer. -
Page 90: Downloading Partitions
MK2000 MicroKiosk Product Reference Guide Downloading Partitions The following tools can be used to update partitions (which are packages of one or more files that completely fill a partition region). • Initial Program Load (IPL) • AirBEAM Smart. Initial Program Loader Initial Program Loader (IPL) is a menu-based method of downloading partitions to non- volatile storage (flash) on the MK2000, see Upgrade Procedures on page E-1. -
Page 91: Downloading Files
Updating Data Note:When running AirBEAM in non-interactive mode a temporary loss of the UI is possible. AirBEAM may be processing in the background and therefore dominating the CPU. This may appear to the user as though pen taps and key-presses are not being recognized. That is not the case, the keystrokes are placed in the queue and processed accordingly when AirBEAM completes its updates. -
Page 92: Ftp Server
MK2000 MicroKiosk Product Reference Guide FTP Server The FTP server is implemented based on RFC 959, which defines the FTP requirements. FTP server supports the minimum implementation of the FTP server defined in RFC 959. This minimum implementation includes configuration values, transfer parameters and supports only ASCII and image data types. - Page 93 Updating Data CF Card Files can be uploaded and/or downloaded to the MK2000 from a CF card inserted in the MK2000. The CF card can then be removed and the downloaded data accessed from any device capable of reading CF card data.
- Page 94 MK2000 MicroKiosk Product Reference Guide...
-
Page 95: Chapter 6. System Features
Chapter 6 System Features Overview The MK2000 provides a wide range of capabilities, to support independent application development. Control Panel Non-Volatile Settings The following Control Panel Non-Volatile settings can be re-set and saved. The saved new settings are retained after power down (see Configuration Utility on page 3-9): •... -
Page 96: Registry Persistence
MK2000 MicroKiosk Product Reference Guide Registry Persistence The MK2000 achieves configuration persistence across cold boots by selectively writing portions of the registry to the flash file system (using Registry Export) and then merging those registry entries at boot time (using Regmerge). -
Page 97: Gatekeeper
Protected Mode access was not requested and the User Application is defined, it launches the Symbol "Startup" program. "Startup" is responsible for running AirBEAM (if present) any system-level programs and finally the User Application. If no User Application is defined the system boots to Protected Mode. - Page 98 MK2000 MicroKiosk Product Reference Guide Remapping Buttons The four buttons can be used individually, or in combinations. 14 of the 15 combinations can be remapped to a virtual keycode that represents a given character or key sequence, as defined in the table at the end of this section. The other combination is permanently mapped to reset.
- Page 99 System Features Use a keycode value from the following table: Table 6-3. Keycode Values Button Values Function Value Function Value BACK 0x08 COMMA 0xBC 0x09 HYPHEN 0xBD CLEAR 0x0C PERIOD 0xBE RETURN 0x0D SLASH 0xBF SHIFT 0x10 BACKQUOTE 0xC0 CONTROL 0x11 0x70 0x12...
-
Page 100: Network Time Update: Sntp Client
MK2000 MicroKiosk Product Reference Guide Network Time Update: SNTP Client The MK2000 provides a Simple Network Time Protocol (SNTP) client that can be used to automatically set and update the system time. This is advantageous for remote management of MK2000s because they do not have a backup battery to maintain the system time across reboots or power outages. - Page 101 System Features • Update Period A number indicating the interval in minutes between executions of the program. A value of zero means the program is not scheduled to run periodically. A non-zero value means the program will run again in "Update Period" minutes. Updating the time once a day is generally sufficient to ensure consistently accurate time reporting.
-
Page 102: Inactivity Application (Screen Saver)
MK2000 MicroKiosk Product Reference Guide Inactivity Application (Screen Saver) The Inactivity Application Manager (IAM) is the screen saver engine for the MK2000. It is responsible for launching and terminating the screen saver at appropriate times but does not provide the screen saver application itself. The screen saver application is termed here an "Inactivity Application". - Page 103 System Features • Background A DWORD value specifying the background color to use around graphics that are smaller than the screen size. If not specified, the default background is 0x700000 (a middle range blue). These value can be set using the Config Utility. The program does not accept any command line parameters.
- Page 104 MK2000 MicroKiosk Product Reference Guide 6-10...
-
Page 105: Chapter 7. User Applications
Chapter 7 User Applications Overview The MK2000 provides a wide range of capabilities, to support user application development. Additional information, source code and examples are provided in the MK2000 SDK. Software Development Environments The MK2000’s operating system is WinCE .NET 4.1. The MK2000 allows several choices for development environments. -
Page 106: Browser Applications
Internet Explorer CE version 5.5 features and limitations.) The MK2000’s browser supports Symbol’s Kiosk Mode, which enables the browser to be configured with its tool bar and the Window’s Start bar hidden, not accessible from the screen. -
Page 107: Vt220 Emulation (Support For Mk1000 Legacy Applications)
User Applications VT220 Emulation (Support for MK1000 Legacy Applications) A version of Symbol’s VT220 terminal emulation program is available (Symbol Developer zone, http://devzone.symbol.com/) for the MK2000. This program is backwards compatible with the MK1000’s VT220 emulation. PCK Emulation (Support for MK1000 Legacy Applications) A version of Symbol’s PCK terminal emulation program is available (Symbol Developer... - Page 108 MK2000 MicroKiosk Product Reference Guide...
-
Page 109: Appendix A. Technical Specifications
Appendix A Technical Specifications Technical Specifications Table A-1. MK2000 Technical Specifications MK2000 Technical Specifications Dimensions 10.9 in. H x 8.9 in. W x 3.6 in. D 27.7 cm H x 22.6 cm W x 9.1 cm D Weight 3.5 lbs / 1.6 kg (typical) Power 12-24 VDC 24 Watts Supports Power-over-Ethernet... - Page 110 Operating System: Windows CE V4.1 Browser Internet Explorer ® Audio/Video Windows Media Player Available Applications Demo Applications (Resident and Laptop, also see SDK) PCK9100 Emulation VT220 Emulation ® AirBEAM On-board FTP Server On-board SNTP Client For off-the-shelf 3rd party applications, visit www.Symbol.com...
- Page 111 Laser Safety IEC Class 2, CDRH Class II Mounting Options Conforms to VESA, 100mm mounting standard Wall Mount Bracket available from Symbol Technologies Pole Mount Bracket available from Symbol Technologies Optional Accessories 3 track Magnetic Stripe Reader Signage Mounting Kit...
- Page 112 MK2000 MicroKiosk Product Reference Guide...
-
Page 113: Appendix B Laptop Driven Demo Application
The Laptop Driven Demo Application is supplied with the MK2000 SDK. In addition, both the Laptop Driven Demo Application and the Resident Demo Application are available at: http://devzone.symbol.com. Laptop Driven Demo Application / Resident Demo Application differences: •... -
Page 114: Laptop Driven Demo Functionality
MK2000 MicroKiosk Product Reference Guide Laptop Driven Demo Functionality The demonstration application works with the touch screen and with the 4 programmable buttons, either can be used to navigate the menu system. The 4 function buttons and or the touch screen virtual buttons (titles displayed over the 4 programmable buttons) can be used to navigate the menu system. -
Page 115: Customizable Features
Customizable Features The Laptop Driven Demo Application is easy to customize and is designed for international use. The items listed below can be modified: • Currency type symbol ($, £, F, etc…) • Images displayed in advertising (attract) mode •... -
Page 116: Setting-Up The Laptop Driven Demo Application
MK2000 MicroKiosk Product Reference Guide Setting-Up The Laptop Driven Demo Application ® The application is run from a Windows 2000 laptop with MS IIS (Internet Information Services) software enabled and a direct ethernet network connection via an ethernet crossover cable. - Page 117 Laptop Driven Demo Application MK2000 Setup ® Access the Windows CE desktop: At boot up, the MK2000 automatically launches the Laptop Driven Demo Application, ® to access the Windows CE Desktop use the following steps: 1. To perform a cold boot press and hold buttons B and C until the display goes blank (typically 15 seconds) then release buttons, see Figure 1-1 on page 1-3.
- Page 118 MK2000 MicroKiosk Product Reference Guide Starting The Application After the mkconfig.reg file is loaded, press and hold buttons B and C until the display goes blank (typically 15 seconds) then release buttons, see Figure 1-1 on page 1-3. The MK2000 reboots to the Laptop Driven Demo Application.
-
Page 119: Folder, File And Database Structure
Laptop Driven Demo Application Folder, File and Database Structure The Laptop Driven Demo Application uses the following folder structure. Main Application Folder: MK2000 Directory Path: C:\Inetpub\wwwroot\MK2000 Residing in the main application folder are three sub-folders. Access Database: MK2000\Database Images of Retail Items: MK2000\SKU_Images Slide Show Images / Video: MK2000\SlideShow_Images... -
Page 120: Laptop Driven Demo Application Structure
MK2000 MicroKiosk Product Reference Guide Laptop Driven Demo Application Structure The Laptop Driven Demo Application uses two categories of screens to demonstrate the MK2000 capabilities. The Customer Application Screens are designed to be used and accessed by customers. The Store Operations Screens are designed to be used and accessed only by store employees. -
Page 121: Customer Application Screens
Laptop Driven Demo Application Customer Application Screens Main Menu Bar The MK2000 displays the Main Menu Bar titles above the programmable buttons while in Attract Mode (Idle Mode), see Modifying Button Titles on page B-7 to change the titles. Scanning Bar Codes A bar code (item’s SKU, employee badge or loyalty card) can be scanned from any point within the application. -
Page 122: Attract Mode
MK2000 MicroKiosk Product Reference Guide Attract Mode The MK2000 Laptop Driven Demo Application automatically enters Attract Mode and displays a slide show in 5 second intervals (typical). Slide Show (screen saver) While the slide show displays, the Main Menu Bar, is visible. Slides displayed in this mode are located in the SlideShow_Images folder. -
Page 123: Price Verification
Laptop Driven Demo Application Inactivity Application Manager (IAM) When there are no user inputs for a preset duration the Inactivity Application functions like a screen-saver. The Inactivity Application exits when it detects a user input and restores control to the User Application. The User Application can continue to perform tasks while the IAM is running. - Page 124 MK2000 MicroKiosk Product Reference Guide Espanol (Alternate Language) The MK2000 Laptop Driven Demo Application’s default primary language is English and the default alternate language is Spanish. On the Price Verification screen, the title above button 1 labels the alternate language. Once selected, the alternate language remains in effect until the screen is exited or until another button is pressed.
- Page 125 Laptop Driven Demo Application Audio Enabled Price Verification Screen Audio Enabled Price Verification screen provides an audio listening station to the price verification screen: • Two Volume Control Buttons (Louder/Quieter) • Pause • Home, returns to Attract Mode Attract Mode on page B-10. Figure 2-4.
-
Page 126: Loyalty Card Program
MK2000 MicroKiosk Product Reference Guide Loyalty Card Program Selecting the Loyalty Card button from the Main Menu Bar (see Attract Mode on page 4-9) or from the Price Verification screen, displays the Loyalty Program screen. Figure 2-5. Loyalty Program Screen Scanning the Loyalty Card, see Demo Application Bar Codes on page C-1 provides details about the customer’s Loyalty Program account status. - Page 127 Laptop Driven Demo Application Loyalty Card Setup File: The Loyalty Card promotion details are obtained from the LoyaltyCardSpecial.txt file. The text file is used to specify the graphic used and the text to be displayed on the Loyalty Card Program display screens. To change the information on the Loyalty Card Program display screens change the LoyaltyCardSpecial.txt file.
-
Page 128: Store Operations Screen
MK2000 MicroKiosk Product Reference Guide Store Operations Screen Scan an employee badge (5 digit code 128) to enable the Store Operations mode. A detailed description of each of the button functions is provided (see the referenced pages). Select Exit to return to Attract Mode on page B-10. -
Page 129: In-Store Messaging Screen
Laptop Driven Demo Application In-Store Messaging Screen Selecting In-Store Messaging from the Store Operations Screen on page B-16 displays the In-Store Messaging View Screen. When the screen is initially displayed, the first (most recently received) item is highlighted. The In-Store Messaging View Menu Bar indicates the current button functions. -
Page 130: Voicemail Options Screen
MK2000 MicroKiosk Product Reference Guide Voicemail Options Screen Selecting a voice mail item from the In-Store Messaging screen displays the Voicemail Options screen, see Voicemail Options Screen on page B-18. The Voicemail Options Screen is used to listen or respond to a voice message. -
Page 131: Voicemail Playback Screen
Laptop Driven Demo Application Voicemail Playback Screen Selecting an item from the Voicemail Options Screen displays the Voicemail Playback screen. The Voicemail Playback Screen is used to listen to and/or reply to a message. Select Options: • Two volume control buttons (Louder/Quieter) •... -
Page 132: Voicemail Response Screen
MK2000 MicroKiosk Product Reference Guide Voicemail Response Screen Selecting Reply from the Voicemail Options Screen displays the Voicemail Response screen. The Voicemail Response Screen is used to record a voicemail reply using the MK2000’s built in microphone, see Figure 1-1 on page 1-3. This screen can be used to record a message and play the message back. -
Page 133: Text Messaging Screen
Laptop Driven Demo Application Text Messaging Screen Selecting a text based message item from the In-Store Messaging screen displays the Text Messaging screen, see Text Messaging Screen on page B-21. The Text Messaging Screen is used to view a text based message. Select Options: •... -
Page 134: Scan A 2D Bar Code Screen
MK2000 MicroKiosk Product Reference Guide Scan a 2D Bar Code Screen The Scan a 2D bar code screen allows store associates to read a 2-D bar code such as a PDF or composite code (see sample 2D bar code (PDF417) on page C-7). -
Page 135: Demo Setup Text File
Laptop Driven Demo Application Demo Setup Text File The Demo_App_Setup.txt file contains the text references used by the Laptop Driven Demo Application. The text references are read sequentially into the application program. Make changes to the Demo_App_Setup.txt file and the changes are applied to the entire Laptop Driven Demo Application. - Page 136 MK2000 MicroKiosk Product Reference Guide Demo_App_Setup.txt File, Contents Laptop Demo Application Variables Regreso AltButton3 Button1 Button2 Button3 Button4 B-24...
-
Page 137: Appendix C Demo Application Bar Codes
Appendix C Demo Application Bar Codes Demo Application Bar Codes Sample bar codes are provided for use with the Demo Application. Wide Screen TV 11048 83112... - Page 138 MK2000 MicroKiosk Product Reference Guide DVD Player 11096 38390 White Correction Fluid 70330 50367...
- Page 139 Demo Application Bar Codes Glue Stick 71709 00166 Transparent Tape 51131 77138...
- Page 140 MK2000 MicroKiosk Product Reference Guide Standard Staples 74711 35440 Tylenol 00450 44909...
- Page 141 Demo Application Bar Codes Standard Staples 12546 65021 75678 12772...
- Page 142 MK2000 MicroKiosk Product Reference Guide Employee Badge John Ryan (Code 128) Employee Badge John Ryan 56842 Loyalty Card Clark Kent (Code 39) Loyality Card Clark Kent 4125279101...
- Page 143 Demo Application Bar Codes 2D bar code (PDF417) You have just scanned a PDF417 bar code using the MK2000!" Text Reads: “...
- Page 144 MK2000 MicroKiosk Product Reference Guide...
-
Page 145: Appendix D Terminal Configuration Manager
Appendix D Terminal Configuration Manager TCM Introduction The Terminal Configuration Manager (TCM), is used to specify a group of files to use when creating a partition and to load partitions from a host computer into the MK2000’s flash memory using the terminal’s Initial Program Loader (IPL). In TCM, a script is created that contains the information (commands to copy files) for building the image. -
Page 146: Starting Terminal Configuration Manager
MK2000 MicroKiosk Product Reference Guide Starting Terminal Configuration Manager To start TCM, double tap on the TCM icon in the SYMSDK group. The following screen appears, displaying two directory windows; Script1 and File Explorer. Each directory window is split; the left half (or pane) of the window displays the directory tree for the current... - Page 147 Terminal Configuration Manager Table D-1 lists the components of the TCM start-up screen. Table D-1. TCM Start-Up Screen Components Component Description Script Window Associated with a script file containing the information to create a Flash Disk image. This window is the target window, or the primary TCM window to create a script or change a script file’s contents by copying, deleting and renaming files and directories.
-
Page 148: Defining Script Properties
MK2000 MicroKiosk Product Reference Guide Defining Script Properties Before a script is created, the script properties must be defined. This defines the type of terminal, flash type, number of disks being created and the memory configuration of each disk partition. -
Page 149: Creating The Script For The Hex Image
Note: If an existing script is opened and changes are made, saving the changes writes over the original script. To use an original or Symbol-supplied standard script as a base and save the changes in a new script, use Save As... -
Page 150: Copy Components To The Script
MK2000 MicroKiosk Product Reference Guide Copy Components to the Script To copy files or directories to the script being generated: 1. Tap on the File Explorer Window to make it the active window. 2. Tap on the source directory in the Directory Tree Pane. TCM displays the directory contents in the Contents Pane. -
Page 151: Building The Image
Note: Saving changes to an existing script, writes over the original script. To use an original or Symbol-supplied standard script as a base and save the changes in a new script, use Save As instead of Save after making the changes and save to a different filename. -
Page 152: Sending The Hex Image
MK2000 MicroKiosk Product Reference Guide To build a script: 1. In the Script Window, select the script to be built. 2. From the Script menu, select Build, On the toolbar, choose . The Configure Build window appears. 3. Select the item to build. If an application is selected to build, specify the application. -
Page 153: Tcm Error Messages
Terminal Configuration Manager TCM Error Messages TCM validates the cells in the partition table when the Execute button is selected. Cells highlighted in red contain an error. Partition loading is disabled until all errors are corrected. Following are errors that TCM may encounter and possible solutions. Table D-2. - Page 154 MK2000 MicroKiosk Product Reference Guide D-10...
-
Page 155: Appendix E Upgrade Procedures
Appendix E Upgrade Procedures Overview The MK2000 Upgrade functions allow the user to upgrade the MK2000 with software updates and/or feature enhancements. Partition Update vs. File Update There are two types of update supported by the MK2000: partitions and files. The file system used by the MK2000 is the same as the file system used on a desktop computer. -
Page 156: Upgrade Requirements
MK2000 MicroKiosk Product Reference Guide Upgrade Requirements Upgrade requirements: • Compact Flash (CF) card with the appropriate upgrade files Caution While any of the access covers are removed, the user must follow proper ESD (Electro-Static Discharge) precautions to avoid damaging sensitive components. -
Page 157: Ipl Menu Navigation
Upgrade Procedures IPL Menu Navigation The Initial Program Loader (IPL) Menu selection screens use the MK2000’s first three buttons to navigate the menus and make selections. The button functions for using the menus are: C (Select/Action) B (Up) A (Down) Figure E-1. -
Page 158: Os Upgrade
MK2000 MicroKiosk Product Reference Guide OS Upgrade The IPL mode is used to upgrade the MK2000 OS. IPL Mode, OS Upgrade Procedures The OS Upgrade procedures consists of nine steps: • Insert the CF Card • Enter IPL Mode •... - Page 159 Upgrade Procedures 3. Select OS Partition Upgrade, see Figure E-2. When a partition is used it refers to any download component in the Mk2000 (such as OS). Use the A button (Down) ® Windows see Figure E-1 on page E-3 to scroll down to the option and select the option using the C button (Select/Action).
- Page 160 MK2000 MicroKiosk Product Reference Guide 5. Select the OS Upgrade File, see Figure E-4. The Select File Name menu is displayed, use the A button (Down), see Figure E-1 on page E-3 to highlight NKXXX.Bin and select using the C button (Select/Action).
- Page 161 Upgrade Procedures 7. OS Upgrade, Downloading Message, see Figure E-6. When the OS upgrade has initiated, the following message is displayed (be patient this takes 15-25 minutes): Windows CE Downloading: via CF Card NWRMKOAC.BGZ ################__ 95%" Figure E-6. OS Upgrade, Downloading Message 8.
-
Page 162: Monitor Upgrade
MK2000 MicroKiosk Product Reference Guide Monitor Upgrade Note: Failures during the Monitor upgrade often render the device inoperable. If the device does not boot after performing a monitor update call for factory service. Monitor Upgrade Procedures The Monitor Upgrade procedures consists of eight steps: •... - Page 163 Upgrade Procedures 3. Select the Monitor upgrade mode, see Figure E-8. Use the A button (Down) see Figure E-1 on page E-3 to scroll down to the Monitor option and select the option using the C button (Select/Action). Timer off Platform Application Data...
- Page 164 MK2000 MicroKiosk Product Reference Guide 5. Select the Monitor Upgrade File, see Figure E-10. The Select File Name menu is displayed, use the A button (Down), see Figure E-1 on page E-3 to highlight MonXXX.Bin and select using the C button (Select/Action).
- Page 165 Upgrade Procedures 7. Monitor Upgrade, Downloading Message, see Figure E-12. When the Monitor upgrade has initiated, the following message is displayed: Windows CE Downloading: Via CF Card MONITOR.BIN Downloading BIN: 351856 bytes to address 00000000 in Flash ROM ############# 100%" Figure E-12.
-
Page 166: Partition Table
MK2000 MicroKiosk Product Reference Guide Partition Table Partition Table Upgrade Procedures Partition Table Upgrade procedures consists of the following steps: • Insert the CF Card • Enter IPL Mode Partition Table • Select upgrade mode • Select the File Media Source Partition Table •... - Page 167 Upgrade Procedures 3. Select The Partition Table Upgrade Mode, see Figure E-14. Use the B button (Up) Partition Table see Figure E-1 on page E-3 to scroll up to the option and select the option using the C button (Select/Action). Timer off Platform Application...
- Page 168 MK2000 MicroKiosk Product Reference Guide 5. Select the Partition Table Upgrade File, see Figure E-16. The Select File Name menu is displayed, use the A button (Down), see Figure E-1 on page E-3 to highlight PARTBLXX.HEX and select using the C button (Select/Action).
-
Page 169: Demo Application Install/Upgrade
Upgrade Procedures 7. Partition Table Upgrade, Downloading Message, see Figure E-18. When the Partition Table upgrade has initiated, the following message is displayed: Partition Table Downloading: Via CF Card NWRMKTAB.HEX ############# 100%" Figure E-18. Partition Table Upgrade, Downloading Message 8. Partition Table Successfully Loaded Message, see Figure E-19. When the new Partition Table is successfully loaded the following message is displayed: Result was: Success! Press Action to Continue... - Page 170 MK2000 MicroKiosk Product Reference Guide E-16...
-
Page 171: Appendix F Troubleshooting
Appendix F Troubleshooting Troubleshooting Troubleshooting topics include: • The MK2000 does not turn on. • The MK2000 does not respond to polls from the host computer. • The MK2000 does not send data to host computer. • How to Re-Boot the MK2000. ®... - Page 172 MK2000 MicroKiosk Product Reference Guide Table F-1. Troubleshooting Problem Possible Causes Possible Solutions MK2000 does not turn on. No power to the - Power via AC outlet device. - Check power to the device. Ensure the Symbol approved power supply is plugged into an...
- Page 173 Troubleshooting Table F-1. Troubleshooting (Continued) Problem Possible Causes Possible Solutions How to load files into the MK2000. See Downloading Files on page 5-3. Demo Application (Resident or Demo program Locate and delete the files associated Laptop) does not work after parameter settings with the Demo Application (located in changes were made to the unit.
-
Page 174: Read Mk2000 Settings
MK2000 MicroKiosk Product Reference Guide Read MK2000 Settings If an MK2000 has been configured to automatically launch an application on power-up, this ® auto-boot must be bypassed when the system is booted to enter Windows CE Protected Mode, MK2000 Protected Mode on page 6-2. -
Page 175: Glossary
The ability of an interface controller to determine the code type of a scanned bar code. After this determination is made, the information content is decoded. The dark element in a printed bar code symbol. Bar Code Density The number of characters represented per unit of measurement (e.g., characters per inch). - Page 176 MK2000 MicroKiosk Product Reference Guide Bar Width Thickness of a bar measured from the edge closest to the symbol start character to the trailing edge of the same bar. Baud Rate A measure of the data flow or number of signaling events occurring per second.
- Page 177 Continuous Code A bar code or symbol in which all spaces within the symbol are parts of characters. There are no intercharacter gaps in a continuous code. The absence of gaps allows for greater information density.
- Page 178 A server in the network or a service within a server that assigns IP addresses. Discrete Code A bar code or symbol in which the spaces between characters (intercharacter gaps) are not part of the code. Discrete 2 of 5 A binary bar code symbology representing each character by a group of five bars, two of which are wide.
- Page 179 Glossary Host Computer A computer that serves other terminals in a network, providing such services as computation, database access, supervisory programs and network control. International Electrotechnical Commission. This international agency regulates laser safety by specifying various laser operation classes based on power output during operation. IEC (825) Class 1 This is the lowest power IEC laser classification.
- Page 180 MK2000 MicroKiosk Product Reference Guide Kerberos Kerberos is a network authentication protocol. It is designed to provide strong authentication for client/server applications by using secret-key cryptography. A free implementation of this protocol is available from the Massachusetts Institute of Technology. Kerberos is available in many commercial products as well.
- Page 181 A minimum PCS value is needed for a bar code symbol to be scannable. PCS = (RL - RD) / RL, where RL is the reflectance factor of the background and RD the reflectance factor of the dark bars.
- Page 182 The distance between the outside edges of the quiet zones of the first row and the last row. Symbol Length Length of symbol measured from the beginning of the quiet zone (margin) adjacent to the start character to the end of the quiet zone (margin) adjacent to a stop character.
- Page 183 Glossary TCP/IP (Transmission Control Protocol/Internet Protocol) A communications protocol used to internetwork dissimilar systems. This standard is the protocol of the Internet and has become the global standard for communications. TCP provides transport functions, which ensures that the total amount of bytes sent is received correctly at the other end.
- Page 184 Wired Equivalent Privacy, is specified by IEEE for encryption and decryption of RF (wireless) communications. WNMP (Wireless Network Management Protocol) This is Symbol’s proprietary MAC layer protocol used for inter access point communication and other MAC layer communication. WNMS (has been...
-
Page 185: Index
Index Numerics 2D bar code ....4-20, B-22 bar code scanner ....1-7 3rd party applications . - Page 186 MK2000 MicroKiosk Product Reference Guide communications ....2-10, 2-19 demo mode ethernet, wired ....2-10 2D bar code .
- Page 187 Index failure recovery ..... . 3-6 JScript ......7-2 file explorer .
- Page 188 ....6-4 tall symbol ..... 1-12 remote desktop protocol .
- Page 189 Index RF setup ......3-15 setup RFC 959 ......5-4 wired ethernet .
- Page 190 MK2000 MicroKiosk Product Reference Guide TCM ......D-1 unmanaged applications ....7-2 building hex image .
- Page 191 We’d like to know what you think about this Manual. Please take a moment to fill out this questionnaire and fax this form to: (631) 738-3318, or mail to: Symbol Technologies, Inc. One Symbol Plaza M/S B-4 Holtsville, NY 11742-1300 Attention: Technical Publications Manager IMPORTANT: If you need product support, please call the appropriate customer support number provided.
-
Page 194: Quick Startup Instructions
- Accessing Windows CE Desktop (Protected Mode) - Up-Grading the Demo Application - How do I configure the MK2000 MK2000 MicroKiosk Product Reference Guide 72-57772-01 Revision A - June 2003 Symbol Technologies, Inc. One Symbol Plaza, Holtsville N.Y. 11742-1300 http://www.symbol.com/manuals...
Need help?
Do you have a question about the MK2000 MicroKiosk and is the answer not in the manual?
Questions and answers