DataCard SD Series User Manual
Card printers
Hide thumbs
Also See for SD Series:
- Quick install manual (10 pages) ,
- Packaging manual (3 pages) ,
- Installation and manual (86 pages)

Related Manuals for DataCard SD Series

Summary of Contents for DataCard SD Series
- Page 1 Datacard Series Card Printers ® ™ User’s Guide March 2014 Part No. 527400-001 Rev. A...
-
Page 2: Trademark Acknowledgments
Notice Please do not attempt to operate or repair this equipment without adequate training. Any use, operation, or repair you perform that is not in accordance with the information contained in this documentation is at your own risk. Proprietary Notice All drawings and information herein are the property of DataCard Corporation. All unauthorized use and reproduction is prohibited. Trademark Acknowledgments Datacard is a registered trademark and service mark of DataCard Corporation in the United States and other countries. SD is a trademark of DataCard Corporation. Windows is a registered trademark of Microsoft Corporation. All other product names are the property of their respective owners. Datacard Group 11111 Bren Road West Minnetonka, MN 55343‐9015 Phone: 952‐933‐1223 Fax: 952‐933‐7971 www.datacard.com ©2014 DataCard Corporation. All rights reserved. Printed in the United States of America. - Page 3 Compliance Statements Liability Statement The WARNING and CAUTION labels have been placed on the equipment for your safety. Please do not attempt to operate or repair this equipment without adequate training. Any use, operation or repair in contravention of this document is at your own risk. Safety All Datacard® products are built to strict safety specifications in accordance with CSA/ UL60950‐1 requirements and the Low Voltage Directive 2006/95/EC. Therefore, safety issues pertaining to operation and repair of Datacard® equipment are primarily environmental and human interface. The following basic safety tips are given to ensure safe installation, operation and maintenance of Datacard® equipment. • Connect equipment to a grounded power source. Do not defeat or bypass the ground lead. • Place the equipment on a stable surface (table) and ensure floors in the work area are dry and non‐slip. • Know the location of equipment branch circuit interrupters or circuit breakers and how to turn them on and off in case of emergency. • Know the location of fire extinguishers and how to use them. ABC type extinguishers may be used on electrical fires. • Know local procedures for first aid and emergency assistance at the customer facility. • Use adequate lighting at the equipment location. • Maintain the recommended temperature and humidity range in the equipment area. ...
-
Page 4: Regulatory Compliance
Regulatory Compliance These notices apply to the Datacard printer and all Datacard accessory devices that connect to the printer. FCC Notices This device complies with Part 15 of the FCC Rules. Operation is subject to the following two conditions: (1) This device may not cause harmful interference, and (2) this device must accept any interference received, including interference that may cause undesired operation. Note: This equipment has been tested and found to comply with the limits for a Class A digital device, pursuant to Part 15 of the FCC Rules. These limits are designed to provide reasonable protection against harmful interference in a commercial installation. This equipment generates, uses and can radiate radio frequency energy and, if not installed and used in accordance with the instructions, may cause harmful interference to radio communications. However, there is no guarantee that interference will not occur in a particular installation. If this equipment does cause harmful interference to radio or television reception, which can be determined by turning the equipment off and on, the user is encouraged to try to correct the interference by one or more of the following measures: — Reorient or relocate the receiving antenna. — Increase the separation between the equipment and receiver. — Connect the equipment into an outlet on a circuit different from that to which the receiver is connected. — Consult the dealer or an experienced radio/TV technician for help. Changes or modifications not expressly approved by the party responsible for compliance could void the user's authority to operate the equipment. Industry Canada Notice This device complies with Industry Canada licence‐exempt RSS standard(s). Operation is subject to the following two conditions: (1) this device may not cause interference, and (2) this device must accept any interference, including interference that may cause undesired operation of the device. Le présent appareil est conforme aux CNR d'Industrie Canada applicables aux appareils radio exempts de licence. L'exploitation est autorisée aux deux conditions suivantes: (1) l'appareil ne doit pas produire de brouillage, et (2) l'utilisateur de l'appareil doit accepter tout brouillage radioélectrique subi, même si le brouillage est susceptible d'en compromettre le fonctionnement. -
Page 5: Notice For Europe
Host Device Labeling Requirement Notice To meet the FCC and Industry Canada host device labeling requirements, any host equipment incorporating the 506241 module must include the FCC ID/IC number on the host label as follows: Contains transmitter module IC: 889B‐506241001 where 889B‐506241001 is the module's IC certification number. Contains transmitter module FCC ID: GDI‐506241001 where GDI‐506241001 is the module's FCC ID number. Notice for Europe The EU Declaration of Conformity can be found on Datacard.com We hereby certify that this printer complies with EMC Directive2004/108/EC , R&TTE Directive 1999/5/EC, and the EU RoHS Directive EU Directive 2011/65/EC. This printer conforms to Class A of EN 55022 and to EN 301 489‐5. Operation of this equipment in a residential environment may possibly cause interference. In the event of interference, the users, at their own expense, will be required to take whatever measures are necessary to correct the problem. Notice for China (Simplified Chinese) 为 级产 环 该产 线 这 对 Notice for Taiwan (Traditional Chinese) - Page 6 Notice for Japan Japanese Voluntary Control Council for Interference (VCCI) class A statement Korea Communications Commission (KCC) statement California Proposition 65 Compliance WARNING: This product contains chemicals, including lead, known to the State of California to cause cancer, and birth defects or other reproductive harm. Wash hands after handling.
- Page 7 Revision Log SD Series Card Printers User’s Guide Revision Date Description of Changes March 2014 First release of this manual (formerly Part No. 527248-001). Updated for XPS Card Printer Driver v5 and SD460 laminating system.
- Page 8 viii...
-
Page 9: Table Of Contents
About this Manual______________________________________________________________ 1 Intended Audience ____________________________________________________________ 1 Technical Support ______________________________________________________________ 1 Chapter 2: About the Printer ________________________________________________________ 3 About the SD Series Card Printers________________________________________________ 3 Printer Components ____________________________________________________________ 3 Printer Top and Front________________________________________________________ 4 Printer Left Side _____________________________________________________________ 5... - Page 10 Chapter 6: Troubleshooting________________________________________________________ 35 Locate a Problem Within the Card Production System ___________________________ 36 Locate a Problem with Basic Printer Functions ___________________________________ 37 Installation Problems __________________________________________________________ 38 USB Installation Troubleshooting ____________________________________________ 39 Network Installation Troubleshooting ________________________________________ 40 Card Printer Driver Problems ___________________________________________________ 40 The Card Printer Driver does not detect the network-connected printer ______ 41 The Card Printer Driver does not detect the USB-connected printer___________ 41 Driver status or Windows print queue does not provide expected data _______ 42...
- Page 11 117: Reader not available ______________________________________________ 66 118: Print ribbon type problem __________________________________________ 67 119: Print ribbon not supported _________________________________________ 67 120: User paused the printer ____________________________________________ 67 121: Print ribbon not identified __________________________________________ 68 122: Magstripe format problem _________________________________________ 68 123: Insert new card side 1 up __________________________________________ 68 124: Insert same card side 2 up _________________________________________ 68 149: Option not installed________________________________________________ 69...
- Page 12 Driver-Only Messages ______________________________________________________ 76 500: The printer is not available _________________________________________ 76 501: The printer connection was lost ____________________________________ 76 502: The card data is missing or is not usable_____________________________ 76 504: The card data is missing or is not usable_____________________________ 76 505: USB communication issue __________________________________________ 77 506: A card is currently processing ______________________________________ 77 508: The printer is shutting down ________________________________________ 77...
-
Page 13: Chapter 1: Introduction
Chapter 1: Introduction About this Manual This manual provides user information for the SD Series Card Printers. The manual includes: An overview of printer components and options, and a description of the • system label. How to use the printer, including how to power the printer on and off, how to • use the front panel and LCD menus, card processing basics, how to print a test card, and how to load and replace supplies. How to perform routine maintenance and troubleshooting tasks. • An additional Installation and Administrator’s Guide is available for use by administrators or other professionals responsible for printing cards. Refer to the Owner’s Library CD. Intended Audience The manual is intended for the printer operator who prints cards, loads and replaces supplies, maintains the printer, and performs troubleshooting. Technical Support Contact Datacard Technical Phone Support at 1‐800‐328‐3996. SD Series Card Printers User’s Guide... - Page 14 Introduction...
-
Page 15: Chapter 2: About The Printer
Chapter 2: About the Printer About the SD Series Card Printers The card printer applies images, text, and encoded data to plastic cards. It can print full‐color and monochrome images, depending on the type of print ribbon installed. A busy issuance site might issue up to 10,000 cards a month. During these busy times, the site might use more than one printer to keep up with demand. The printer issues cards either one at a time or in batches—up to 100 cards at a time. An optional 200‐card input hopper is available for some printers. Options available for the card printer include magnetic stripe, smart card, and automatic duplex modules, and a reject hopper. The configuration label on the printer shows the options installed. Refer to “System Label” on page 9 for more information about recognizing the factory‐installed options on your card printer. Printer Components Refer to the following to view the printer components and the different options: Printer Top and Front on page 4 • Printer Left Side on page 5 • Inside the Printer on page 6 • Print Ribbon Cartridge on page 7 • Printer with Duplex Option on page 7 • Printer with Laminator (SD460 System Only) on page 8 • System Label on page 9 • SD Series Card Printers User’s Guide... -
Page 16: Printer Top And Front
Printer Top and Front Cover Latch Button Cover Ridges Ribbon Cartridge Handle Card Input Hopper Front Panel Output Hopper Cover Open the cover to access the printhead and ribbon. Latch Button Push the latch button to release the cover and open the printer. -
Page 17: Printer Left Side
Cable Lock Receptacle The receptacle allows you to insert the security plate ® before attaching the optional Kensington lock. Printer Connections Printer connections include: Power receptacle • USB connection • Network connection • SD Series Card Printers User’s Guide... -
Page 18: Inside The Printer
Inside the Printer Printhead Configuration Label Print Ribbon Cartridge Configuration Label The label shows the location and date of manufacture, and lists the options installed. Printhead The printhead transfers images to cards using the print ribbon. Print Ribbon Cartridge The cartridge holds the print ribbon and cleaning sleeve. -
Page 19: Print Ribbon Cartridge
Duplex Module Reject Card Tray Duplex Module The duplex module automatically turns the card for two-sided printing. Reject Card Tray Unfinished cards or cards not processed properly are placed in the optional reject card tray. SD Series Card Printers User’s Guide... -
Page 20: Printer With Laminator (Sd460 System Only)
Printer with Laminator (SD460 System Only) Printer Laminator Laminator Access Door Laminator The laminator attaches to the printer and applies patch or topcoat overlay material to the card. Laminator Access Door Open the door to access the laminator cartridges. Refer to Appendix A, "SD460 Laminating System" on page A‐1, for complete ... -
Page 21: System Label
System Label The printer configuration label on the side of the cover swingarm shows the components installed. It provides information that is useful when requesting service. The label shows the following information: Printer name • Configuration, which includes options • installed in the printer Date and country of assembly • MAC address to use when the printer is connected via an Ethernet network • Information for components installed by the dealer or sales group is handwritten on the label. SD Series Card Printers User’s Guide... - Page 22 About the Printer...
-
Page 23: Chapter 3: Using The System
Chapter 3: Using the System This section provides information about how a card travels through the printer, printer controls, printing a test card, loading and replacing supplies, and cleaning the printer. How the Card Travels The card is verified and sent to print from the PC. The hopper pick mechanism picks a card and moves the card into the printer for processing. Optionally, the card moves to the magnetic stripe encoding area or to the smart card park station, depending on the type of card selected. Encrypted data is decrypted and written to the card. In an SD460 laminating system, the card then moves into the laminator where the overlay material is applied to the front and back of the card. The finished card exits the printer through the card output hopper. SD Series Card Printers User’s Guide... -
Page 24: Card Printer System Overview
Card Printer System Overview The card printer is used with other equipment and software to create a card production system. The system produces cards for a specific purpose, and the cards must meet requirements. Equipment The system can include: A PC, with software to support the printer, such as: The XPS Card Printer Driver for • Windows. ID software designed • specifically to capture, format, and save the data for cards. A retail application such as • ® Microsoft Word or Adobe® ® Photoshop . Capture devices, such as: A digital camera connected to the PC to take photos for ID badges and • other cards. A signature capture pad or fingerprint reader. • The printer with supplies and a facility power source. A data connection between the printer and PC, which can be a USB connection or a network connection. (Do not use both with one printer.) Tasks and Users Typical roles in a card production system include: The operator, who makes cards, loads supplies, and handles minor problems •... -
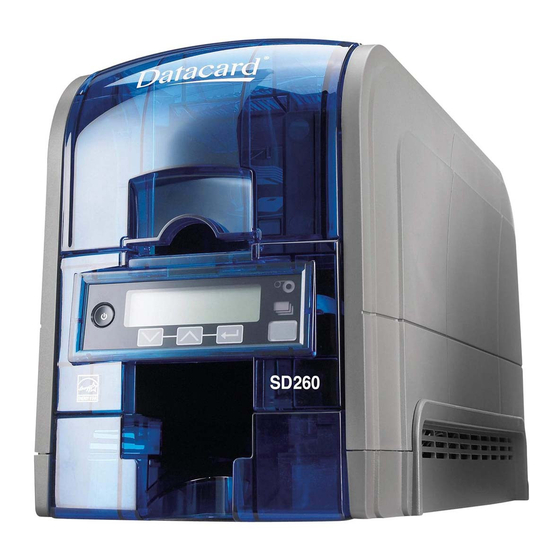
Page 25: Printer Controls
Printer Controls The front panel of the printer provides the controls for operating the printer. The front panel controls are described in the following sections. LCD Panel Status Lights Ribbon Cards Power Button User Light & Down Enter User Button Arrow Arrow Power Button Use the P button to power off and power on the printer. All lights show OWER steady amber while the printer powers on. To power off the printer, press the button for 1 to 2 seconds until the printer begins to shut down. To power off the printer while it is processing cards, press the button for 2 seconds or more. Card jobs in the printer are not completed. SD Series Card Printers User’s Guide... -
Page 26: Lcd Panel Menus
LCD Panel Menus The LCD panel shows the printer’s menus and displays printer messages or conditions. Refer to “Respond to Messages” on page 61 for more information. The menu system has four major branches: Maintenance Use the menu to • run a cleaning card or print a test card. Status Use the menu to see • settings and data about the printer. Configuration Use the menu to • change settings. Use the Activate menu to • enable or disable the printer for transport. Use the Activate menu only during installation or removal of systems that require activation. & T INTS Ready You can access the menu system when displays on line 1 of the LCD • panel. Ready The printer returns to the ... -
Page 27: User Button And Light
Blinking amber The printer has an error. Color Cycle: The system is not ready or a Amber, Green, door on the system is open. Light Green, Off The colors cycle quickly. SD Series Card Printers User’s Guide... -
Page 28: Down Arrow, Up Arrow, And Enter Key
Down Arrow, Up Arrow, and Enter Key Use the arrow keys to move through the printer menu system, and the E key NTER to make a selection. Ready Press the up or down arrow key while the LCD panel displays to display additional information about the printer on line 2, including the firmware version, printer model, serial number, and network IP address or USB IP address. The SD460 laminating system also displays the laminator firmware version and the laminator serial number. If you don’t press a key for 30 seconds, the LCD panel Ready returns to the default message. Ribbon Light The ribbon indicates the status of the print ribbon in the printer. Indicators include the following: Off The print ribbon is okay. Blinking amber A blinking light indicates one of the following: The printer problem applies •... -
Page 29: Retrieve The Printer Ip Address
Status Press the down arrow to display on line 2. Press E to enter the Status menu. NTER Network Status Press the down arrow key until displays on line 2. Press E to display the Network Status menu. NTER IP Address Press the down arrow key until displays on line 2. Press E to display the IP address. Record the IP NTER address. Press E to return to the Network Status menu. NTER Subnet Mask displays on line 2. Press E to display the subnet mask. Record it, if NTER necessary. SD Series Card Printers User’s Guide... -
Page 30: Print A Test Card
Press E to return to the Network Status menu. NTER Gateway Address displays on line 2. Press E to display the gateway address. Record it, NTER if necessary. Press E to return to the Network menu. NTER Exit Press the down arrow key to scroll to on line 2. Ready Press E . Then, press the U button to return the printer to . The NTER button glows green. Print a Test Card The printer includes a test card that runs without using a driver or other source of card data. Use it to verify that the printer is working. Ready Begin with the printer . The U button shows steady green. Suspended Press the U button to display on line 1 of the LCD panel. Press E to enter the menu system. -
Page 31: Load And Replace Supplies
Load and Replace Supplies To prepare the printer to print cards, load blank card stock into the input hopper (optional), and load print ribbon and a cleaning sleeve onto the print cartridge. If you are using an SD460 system, also load overlay material into the L1 and L2 (if equipped) laminator cartridges. Refer to Appendix A, "Load Laminator Overlay Material" on page A‐8, for information about loading the laminator cartridges. Load Cards If you are using a manual feed printer, skip this step and keep a supply of blank cards close to the printer. For printers with an input hopper, do the following: Open the input hopper. Load the cards into the input hopper. (Cards can stick together. Slide or fan the cards to separate the edges before placing them in the input hopper.) Insert ISO magnetic stripe • cards with the stripe (back side) facing down and to the right. Insert smart cards with the smart card chip facing up and toward the back • of the hopper. Close the input hopper. SD Series Card Printers User’s Guide... -
Page 32: Load The Print Ribbon
Load the Print Ribbon Load the print ribbon when you install the printer and when the ribbon runs out. Open the printer cover. Remove the print ribbon cartridge. Load a full roll of print ribbon (the blue spool) onto the spindle closest to the cartridge handle. Place the silver take‐up spool on the spindle with the black gear. Wind the take‐up spool counterclockwise one full turn. Load the Cleaning Sleeve Load a new cleaning sleeve when you load a new roll of print ribbon, when you notice debris on the printed cards, or when the cleaning sleeve is no longer sticky. The printer ships with the cleaning roller spindle installed on the print ribbon cartridge. Remove the cleaning roller spindle from the ribbon cartridge and slide the spindle into the continuous cleaning sleeve (a). Place the spindle with the cleaning sleeve onto the ribbon cartridge (b). Remove the protective wrapper from the cleaning sleeve (c). Using the System... -
Page 33: Install The Ribbon Cartridge
Install the Ribbon Cartridge Install the assembled print ribbon cartridge into the printer. Open the printer cover. Hold the print ribbon cartridge by the handle and lower it into the printer with the handle toward the front of the printer. Make sure that the ribbon cartridge is correctly positioned in the guides. Close the printer cover. Press down on the ridges on the front of the cover to make sure that it latches properly on both sides. SD Series Card Printers User’s Guide... - Page 34 Using the System...
-
Page 35: Chapter 4: Printing Cards
Chapter 4: Printing Cards Before Starting to Print This section explains how to print a card. Make sure that: Cards are loaded in the printer or available to insert. • Ribbon is loaded in the printer. For the steps to follow, refer to “Load the • Print Ribbon” on page 20. If you are using the SD460 system, refer to Appendix A, “SD460 Laminating System”, for information about preparing the laminator. The card design is set up. If you need to set up or modify the design, refer to • “Elements of Card Design” in your printer’s Installation and Administrator’s Guide. & T INTS Make sure that magnetic stripe cards are loaded correctly. The printer shows the correct position. You also can: Print a test card directly from the printer. Refer to “Print a Test Card” on • page 18. Print a driver sample card. Refer to “Printing a Driver Sample Card” in your • card printer’s Driver Guide. SD Series Card Printers User’s Guide... -
Page 36: Print Cards
Print Cards Make sure that cards are loaded in the printer or available to insert when prompted. For the steps to follow, refer to “Load Cards” on page 19. Print from ID Software From the ID software, use the template or create a design for the card. Select the printer if you use more than one printer. Enter the data for the card. Follow the instructions for your software. Capture the photo for the card, if necessary. Click the Print button to send the card to the printer. At the printer, insert a card in the single‐feed slot, if necessary. Print from Other Software Open the software application and select the card printer as the current printer. Use the application’s setup page to select the ISO ID‐1 page size, or set the page size to 2.13 x 3.38 in. Set the margins to 0 (zero). Select an orientation—portrait or landscape. Create the card design: Add graphics, such as a company logo or background. Add a photo. Add text information, such as name, address, or employee number. For information about additional card features, refer to “Elements of Card Design” in your printer’s Installation and Administrator’s Guide. Printing Cards... - Page 37 Click Print to send the card to the printer. At the printer, insert a card in the single feed slot, if necessary. & T INTS The printer can receive card jobs from more than one PC. It prints cards in the • order they are received. Orient all cards the same way. • Do not touch the card surface to be printed. Handle cards by their edges or • wear gloves. SD Series Card Printers User’s Guide...
- Page 38 Printing Cards...
-
Page 39: Chapter 5: System Maintenance
Chapter 5: System Maintenance Clean the Printer The printer performs best when it is cleaned on a regular basis. Follow the cleaning guidelines for your site to keep the printer in good working condition. Clean the printer when: The printer displays a message for which cleaning is a solution. • There is debris on completed cards. • A new roll of print ribbon is installed. • You can perform the following cleaning tasks: Clean the Printhead on page 28 • Run a Printer Cleaning Card on page 30 • Clean the Laminator on page A‐12 • SD Series Card Printers User’s Guide... -
Page 40: Clean The Printhead
Clean the Printhead Clean the printhead when: The printhead is replaced. • There are unprinted lines on the finished card. This usually indicates dirt or • contaminants on the printhead. The printhead is touched accidentally. Oils from hands can affect print quality • and damage the printhead. Do the following to clean the printhead: Power off the printer. Open the printer cover and remove the print ribbon cartridge. Open and remove a cleaning swab from its package. Use gentle pressure to move the cleaning swab back and forth along the full length of the printhead edge until it is completely clean. System Maintenance... - Page 41 Replace the print ribbon cartridge. Avoid bumping the printhead when you install the print ribbon cartridge. Close the printer cover. Press down on the ridges on the front of the cover to make sure that it latches properly on both sides. Power on the printer. Print a sample card to verify the quality of printing. Refer to “Print a Test Card” on page 18 for more information. & T INTS Avoid touching the printhead edge with your fingers. Contamination due to • skin oils eventually can damage the printhead. Avoid touching the printing edge of the printhead cartridge with any sharp • objects that can permanently damage the printhead. Use only the cleaning swab to clean the printhead. Other materials can stick • to the printhead and cause damage. Use a cleaning swab one time only. Discard it after you clean the printhead. • SD Series Card Printers User’s Guide...
-
Page 42: Run A Printer Cleaning Card
Run a Printer Cleaning Card Run a cleaning card to clean debris from the inside of the printer and from the hopper rollers. The cleaning card can remove most contaminants from the printer. Run a cleaning card after every 250 cards processed by the printer, or every 6 months. Prepare the printer for cleaning. Power on the printer. Open the printer cover and remove the print ribbon cartridge. Close the cover. Open the input hopper and remove any unprinted cards. Open the cleaning card package and remove the cleaning card. Load the cleaning card in the input hopper. (Plan to clean the printer immediately. The cleaning card dries out if it is out of its package for more than a few minutes.) If you have a manual feed printer, wait until you are prompted to insert the cleaning card. System Maintenance... - Page 43 button. Suspended displays on line 1 of the LCD panel. Press the E key to enter the menu system. NTER Maintenance displays on line 2 of the LCD panel. Press the E key to NTER Maintenance enter the menu. Cleaning Card displays on line 2 of the LCD panel. Press the E key to NTER Cleaning Card enter the menu. Start displays on line 2 of the LCD panel. Press the E key to start the NTER cleaning process. SD Series Card Printers User’s Guide...
- Page 44 Insert cleaning card displays on the LCD panel. If you have a manual feed printer, insert the cleaning card. Press the U button to start the cleaning cycle. The printer moves the card through the printer several times and ejects it into the output hopper. If you are cleaning an SD460 system, the cleaning card moves into the laminator after cleaning the printer and cleans the laminator rollers and card entry area. The cleaning card is ejected into the laminator output hopper. Refer to Clean the Laminator on page A‐12 for complete information on cleaning the laminator. Remove the used cleaning card. Wait a few minutes for the rollers to dry. Prepare the printer for use. Replace the cards in the input hopper. Install a new cleaning sleeve on the ribbon cartridge and remove the protective cover. Refer to “Load the Cleaning Sleeve” on page 20 for the steps to follow. Replace the ribbon cartridge and close the printer cover. Press down on the ridges on the front of the cover to latch it properly. Ready Press the U button to return the printer to . The printer is available to print cards again. Discard the used cleaning card and cleaning sleeve. System Maintenance...
- Page 45 & T INTS Use the cleaning card one time only. • Change the cleaning sleeve each time you clean the printer or change the • print ribbon. If the card light is blinking amber and there are cards in the input hopper, the printer’s configured cleaning count has been reached and it is time to clean the printer. The cleaning count is set in Printer Manager. Refer to the printer’s Installation and Administrator’s Guide for complete information about using Printer Manager. SD Series Card Printers User’s Guide...
- Page 46 System Maintenance...
-
Page 47: Chapter 6: Troubleshooting
Chapter 6: Troubleshooting This section helps you identify and fix basic issues that can occur during printing. Also refer to your printer’s Driver Guide or OpenCard manual for additional troubleshooting information. The section starts with an overview of card production and printer issues you may encounter: Locate a Problem Within the Card Production System on page 36 • Locate a Problem with Basic Printer Functions on page 37 • This section also describes troubleshooting for the following: Installation Problems on page 38 • Card Printer Driver Problems on page 40 • Card Appearance on page 42 • Magnetic Stripe Problems on page 48 • Laminator Problems on page 50 • Card Jams on page 55 • Messages and Conditions on page 56 • SD Series Card Printers User’s Guide... -
Page 48: Locate A Problem Within The Card Production System
Locate a Problem Within the Card Production System For typical components of the system, refer to “Card Printer System Overview” on page 12. If any one of the following components does not work properly, printing cards can be affected. The XPS Card Printer Driver • If you need to reinstall the Card Printer Driver to fix a problem, we recommend you download the latest version of the driver from http:// www.datacard.com. Select Support & Drivers > Drivers & Downloads from the menu. Enter your printer model in the Enter Product Name or Number area, and click Go. Card production software • Card production software formats the types of data used to print cards. Make sure that the card production software features you use work with your printer. If you do not use card production software, make sure that the software you use supports the requirements for creating cards. If you use magnetic stripe data, use an application that saves text as text and not as a graphic. (For example, Microsoft Paint only saves graphic data, while Adobe Photoshop saves both graphic and text data.) Fonts and escapes require that text is sent from the application as text. Printer plug‐in • Card production software might require a printer plug‐in, which makes the data in the card production software available in the form the Card Printer Driver can use. Other components of the system • An ID or badge system usually includes a camera to take photos, and may include other capture devices for biometric data. The proper use and maintenance of these components is important to the quality of cards you produce. -
Page 49: Locate A Problem With Basic Printer Functions
Ready Does the printer power on and display on the front panel within 1 minute? If the printer powers on correctly, continue to step 3. • Ready If the printer powers on but does not display , the printer is not • working properly. Request service for the printer. If the printer does not power on, make sure that the power source is • functioning by doing one of the following: Remove the printer power cord from the outlet and connect it to • another outlet. Remove the power cord from the printer and connect it to another • device, such as a light, and then connect it to the same outlet. If the power source is functioning, there is a problem with the printer. Request service for the printer. If the power source isn’t functioning, replace it and then begin with step 1. Print a test card. Refer to “Print a Test Card” on page 18 for more information. If the test card prints, the printer is working correctly. Continue to step 4. • If the test card does not print, the printer is not working correctly. Request • service for the printer. Connect the printer data cable, if necessary. Make sure that you use the same type of cable (USB or network) used when the printer was installed. SD Series Card Printers User’s Guide... -
Page 50: Installation Problems
If you use the XPS Card Printer Driver, print a driver sample card. For the steps to follow, refer to your printer’s Driver Guide. If the sample card prints, the printer and driver are working correctly. • Continue to step 6. If the sample card does not print, the printer and driver have a • communication problem. Determine the cause of the problem and try the sample card again. If you are not using the Card Printer Driver, ask your service provider or software provider for assistance. Print a card using your card production software. If the card prints, your software is working successfully with the printer. • Troubleshoot the card design. If the card does not print, check the following: • In the application, is the correct printer selected in the Print Setup or • Print dialog? If the printer produced a blank card, review the page size or driver • settings. If the card causes an error, the card might have a type of data the printer does not support. Installation Problems This section describes issues that prevent a successful installation and provides recommended solutions to those issues. Choose from the following topics: USB Installation Troubleshooting on page 39 • Network Installation Troubleshooting on page 40 • Troubleshooting... -
Page 51: Usb Installation Troubleshooting
Hibernation on a laptop PC requires several moments to enable USB communication. Unplug the USB printer port and then connect it again. Replace the PC port or the PC. Contact your PC or port vendor if you need assistance. SD Series Card Printers User’s Guide... -
Page 52: Network Installation Troubleshooting
Network Installation Troubleshooting Problem Solution The network cable is Reconnect the data cable to the network port and loose. the printer. Restart the printer. The Status page of Follow your network troubleshooting procedures to Printer Properties shows isolate and test each component of the computer- the printer is not to-printer communication link. -
Page 53: The Card Printer Driver Does Not Detect The Network-Connected Printer
You cannot switch the type of Message 500 displays data cable after installation. after you send a card Make sure that both ends of the data cable are to print. connected. Replace a defective USB cable if needed. SD Series Card Printers User’s Guide... -
Page 54: Driver Status Or Windows Print Queue Does Not Provide Expected Data
Driver status or Windows print queue does not provide expected data Problem Solution The Card Printer Driver Check the following: sample card or Enable bidirectional support must be selected • magnetic stripe test on Printer Properties > Ports tab to allow printing cards do not print. -
Page 55: Something Did Not Print
100% black background to a color near black, so that it prints using the YMC (color) panels of the print ribbon. Refer to “Elements of Card Design” in the printer’s Installation and Administrator’s Guide for more information about color printing. SD Series Card Printers User’s Guide... -
Page 56: Printing Includes Unexpected Data
Printing includes unexpected data Problem Probable Cause Solution Text that was intended The magnetic stripe Refer to “Magnetic Stripe Fonts” in the for the magnetic stripe font was not applied to printer’s Driver Guide. printed on the card the text. instead. - Page 57 Run a cleaning card. Refer to “Run a the card packaging Printer Cleaning Card” page 30. Use contains debris. cards that meet the requirements for the printer. Refer to “Cards” in your printer’s Installation and Administrator’s Guide. SD Series Card Printers User’s Guide...
-
Page 58: The Printing Is Too Light
The printing is too light Problem Probable Cause Solution Photos look faded. The image capture Color settings might not be optimal. system needs Adjust color settings. Refer to the adjustment. documentation for the image capture system, “Color Printing” in your printer’s Installation and Administrator’s Guide, and “Color Adjustment Tab”... -
Page 59: The Printing Is Too Dark
Microsoft Word, to create the color panels. and Fax Viewer is card. printing the file. Many applications use the Windows tool to preview and print graphics. The tool does not render to true black and white. SD Series Card Printers User’s Guide... -
Page 60: Magnetic Stripe Problems
Magnetic Stripe Problems To begin troubleshooting a magnetic stripe problem, first print a magnetic stripe test card from Printer Manager or the Card Printer Driver. For the steps to follow, refer to the “Printer Manager” section of the printer’s Installation and Administrator’s Guide or “Printing a Driver Sample Card” in the card printer’s Driver Guide. The printer uses the coercivity set using the LCD panel or in Printer Manager, and the data format set using Printer Manager. Problem Solution Cards are not loaded Load ISO cards with the magnetic stripe (back side) correctly. facing down and toward the right. Refer to “Load Cards” page Cards do not have a Load magnetic stripe cards in the input hopper. - Page 61 If the printer label indicates a single-track JIS module, you can send data for track 1. The magnetic stripe option and cards must be capable of accepting and encoding each track of data sent by the card production software. SD Series Card Printers User’s Guide...
-
Page 62: Laminator Problems
Laminator Problems This section describes problems that might occur when you are using a laminator to apply overlay to the card. Patch Appearance Problems Problem Probable Cause Solution Smart cards don’t work The Debow card Make sure that the Debow card option in after the overlay is option is selected. the Card Printer Driver is not selected. applied. - Page 63 Use the correct patch material for your such as a smart card card type. Refer to "Laminator Overlay chip, that interfere with Materials" page A-6 for a description application of the of overlay types. overlay. SD Series Card Printers User’s Guide...
- Page 64 Problem Probable Cause Solution The patch shows The temperature for Decrease the laminator temperature opaque areas at the applying the overlay is setting. Refer to the Printer Manager leading edge of the too high. “Laminate Type” section of the printer’s card.
-
Page 65: Topcoat Appearance Problems
If it doesn’t, remove leading edge of the direction on the take- the cartridge and turn the take-up spool card. up spool. clockwise several turns. SD Series Card Printers User’s Guide... - Page 66 Problem Probable Cause Solution The topcoat shows The temperature for Decrease the laminator temperature for opaque areas along a applying the topcoat is the overlay material. Refer to the Printer short edge of the card. too high. Manager “Laminate Type” section of the printer’s Installation and Administrator’s Guide.
-
Page 67: Use Advanced Troubleshooting Tools
Use Advanced Troubleshooting Tools Printer Manager provides access to card design settings and additional troubleshooting tools. Printer Manager also allows you to perform advanced troubleshooting with the guidance of your service provider. Refer to “Printer Manager” in the printer’s Installation and Administrator’s Guide for more information. Card Jams The card did not reach the position for the next action, such as printing or ejecting the card. You usually can resolve the error by pressing the U button so that the printer Ready displays . If the error persists, do the following to remove the card from the printer. Open the printer. Remove the print ribbon cartridge. Turn the manual advance knob to move the jammed card until it is accessible from the rollers or exits into the output hopper. Remove the card. Replace the ribbon cartridge and close the printer. Press the U button on the printer or click Retry in the message box. & T INTS Check the ribbon to make sure that it is not torn. Refer to “109: Print ribbon problem” on page 64 to repair or replace the ribbon, if needed. For laminator card jams, refer to "Clear Laminator Card Jam" on page A‐11. SD Series Card Printers User’s Guide... -
Page 68: Messages And Conditions
Messages and Conditions When the printer cannot process the card sent, it issues a condition. The LCD panel on the front panel shows these conditions. When you use the XPS Card Printer Driver, the printer driver also displays the condition as a message on the PC. In a shared printer environment, messages can differ slightly from the messages and conditions described in this section. Messages on the Printer LCD • Messages from the XPS Card Printer Driver on the PC on page 60 • Messages from Printer Manager on page 60 • Other Messages on page 60 • Messages on the Printer LCD All messages are associated with a print job. The printer issues messages that focus on recovering from problems. The printer displays a message number and a short description for each • message. If more than one message was issued, the next message displays after you • correct the problem and press the U button. The lights on the front panel flash while messages display on the LCD panel. • LCD Message User Light Supply Light Card Light Sound Request not supported Amber Flash Off... - Page 69 Warning Insert new card side 1 up Amber Flash Off Warning Insert same card side 1 up Amber Flash Off Warning Insert cleaning card Amber Flash Off Warning Improper shutdown Amber Flash Off Warning SD Series Card Printers User’s Guide...
- Page 70 Supply Laminator LCD Message User Light Light Card Light Light Sound Laminator not available Green Error Flash Laminator error critical Green Amber Green Red Flash Error Flash Flash Flash Laminator entry card Green Red Flash Error problem Flash L1 area card problem Green Red Flash Error...
- Page 71 Impresser heater problem Green Red Flash Error Flash Bar code scanner Green Red Flash Error problem Flash Firmware version Green Amber Green Error mismatch Flash Flash Flash Laminator system Green Amber Green Error mismatch Flash Flash Flash SD Series Card Printers User’s Guide...
-
Page 72: Messages From The Xps Card Printer Driver On The Pc
Messages from the XPS Card Printer Driver on the PC The Card Printer Driver displays the same messages as those on the printer • LCD panel. The messages that display on the PC provide additional information about the condition that caused the message and contain recovery instructions. Click the appropriate button in the message box to clear the message. Messages display on the PC that sent the card print job. • If you cancel a job at the printer, the message is removed from the PC. Any • additional messages for the canceled job (for example, for a broken ribbon) do not display on the PC. Messages can display in the background, behind the application sending the • card. On some operating systems, the message displays in the status bar. Click the blinking Explorer (folder) icon in the status bar to open the message. If more than one message was issued, the next message displays after you • close the current message. If there is more than one card printer installed on the PC, messages display • one at a time. The title bar of each message shows the printer name. If there is more than one card printer installed on the PC and each has issued • errors, the printer driver displays the messages received, even if you cleared the error at the printer. The Card Printer Driver Driver can issue messages that do not display on the • printer LCD panel. Refer to “Driver‐Only Messages” on page 76 and “Driver SDK Messages” on page 78 for a list of these messages. Messages from Printer Manager Printer Manager issues messages that display in a web browser window. Click ... -
Page 73: Respond To Messages
100: Request not supported The printer does not support the personalization being requested for the card. The card will be canceled. Change the card data to match the printer’s options and settings, or print to a printer that is configured to support the personalization being requested. Press the U button on the printer, or click OK in the message box to clear the message. 101: Job could not complete The card took too much time to complete. The card will be canceled. Press the U button on the printer, or click OK in the message box to clear the message. 102: Card not in position The card is not positioned in the printer correctly. Open the printer and remove the ribbon cartridge. Turn the knob to remove the card. Replace the ribbon cartridge and close the printer. Press the U button on the printer. In the message box, click Retry, or click Cancel to cancel the card. SD Series Card Printers User’s Guide... -
Page 74: 103: Printer Problem
103: Printer problem The printer had an error. The card will be canceled. Press the printer P button to power off the printer. OWER Press the P button again to power on the printer. OWER Click OK in the message box to clear the message. 104: Critical problem The printer had a serious error. The card will be canceled. Press the printer P button to power off the printer. OWER Request service. The system must remain powered off. Click OK in the message box to clear the message. 105: Magstripe data error The printer failed to verify that the correct magnetic stripe data was written on the card. Make sure that you are using magnetic stripe cards that match the printer settings. Make sure that the cards are placed in the printer correctly. Press the U button on the printer. In the message box, click Retry, or click Cancel to cancel the card. & T INTS The card might have been turned the wrong way. • The card might not have a magnetic stripe. • Troubleshooting... -
Page 75: 106: Magstripe Data Not Found
The printer did not find magnetic stripe data on card. Make sure that you are using magnetic stripe cards that match the printer settings. Make sure that the cards are placed in the printer correctly. Press the U button on the printer. In the message box, click Retry, or click Cancel to cancel the card. & T INTS The card might not match printer settings or the data sent. • Ask the system administrator to verify that the card, the data, and the printer • settings match. 107: Magstripe read data error The printer failed to read the magnetic stripe data from the card. The card will be canceled. Make sure that you are using magnetic stripe cards that match the printer settings. Make sure that the cards are placed in the printer correctly. Press the U button on the printer, or click OK in the message box to clear the message. & T INTS The data might use a different format than the current printer setting. • Ask the system administrator to verify that the card, data, and printer settings • match. SD Series Card Printers User’s Guide... -
Page 76: 108: Magstripe Read No Data
108: Magstripe read no data The printer did not find any magnetic stripe data on card. The card will be canceled. Make sure that you are using magnetic stripe cards that match the printer settings. Make sure that the cards are placed in the printer correctly. Press the U button on the printer, or click OK in the message box to clear the message. & T INTS The card might have been turned the wrong way. • The card might not have a magnetic stripe. • 109: Print ribbon problem The print ribbon is not moving properly. Open the printer and remove the ribbon cartridge. Reposition, repair, or replace the ribbon and advance the repaired area one full turn. Replace the ribbon cartridge and close the printer. Press the U button on the printer. In the message box, click Retry, or click Cancel to cancel the card. 110: Print ribbon out or missing The printer does not have usable ribbon. To complete the current card: Open the printer and remove the ribbon cartridge. Install a new ribbon and cleaning roller. Replace the cartridge and close the printer. -
Page 77: 111: Card Not Picked
112: Card hopper empty The printer did not detect cards in the input hopper. Add cards to the input hopper. Press the U button on the printer. In the message box, click OK, or click Cancel to cancel the card. 113: Close cover to continue The printer cover must be closed to print. Push down on the cover to latch it. Press the U button on the printer. In the message box, click OK, or click Cancel to cancel the card. & T INTS Make sure that the ribbon cartridge is installed properly with the cartridge handle even with the edges of the printer. 114: Cover opened during job The printer cover was opened while printing. Push down on the cover to latch it. Press the U button on the printer. In the message box, click Retry, or click Cancel to cancel the card. & T INTS Make sure that the ribbon cartridge is installed properly with the handle even with the edges of the printer. SD Series Card Printers User’s Guide... -
Page 78: 116: Magstripe Not Available
116: Magstripe not available The printer does not have a magnetic stripe option. The card will be canceled. Remove magnetic stripe data from the card or use a printer that has a magnetic stripe option installed. Press the U button on the printer, or click OK in the message box to clear the message. & T INTS To remove magnetic stripe data, you or your system administrator may need to: Clear a check box in the card production application. • Change the font from Mag Track x XPS Card Printer to a printable font such as • Arial, Verdana, or Calibri. Refer to “Magnetic Stripe Fonts” in your printer’s Driver Guide. 117: Reader not available The printer does not support the personalization being requested for the card. The card will be canceled. Change the card data to match the printer’s options and settings or print to a printer that is configured to support the personalization being requested. Press the U button on the printer, or click OK in the message box to clear the message. & T INTS To remove the reader request, you or your system administrator may need to clear a check box in the card production application. Troubleshooting... -
Page 79: 118: Print Ribbon Type Problem
119: Print ribbon not supported The printer cannot use the ribbon installed. The card will be canceled. Use ribbon designed for this printer. Press the U button on the printer, or click OK in the message box to clear the message. & T INTS Purchase ribbon from your dealer or authorized reseller. • Check the Datacard website for newer firmware that supports new ribbon • types. 120: User paused the printer The printer was paused while printing. To complete the current card press the printer’s U button. In the message box, click OK to clear the message and complete the current card, or click Cancel to cancel the card. & T INTS If the user pressed the U button for several seconds, the card has been • canceled. If this message occurs often, ask your system administrator to set the button • sensitivity to a lower value. SD Series Card Printers User’s Guide... -
Page 80: 121: Print Ribbon Not Identified
121: Print ribbon not identified The printer cannot use the ribbon installed. The card will be canceled. Use ribbon designed for this printer. Press the U button on the printer, or click OK in the message box to clear the message. & T INTS Ask your dealer or authorized reseller for a replacement ribbon. 122: Magstripe format problem The magnetic stripe data sent does not match the format set in the printer. The card will be canceled. Press the U button on the printer, or click OK in the message box to clear the message. 123: Insert new card side 1 up Insert a new card in the printer with side 1 facing up. If the card is not immediately picked, press the printer’s U button or click OK. Click Cancel in the message box if you want to cancel the card. 124: Insert same card side 2 up Take the card from the printer. -
Page 81: 149: Option Not Installed
152: Insert new card side 2 up Turn a new card over end to end so side 2 is facing up. Insert the card in the printer. If the card is not immediately picked, press the printer’s U button or click OK. Click Cancel in the message box if you want to cancel the card. 153: Insert same card side 2 up Take the card from the printer and turn it over end to end so side 2 is facing Insert the card in the printer. If the card is not immediately picked, press the printer’s U button or click OK. Click Cancel in the message box if you want to cancel the card. 170: Insert new card side 1 up Insert a new card in the printer with side 1 facing up. If the card is not immediately picked, press the printer’s U button or click OK. Click Cancel in the message box if you want to cancel the card. SD Series Card Printers User’s Guide... -
Page 82: 171: Insert Same Card Side 1 Up
171: Insert same card side 1 up Take the card from the printer and turn it over end to end so side 1 is facing Insert the card in the printer. If the card is not immediately picked, press the printer’s U button or click OK. Click Cancel in the message box if you want to cancel the card. 172: Insert cleaning card Insert cleaning card. If the card is not immediately picked, press the printer’s U button or click OK. Click Cancel in the message box if you want to cancel the cleaning card. 173: Improper shutdown Always use the power button to power off the printer. Click OK in the message box to clear the message. Laminator Messages The following messages display on the printer LCD panel when you are using an SD460 laminating system. They also display in a message box on the PC that issued the card print job. 177: Laminator not available The printer and laminator cannot communicate. The card will be canceled. Make sure the data cable from the laminator to the printer is securely plugged in. Press the printer Power button to power off the system. Press the Power button again to power on the system. -
Page 83: 197: Laminator Entry Card Problem
198: L1 area card problem The card is not where it should be in the laminator. Open the laminator and remove the L1 supply cartridge. Turn the knob to remove the card. Replace the supply cartridge and close the laminator. 199: L2 area card problem The card is not where it should be in the laminator. Open the laminator and remove the L2 supply cartridge. Turn the knob to remove the card. Replace the supply cartridge and close the laminator. 200: Laminator exit card problem The card is not where it should be in the laminator. Open the laminator. Turn the knob to remove the card. Close the laminator. 201: L1 supply problem The L1 supply is not moving properly. To try another card: Open the laminator and remove the L1 cartridge. Reposition, repair, or replace the supply and advance the repaired area one full turn. Replace the cartridge and close the laminator. SD Series Card Printers User’s Guide... -
Page 84: 202: L1 Supply Out Or Missing
202: L1 supply out or missing The laminator does not have usable supplies. Open the laminator. Replace the supply. Close the laminator. 203: L1 supply type problem The laminator cannot use the supply installed. Use supplies designed for this laminator. 204: L1 supply not supported The laminator cannot use the supply installed. Use supplies designed for this laminator. 205: L1 supply not identified The laminator cannot use the supply installed. Use supplies designed for this laminator. 206: L2 supply problem The L2 supply is not moving properly. To try another card: Open the laminator and remove the L2 cartridge. Reposition, repair, or replace the supply and advance the repaired area one full turn. Replace the cartridge and close the laminator. 207: L2 supply out or missing The laminator does not have usable supplies. ... -
Page 85: 208: L2 Supply Type Problem
210: L2 supply not identified The laminator cannot use the supply installed. Use supplies designed for this laminator. 211: L1 heater problem The laminator has encountered a critical error. The card will be canceled. Press the printer Power button to power off the system. Request service. The system must remain powered off. 212: L2 heater problem The laminator has encountered a critical error. The card will be canceled. Press the printer Power button to power off the system. Request service. The system must remain powered off. 213: L1 heater sensor problem The laminator has encountered a critical error. The card will be canceled. Press the printer Power button to power off the system. Request service. The system must remain powered off. 214: L2 heater sensor problem The laminator has encountered a critical error. The card will be canceled. Press the printer Power button to power off the system. Request service. The system must remain powered off. SD Series Card Printers User’s Guide... -
Page 86: 215: L1 Heater Roller Problem
215: L1 heater roller problem The laminator has encountered a critical error. The card will be canceled. Press the printer Power button to power off the system. Request service. The system must remain powered off. 216: L2 heater roller problem The laminator has encountered a critical error. The card will be canceled. Press the printer Power button to power off the system. Request service. The system must remain powered off. 217: Debow problem The laminator has encountered an error in the debow area. Remove the card. Press the printer Power button to power off the system. Press the printer Power button again to power on the system. If the problem occurs again, request service. 218: Impresser problem The laminator has encountered a critical error. The card will be canceled. Press the printer Power button to power off the system. Request service. The system must remain powered off. 219: Impresser sensor problem The laminator has encountered a critical error. The card will be canceled. Press the printer Power button to power off the system. Request service. The system must remain powered off. 220: Impresser heater problem The laminator has encountered a critical error. The card will be canceled. -
Page 87: 221: Bar Code Scanner Problem
221: Bar code scanner problem Open the laminator and remove the L1 cartridge. Verify the supply has bar codes printed on it. Replace the cartridge and close the laminator. Try the card again. If the problem occurs again, request service. 222: Firmware version mismatch The printer and laminator firmware versions are not compatible. The system cannot laminate cards until the firmware has been updated. Update both the printer and laminator to the latest firmware versions. 223: Laminator system mismatch The printer and laminator are not compatible. The laminator is not supported by your printer model. Contact your service provider for the correct laminator model. SD Series Card Printers User’s Guide... -
Page 88: Driver-Only Messages
Driver-Only Messages The following messages are issued by the Card Printer Driver and display in a message box on the PC that sent the card print job. These messages do not display on the printer LCD panel. 500: The printer is not available The computer cannot communicate with the printer. To complete the current card: Ready Make sure that the printer is powered on and in the state. Make sure the printer is connected to the computer using a USB or network cable, but not both. When the printer is ready, click OK. Click Cancel if you want to cancel the card 501: The printer connection was lost The computer lost communications with the printer during printing. The card will be canceled. Make sure the printer is powered on. Make sure the printer connection to the computer is secure. Click OK to clear the message. 502: The card data is missing or is not usable The printer driver has detected invalid or missing data. The card will be canceled. ... -
Page 89: 505: Usb Communication Issue
Click OK to clear the message. 506: A card is currently processing The printer is busy processing an interactive job. The card will be canceled. Wait until the current card is complete and then try again. Click OK to clear the message. 508: The printer is shutting down The printer is shutting down or resetting. The card will be canceled. When printer is powered back on, try again. Click OK to clear the message. 509: The printer is offline or suspended The printer must be online to print. To complete the current card press the printer’s U button until the printer Ready returns to the state. Click OK to clear the message, or click Cancel to cancel the card. SD Series Card Printers User’s Guide... -
Page 90: Driver Sdk Messages
Driver SDK Messages The following messages are issued when you use the Card Printer Driver Software Development Kit (SDK) to define your card printing. The messages are returned by the SDK to the application that sent the print job. These messages do not display on the printer LCD panel or in a message box on the PC that sent the job. 511: Cannot lock or unlock the printer. Locks are not installed. Severity: Critical 512: Cannot lock or unlock the printer. The password is incorrect or invalid. Severity: Critical 513: Cannot lock or unlock the printer. The printer is busy. Severity: Notice 514: Cannot lock or unlock the printer. -
Page 91: Appendix A: Sd460 Laminating System
Appendix A: SD460 Laminating System This appendix provides information about the SD460 laminating system. About the SD460 System The SD460 system consists of a card printer and the SLM laminator. The SD460 system can print cards and apply an overlay material on the front and back of the card for increased durability and security. Using an overlay material with holographic or other transparent images also improves the security of the card. These materials are tamper evident, making it difficult to reproduce or modify a card. Printer Laminator SD Series Card Printer User’s Guide... -
Page 92: Outside The Laminator
Outside the Laminator Use the following information to become familiar with the laminator. Laminator Back and Left Side Printer Mounting Card Entry Pins Area Laminator Status Light Printer Mounting Pin Reject Card Tray Printer Mounting Lock Laminator Power Connection Printer Mounting Pins The pins align the printer with the laminator. Printer Mounting Lock The lock secures the printer to the laminator. -
Page 93: Laminator Status Light
The card output hopper holds up to 100 completed cards. Laminator Access Door The access door provides access to the laminator supplies. Impresser The optional impresser is located inside the laminator just before the card exit slot. SD Series Card Printer User’s Guide... -
Page 94: Inside The Laminator
Inside the Laminator The SD460 system has one standard laminator, in the L1 position, with an optional second laminator in the L2 position. The laminators apply topcoat or patch overlay material to the card. Topcoat is a continuous film and patch is a die‐cut polyester shape. Both laminators can apply either overlay type. Refer to "Laminator Overlay Materials" on page A‐6. Manual Advance Knobs L2 Laminator L2 Transport Access Door Laminator L1 Laminator Access Door Manual Advance The manual advance knobs move the card through Knobs the laminator to remove it from the system. Use the knobs to clear a card jam. -
Page 95: Laminator Configuration Label
If your system includes the optional second laminator (L2), make sure that the laminator cartridge is always installed even if the cartridge is not loaded with overlay material. If the cartridge is not in place, cards are not supported as they travel through the system and can fall into the bottom of the laminator. Laminator Configuration Label The laminator configuration label is located inside the laminator beneath the L2 cartridge. Open the laminator access door and remove the L2 laminator cartridge to see the label. If an L2 laminator is not installed, open the L2 transport access door to see the label. SD Series Card Printer User’s Guide... -
Page 96: Laminator Setup
Laminator Setup The SD460 supports full‐color print ribbons that do not have a topcoat (T) panel, including YMCK and YMCKK ribbon. The topcoat or patch overlay applied by the laminators provides protection against wear and color fading, so the print ribbon topcoat panel is not needed. However, the DuraShield overlay requires that the ribbon topcoat be applied first. The SD460 also supports full‐color print ribbon with a front‐side ultraviolet (UV) fluorescing (F) panel, YMCKF‐KT. The UV (F) panel is designed to create an optically variable image on the card. Refer to the printer’s Driver Guide for information on designing a card to use a UV ribbon. Laminator Overlay Materials The L1 and L2 laminators can apply either topcoat or patch material. Topcoat is a continuous film and patch is a die‐cut polyester shape. Topcoat Patch Patch overlays have a registration mark that is used by the printer to align the patch with the beginning of the card. The registration mark is a rectangular hole between the patches. Patches can cover the entire card, can have an opening for a smart card chip, or can cover the card under the magnetic stripe. If both L1 and L2 laminators are installed, each laminator can apply different overlay material. For example, you might apply a patch that covers the complete card on the front, and a patch sized for a magnetic stripe on the back. Complete Smart Card Magnetic Stripe Card SD460 Laminating System... - Page 97 Both topcoat and patch overlays can be clear or can have a transparent holographic image on them. The holographic materials are called holographic topcoat or holographic patch and can be ordered with a custom image. Clear Patch Clear Topcoat Random Holographic Random Holographic Topcoat Patch In addition, both holographic topcoat and holographic patch can be designed with a registered image that is located in the same position on each card. Registered holographic topcoat has a registration mark so that the image can be aligned with the card. Refer to the printer’s Installation and Administrator’s Guide for information on ordering overlay material. Registered Holographic Patch Registered Holographic Topcoat If you use a custom holographic overlay, make sure that you know the location of important card features, such as photos and logos. Do not place holographic images where they interfere with the appearance of photos or machine‐ readable features. SD Series Card Printer User’s Guide...
-
Page 98: Load Laminator Overlay Material
Load Laminator Overlay Material Load the overlay material in one laminator cartridge at a time. The L1 (green) and L2 (orange) cartridges fit only in their assigned locations inside the laminator. They are not interchangeable. Open the laminator access door. Remove the L1 (green) laminator cartridge from the laminator. Place the cartridge on a smooth level surface for loading. Push the release latch (a) and open the gate on the laminator cartridge (b). Remove both used spools from the cartridge (if present). SD460 Laminating System... - Page 99 Load the new roll of laminator overlay material. Put the blue supply spool on the blue supply spindle of the cartridge (c). The overlay supply roll can go on only one way and only fits on the correct spindle. Put the empty silver take‐up spool on the silver take‐up spindle (d). Turn the take‐up spool clockwise to remove slack from the material (e). The overlay material loads in an S‐shape. Make sure that the overlay material is between the guides on both the take‐up and supply sides of the cartridge. Close the laminator cartridge gate (f). Push it in until the latch clicks in place (g). Make sure that the overlay material is not pinched by the cartridge gate. Replace the loaded laminator cartridge in the printer. Remove the L2 (orange) cartridge, if installed, from the laminator. Repeat steps 3 through 7 to load the overlay onto the cartridge. Close the laminator access door. SD Series Card Printer User’s Guide...
-
Page 100: Card Design
Card Design Set up your card design using your card production software or another application, such as Microsoft Word. You can specify your lamination preferences using the Card Printer Driver. Your card production software also may provide lamination settings. The Card Printer Driver allows you to specify both printer and lamination preferences. Refer to your printer’s Driver Guide for complete information on setting up printing preferences and lamination options. If the printer has one laminator, you can apply the overlay material to one or • both sides of the card. If the printer has two laminators loaded with different overlay materials, the • quickest way to process a card is to apply the overlay in L1 to the front of the card and the overlay in L2 to the back of the card. You can fine‐tune the settings that control the application of the overlay using Printer Manager. Refer to the printer’s Installation and Administrator’s Guide for information on using Printer Manager. Verify Setup After you set up the printer, print several test cards to determine how well the laminator applies the overlay to the card. You can print test cards from the Card Printer Driver (refer to the printer’s Driver Guide), from the printer LCD panel (refer to “Print a Test Card” on page 18), or from Printer Manager (refer to the printer’s Installation and Administrator’s Guide). You may need to print multiple test cards to make sure the overlay is positioned correctly. The card stock, the card design, and the printer’s environment all can affect the appearance of cards. When evaluating a card, make sure that: The overlays are being applied properly: • Each overlay is applied completely to the card. • The material adheres well to the edges of the card. • The overlay does not come off when the card is bent or twisted. • The card is debowed correctly. • The impression is positioned correctly and has the proper depth. •... -
Page 101: Clear Laminator Card Jam
Clear Laminator Card Jam Open the laminator access door. Remove the L1 and L2 (if installed) laminator cartridges. Turn the manual advance knobs inside of the laminator until the card is accessible. Remove the card. Replace the laminator cartridges. Close the laminator access door. SD Series Card Printer User’s Guide A-11... -
Page 102: Clean The Laminator
Clean the Laminator Clean the laminator when at least one laminator cartridge is loaded with holographic overlay material and any of the following are true: Particles appear on the laminated cards. • Particles are visible inside the laminator. • For examples of problems that require laminator cleaning, refer to “Laminator Problems” on page 50. This procedure uses a double‐sided, sticky cleaning card that removes holographic overlay particles from the laminator. When you clean the SD460 system using a regular cleaning card, the card also moves into the laminator and cleans the laminator rollers, card entry area, and the impresser exit rollers. This is sufficient if you are not using holographic overlay. Refer to “Run a Printer Cleaning Card” on page 30. Open the laminator access door and remove the L1 and L2 laminator cartridges. Remove printed cards from the output hopper, if necessary. A-12 SD460 Laminating System... - Page 103 Remove the protective paper from both sides of the double‐sided, sticky laminator cleaning card and insert the card under the rollers of the card exit slot of the laminator. When it is in the correct location and pushed in far enough, the card stays in place. Use the LCD menu system to start the cleaning cycle. Ready Begin when the printer displays and the U button shows steady green. Press the U button. Suspended displays on line 1 of the LCD panel. Press the E key to enter the menu system. NTER Maintenance displays on line 2 of the LCD panel. Press the E key to NTER Maintenance enter the menu. SD Series Card Printer User’s Guide A-13...
- Page 104 Cleaning Card displays on line 2 of the LCD panel. Press the E key to NTER Cleaning Card enter the menu. Printer displays on line 2 of the LCD panel. Press the down arrow. Laminator displays on line 2. Press the E key. NTER Start displays on line 2 of the LCD panel. Press the E key to start the NTER cleaning process. Insert cleaning card displays on the LCD panel. Press the U button to start the cleaning cycle. The laminator pulls the cleaning card from the card exit slot into the laminator and moves it back and forth through the L1 and L2 cartridge areas, the card entry area, and the exit rollers several times. The used card is ejected into the laminator output hopper. A-14 SD460 Laminating System...
- Page 105 Inspect the laminator cartridges for particles. If particles are present: Retrieve the laminator cleaning card from the output hopper and use it to remove the particles of overlay material from the cartridges. If particles still remain on the cartridge and inside of the laminator, use a vacuum cleaner with a small plastic hose attachment to carefully remove the particles. Also clean any remaining particles from the output hopper. & T INTS If the cleaning card is not pulled into the laminator, the card is not in the • correct position. The cleaning card must be located under the rollers of the card exit slot inside the output hopper. At the end of the laminator cleaning cycle, the card can stick to the rollers in • the output hopper. Pull gently on the card to remove it. Discard the laminator cleaning card after one use. • If cleaning the laminator does not solve the problem, contact your service • provider for assistance. SD Series Card Printer User’s Guide A-15...
- Page 106 A-16 SD460 Laminating System...