Table of Contents
Advertisement
Quick Links
Advertisement
Table of Contents

Related Manuals for Lexicon NUVERB - FOR MACINTOSH


Summary of Contents for Lexicon NUVERB - FOR MACINTOSH
- Page 1 ™ NuVerb D ig i ta l e ff e c ts c a r d fo r Ma c i n t os h ® U s e r G u i d e...
- Page 2 Apple, the Apple logo, and Macintosh are registered trademarks of Apple Computer, Inc. NuBus is a trademark of Texas Instruments Lexicon Inc. 3 Oak Park Bedford, MA 01730 Copyright 1993, Lexicon Inc. Tel 781-280-0300 All Rights Reserved. Fax 781-280-0490 Printed in the U.S.A.
- Page 3 ™ NuVerb D ig i ta l e ff e cts ca r d fo r Ma ci n t os h ® U s e r G u i d e...
-
Page 4: Table Of Contents
NuVerb User Guide Section Title Table of Contents Getting Started Tutorial 2: The Hot Palette ..........26 Open NuVerb ............. 27 Introduction................1 Load a Program, change a Hot Palette parameter 28 Unpacking ................5 Editing Hot Palette Parameters ....... 29 Contents of shipment .......... - Page 5 Lexicon Section Title Tutorial 5: Working with Other Systems ....... 58 Appendix Hardware Considerations ........58 Troubleshooting Guide...........A-1 Connection..............59 Specifications..............A-5 Software Considerations .......... 59 MIDI ................60 Applications ............... 60 Example: Connection to a Digidesign ProTools System ..............61 Reference Summary of Keyboard Shortcuts........
- Page 6 NuVerb User Guide Section Title...
-
Page 7: Getting Started
Congratulations on your purchase of NuVerb — and welcome to the next generation of effects processing technology. NuVerb provides the first comprehensive approach to effects creation and automation, and brings Lexicon’s world-class digital signal processing technology to the exciting arena of the desktop. - Page 8 Random Ambience creates early reflection simulation, with similarly brilliant results. Rich Plate is a classic Lexicon plate effect, which is denser, smoother, and less colored than conventional plates. Stereo Adjust has been optimized for achieving perfect level, EQ, and Balance in a mastering facility.
- Page 9 NuVerb User Guide Getting Started The Interface NuVerb features the most user-friendly interface available in any digital effects processor. Each program is presented as an on-screen diagram, with dynamic control available within the diagram elements. Start with any program, and edit Input Level, Balance, and wet/dry Mix. Then select the Effect Edit button to call up a diagram that lets you fine tune all of the effect parameters.
- Page 10 Using multiple NuVerb cards with the interface software offers massive control and automation, centralized in one system. NuVerb offers greater flexibility, faster and easier programming, and world-reknowned Lexicon sound — all accessible from the desktop.
-
Page 11: Unpacking
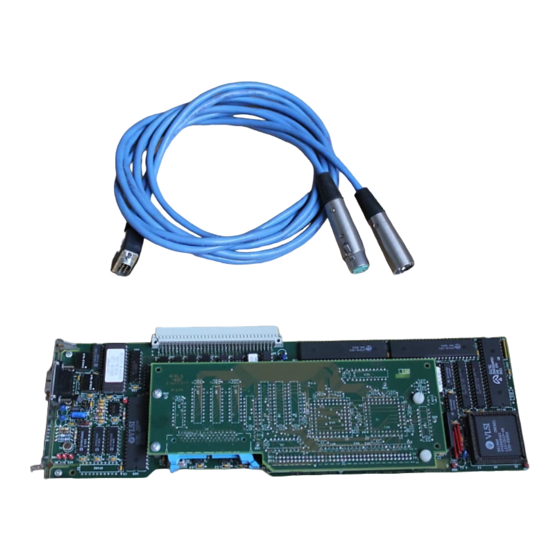
NuVerb User Guide Getting Started Unpacking Contents of Shipment Your NuVerb package should contain a p.c. board, a cable, documentation, and two Macintosh disks. Please note the manner in which these items are packed, and keep all packing materials, in the event you need to re-ship your unit. A: Sleeve B: Box C: Bottom foam insert... -
Page 12: Installation
Lexicon Getting Started Installation Setting Up Setting up your Macintosh to run NuVerb requires the following steps: • Installing the NuVerb Digital Reverb Effects Card into a NuBus slot • Installing NuVerb software • Connecting an AES digital audio source •... - Page 13 NuVerb User Guide Getting Started 6. Remove the NuVerb Effects Card from its static-proof bag. Hold the card by its top edge. Avoid touching the connector on the bottom of the card. If you lay the card down, make sure to place it on its static-proof bag. 7.
-
Page 14: Installing Nuverb Software
Lexicon Getting Started Installing NuVerb Software System Requirements NuVerb requires at least 8 megabytes of RAM. The application itself uses only 4 megabytes, but the Macintosh operating system also requires memory. Any software you run along with NuVerb will have additional memory requirements. Refer to the manufacturer's specifica- tions. - Page 15 NuVerb User Guide Getting Started 3. Select all of the items on the disk and copy them to the NuVerb folder you created. 4. Eject the NuVerb disk and store it safely, as this is your original master copy. 5. Open the NuVerb folder and double click on the NuVerb .sea icon. This starts the installation process.
-
Page 16: Connecting An Aes Audio Source
NuVerb is supplied with a cable with aDB-9 connector for attachment to your Mac and an XLR connector for attachment to your AES/EBU source. 2. If you do not have the correct cable, contact Lexicon or your NuVerb dealer for a replacement. - Page 17 NuVerb User Guide Getting Started Connecting an Analog Audio Source NuVerb can be used with a traditional analog mixing console using an analog-to-digital/ digital-to-analog converter that provides an AES output from analog and also converts AES back to analog. These are available from several manufacturers. Also, check for updated information shipped with the NuVerb package, or included in the NuVerb Read Me First file which is part of the NuVerb software package.
- Page 18 Lexicon Getting Started...
-
Page 19: Learning To Use Nuverb
NuVerb User Guide Learning to Use NuVerb Learning to Use NuVerb Tutorial 1: Starting NuVerb Once you have successfully completed hardware and software installation, you are ready to open NuVerb. This tutorial assumes you have an audio source connected directly via AES, or via an analog converter, and are monitoring the output of NuVerb. -
Page 20: Open Nuverb
Lexicon Learning to Use NuVerb Open NuVerb To open NuVerb, double click on the NuVerb program icon. When opened, NuVerb will create a default library of programs and open them in a Library window on your screen. If this does not happen, select Create Default Library from the Options menu. -
Page 21: Creating And Loading Programs
NuVerb User Guide Learning to Use NuVerb Creating and Loading Programs A new program is created simply by copying one of the factory default programs, editing it and renaming it. Highlight Large Hall and select Copy from the Edit menu. This places a copy of the program into the Macintosh clipboard. -
Page 22: Edit A Program
Lexicon Learning to Use NuVerb To load a selected program, click on the Program Load button, or click on the program you want loaded. For example, with one of your new copies of Large Hall. highlighted, click on the Load Program button at the bottom of the library . - Page 23 NuVerb User Guide Learning to Use NuVerb The Program Editor opens to show a graphic overview of the program, and a panel of edit buttons. The overview shows only the general program type (single, dual mono, or cascade) and allows basic level and balance adjustments to be made within the diagram’s parameter boxes.
-
Page 24: Change The Value Of A Parameter
Lexicon Learning to Use NuVerb Select a parameter To select a parameter, position the pointer over a parameter box and click. For this example, click and hold on “Out Mix”. A heavy black outline around the “Out Mix” parameter box indicates that it is selected. -
Page 25: Viewing Effects
NuVerb User Guide Learning to Use NuVerb Viewing Effects To look at the currently running effect in greater detail, click on the box labeled “EFFECT EDIT”, or click on the Effect Edit button on the Control Panel. To display effect parameters, click on the EFFECT EDIT box ... - Page 26 Lexicon Learning to Use NuVerb Note the box in the middle of the display, labeled REVERBERATOR. To access the reverb parameters within this box, click on it, or on the Reverb Edit button on the Control panel. To display details of the Reverberator, click on the REVERBERATOR box ...
-
Page 27: Naming Programs And Effects
NuVerb User Guide Learning to Use NuVerb The available views depend on the number of parameters in any given effect. For some effects one level of detail is sufficient to represent all of the parameters. Others require a deeper level of detail. -
Page 28: Saving A Library
Lexicon Learning to Use NuVerb Saving a Library The standard Macintosh save command calls up a dialog box allowing you to save a library. When working with libraries, it is a good idea to save the library regularly as you modify and save programs within the library. - Page 29 NuVerb User Guide Learning to Use NuVerb Working with Multiple Libraries NuVerb allows only one library at a time to be assigned to any NuVerb card. The Slot number on the Library Control Panel indicates to which NuVerb card a particular library is assigned. The first library opened is automatically assigned to the lowest slot number in your system.
- Page 30 Lexicon Learning to Use NuVerb To Cut a Program Select a program by clicking on it, then select Cut from the File menu. The highlighted program is removed. Cut programs can be pasted into another location within the same library, or into another library.
-
Page 31: Keyboard Commands For Selecting Parameters
NuVerb User Guide Learning to Use NuVerb Keyboard commands for selecting parameters, changing values, and selecting views The following keyboard commands can be used as a substitute for mouse control within the Edit window: 1. To cycle though the parameters displayed in any Edit window view: Press tab 2. -
Page 32: Tutorial 2: The Hot Palette
Lexicon Learning to Use NuVerb Tutorial 2: The Hot Palette The Hot Palette provides status information and selectable real-time controls for NuVerb. Like a Toolbox in a graphics program, the palette always stays in front of other windows, as it provides important, regularly-used information and control. - Page 33 NuVerb User Guide Learning to Use NuVerb The currently loaded program is displayed here. Clicking here opens an information display Click here to mute NuVerb effects, This is especially useful when several libraries showing Hot Palette fader assignment and or to pass a dry signal directly are open on the desktop.
-
Page 34: Open Nuverb
Lexicon Learning to Use NuVerb Open NuVerb To open NuVerb, double click on the NuVerb program Icon. When opened, NuVerb creates a default library of programs and opens a Program Library window on your screen. If this does not happen select Create Default Library from the Options menu. -
Page 35: Editing Hot Palette Parameters
NuVerb User Guide Learning to Use NuVerb Editing Hot Palette Parameters From the Program Editor, click on the Fader/MIDI Cntl button to open a dialog box for Hot Palette control assignments. Now, let’s look at how program faders are assigned to parameters. Select any program in your library. - Page 36 Lexicon Learning to Use NuVerb Click on the first display under the label Parameter. A pop-up menu appears, allowing selection among the available program parameters. Select Wet-Dry Mix and assign it by releasing the fader. Now that you have selected a parameter for control, a row of selectable assignment boxes should appear.
-
Page 37: Multi-Parameter And Inverse Fader/Midi Control
NuVerb User Guide Learning to Use NuVerb The next set of Min and Max controls adjust the range of the selected parameter available for the source to control. As an example, this might be used to give a MIDI controller fine control of a value range, where a range of 1000ms is available for predelay, and you are only interested in fine control from 1ms-150ms. -
Page 38: Midi Controllers And The Hot Palette
Lexicon Learning to Use NuVerb MIDI Controllers and the Hot Palette MIDI controllers can be assigned to parameters with the same method used to assign fader control. To assign a MIDI controller to a parameter, you will need a keyboard (or any device that generates MIDI controllers), and a MIDI interface for your computer. -
Page 39: Viewing Fader Assignments
NuVerb User Guide Learning to Use NuVerb Viewing Fader Assignments The Fader Data button on the Program Editor control panel shows current Hot Palette fader assignments. When a Hot Fader is assigned to more than one parameter, its Hot Palette label changes to Multi. -
Page 40: Saving Hot Palette Parameter Changes
Lexicon Learning to Use NuVerb Saving Hot Palette Parameter Changes Changes made from the Fader/MIDI Control window can be saved by selecting Snapshot from the Edit menu. After a program is loaded from a library, you can make changes to the program "live" via the Hot Faders, or via MIDI. -
Page 41: Tutorial 3: Nuverb And Midi
NuVerb User Guide Learning to Use NuVerb Tutorial 3: NuVerb and MIDI NuVerb’s MIDI implementation suggests many exciting possibilities for controlling and shaping the sound. Multiple parameters can be controlled with a single MIDI controller, or Hot Fader. Multiple cards can be controlled simultaneously. Parameters can be “inverse mapped” so that, from the same control, one increases in value another decreases. -
Page 42: Selecting The Midi Operating System
Lexicon Learning to Use NuVerb Selecting the MIDI Operating System Select MIDI Manager and/or OMS under Preferences in the Edit menu. The MIDI operating system you use with NuVerb (MIDI Manager and/or OMS) must be selected under Preferences from the Edit menu. Once you have selected one of these operating systems, and clicked on OK, you will be asked to quit and restart NuVerb. -
Page 43: The Midi Setup Window
NuVerb User Guide Learning to Use NuVerb The MIDI Setup Window The MIDI Setup window is used to select the MIDI drivers/devices that NuVerb will recognize. Below is an example of this window. Familiarize yourself with its parts and functions. Next, click on a port assignment First, click here to open a menu which box to open a menu which allows... -
Page 44: Working With Midi
Lexicon Learning to Use NuVerb Working with MIDI Select a MIDI Driver MIDI drivers are selected under Preferences in the Edit menu. Select Apple MIDI Manager, Opcode OMS, or both. In order to work with MIDI, you must first enable MIDI Manager and/or OMS. Select Preferences from the Edit menu and make your selection. - Page 45 You can have as many NuVerb cards in your Macintosh as you have NuBus slots. (This will vary with Macintosh type.) A NuBus expansion chassis increases the number of slots available to your Mac. Digidesign manufactures an expansion chassis which is certified by Lexicon for use with NuVerb. (For information, contact either Lexicon or Digidesign)
- Page 46 Lexicon Learning to Use NuVerb Assign a MIDI port Click on a port assignment box and select a port for MIDI data input. Eight ports are provided to accomodate the eight inputs supported by OMS, and to allow simultaneous use of MIDI Manager.
- Page 47 NuVerb User Guide Learning to Use NuVerb MIDI Source Assignment Click on a device assignment box to pop up a menu of MIDI devices available for assignment. The next step is to select the MIDI Device for each assigned port. The MIDI devices available fall into two types: OMS type devices and MIDI Manager type devices.
-
Page 48: Selecting Midi Channel And Accepting
Lexicon Learning to Use NuVerb Selecting MIDI Channel and Accepting Program Change Messages Click on the box beneath a port assignment to enable recognition of MIDI Program Change messages. Click on the channel assignment box(es) beneath the device assigned to that port to enable recognition of MIDI data on the selected channel(s). -
Page 49: The Launch Oms Button
NuVerb User Guide Learning to Use NuVerb The Launch OMS Button Click on Launch OMS to make quick changes in your OMS setup. (This button is only available if you have selected OMS under Preferences.) For those using Opcode OMS, this button launches the OMS application so that you can make quck changes in the configuration of your OMS Studio setup. -
Page 50: Tutorial 4: Automation
Lexicon Learning to Use NuVerb Tutorial 4: Automation NuVerb's Automation list provides an unprecedented degree of effects control in a suprisingly easy interface. The Automation list is opened from the Windows menu, and can be configured under Preferences to automatically open when the program is booted. Basically, you input MIDI time code, put the list into record and click on programs to load them and move the faders to adjust the parameters —... -
Page 51: The Automation List Window
NuVerb User Guide Learning to Use NuVerb The Automation List Window Click here to enable the Automation list. Click here to select a smaller window for Note: you must supply MIDI Time code monitoring. (The monitor view has a button to synchronize the list and provide a in this location labeled Editor which returns timing source. - Page 52 Lexicon Learning to Use NuVerb Program and parameter changes are recorded as Automation List events. Create a program change event by clicking on the Record button, starting the timecode source, and clicking on programs in an active library. Once a program is entered into the list, parameters can be entered in one of three ways: via Hot Fader adjustment, via MIDI, or by changing parameters In the Program Editor.
-
Page 53: Recording An Automation List
NuVerb User Guide Learning to Use NuVerb Recording an Automation List Let’s try recording and playing back a simple “pass” of Automation. We’ll need: • An audio source • A source of MIDI timecode (locked to the audio source) Connect the MIDI timecode source to NuVerb through our MIDI interface using the MIDI Manager Patchbay™. -
Page 54: Playback
Lexicon Learning to Use NuVerb Now, you have a simple event list. You can, of course, record more moves, more parameter changes, and longer sequences using this basic procedure. Automation data to multiple cards can be simultaneously recorded using external MIDI controllers for control of multiple cards. -
Page 55: Editing Commands
NuVerb User Guide Learning to Use NuVerb Editing Commands Before we begin editing, let’s take a look at the techniques used for editing lists, including selection and manipulation of events. Single Event Click on any event entry to select it for editing. Contiguous Events Hold down the shift key, and click and drag to select a group of adjacent events. - Page 56 Lexicon Learning to Use NuVerb Now, let’s take a look at the Automation editing commands. Editing Commands found in the Edit menu This command removes any selected event(s) from your list. (Cut items are temporarily saved. A paste command will insert these in a new location. Another cut or copy command will erase them and replace them with new temporaily stored items.)
- Page 57 NuVerb User Guide Learning to Use NuVerb Changing the values of list events To change the value of a list event, press option while clicking on the value. This will display a fader for value adjustment. Changing Start Time and Duration of an Event Press option while clicking on the event start time or duration.
-
Page 58: Editing An Automation List
Lexicon Learning to Use NuVerb Editing an Automation List Let’s go ahead and do some editing on the list you made in the previous section. • Open your list. To do this, select Open from the File menu. Among the listings, you should see the list we just created. - Page 59 NuVerb User Guide Learning to Use NuVerb Offsets Click on the Offset button to open a dialog box allowing you to enter offset amounts. Click on the Offset button at the bottom of the FX Automation™ window to call up a dialog box that allows you to add to or subtract from the starting time of the selected event(s).
-
Page 60: Comments
Lexicon Learning to Use NuVerb Editing the program in the list Click on the Program Edit button with a program name on the Automation List selected, or double click on any unselected Automation list program name to open the Program Editor. -
Page 61: More On Recording Lists
NuVerb User Guide Learning to Use NuVerb More on Recording Lists Recording from MIDI MIDI can be used for automation. Simply select a program and assign MIDI controllers to the parameters you want to control. When recording a list, parameters remotely controlled via MIDI go right into the list, as do program changes. - Page 62 Lexicon Learning to Use NuVerb Automation lists and timing accuracy The timing accuracy of entry into the Automation list is dependent on the clock speed of your Mac, other programs you are running at the time (how busy your Mac is), and the method of entry you choose.
- Page 63 NuVerb User Guide Learning to Use NuVerb Program Changes Many of the things you used to have to change programs to do can now be achieved by changing multiple parameters in the same program! NuVerb offers some new ways of dealing with the age old problem of loss of audio between program changes.
-
Page 64: Tutorial 5: Working With Other Systems
For example, Digidesign specifies that ProTools (4 tracks) will run with 8 megabytes of RAM. Likewise, Lexicon specifies that NuVerb will run with 8 megabytes of RAM. In both cases, allowances are being made for memory requirements of Macintosh system software, so the amount of memory actually required to run both NuVerb and ProTools is probably closer to 12 megabytes than 16 megabytes. -
Page 65: Connection
NuVerb with the analog mixer. Software Considerations As mentioned earlier, Lexicon is committed to maintaining compatability with widely available software in both the disk recording and the sequencer markets. Find out if the manufacturer of your software is a NuVerb Development Partner. In certain cases, as with... -
Page 66: Midi
Lexicon Learning to Use NuVerb MIDI MIDI can be used to control NuVerb program parameters. In addition, NuVerb uses MIDI Time Code (MTC) for FX Automation™ timing and synchronization. NuVerb is compatable with Apple MIDI Manager, Opcode OMS, and Mark of the Unicorn MIDI Manager Driver. -
Page 67: Example: Connection To A Digidesign Protools System
NuVerb User Guide Learning to Use NuVerb Example: Connection to a Digidesign ProTools System Pro Tools Setup Hardware 1. Connect NuVerb via AES to ProTools Digital IN. 2. Connect the audio monitors to analog outputs 3 and 4. (1 and 2 are going to be used as sends/returns to and from NuVerb.) Note that ProTools allows using either the digital inputs and outputs or the analog inputs and outputs 1 and 2. - Page 68 Lexicon Learning to Use NuVerb 8. From the ProTools Options menu, select Play in Background. This allows ProTools to play audio while NuVerb is running (in the foreground). 9. From theProTools Display menu, select Show Mix Window. Turn up the send controls at the top of this window.
-
Page 69: Reference
NuVerb User Guide Reference Reference Summary of Keyboard Shortcuts In the Edit Window: In the Menus: steps through displayed parameters File enter toggles fader display Command N opens new library Command selects a more detailed view Command O calls dialog box for opening files, folders and Command selects a more general view applications... -
Page 70: Nuverb Screen Graphics
Lexicon Reference NuVerb Screen Graphics Window Controls General Information Most windows consist of an active viewing and entry portion with a series of buttons in a control panel at the bottom of the window. In general, clicking on a button will activate it, and activated buttons will appear as shaded. - Page 71 NuVerb User Guide Reference Program Library Window Under Options in the menu, select Create Default Library to open the Program Library Window. Clicking here selects between these two views Program names are preceded by a code (SG, DM, or CC) indicating program type:Single, Dual Mono, or Cascade.
- Page 72 Lexicon Reference Program Editor The view/entry area of the Program Editor shows a diagrammatic representation of the program. Each program has as many as two additional views, enabling you to “zoom in” on the details of the effect(s) in any program. A panel of buttons beneath the viewing area provides easy access to other views and other control windows.
- Page 73 NuVerb User Guide Reference Expanded Views From the Program Edit view, clicking on the EFFECT EDIT box, or on the Effect A (or B) Edit button provides a second level of detail. Only the viewing area of the Program Editor is modified.
- Page 74 Lexicon Reference The Hot Palette Parameters are assigned to the Hot Palette via the Program Editor Fader/MIDI Cntl button. Faders are available for Hot Palette parameter boxes, just as in the Edit window. Opens a display showing fad- ers assigned to multiple cards and/or parameters.
- Page 75 NuVerb User Guide Reference The Fader/MIDI Control Dialog A dialog box is available from the Program Editor Fader/MIDI Cntl button which allows you to configure the Hot Faders. In the Program Editor, click on the Fader/MIDI Cntl button to open the dialog Select a parameter to control...
- Page 76 Lexicon Reference The MIDI Setup Window Once you have rebooted NuVerb with your MIDI driver selections, the MIDI menu items under Options — MIDI Setup ... (Command M) and Open MIDI Input Window (Command I) will be enabled. Open MIDI Input Window (Command I) opens a status window where you can verify the current status of your MIDI configuration.
- Page 77 NuVerb User Guide Reference The Automation List The Automation List is opened from the Windows menu, and can be configured under Preferences to automatically open when the program is booted. Click here to select a smaller window for Click here to enable the Automation list. monitoring.
- Page 78 Lexicon Reference NuVerb Preferences As with most Macintosh programs, Preferences (in the Edit menu) allows you to specify certain application restrictions. In NuVerb, these options are extensive, and involve, among other things, assignment of MIDI channels, and selection of audio formatting. Reboot NuVerb after setting preferences.
-
Page 79: Nuverb Menus
NuVerb User Guide Reference NuVerb Menus File New Library Command N Opens a library window titled Lib: 1. Subsequent new libraries will be named 2, 3, etc. Open... Command O Opens a dialog box allowingyou to open disks, files, folders and applications Close Command W... - Page 80 Lexicon Reference Edit Command X Cuts selected text or graphics and temporarily stores it in the Clipboard Copy Command C Copies selected text or graphics and temporarily stores the copy in the Clipboard Paste Command V In libraries, inserts contents of Clipboard above selection; if no selec- tion, inserts at end of list.
- Page 81 NuVerb User Guide Reference Options Create Default Library Command L Opens a library listing of NuVerb preset programs. Multiple Default Libraries can be opened. They will be titled: Untitled 1, Untitled 2, etc. _____________________________________________________________ MIDI Setup . . . Command M Opens a status window for viewing current MIDI configuration Open MIDI Input Window Command I Opens a setup window for configuring MIDI devices...
-
Page 82: Effects And Parameters
Lexicon Reference Effects and Parameters Effects available in the Single Mode: Random Hall General Description NuVerb incorporates the results of a great deal of research into acoustics and reverberation. Reverberation, or reflected sound energy, gives recorded music a sense of being performed in a real acoustic location. - Page 83 NuVerb User Guide Reference As SHAPE is raised to about 1/8 of its range, the initial sharp attack of the reverberation is reduced, and reverberation builds more slowly. The envelope then sustains briefly before it begins to die away at the rate set by RTIM. SPREAD has little or no effect on this shape. When SHAPE is at 1/4 of its range, buildup is even slower and the sustain is longer.
- Page 84 Lexicon Reference The speed at which the delay elements move is controlled by SPIN. Values of SPIN which are higher than about 38 can cause audible pitch wobble in very critical material (such as classical guitar or piano and can also cause noise on pure tones. This noise is not audible in speech, however, and, for mixed music or speech, values up to 48 will give an improved sound.
- Page 85 NuVerb User Guide Reference Random Hall Parameters The Reverberator RTIM (Reverb Time) .02 - 60.49s RTIM sets the reverb time for mid-frequency signals. Because low-frequency reverb time (BASS) is a multiplier of RTIM, RTIM acts as a master control for the reverb time. SIZE 4.0 - 39.4M SIZE sets the rate of buildup of diffusion after the initial period (which is controlled by DIFF).
- Page 86 Lexicon Reference XOVR (Bass Crossover) 0.1 - 26.5kHz XOVR sets the frequency at which the transition from RTIM to BASS takes place. XOVR should be set at least two octaves higher than the low frequency you want to boost. For example, to boost a signal at 100 Hz, set XOVR to 400 Hz (This setting works well for classical music).
- Page 87 NuVerb User Guide Reference Diffusion, Predelay, Reverb Level, and Rolloff DIFF (Diffusion) 0 - 99 DIFF controls the degree to which initial echo density increases over time. High settings of DIFF result in high initial buildup of echo density, and low settings cause low initial buildup. Echo density is also affected by SIZE;...
- Page 88 Lexicon Reference Pre-echoes can best be understood by visualizing a stage where the early reflections are the sounds emanating from the rear and side stage walls directly after the sound from the stage. Usually the rear stage wall reflection is earlier and louder than those from the two side walls.
- Page 89 NuVerb User Guide Reference Random Ambience General Description The NuVerb Random Hall effects are designed to add a cushion of reverberance to recorded music, while leaving the clarity of the direct sound unaffected. Random Ambience is different. It is intended to become a part of the direct sound — to give it both better blend and a definite position in space.
- Page 90 Lexicon Reference Random Ambience Parameters The Ambience Generator SIZE 4.0 - 39.4M SIZE allows you to vary the apparent size of the space over a wide range. SIZE is the most dramatic control, and must be selected to match the music or effect material. It should be the first control that you adjust to tailor the desired space.
- Page 91 NuVerb User Guide Reference Diffusion, Predelay, Rolloff and Dry Delay DIFF (Diffusion) 0 - 99 DIFF controls the degree to which initial echo density increases over time. High settings of DIFF result in high initial buildup of echo density; low settings cause low initial buildup. Echo density is also affected by SIZE;...
- Page 92 Lexicon Reference Rich Plate General Description The Rich Plate effect is denser, smoother, and more colored than other reverb effects. When used with the SIZE control at around 16 meters, the sound is dense and tight — ideal for percussion. Larger sizes and longer reverb times are suitable for vocals and brass.
- Page 93 NuVerb User Guide Reference SPREAD works together with SHAPE to control the duration of the initial ambience created by NuVerb. Low SPREAD settings result in a rapid onset of reverberation at the beginning of the envelope, with little or no sustain. Higher settings spread out both the buildup and sustain. XOVR (Bass Crossover) 0.1 - 26.5kHz XOVR sets the frequency at which the transition from RTIM to BASS takes place.
- Page 94 Lexicon Reference Diffusion, Predelay, Reverb Level, and Rolloff DIFF (Diffusion) 0 - 99 DIFF controls the degree to which initial echo density increases over time. High settings of DIFF result in high initial buildup of echo density; low settings cause low initial buildup. Echo density is also affected by SIZE;...
- Page 95 NuVerb User Guide Reference FBK1 (Feedback 1), FBK2 (Feedback 2) 0 - 93% FBK1 and FBK2 determine the amount of recirculation passed back through to the left and right inputs. DLY3 (Delay 3), DLY4 (Delay 4) 0 - 1000ms DLY3 (and DLY4 are also picked off after the diffusor. The level of each is controlled by LVL3 and LVL4, respectively.
- Page 96 Lexicon Reference Stereo Adjust General Description The Stereo Adjust effect offers fine adjustments of level and equalization during digital mastering. Its stereo digital fader permits 0.25dB trimming and provides full fades to digital zero at the end of a track. Its two sets of shelving treble EQ can be set for different 3dB points and gains.
- Page 97 NuVerb User Guide Reference mono signals are completely removed. This represents an extreme setting which should seldom be needed in practice. With material which has stereo bass information, or which contains some reverberation, the effect of raising SPEQ is to increase the sense of spaciousness and depth of the sound. It is particularly useful on material recorded with panpots, or coincident and semi-coincident microphone technique.
- Page 98 Lexicon Reference L TRB+ (Left Treble Adjust), RTRB+ (Right TrebleAdjust) Cut, -18 - +6dB These controls allow independent adjustment of left and right treble. They may be used together with the stereo adjustments to create a 12 dB/octave cut or boost. Note that the 3 dB frequencies can be different from the stereo set.
- Page 99 NuVerb User Guide Reference ROT (Rotate) L+2.9dB- R+2.9dB ROT is similar to BAL, but it treats stereo information somewhat differently. Any signal panned to the center (mono) will be treated by ROT exactly as it would be treated by BAL. However, if a signal is panned full right and the control is moved toward the left, instead of simply being attenuated (as BAL would do) the right channel is inverted in phase and added to the left channel.
- Page 100 Lexicon Reference Fine Sample Accurate Delays can be used for subtle time alignment adjustments. NuVerb will correctly display the resulting time shift as a function of the sampling rate. As many as 500 samples can be added to any stereo/coarse delay setting for a maximum possible delay per channel of 5 seconds + 500 samples.
- Page 101 NuVerb User Guide Reference DC Offsets DCSW (DC Offset Nulling) Reset, Manual, Auto DCSW provides three choices: RESET, MANUAL ADJUST, and AUTO ADJUST. RESET disables all DC adjustment. AUTO ADJUST enables routines for correcting DC offset from material recorded through analog-to-digital converters that are not properly trimmed for DC. MANUAL ADJUST allows selection of specific offset values.
- Page 102 Lexicon Reference Programs Available in the Dual Mono and Cascade Modes: Dual Delay General Description The Dual Delay effect consists of 2 types of delay lines: Gliding Flange delays and Fixed delays. This is a true stereo effect. (If run in Dual Mono mode, however, it will be mono.) Two independent gliding flange predelays are available, each with a 10ms range in single sample steps.
- Page 103 NuVerb User Guide Reference Dual Delay Parameters The Flanger FLNGDLY (Flange Delay) 0-479 samples = 0- 20ms FLNGDLY is a separate 20 ms ganged stereo delay line which is controllable in single sample steps. LPDLY, RPDLY (Left , Right Flange Base Delays 0-479 samples = 0-20ms LPDLY and RPDLY are base delays which get summed with the stereo ganged flange delay.These base delays are adjustable in single sample steps throughout a 20 millisecond range.
- Page 104 Lexicon Reference DLY3, DLY4 (Delay 3, Delay 4) 0-19996 samples = 0-2498.9ms DLY3 controls the delay time which cross-feedbacks to the input of DLY2. DLY4 controls the delay time which cross-feedbacks to the input of DLY1. FBK3, FBK4 (Feedback 3, Feedback 4)
- Page 105 NuVerb User Guide Reference Split Chamber General Description The Split Chamber effect can simulate many different types of acoustic spaces or mechanical devices. This effect is great on anything. Sizes of 25 and larger set a lower acoustic density. Shape and Spread help create the illusion of larger spaces while using short reverb times. As in the Random Hall effect, the Link parameter couples the Size parameter to the reverb time and Spread.
- Page 106 Lexicon Reference SIZE 4.0 - 66.4M SIZE sets the rate of buildup of diffusion after the initial period (which is controlled by DIFF). It also acts as a master control for RTIM and SPRD. The SIZE control changes a reverb sound from very large to very small.
- Page 107 NuVerb User Guide Reference BASS (Bass Multiply) 0.2x - 4.0x BASS sets the reverb time for low-frequency signals, as a multiplier of the RTIM parameter. For example, if BASS is set to 2X, and RTIM is set to two seconds, the low frequency reverb time will be four seconds.
- Page 108 Lexicon Reference Additional delay added with the PDLY control can increase the initial time gap slightly, emulating a situation where reverberant pick-up microphones are located much further from the source than the main microphones. If less than about 30ms of pre-delay is added, this additional delay can add clarity with some music, but it can also sound unnatural.
- Page 109 NuVerb User Guide Reference Compressor General Description The Compressor effect is a true digital compressor which will run in either Dual Mono or Cascade mode. In Dual Mono mode, it configures to Mono in Mono out; in Cascade mode, it configures as a true stereo effect.
- Page 110 Lexicon Reference Compressor Parameters PDLY (Predelay) 0 - 48ms PDLY sets the predelay of the audio before the digital VCA. The Compressor SLOPE 1.0 - 99.99 : 1 SLOPE controls the slope of the gain reduction curve or the ratio of input level versus output level.
- Page 111 NuVerb User Guide Reference PONS GeneralDescription Dither is a low-level pseudo-random signal which is added to digital audio to reduce quantization noise, in effect, by replacing it with a “nicer sounding” noise. It is possible to filter the quantization noise in such a way that almost all of the noise within the frequency range where human hearing is most acute is shifted to higher frequencies.
-
Page 112: Midi Implementation
Lexicon Reference MIDI Implementation Lexicon NuVerb Function Transmitted Recognized Remarks Basic Default Channel Channel 1-16, OMNI Any combination Mode Defaullt Messages Altered Note Number True Voice Velocity Note ON Note OFF After Keys Touch Channels Pitch Bender Control 0-95 Change... -
Page 113: Timecode Applications
NuVerb User Guide Reference Time Code Applications About time Code Time Code is an electronic signal applied to tape or film which identifies each individual video frame. The ability to uniquely identify any frame provides a reference system for fast and accurate location of any point on the tape. - Page 114 Lexicon Reference SMPTE Drop Frame Time Code, as its name implies, eliminates frame addresses from the Time Code each hour to allow matching of Time Code and clock time. Specifically, frame addresses 00 and 01 are eliminated at the end of every minute in an hour, except for minutes 00, 10, 20, 30, 40, and 50.
- Page 115 NuVerb User Guide Reference Synchronizing MIDI For synchronization the MIDI specification provides for MIDI Clock, MIDI Clock with song pointer information, and MIDI Time Code. Other manufactures have provided their own proprietary methods of MIDI synchronization, the most common being OMS by Opcode, and DTL by Mark of the Unicorn.
- Page 116 Lexicon Reference Converting Time Code To MIDI Time Code There are a number of products that convert Time Code To MIDI Time Code, such as: • MIDI Interfaces -Many of the more sophisticated MIDI interfaces also provide conversion capabilities •...
- Page 117 NuVerb User Guide Reference MIDI Interface Sources Manufacturer Model Comments Adams-Smith, 34 Tower St., Hudson MA 02179 Zeta 3 o/p MTC Electric Willy MTC-LTC converter Alesis, 3630 Holdridge Ave., Los Angeles CA 90016 ADAT controller o/p MTC Atari, P.O. Box 61657, Sunnyvale CA 94088 SMPII o/p MTC Fostex, 15431 Blackburn Ave., Norwalk CA 90650...
-
Page 118: About Midi Manager
Lexicon Reference About MIDI Manager MIDI Manager is an Apple System Folder startup document that allows you to run several MIDI applications at once. It allows you to send MIDI data from one program to another. In NuVerb this is used for synchronization via MIDI Time Code. -
Page 119: Appendix
NuVerb User Guide Appendix Appendix Troubleshooting Hardware Verification Check off these items: Card correctly seated in NuBus socket with no bent pins Digidesign Expansion chassis correctly installed and functioning properly (if applicable) Audio source has AES output capability NuVerb AES I/O cable correctly connected to AES source/destination Audio monitoring device correctly connected to receive NuVerb output. - Page 120 2. Remove the board, observing all installation precautions in regard to static, power down etc. Check for bent pins on the edge connector. If the pins are bent, contact Lexicon Customer Service at (617) 736-0300.
- Page 121 NuVerb User Guide Appendix In general, all you need to run NuVerb is the NuVerb application and MIDI Manager (supplied with NuVerb). Watch out for System folder conflicts. If there is an installation problem, it is probably here. The application itself is supplied in a compressed form on a floppy disk and must be copied to the Mac hard drive and decompressed to run.
- Page 122 Lexicon Appendix 3. Verify that PatchBay™ is placed inside the Apple Menu folder and that it is present in the Apple menu. If you are unfamiliar with MIDI Manager patching, you also place Patchbay Help™ in the Apple menu. 4. Remove all System Extensions, except MIDI Manager, and re-boot. If NuVerb works properly, begin replacing the extensions one at a time, re-booting each time to determine which extensions are in conflict.
-
Page 123: Specifications
NuVerb User Guide Appendix Specifications AES/EBU Interface Sample Rates: 44.1 kHz or 48 kHz +5% Slave only — All Channel Status and User bits are passed through; they are neither observed nor modified. Conforms to both the AES ANSI S 4.40-1985 specification, and the EBU doc. - Page 124 Lexicon Appendix...
- Page 125 Lexicon Inc. 3 Oak Park Bedford, MA 01730 Tel 781-280-0300 Fax 781-280-0490 Lexicon Part # 070-09486...